There are actually many reasons for the malfunction. Firstly, the sensor itself, which indicates the oil pressure level, may fail, causing the light to indicate a problem. It is also possible that the oil pump itself or its parts are malfunctioning or not functioning correctly. To completely eliminate the problem in the event of parts failure, it is necessary to carry out special repairs to the oil pump.
Where is the oil pump located?
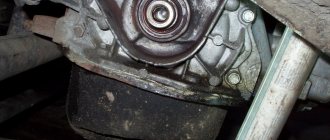
The oil pump is located behind the crankshaft pulley, and therefore can only be clearly seen after removing the pulley from the engine. The pump is attached to the cylinder block with six bolts, which ensure reliable fixation of the parts. When the oil pump fails, the following problems arise:
- the oil pressure level in the system drops sharply, which will be signaled by the sensor on the panel;
- Oil consumption will begin to increase significantly, which will entail the need to regularly add oil.
If you find similar problems in your car, you need to contact a service center for diagnostics and troubleshooting.
If you have experience in car repairs with your own hands, then replacing the oil pump on a VAZ-2109 yourself will not be a problem for you.
Purpose and types of automobile oil pumps
The purpose of the oil pump is to create the necessary pressure in the engine lubrication system. Under high pressure, oil flows through special channels to all rubbing parts of the engine, intensively reducing their friction against each other, thereby preventing premature wear.
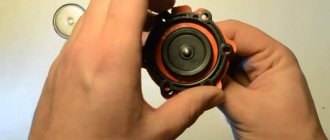
Oil pump for VAZ car, adjustable, with pressure reducing valve
Advantages of adjustable rotary oil pumps
Almost all modern VAZ cars (starting from VAZ 2114 and higher) are equipped with adjustable rotary-type oil pumps.
Main design elements of the VAZ adjustable rotary oil pump
Here are the main advantages of these devices:
- When using an adjustable oil pump, engine power increases by 30%. This occurs due to a decrease in the power factor taken from the motor by third-party devices;
- with an adjustable oil pump, the oil has to be changed less frequently, since the crankshaft speed decreases, which means the number of revolutions decreases;
- The adjustable oil pump practically does not foam the oil. The problem that is relevant for unregulated gear pumps has been successfully solved in rotary pumps.
How to replace an oil pump
Before you begin removing the oil pump and replacing it, it is necessary to carry out preparatory work. First, make sure you have easy access to the following tools:
- set of wrenches;
- socket heads;
- universal joints;
- extension.
We remove the old pump:
- If you own a fuel-injected car, you must first remove the crankshaft position sensor from the engine. You won't have to do this with a carburetor engine.
- After this, you should completely drain the engine oil that is in the engine.
- When you have drained all the oil, you need to remove the crankshaft timing pulley.
- Now remove the oil pan, unscrew the bolts that secure the oil pan, and remove it.
- Remove the oil pump bolts using an extension.
- Move the pump using a screwdriver - to do this, insert it between the bearing and the pump.
- After all this, carefully remove the pump from the crankshaft.
Once you have removed the old oil pump, you can begin installing the new one. This must be done in the correct sequence:
- Before installing the new pump, rotate the drive gear so that it is completely aligned with the flats on the crankshaft.
- Now you need to thoroughly lubricate the working edge of the crankshaft front oil seal; use engine oil for this.
- When you have completed all the previous operations, you can install the oil pump on the crankshaft. Carefully tuck the lip of the oil seal in, and then tighten the bolts that secure the oil pump.
After this, you need to carry out the final stage of installation - collect all the parts that you removed before (including covers and gaskets) and install them in the correct order.
Source
The power plant of a modern car is equipped with several pumps. They can be called “hearts”, each of which pumps a specific liquid - fuel, antifreeze or oil. Today we will talk about one of them – oil. Since it is impossible to diagnose this unit without partially disassembling the motor, the condition of the pump is determined by indirect signs.
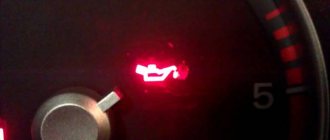
If it malfunctions, events most often unfold as follows: the oil pressure warning light lights up on the instrument panel. The car enthusiast checks its level and sees that it is normal (or adds oil if necessary), but the lamp does not even think of going out, which leads to the need to troubleshoot.
There can be many reasons why the light comes on, but most likely the oil pressure sensor is broken or something is wrong with the pump. In this article we will tell you how to correctly replace this unit on a VAZ-2109 and other cars of this family.
Where is the oil pump on the VAZ 2109
Its location is behind the crankshaft pulley. As a result of this circumstance, it will not be possible to get to it without removing some parts, in particular, the pulley itself and the oil pan. Below is a photo showing the oil pump in its seat.
When to change the oil pump
If the pump fails, the following things happen:
- The oil pressure drops, as a result of which the corresponding control light on the dashboard lights up.
- Oil consumption increases, and it constantly has to be topped up (however, this does not always happen).
How to replace the oil pump on a VAZ 2109, 2108, 21099
Tools:
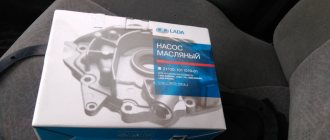
Before you begin the replacement, prepare all the necessary tools. This is a set of wrenches, a set of sockets, a universal joint and an extension. If the pump is replaced with a new one, then buy the necessary spare part (its catalog number is “2108-1011010″). Also, drive the car into a hole or overpass, otherwise it will be very difficult for you to get to the pump.
Removal:
1) Remove the crankshaft position sensor. It should be noted that this is only relevant for an injection engine; if the engine is carburetor, skip this point.
2) Drain the engine oil.
3) Next, remove the toothed pulley.
4) Now you can remove the oil pan. Then find the oil receiver and unscrew the bolts that secure it, and then remove it.
5) Take the correct size socket and extension and use them to remove the 6 bolts that secure the oil pump to the engine block. Be extremely careful as there are washers under the bolts and it is very important not to lose them.
6) Ideally, after step 6, the pump should be removed, but in practice this does not always happen. If this is your case, take a thicker screwdriver, insert it between the pump and the main bearing and gently wiggle it (remember, do not damage the bearing!).
7) Carefully remove the oil pump.
Installation:
1) Before you install a new unit, follow one very important procedure. You need to find the drive gear and turn it like this... (continued below)
2) So that its position coincides with the special flats located on the crankshaft.
3) Now take some engine oil and lubricate the front crankshaft oil seal (more precisely, its working edge).
4) Is the oil seal lip lubricated? Install the pump onto the crankshaft. For this you will need an ordinary pencil. It will be needed to tuck the oil seal into its place (this must be done strictly with the unsharpened end of a pencil!). After this, screw back the 6 bolts securing the oil pump, not forgetting the washers.
5) Now reassemble the remaining parts in the reverse order of removal. Archive important!
Since you will have to remove the timing belt to get to the timing pulley (and at the same time the radiator along with a number of other parts), be extremely careful with the crankshaft when changing the pump. It must not be allowed to rotate at a significant angle, otherwise the pistons have every chance of meeting the valves, as a result of which they can be deformed, and this will lead to dire consequences.
Dismantling
Removing the pump yourself is not difficult. Yes, and you are quite capable of performing independent repairs.
- De-energize the car by removing the negative terminal from the battery.
- Loosen the generator mounting bolts and remove the belt.
- Prepare a clean container by draining the oil from the crankcase into it. Next, you will need to remove the engine protection and oil pan.
- Remove the camshaft drive timing belt.
- Now that the belt is removed, do not turn the crankshaft or camshaft under any circumstances. Otherwise you will damage the valves by hitting them with the pistons.
- Remove the crankshaft pulley by using two flat head screwdrivers and pulling it off the shaft. If the key does not hold well in its seat, it is better to remove it too.
- Next in line for dismantling is the oil receiver. To remove it, you need to unscrew the two fastening bolts located on the main bearing cover, as well as one fastening bolt connecting the oil receiver to the pump (oil).
- Remove the pump, held in place by six bolts.
- After unscrewing all the bolts, carefully slide the oil pump away from the main bearing cap, then remove the oil pump with peace of mind.
Replacing the oil pump
As was said, on the VAZ 2109 the oil pump, which is replaced in the cases given above, must first be removed. Let us give again the main reasons why the oil pump needs to be dismantled:
- at idle speed when the engine is warm, there is not enough oil pressure (often this is due to foreign particles getting under the pressure relief valve or the problem is associated with wear of the oil pump gears);
- When the engine is sufficiently warmed up, excessive oil pressure is observed (the pressure relief valve in the pump gets stuck).
We arm ourselves with the necessary tools:
Dismantling
We begin work on removing the oil pump:
- we lift the car onto the inspection hole;
- remove the mudguard;
Removing the vehicle's mudguard
- drain the oil from the engine crankcase.
Note. Now you need to start dismantling the oil sump. Often the crankcase gasket causes pump failure.
- unscrew the two metal bolts securing the pump;
Two bolts securing the VAZ oil pump
- remove the oil pump.
Note. You should know that the oil pump is installed at the front of the engine and consists of a pump housing, mounting bolts and an inlet pipe. The fastening bolts come in different lengths, and during installation they will need to be mounted in their original places.
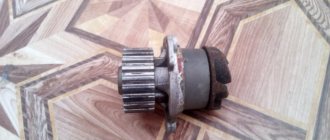
Repair of oil pump drive VAZ
VAZ oil pump drive
Disassembly and repair
After completing the dismantling work, you can proceed in two ways:
- Replace the old pump with a new one;
- Repair the old oil pump.
Repair allows you to identify worn elements and replace them with new ones, which will restore functionality. If the breakdown is more serious than simple wear and tear of consumables, the optimal solution would be to completely replace the oil pump.
To disassemble the pump, follow the instructions.
- Divide the pump into two parts. To do this, we have already unscrewed 6 bolts securing the cover to the body and used a screwdriver to pry off this cover. It came out of the pins on the body. So we remove the element and put it aside.
- Inside the pump housing there are driven and drive gears, which need to be removed and placed aside for now. Then we will check their condition.
- Next, the pressure reducing valve is removed. To do this, first unscrew the valve plug and remove the spring from the hole, and then the valve.
- In some cases, problems may arise with removing the valve. If you encounter this situation, gently tap the oil pump body against a piece of wood or use a wooden cone-shaped pin. It is inserted into the valve hole, the valve is hooked and removed.
- After disassembling your oil pump on the VAZ 2109, thoroughly wash all its components using clean kerosene. Don't forget to wipe the parts dry afterwards.
- Check the condition of the cover and body of your pump for mechanical defects, chips, cracks.
- Pay special attention to the landing spots of the gears, where there should be no signs of wear or other mechanical defects. If they are, the pump will have to be replaced.
Pressure reducing valve
There are practically no methods that allow you to check the oil pump pressure relief valve without the need for dismantling. But you can check it with your mouth - even experts recommend using this method. A cloth is applied to the valve fitting, through which air passes well. Next, take a sharp breath. If there is strong resistance, then the valve is working.
Replacing the oil pump on VAZ 2108, VAZ 2109, VAZ 21099
Have you ever encountered a situation where, while on the road, a light suddenly lights up on the dashboard, indicating insufficient oil pressure in the system? Many people first go to fill the engine with oil, but after filling, when they get behind the wheel, they see that the light has not stopped burning. In today's publication we will try to understand the causes of this problem.
So, there are plenty of reasons: starting from the oil pressure sensor, which can fail and give false readings, and ending with the oil pump, where there may also be a malfunction, and the parts inside are not working properly. The solution is to repair this pump. We recommend that you familiarize yourself with the intricacies of the process and the sequence of actions here: “Oil pump repair.”
Pump location
Located behind the crankshaft pulley. It will be possible to examine it only with the pulley removed from the car engine. The photo below shows this pump attached to the cylinder block using six mounting bolts.
When to change the oil pump?
In case of the following problems:
• Firstly, the oil pressure in the system decreases, which is indicated by the oil pressure light.
• And secondly, oil consumption in the system increases, requiring constant addition of engine oil to the engine.
Location of the oil pump in VAZ cars
The oil pump in VAZ cars is part of the engine, so you won’t be able to see it just by opening the hood. To get to the oil pump, you need to place the car on an inspection hole, remove the crankcase protection from it, and then remove the pan.
To get to the oil pump, you will have to remove the pan and crankcase from the VAZ car
How to replace the oil pump, also known as the oil pump, on a VAZ 2108-VAZ 21099?
Note! The tools you will need are a set of basic wrenches, sockets, u-joints, and an extension.
Removal
1) On fuel-injected cars, first of all, it is necessary to remove the crankshaft position sensor from the engine. (Details and subtleties of the process are described in the article: “Replacing the crankshaft position sensor”)
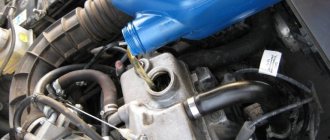
2) Then drain the engine oil in the car engine. (Here the instruction will come to your aid: “Changing the engine oil”)
Design
Oil pump VAZ 2109
Today there are three types of pumps:
- 2-gear pumps, in which one gear is connected to a shaft, which starts working from the intermediate or camshaft of the VAZ. This pump is installed inside a sump located in the lower area of the cylinder block. Typically, the rotation speed of the element is ½ the rotation speed of the motor.
- A gerotor pump has a rotating small gear inside an outer gear. This pump is located in the lower area of the motor in the sump.
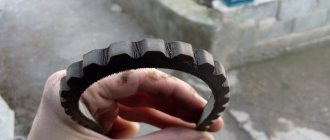
Old style oil pump
- The internal pump is often installed on the front cover of the engine. It begins to function from the crankshaft. Structurally, such a mechanism is similar to a gerotor mechanism, but in this situation it replaces the front damper of the engine. As a result, it is possible to generate higher oil flow with higher pressure.