The cylinder head is a cover designed to enclose the cylinder block. It is also indispensable for some other functions that are no less important in the operation of the car’s power plant.
While the engine is running, a gas-air mixture is supplied to the head itself, and thanks to the exhaust manifold, exhaust gases are removed.
When to replace the cylinder head
The cylinder head is a fairly durable working unit, so it is not subject to repair or complete replacement very often. On cars manufactured in the Russian Federation, the cylinder head has to be removed due to cylinder leakage or when the gasket is worn out.
And sometimes the cylinder head is removed for modification. Removing this unit on a car with any number of valves is quite easy, although some skill may be required.
In this regard, if you need to remove the cylinder head yourself for the first time, then it is best to do this under the supervision of a person who has previously encountered a similar task.
Symptoms of a problem
So, when all the points have been considered, it remains to list the signs of cylinder head gasket failure:
- A large amount of white smoke comes out of the muffler.
White smoke from the muffler is a sign of a faulty cylinder head gasket
Sufficient amount of emulsion on the filler cap.
Emulsion on the filler cap
- Antifreeze has an oil effect.
- The oil level in the pan has increased.
- The smell of antifreeze or exhaust gases can be traced in gasoline.
This is interesting: Replacing a Daewoo Nexia headlight: instructions, photos, videos, process
Work process
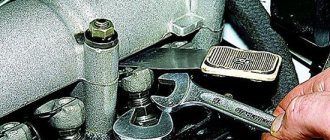
Disconnect the negative terminals from the battery.- The piston of the first cylinder is set to the top dead center position.
- All coolant is drained.
- Fuel pressure decreases.
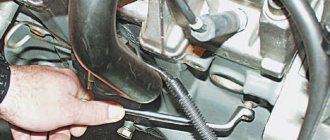
- The intake pipe of the exhaust system is disconnected from the manifold.
- The cylinder head cover is being dismantled.
- All pipes, electrical wires and hoses are removed. But before you do this, you need to remember or note what was originally connected and where. This is done in order to avoid possible confusion during re-installation.
- There are three bolts on the camshaft belt cover that need to be unscrewed and the cover itself removed.
- The timing belt is removed and completely removed.
- The shafts must be secured against possible rotation.
- The pulley is attached to the camshaft using bolts that must be unscrewed and then the pulley removed.
- The nut securing the rear camshaft cover is unscrewed.
- Unscrew the remaining bolts and remove the cover completely.
- Slightly loosen the tension of the dozen bolts holding the head.
- Then each individual bolt is unscrewed one by one and removed along with the washers.
- The head is released and removed.
- If the head is attached directly to the gasket, a screwdriver or any other long
tool. Next, you need to use this tool as a lever in order to slightly lift the head, and then remove it completely. - Very carefully, so as not to scratch the surface of the head, it is necessary to remove the remnants of the old gasket. It is best to use a special liquid for this matter.
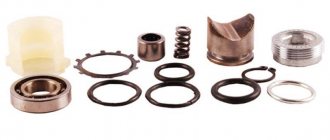
- We put the new gasket in place.
- We make sure that the shafts are in the top dead center position and all valves on the first cylinder are completely closed.
- We put the bolts back.
- Using a torque wrench, we begin to tighten the bolts one by one.
- We reinstall all removed equipment.
- We adjust the clearances in the valve drive and tension the camshaft belt.
As you can see, repairing the cylinder head on a VAZ-2114, which has 8 valves, is a fairly simple, albeit slightly labor-intensive task, which means that every person who has at least a slight understanding of this unit can handle it.
Assembly Features
Before assembly, you should check the bolts securing the head to the hood; their length should not be more than 13.5 cm; if they are longer, they can no longer be used.
You should also check the flatness of the head. If it was overheated, it is possible that it was warped and will require repair in the form of trimming the plane.
During assembly, the head bolts are tightened in a certain sequence and with a strictly defined tightening torque. Next, everything is assembled in the reverse order of disassembly.
Disassembly is also carried out in the same sequence if the power plant is being modified.
Removing the cylinder head on a VAZ 2114 to replace the gasket with your own hands - part 2
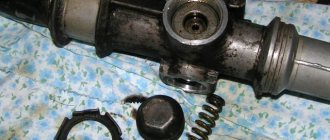
Continued... The first part is here And so, after all the manipulations, we only have a few steps left to do to remove the cylinder head: 1. Unscrew 10 bolts with the E14 head of the cylinder head itself:
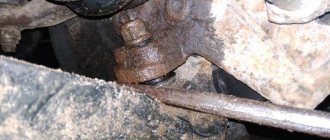
2. Unscrew the 4 bolts securing the pants. But here (like the author from the video) I had a problem in the form of soured nuts (((It’s good that I already saw a solution to this problem. Instead of point 2. Unscrew the two bolts connecting the pants with the muffler from the bottom of the car and remove the terminal (like a lambda) . And we try to take out the cylinder head along with the pants. To be honest, taking it out took me a lot of time, because I have to manage to twist the head so that the pants come out. It’s not very convenient to do this alone. But I won it))) 3. We remove cylinder head:
Indeed, the gasket was broken on the right side in front near the timing belt. It was not in vain that I filmed it. And this is happiness:
In this form it is easier to unscrew the nuts of the pants:
And then, without sparing the VD, we try to unscrew them. I managed to unscrew 2 nuts with a 13mm socket. One nut only thanks to a 12mm socket (I just hammered it onto the licked nut with a hammer). The fourth one was the one I had to tinker with the most. They didn’t take either a 13 or 12 head. I tried it with a chisel, nothing (((. And then I remembered my gas key))). A couple of manipulations and the last nut fell)))
Source
Approximate cost of overhauling an eight-valve engine
Unfortunately, car engines do not last forever. Over time, “oil burn” begins, compression drops, noises and knocking appear, as a result of which it is necessary to carry out a “overhaul”. At the beginning of January 2015, I overhauled engine 21083 on a 1998 VAZ-2110 car. Compression on all cylinders dropped to less than 8 and knocking noises were heard from worn pistons. The repair was carried out on a turnkey basis, the owner left the car with me and 5 days later he came and picked up the repaired car. During the repair, I tried to record all expenses so that I could estimate the total cost of a typical engine overhaul.
Where and from whom can I order the service?
If an engine overhaul of a VAZ-2114 is required, then there are several options:
- Take the car to a car service center.
- Contact a private master.
- Repair the unit yourself.
A major type of repair requires extensive knowledge, skills, experience, certain equipment and tools. Therefore, only a master of a service center can carry out a high-quality engine restoration. Car service centers issue a warranty certificate. You should contact private traders only on the advice of good friends. Among such workers there are often low-skilled people. In addition, they do not provide a warranty card.
What is this?
Engine overhaul refers to the work of a master aimed at returning the engine to a state as close as possible to its original state. In this case, most of the nodes are changed or restored. This type of repair is resorted to when there is a lot of wear on the parts of the unit.
The list of work may include grinding the crankshaft journal and camshaft, installing new pistons and springs, and honing the cylinders. If too many engine components are faulty, then it is more advisable to completely replace it.
The following signs indicate that it is time to overhaul the engine on the VAZ-2114:
- The appearance of red, black or dark gray carbon deposits on the spark plugs.
- Increased oil consumption.
- The occurrence of knocking in the engine.
- Increased fuel consumption.
- The appearance of smoky exhaust.
- Bad traction.
- Engine overheating.
- At idle, the engine runs unevenly.
- Reduced power.
Major repairs proceed approximately according to this scheme:
- Preparing the engine for dismantling (disconnecting wires, hoses, gearbox).
- Removing the engine.
- Removal and inspection of the cylinder head.
- Disassembling the unit for diagnostics and cleaning.
- Block boring. Grinding the crankshaft. Application of hone to the cylinder walls.
- Weight distribution of connecting rods, pistons.
- Block assembly.
- Restoring the head (replacing caps and guides, straightening seats).
- Assembling the engine and installing it in the engine compartment.
- Connection.
- Functionality check.
Removing the cylinder head on a VAZ 2114
As is already clear from the title, we will talk about removing the cylinder head.
In the previous entry I wrote that I had a blown cylinder head gasket. I started looking for solutions from the experts. But the price tag really upset me. Replacing the gasket (just a replacement, without grinding!) the price starts from 100 American rubles and this is not at a company service, but in the garage of Uncle Vasya (Petya, etc.) who do not provide a guarantee.
After surfing the Internet, I found a good video on how to replace it yourself:
In the end, I decided to change it myself. Of course, I don’t have enough experience (before this I raised my head twice in a Volga 31029), but that didn’t stop me) Luckily I have a second car. Therefore, one can be safely put in for repairs.
Initially, I wrote it down and took photos for myself personally (to make it easier to assemble everything later and not have to look for “extra” spare parts from where). But I decided to post it on Drive, maybe it will be useful to someone.
And so we drive the car into the garage and begin to remove the cylinder head. Don't consider this an instruction - I'll just write out my sequence of actions.
1. Remove the crankcase protection with heads 17 and 19. Everything is simple here.
2. Take the miracle product WD-40 and generously water the nuts on the pants fastenings so that they begin to sour. The more time, the better.
3. Remove the battery (terminals with a 10 key, fastening with a 13 key)
4.Remove the terminal from the sensor on the air filter:
Source
Countersinking saddles
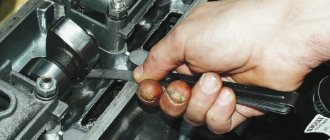
When repairing the cylinder head yourself, be prepared for the most monotonous and lengthy process - countersinking. A lot depends on its quality:
- tight fit of the valve to the seat;
- compression ratio in the combustion chamber.
The seat grinding work is carried out with a special tool - a roller cutter (less often - a countersink). With its help, a not quite finished seat can be given the desired shape so that the valve fits more tightly. Start work with a countersink at 60 degrees.
As soon as metal removal has begun in a circle, change the nozzle - take a countersink with a cone angle of 120 degrees. Work with it until a clear round edge appears. The final stage of countersinking is done with a 90-degree cone - it should go through the working chamfer of no more than 1.5 mm. Further grinding of the valve will increase it to the required value.
Approximate price
On average, a major overhaul of a VAZ-2114 engine costs from 22,000 rubles.
Engine repair cost broken down:
- Dismantling – 500 rubles .
- Installation – 600 rubles .
- Replacing oil scraper caps - 2000-4000 rubles .
- Pulling the engine sump - about 490 rubles .
- Crankshaft grinding - from 900 rubles .
- Replacing the crankshaft bearing - about 330 rubles .
- Honing and boring on a standard block - from 1000 rubles .
- Replacing the valve cover - 420-620 rubles .
- Replacement of the engine mount - from 540 rubles .
Replacing the engine on a VAZ-2114 will cost approximately 5,500 rubles . This does not include the price of a new unit.
Grinding in the valves
After preparing the seat, the next stage of repair awaits us - grinding in the valves. To do this you will need a special lapping paste. A small layer is applied to the valve, then the latter is inserted into the head. A piece of rubber hose (of such a diameter that it is difficult to fit) is placed on the valve stem.
Then place the free end between your palms and begin, rubbing your hands, to rotate the valve in different directions. The abrasive paste will do its job, and the repair of the cylinder head valve can be considered complete.
Chip tuning
You can boost a modern engine using software methods. Chip tuning is a modification of the program parameters of the electronic engine control unit in order to obtain the required results. It is used both as an independent method of boosting the engine, and as part of complex tuning measures.
Engine chip tuning procedure:
A car in the engine ECU has a certain set of parameters and directives, often differing even on the same car model depending on the sales region. So, most often, adjustments are made to the ignition timing in order to reduce the load on the transmission and achieve other goals. As a result, fuel combustion can become inefficient, the engine “thinks” during acceleration, power failures and high consumption of expensive fuel are observed.
Another important nuance is that some automakers may deliberately programmatically degrade the engine to reduce prices and achieve other technical or marketing goals, although technically the engine retains the ability to produce more “horses.”
Proper chip tuning allows you to eliminate these shortcomings (including engine depowering), making the car faster, more dynamic, more powerful and more economical. The advantage of such an “electronic” modernization is good results in the absence of intervention in the engine hardware, which can help maintain the warranty on the engine (although many dealer service centers refuse warranty service if they detect the fact of chip tuning).
It will also be necessary to change the ECU firmware when changing the technical configuration of the engine, so that the control program works correctly with new parts and the engine produces the desired results. “Separate” chip tuning shows very good results on sports cars and vehicles boosted “from the factory”, which initially have reinforced parts. On an ordinary low-power engine, chip tuning without large-scale interventions in the technical part will not show good results.
Important: flashing the “brain” of a machine is a responsible procedure, and it should be carried out by an experienced and knowledgeable person. Otherwise, there is a possibility of causing irreparable damage to the car.