The VAZ 2114 uses a 4-cylinder in-line power plant, the power system is an injector. The location of the gas distribution mechanism is upper, that is, not only the valves of the mechanism are located in the block head, but also the camshaft. The VAZ 2114 uses an adjustable gas distribution mechanism, that is, the thermal gap is not independently regulated, as is done in a timing belt with hydraulic compensators, but is a strictly fixed value that periodically needs to be checked and adjusted.
On this car, since the timing is adjustable, the thermal gap is fixed; at the intake valve it should be 0.2 mm, and at the exhaust valve - 0.35 mm. A small error of 0.05 mm is also allowed.
The exact value on the VAZ 2114 engine is ensured by the use of adjusting washers of a certain thickness. These washers are placed between the camshaft lobe and the valve lifter.
Valve clearance measurement
During engine operation, wear occurs due to friction, as a result of which the thermal gap changes, so periodic inspection and adjustment is required. If this is not done, then changing its value will lead to disruption of the timing and valve timing. In this case, the VAZ 2114 loses power, gasoline consumption increases, and starting the engine on “cold” or “hot” worsens.
Signs of out-of-adjustment valves
To determine the exact source of engine noise, you need to understand the timing mechanism. The wear of some of the timing belt design elements is similar to the signs of gaps. Signs of poor adjustment look like this:
- The appearance of a metallic clatter emanating from under the cylinder head. As the temperature rises, the noise gradually disappears. This symptom appears at high levels of wear. If the sound does not disappear as it warms up, this may indicate more serious problems with the cylinder head;
- “Tweaking” the engine, periodically turning off one or more cylinders can also indicate the formation of large gaps. A large deviation of the permissible gap from the norm can cause the part to jam in one position. In this situation, the engine will constantly trip. Checking the possibility of repairing a breakdown without removing the “head” is carried out by measuring compression. If there is at least 5-6 bar in the cylinder with the problematic element, then the repair may not be difficult. If the compression is zero, there is no escape from opening the engine;
- Shots in the exhaust pipe. The first thing to do when such a problem occurs is to change the gasoline. If instead of AI-95 you filled in AI-92 (or vice versa), lumbago may occur. In general, when using high-octane fuel in engines not designed for this, it leads to gradual burnout. If the reason is the clamped position of one of the elements, make adjustments.
When owning a “four” with a simple 77 hp unit. this problem does not cause many difficulties. If you have minimal experience in car repair, adjusting valves on a VAZ 2114 will not cause much difficulty. There is no point in delaying this procedure, because... Over time, the gap will increase even more, which will lead to burnout of the element.
Useful : Replacing valves on a VAZ 2114
Brief description of the procedure
Nowadays, any modern car, except electric ones, has an internal combustion engine with a gas distribution mechanism.
A lot of parameters depend on the proper operation of this system. And they include fuel consumption, engine response, environmental characteristics and other equally important indicators. The normal function of the gas distribution mechanism is ensured by the correct adjustment of the gaps between the valve and its pusher. If the gap is too large, the camshaft cam will hit the pusher plate with force, and all this will lead to serious damage to engine components and mechanisms. In addition, the valve will not fully open when needed, thereby blocking the movement of exhaust gases or the fuel-air mixture, depending on the type of valve. Intakes are responsible for the supply of fuel, exhausts are responsible for exhaust gases directed to the exhaust manifold.
Operating principle of the valve mechanism
On the contrary, if the valve is tightly clamped, then mechanical damage to engine parts will be less than if the gap is too large. But the engine operation itself will be much worse. It is for good engine performance that it is necessary to carefully adjust the valves on VAZ cars. This procedure is carried out in several ways. The first is that the pusher is moved under the influence of the nut on the rod. The second is the selection of gasket washers of the required thickness. The third is automatic, regulated by engine oil pressure into hydraulic compensators.
What are the dangers of operating a car with unadjusted valves?
To understand the scale of possible problems caused by running a motor with unset clearances, study the consequences:
- Serious increase in fuel consumption due to a non-functioning cylinder;
- The appearance of lumbago from the exhaust pipe;
- Disruption of the combustion process of the fuel-air mixture in the cylinder chamber. This leads to the appearance of soot and deposits. This carbon deposit can be removed only by decoking or complete disassembly of the engine;
- Also, due to improper fuel combustion, the valve timing is disrupted. This leads to loss of power.
The formation of gaps as a phenomenon occurs due to wear and tear of engine elements. Each part of it is subject to wear to some extent, so periodic monitoring of all components of this unit is necessary. Regular changes of oil, filters, spark plugs, use of proven gasoline - all this allows you to extend the service life.
Why do you need to adjust valves?
With mileage, the metal valve stem tends to stretch and contract. The seats in the cylinder head sag, which is why the thermal gap changes. And it is physically needed of a certain value due to the design features of the engine. The consequences of untimely adjustment are not reversible. A clamped valve during operation of an eight-valve engine loses its seal, and the avalanche flow after ignition burns its edges and the cylinder head seat, which is recessed into the body of the head. This type of repair is expensive and does not come with a warranty. It is better to regulate in time, especially since the cost of tuning an 8-valve engine at 600 - 800 rubles per 30,000 km is not so significant.
With correctly adjusted clearances, the car will drive freely, without loss of traction, consuming less fuel. Under no circumstances should you adjust it to hot. Just cool the engine to 30-40 degrees. Otherwise, you can make a mistake and jam the valves.
There are times when the valves have been adjusted, but the knock remains. The reason may not be gaps. On a cold engine, piston skirts and cups and pushers in the body of the head can knock. There can be many reasons, so don’t rush to conclusions, but check everything carefully. There is a special device - a stethoscope, with which you can easily listen to engine noise.
Necessary tools and spare parts
Adjusting the VAZ 2114 valves (8 valves) with your own hands is only possible if you have a tool. In addition to a set of keys, special plates for accurately measuring the gap and the mechanical device itself for the procedure for setting them will be useful for the work. The complete list of necessary spare parts and accessories is as follows:
- Set of spanners and sockets;
- Jack for raising the front of the car;
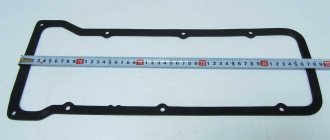
- New valve cover gasket;
- Metal plates of different sizes;
- Lever with rod and lock for adjustment;
- Long pliers or large tweezers;
- Micrometer and data recording sheet.
The engine temperature during work should not be high, because there is a risk of severe pinching.
How to choose the right shim size.
Adjusting washers come in different sizes. These can be purchased from a parts store depending on the size required. In order not to get confused about the sizes, you need to try on the gaps of all the valves and carefully write them down. It can be in the form of a table in which the valve number corresponds to its existing clearance.
If the gap is increased or insufficient, the adjusting washer is removed. Its size is indicated on the reverse side. But since the washer was in operation. It has undergone wear and tear. And its actual size may not correspond to what is written on it. Therefore, the thickness of the washer must be measured with a micrometer to hundredths of a millimeter.
Knowing the existing thermal gap and the thickness of the removed washer. A washer with a different size is selected to obtain the required clearance for the intake and exhaust valves.
For example:
- When measuring, the gap on the intake valve turned out to be 0.10 mm. The removed washer measures 3.75 mm. Since the existing gap of 0.10 mm is less than the required one, it must be increased to 0.20 mm. Accordingly, you should install a washer 0.1 mm thinner than it was. The size of this washer will be 3.65 mm
- If the existing gap is larger than the permissible one, for example 0.30 mm, and the size of the washer has been checked and is 3.70 mm, then in order to establish the correct gap on the intake valve of 0.20 mm, you need to select a washer with a size larger than the existing one by 0.10 mm. The thickness of the repair washer should be 3 .80 mm
Of course, it will not be possible to select the exact dimensions of the washers perfectly. For example, in reality the thermal gaps will not be a round value as in the example of 0.1 mm, but, say, 0.12 mm. It will not be possible to select a repair washer so as to increase the gap by exactly 0.08 mm. Therefore, the gap must be set a little larger than recommended. It's okay if the gap is 0.22mm. The main thing is that it should not be smaller. 0.18 mm is no longer desirable. As mentioned above.
The procedure for adjusting valves on a VAZ 2114
For proper operation, it is necessary to know the exact procedure for adjusting the valves. The table below presents data with the order of operation. Note that the cam numbers are listed in order from the camshaft pulley.
If you have this table, you can carry out similar work on most eight-valve engines. The “Grant” gaps are slightly different. The only difficulty when setting it up yourself is the lack of a set of washers for adjustment.
Checking valve clearances
After the cam is set for valve adjustment. The gap is measured. To do this, it is advisable to have probes of three sizes.
Intake valves
- You must first measure with a 0.15 mm feeler gauge. It must pass freely.
- The 0.2mm probe should pass with little effort
- And the 0.25 mm feeler gauge should not fit between the cam and the adjusting washer.
Exhaust valves
Exhaust valve clearances are measured with larger feeler gauges
- 0.3 mm passes freely
- 0.35mm with little effort
- 0.4mm does not fit through the gap.
In this case, the valve clearances are considered acceptable.
In what cases does the gap need to be increased or decreased?
Using intake valves as an example. The following is defined:
- The 0.15 mm feeler gauge does not fit between the cam and the shim. Therefore, it is necessary to install a washer of smaller thickness.
- A 0.25 mm feeler gauge fits freely into the gap. This means you will need a thicker washer.
The same goes for exhaust valves. Only with other probe sizes.
Adjustment process
After the engine has cooled down and spare parts and tools have been prepared, you can begin to work. Instructions with step-by-step explanation will simplify the work:
- Using a set of wrenches, remove the valve cover.
- We compare the marks of the camshaft pulley and the timing cover (we set the top dead center on the first cylinder). To do this, you can lift the front of the car and turn the wheel while the gear is engaged).
- Using a metal plate, we check the gap on the first valve. The acceptable value is 0.35 mm. On the third element the indicator should be 0.2 mm. If there is a deviation from the norm, adjustment is needed.
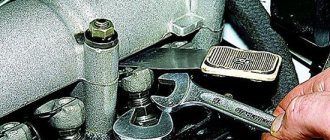
- Using a special squeezing device, we get to the inserted washer. Remove it with tweezers or pliers.
- To install a new washer, you need to find out its required size. The thickness of the new element is calculated using the following formula: H = B + (AC) mm. H is the thickness of the new part; B - thickness of the old washer; A - the resulting gap identified by the feeler gauge (plate); C is the norm.
- If you obtain a result different from the norm, you should choose the most approximate value of the washer thickness. For this, engineers provide a tolerance of 0.05 mm.
- We put the new washer in place. We carry out the same procedure with other parts. The procedure for performing the work is indicated above.
Without a calculation formula for a new spacer and a special tool, adjusting the valves on a VAZ 2114 (8 valves) will be problematic.
Adjustment table according to factory instructions
| car brand | Inlet | Release |
| Priora 21116 | 0,25 | 0,4 |
| Kalina 2 21116 | ||
| Lada Granta 21116 | ||
| grant 2190 | 0,2 | 0,35 |
| Priora 2170 | ||
| 21114 | ||
| 21102 | ||
| 21099 | ||
| 21093 | ||
| 21083 | ||
| 11186 | ||
| 11183 | ||
| 2190 | ||
| 2115 | ||
| 2114 | ||
| 2113 | ||
| 2112 | ||
| 2111 | ||
| 2110 | ||
| 2109 | ||
| 2108 | ||
| VAZ 99 | ||
| VAZ 083 | ||
| 1118 | ||
| 11113 oka | ||
| 1111 oka |
How does an engine operate with incorrectly adjusted valves?
The operating temperature of the motor is high, and when heated, the metal expands. If the adjustment does not correspond to factory specifications, engine performance deteriorates and the following problems are observed:
- The intake valve does not return to its place.
- The fuel mixture is ejected into the resulting gap.
- The exhaust clinker is not cooled, so it quickly becomes unusable due to incomplete contact with the block.
- Compression does not correspond to normal values; accordingly, power decreases and the node significantly loses resource.
If the gap increases, the opening of the intake valves occurs later, therefore, the working mixture does not enter in the required quantity. The engine starts to run poorly and knocking noises appear.
Often the situation is accompanied by a delay in the exhaust valves, and the exhaust gases do not completely “leave” from the cylinders.
If adjusted incorrectly, the power unit operates noisily, wear of parts increases, and power is lost. The solution to the problem is not postponed “for later”: the engine can fail at any time.
Preparation for repair
Before starting work you must:
- Place the car on a level surface and allow the engine to cool to 20 degrees.
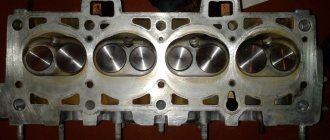
- Remove the valve cover and the plastic cover that covers the timing belt. Everything under the lid must be thoroughly wiped clean of oil.
- The camshaft must be carefully examined; if there is excessive wear, scoring, or cavities, it must be replaced.
- To make the crankshaft rotate more easily, you need to unscrew all the spark plugs.
After all these steps, you should align the mark on the camshaft gear with the casting on the cylinder head. In this case, you will set the first cylinder to the position corresponding to the top dead center
Please note that the crankshaft pulley must be rotated clockwise. But it's better to do things a little differently
Raise the left side of the car so that the front wheel hangs down. Engage fifth gear and rotate the wheel until the marks align.
Using chalk or a marker, you need to apply another mark on the camshaft gear. It should be opposite the one that already exists. This will make the work much easier.
How to determine what thickness of washer you need
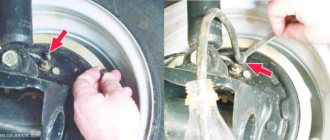
Checking and adjusting thermal clearances in the Renault Logan valve drive
- you have already traveled 146 thousand km;
- they never checked or adjusted the gaps, because the car drives normally;
- but everyone tells you that adjustments need to be made and you don’t know whether to listen to them or not...
Thank you! It helped me a lot.
The article provides detailed instructions for replacing the oil filter. You will also find out when and why you need to change it, as well as what tools are needed for this.
Are you scratching your head over how to do this? What have you tried to do, but she doesn’t want to go out? Then read this article, which describes in detail how this is done. Everything is much simpler than you imagined.
If you don’t know what this “dish” is and what it is “eaten with”, then read this article. Here you will get answers to why the car needs this element, what malfunctions occur and how to deal with them.