Many car owners of Soviet VAZ cars are faced with the need for periodic repair and adjustment of the power unit and, in particular, the timing mechanism. As a result of wear of parts, the thermal clearance of the valves increases, which interferes with the proper operation of the engine and can lead to serious problems. Since the adjustment procedure is not complicated, it can be performed with simple tools in a garage.
- Adjusting valves on a VAZ 2103
When and why adjustment is made - Adjustment Tools
- Preparatory work
- Valve adjustment procedure
Video: adjusting valves on VAZ 2101–07 cars
- What are valve stem seals used for?
Video: replacing valve stem seals on a “classic”
- Replacing the valve cover gasket
VAZ 2101 - valve adjustment
When servicing the engines of classic Lada cars, a number of tasks arise, neglecting which is simply criminal in relation to the engine. Checking the thermal clearance of the valves and, if necessary, adjusting it is just that case
VAZ 2101, as the most striking representative of the classics, is an unpretentious car in maintenance and quite durable, however, it also needs to be given attention
Valve clearance value
The thermal clearance of the valves in the gas distribution mechanism is necessary in order to compensate for the thermal expansion of the cylinder head parts and the cylinder head housing itself. If you do not adjust or check the gap in time, the entire gas distribution mechanism will not work correctly, which will lead to a significant loss of power, unreasonably high fuel consumption and instability of the engine in any mode.
The plant recommends checking the thermal gap at least every 15-20 thousand km, although many reduce this interval, knowing about the quality of oils and spare parts.
Be that as it may, you need to check the gap not only based on the service mileage, but also on the behavior of the engine.
A characteristic knock in the gas distribution mechanism, as well as those manifestations that have already been mentioned, can indicate a violation of the thermal gap.
VAZ 2101 on gas and fine adjustments
The valve timing in the VAZ 2101 engine, valve adjustment of which is on the agenda today, is designed in such a way that they not only ensure optimal filling of the combustion chamber with the fuel-air mixture, but also facilitate purging of the combustion chamber at the end of the power stroke. This allows the engine to work at full efficiency and optimal consumption of gasoline or gas.
By the way, the VAZ 2101 on gas also requires adjustment of the thermal gap, but an allowance of 0.05 mm must be taken into account. This is required by the higher octane number of the gas mixture compared to gasoline and slightly different operating conditions of the gas distribution mechanism under the influence of higher temperatures.
Checking the thermal gap
First, let's check the thermal gap and do this after 15 thousand mileage, regardless of whether a violation of the nominal value appears or not. To do this, you will need a minimum set of tools and this table, which indicates the procedure for adjusting the valves.
As you can see, measurement and adjustment must be carried out in strict accordance with the angle of rotation of the crankshaft relative to the marks on its pulley and the front engine cover. The ratio of the marks is shown in the photo below. As an option, and to avoid mistakes, you can put bright marks with a marker on the camshaft drive gear. Like that.
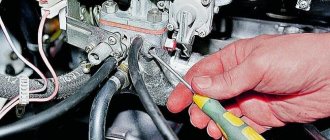
To control the gap between the valve and the lever, you must have a device for adjusting the valves or a minimum standard set of tools and an adjustment probe for adjustment with a working part thickness of 0.15 mm. It is probably not worth describing the process of dismantling the air filter and its housing. The only thing is that it is advisable to place a piece of rags in the carburetor so as not to drop a nut or some other small thing into the manifold.
Adjustment technology
After this, the valve mechanism cover is removed and the crankshaft is set to the initial position, according to the table and photo with marks. Valve measurements and adjustments are carried out only on a cold engine. That is, its temperature should not exceed 20-30 degrees. Schematically, the technique for adjusting or checking gaps looks like this:
- The crankshaft is aligned according to the mark, and the mark on the drive gear should coincide with the boss on the camshaft housing. In this position, the fourth piston is on the compression stroke, which means both valves must be completely closed.
- After this, the gap in the levers of the fourth cylinder is checked with a feeler gauge; based on the table, these are the eighth and sixth cams. The dipstick is inserted between the lever and the camshaft cam. With a normal gap, the feeler gauge should pass with noticeable force.
- If the gap is small and the feeler gauge does not pass between the cam and the pusher, the lock nut is unscrewed and the gap is brought to the nominal value by rotating the adjusting screw.
- After tightening the locknut, the clearance must be checked again.
The gap is adjusted in the same way on the remaining cylinders after rotating the crankshaft to the specified angle.
Actually, that's all you need to know about adjusting the gaps. After checking, it is advisable to replace the valve cover gasket, especially if it has already lost its elasticity. Good luck with all the adjustments and quiet valves on your dime!
VAZ 2101 - engine tuning
Renovation begins
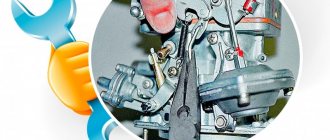
When the problem is identified, it is possible (and even necessary) to begin repairs. To get to the valve levers themselves, you have to do some preparatory disassembly that will give access to the camshaft.
- The first point for this will be the injector, since this is where both the engine air valve and the protective housing are located, which must be removed, like other belt protection.
- All shields and covers also need to be removed, since it is necessary to work in a comfortable manner, since despite the relative simplicity, the work is still delicate.
The operating scheme will be familiar to all owners of VAZ cars up to version 2107. The adjustment procedure (as well as the operation of the power unit as a whole) is the same for cars in this series. Therefore, there will be no surprises in the repair. The valve numbering order starts from the gear, closer to the camshaft. Repairs need to start from the fourth (the one closest to the car interior).
As for the adjustment itself, it is important to be as careful as possible. You don't need rulers or calipers for this. There are marks everywhere on all parts that have anything to do with the operation of the valves. It is necessary to observe their coincidence. The mark on the crankshaft must match the mark on the protective belt housing. But before this, the TDC 4 valves should be adjusted.
It is better to look at the gaps every 15-20 thousand mileage (at the same time you need to pay attention to the carburetor, cleaning of which also contributes to the stable operation of the car). But since a car is a practical matter, a description alone will not do. Below you can clearly see how the valves are adjusted.
Adjusting valves on a VAZ 2103
Since the operation of the engine is based on the constant combustion of the fuel-air mixture in the cylinders, the cylinder-piston group heats up quite strongly, which leads to expansion of the metal.
If such a gap were absent, engine operation would be incorrect or completely impossible due to a violation of the valve timing.
The valve clearance is adjusted between the camshaft cam and a special lever
When and why adjustment is made
Valve adjustment is one of the important measures when servicing the engine on VAZ family cars. First of all, the need for such a process is related to the design of the valve mechanism. During operation of the unit, wear is formed on the contacting surfaces of the lever, the end of the valve and the camshaft cams, which affects the increase in clearance. Due to the fact that the design of the mechanism is quite simple, the adjustment can be done on your own without much difficulty.
The need to set the correct gap arises in the following situations:
- when repairing the timing mechanism;
- noise is heard from the cylinder head area;
- the mileage after the last adjustment is more than 15 thousand km;
- engine power has decreased;
- fuel consumption has increased.
After repair work on the timing mechanism, it is mandatory to adjust the valves
A decrease in dynamics may also be associated with the carburetor
If adjusting this unit does not produce any results, the next thing you need to pay attention to is the valve
Adjustment Tools
Adjustment of the thermal gap is carried out using materials and tools, which should be in the arsenal of every owner of a “classic”:
- a set of socket and open-end wrenches (open-end wrenches for “13” and “17” are required);
- gap gauge;
- screwdrivers;
- rags.
Separately, you should focus on the probe, since a regular flat tool will not work for this procedure. You will need a wide probe with a thickness of 0.15 mm.
To adjust the thermal gap you will need a special wide probe 0.15 mm thick
Preparatory work
In addition to the fact that the adjustment is carried out on a cooled engine, partial dismantling of some of its elements will be required:
- Unscrew the nuts and remove the air filter cover, removing the filter element itself.
- We disconnect the hoses going to the filter housing, and then unscrew the fasteners.
- Using a screwdriver, unscrew the fastening of the choke cable, then remove the throttle linkage.
- Using a 10mm socket wrench, unscrew the nuts securing the cylinder head cover and remove it.
- Remove the distributor cover.
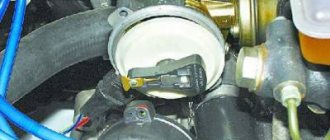
After these steps, using a special key, you will need to install the piston of the fourth cylinder to TDC. In this case, the crankshaft pulley should be installed opposite the length of the mark on the cylinder block, the camshaft gear should be installed opposite the ebb on the bearing cover, the distributor runner should correspond to the wire of the fourth cylinder.
Before starting the adjustment, install the crankshaft and camshaft according to the corresponding marks
Valve adjustment procedure
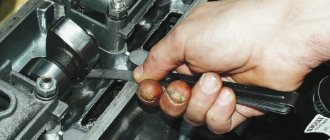
After all the marks are set, we proceed to check or adjust the gap, which should be 0.15 mm:
- We start work from valves 6 and 8, counting from the timing chain side. We insert a feeler gauge between the camshaft cam and the rocker and if it fits in equally tightly, then there is no need for adjustment.
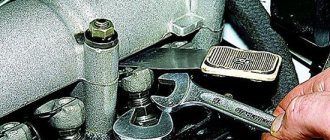
- If the dipstick enters freely or with difficulty, the gap will need to be adjusted. To do this, use a wrench set to “13” to hold the head of the bolt, and use a wrench set to “17” to loosen the locknut. We insert the feeler gauge and set the desired position by rotating the bolt, after which we tighten the lock nut and check to see if the gap has changed.
- We set the gap on the remaining valves in the same way. To do this, turn the crankshaft half a turn and adjust valves 4 and 7.
- We turn the crankshaft another 180˚ and adjust valves 1 and 3.
- Lastly, we check and, if necessary, adjust valves 2 and 5.
The dipstick on all valves must be removed with the same force
At the same time, it is important to know and remember that a small thermal gap will be worse than a large one, and this can lead to burnout of the valves
Valve stem seals
Valve seals, also called valve seals, are designed to remove oil from the valves and prevent excess oil from entering the engine. Due to the fact that the caps are made of rubber, over time this part simply wears out and begins to leak oil, as a result of which its consumption increases.
What are valve stem seals used for?
For proper operation of the camshaft, the assembly requires constant lubrication. However, its entry into the cylinders of the power unit is an undesirable phenomenon. This is exactly what oil caps were designed for. If the oil seal does not perform its function, oil enters the combustion chamber along the valve stem, which leads to the formation of a single mixture with fuel and air. During the combustion of oil, carbon deposits form both on the valve seat and on the adjacent part of the valve. As a result, the part does not close normally.
In addition, carbon deposits accumulate on the cylinder walls, on the upper surface of the piston, as well as on the piston rings. All this affects both the operation of the motor and its service life. For example, idle speed becomes unstable and compression decreases. In addition, oil entering the combustion chamber leads to a deterioration in the ignition characteristics of the fuel-air mixture. This suggests that valve stem seals perform an important function and special attention should be paid to their performance.
Instructions for adjusting valve clearances
On absolutely any classic engine, including the VAZ 2106, the thermal valve clearances must be adjusted from time to time. If this is not done, then over time some valves may be clamped, or, on the contrary, the gap will be too large and they will knock. To avoid this, adjustments must be made in a timely manner. To begin with, I will give a list of tools that will be needed to complete this work with the VAZ 2106.
- Open-end wrench 13
- 17 open-end wrench
- A set of probes, or rather, we need exactly one probe, 0.15 mm thick
- And also a list of tools needed to remove the valve cover
Step-by-step guide to adjusting valve clearances on a VAZ 2106
Before starting this work, it is worth considering that the car engine must be cold, that is, its temperature should be as close to room temperature as possible. It is also worth noting that the timing chain tension should be normal.
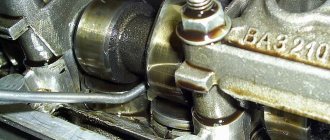
The first step is to remove the valve cover. After this, align the crankshaft and camshaft pulley according to the marks. If the chain was put on correctly, then the marks should match, but it’s still better to check it again. So, the mark on the crankshaft pulley should match the long mark on the front engine cover. This is how everything looks visually:
I specially made it closer so that it could be seen better:
Now we look at the camshaft sprocket and there, too, the mark on the gear should coincide with the protrusion on the cover. The photo below shows everything:
With this position of the crankshaft and camshaft, the piston of the fourth cylinder is at top dead center (TDC). It is at this moment that it is necessary to adjust the clearance of the 6th and 8th valves. If this is your first time, keep in mind that the valve numbers are counted from the left side, that is, from the front of the engine. To understand which valves need to be adjusted in this position, I will show you everything, literally:
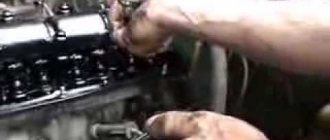
Now we take a feeler gauge 0.15 mm thick and insert it between the rocker and the camshaft; the photo below shows all this more clearly using the example of the 8th valve:
If the feeler gauge passes without effort, then the gap is too large and needs to be made smaller. If, on the contrary, the dipstick does not pass between the rocker and the camshaft of the VAZ 2106, then the gap must be reduced to 0.15 mm. The gaps are adjusted using an adjusting bolt and a control nut as follows. First, slightly loosen the locking nut with a 17 wrench, and with a 13 wrench we set the required gap by unscrewing it or, on the contrary, tightening it.
Once you have achieved the required clearance with the adjusting bolt, you can tighten the locknut. But it is worth considering that during tightening the clearance may decrease, so check the clearance after tightening the nut and adjust again if necessary.
The remaining valves are adjusted in exactly the same way, but in a strictly defined sequence, which I will write about in detail below.
The procedure for adjusting valve clearances on a VAZ 2106
The valves are regulated in a strictly defined sequence, as mentioned above. Below you will find data on how much you need to turn the crankshaft (in degrees) to adjust a particular valve:
- Matching marks (initial position) - 6th and 8th valve.
- Rotate the crankshaft 180 degrees - 4th and 7th valves.
- 360 degree rotation - 1st and 3rd valves
- Shaft position rotated 540 degrees - 5th and 2nd valve.
For convenience, you can put your marks on the crankshaft pulley, that is, divide it into two parts, making another mark opposite the factory one.
There is another way to check the shaft rotation angle. You can remove the distributor cover and adjust the valves according to the above data, only each next two valves are adjusted not after 180 degrees of rotation of the slider, but after 90, that is, 1/4 turn. You can make your own mark on the distributor body.
Reliability, weaknesses, maintainability
Reliability
Almost all car owners consider the VAZ-2103 unpretentious and reliable. When exchanging opinions on forums, owners express a common opinion.
So Andrey writes: “... before the three-ruble note came to me, the engine went through three repairs. Despite the age, the traction is enough for the eyes...” Ruslan notes the easy start: “...starting in cold weather. For example, yesterday I easily started the engine at -30, despite not bringing the battery home. High-torque motor. At least in the range of 3000-4000 rpm there is enough traction, and the dynamics, in principle, are not bad, especially for such an ancient car...”
Another noteworthy review. Yurievich (Donetsk) shares his experience: “... I also noticed one feature, and not only me. By changing oil from mineral water to semi-synthetic, engine life increases. 195 thousand have already passed since the capital, and it’s like a clock, compression is 11, doesn’t eat oil, doesn’t smoke...”
How to adjust valves on a VAZ 2110
There is no need to purchase shims in advance. They are relatively expensive. Initially, you have to establish the size of the gaps and only then buy the required number of washers with the exact dimensions. It is better to carry out work in a garage with good lighting. The roof and walls will protect from unwanted wind and rain, which can carry dirt into the open camshaft.
Disassembly
If everything is ready, then we proceed to the first part of the repair - dismantling the parts:
- disconnect the terminal from the battery;
- remove the air filter housing (on a carburetor engine);
- disconnect the crankcase gas hoses and the throttle cable bracket from the valve cover;
- unscrew the bolts of the timing case. Remove the cover and gain access to the pulley;
- unscrew the spark plugs (this will make it easier to rotate the crankshaft to find TDC and BDC);
- Unscrew the valve cover nuts and remove it.
Before direct tuning, you should remember the mechanism of operation of the timing belt. Namely, the operating order of the valves (in our case, a VAZ 2110 with an 8-valve injector).
| Camshaft rotation angle, degrees | Cam No. (counting from camshaft pulley) | |
| Exhaust (gap 0.35.mm) | Inlet (gap 0.20mm) | |
| 0 plus 2-3 teeth | 1 | 3 |
| 90 plus 2-3 teeth | 5 | 2 |
| 180 plus 2-3 teeth | 8 | 6 |
| 270 plus 2-3 teeth | 4 | 7 |
| Crankshaft rotation angle, degrees | N of the cylinder in which the compression stroke occurs (end) | N adjustable valves (cams) |
| 4 | 8 and 6 | |
| 180 | 2 | 4 and 7 |
| 360 | 1 | 1 and 3 |
| 540 | 3 | 5 and 2 |
The procedure for adjusting the valves on a VAZ 2110 with an 8-valve engine must be performed in the same sequence as in the table. As for installing valves on a VAZ 2110 with 16-valve engines, the diagram looks completely different.
| valve | 1 class (you) | 2 cells (ch) | Zkl (vp) | 4th grade (you) | 5th grade (you) | 6 cells (ch) | 7 cells (vp) | 8th grade (you) |
| Should ±0.05 | 0,30 (0,35) | 0,20 | 0,20 | 0,30 (0,35) | 0,30 (0,35) | 0,20 | 0,20 | 0,30 (0,35) |
| largest gap | 0,25 | 0,35 | 0,40 | 0,35 | 0,40 | 0,30 | 0,30 | 0,40 |
| washer | 4,30 | 3,82 | 3,52 | 4,22 | 4,50 | 4,27 | 3,87 | 4,25 |
| What kind of washer is needed | 4,25 (4,20) | 3,97 | 3,72 | 4,27 (4,22) | 4,6 (4,55) | 4,37 | 3,97 | 4,35 (4,3) |
Adjustment
After removing the valve cover, it is necessary to remove any remaining engine oil near the tappets. This can be done with a medical syringe or a rubber bulb. If there is a retaining rod, you should install it on the two outer studs intended for fastening the cylinder head cover.
Then, we proceed to the second part of the repair and do the following:
- We set the top dead center by aligning the marks of the camshaft pulley and the inner timing case. There are two ways to do this. Hanging and rotating one front wheel. Use a spanner wrench (head) to rotate the camshaft by the pulley mounting bolt, but this operation is dangerous due to breakage of the mounting bolt;
- After finding the top dead center, turn the camshaft slightly so that the pulley moves 40-50° from TDC (this is 2.5-3 teeth). We put our mark, from which we will then rotate the camshaft several more times, making additional marks;
- We measure the thermal clearance of the first valve (exhaust) by slipping one of the feeler gauges (0.35/0.4/0.45 mm) between the camshaft cam and the pusher. Nominal clearance 0.35 mm;
- if the first probe passes freely, then take a larger size (0.4 mm). The pitch is 0.05 mm;
- if the 0.4 or 0.45 probe does not pass, then it is necessary to replace the adjusting washer;
- We turn the pusher with the groove towards us, press it with the lever of the locking rack and take out the used washer with tweezers. Its inner side contains numbers with the original size;
- to calculate the required value, you must use the formula H = B + (A - C). Where:
- H—thickness of the new washer, mm;
- B—thickness of the used washer, mm;
- A - measured gap, mm;
- C—nominal gap, mm.
- The resulting result H is written down in a notepad. You will have to buy a washer of this exact size for the repair valve, rounding up the value;
- according to the table, we move on to the third valve (intake), its nominal clearance is 0.2 mm;
- measure the gap by inserting feeler gauges in order: 0.2/0.25/0.30 mm;
- write down the size of the probe, which is not included in the thermal gap;
- take out the washer and calculate the repair size using the above formula;
- then, according to the table, we turn the crankshaft several times to the indicated degrees and perform the operation with all the valves;
- We go to the store and buy the required number of adjusting washers of the required thickness, according to calculations;
- We install the washers in the pushers, according to the notebook;
- all valve clearances on the VAZ 2110 should be restored to the nominal sizes of 0.2 and 0.35, thanks to the use of adjusting washers;
- checking new thermal gaps;
- after replacing the washers, it is necessary to put the dismantled parts in place;
- we start the engine and observe its operation.
Valve lid
The valve cover covers and seals the timing belt, preventing grease from camshaft, valves and other parts from leaking out. In addition, new engine oil is poured through its neck when replacing. Therefore, a sealing gasket is installed between the valve cover and the cylinder head, which is changed every time after repair or adjustment of the valves.
The valve cover gasket must be replaced after each valve adjustment.
Before replacing it, you should thoroughly wipe the surfaces of the cylinder head and cover to remove any remaining engine oil. Then the gasket is put on the cylinder head studs and pressed with the lid. It is necessary that the gasket fits exactly into the grooves of the cover. After this, the fastening nuts are tightened in a strictly defined sequence.
When tightening the valve cover nuts, do not use too much force as this may damage the cover surface and gasket.
How to properly adjust valves on Lada Samara engines?
What is the correct adjustment of thermal clearances in a car’s gas distribution mechanism or what is affected by valve adjustment
The main advantage is lower fuel consumption (which is important given the ever-increasing price of gasoline). The engine runs quieter and smoother and accelerates faster
How to determine and why valves are knocking
If the valves are not adjusted, characteristic signs appear. The engine operates with a certain noise; a knocking sound is heard on a cold VAZ 2115 engine, similar to a metallic clatter. The reason for this is the gap between the levers and the camshaft cams.
This gap is set by the manufacturer, its value is the same for all engines of the same type. In this vehicle system, the gap increases or decreases, both of which have a bad effect on engine performance and can lead to more serious damage.
Basically, this breakdown occurs due to the use of low-quality fuel. A good fuel is one with an octane number of at least 93.
How often do you need to adjust the valves of VAZ 2114, 2115, what do the manufacturers say?
Factories and car manufacturers recommend checking thermal clearances every 15-30 thousand kilometers. Even if, in your opinion, the engine is working well, then such a procedure will never be superfluous, especially since you can do it yourself.
How are valves located in VAZ 2114, 2115 cars?
VAZ 2114 cars are available with an engine with eight or sixteen valves.
Note! Adjustment of the valve clearance of the VAZ 2114 is carried out only for an 8-valve engine, since hydraulic compensators are installed on the 16-valve engine. The valves in the gas distribution mechanism are designed so that when fuel is injected through one, exhaust gases are released through the other. The valves in the gas distribution mechanism are designed so that when fuel is injected through one, exhaust gases are released through the other.
The valves in the gas distribution mechanism are designed so that when fuel is injected through one, exhaust gases are released through the other.
How to adjust clearances on VAZ 2114, 2115
In order for the valve adjustment of the VAZ 2114 injector 8 valves to be effective, it must be done on a cold engine. The gap size on the intake valve should be 0.2 mm, and on the exhaust valve - 0.35 mm.
Note! The permissible error in both cases is 0.05 mm
Preparing tools
To adjust the valves of a VAZ 2115 injector 8 valves, we will need the following tools: a set of wrenches for adjusting VAZ valves, a device for valve pusher springs, feeler gauges, a caliper or micrometer, and shims.
Adjustment of valves
- Remove the cylinder head cover.
- Remove the air filter and the front timing belt cover.
- Unscrew the candles and carefully fold them. They are removed to make it easier to turn the crankshaft.
- Remove excess oil from the top of the head.
- Turn the crankshaft clockwise so that the marks on the pulley and the rear cover of the toothed belt match.
- Using a set of feeler gauges, we check the gaps between the end of the valve and the pusher. According to principle:
the first outlet and the third inlet, the fifth outlet - the second inlet, the eighth outlet - the sixth inlet, the fourth outlet - the seventh inlet.
Valve numbers are calculated from the drive pulley.
If it is necessary to adjust the VAZ 2114 valve, you need to use a device to recess the pusher and, fixing it in the lower position, remove the adjusting washer and then replace it.
Important! The crankshaft must not be turned in the opposite direction. auto.today. auto.today
auto.today
This is interesting: What voltage should the VAZ-2114 generator produce - how many Volts
Tips and tricks
In order for the adjustment to be correct and effective, you must follow a few simple recommendations:
- the optimal engine temperature for measurements is 20°C;
- gap measurements must be repeated several times;
- marks must be placed on the camshaft;
- after adjustment, the clearances must be rechecked on a warm engine;
- The correct installation of the gaps is evidenced by the quiet and smooth operation of the motor.
Sequence of adjustment of VAZ 2106 valves
Regular operations to adjust the valve mechanism clearances will extend the service life of individual engine elements and ensure its uninterrupted operation. Depending on the type of engine and brand of car, the frequency of these operations may vary. Therefore, it is important to know when and how often adjustments need to be made.
How to adjust valve clearances
But thanks to the instructions given above, the process of adjusting the valves will not be much different in complexity from replacing brake pads or adjusting the clutch. Good luck on the roads, dear readers!
What are valves, their role in the operation of internal combustion engines
Experienced car enthusiasts can safely skip this part, but for beginners this information will be useful. In order for the engine to work, two valves are needed for each cylinder. Now they are used disc-shaped, with rods. In order for the cylinders to be better filled with the fuel mixture, the diameter of the plate at the inlet valve is larger than that of the exhaust valve. Cast iron or steel are used as materials for the valve seat. The seat is pressed into the cylinder head.
When the engine is running, these parts are subject to severe stress. That is why they are made from alloys that are resistant to thermal and mechanical stress.
Where is the noise coming from?
As the gap grows, the cam hits the rocker, and the driver will hear characteristic noises. These valve clearances must comply exactly with the vehicle manufacturer's recommendations. And noise is just a small part of the many side effects of incorrect clearances. If the valves are worn out, then the rocker itself wears out, and then the camshaft cams. This way, the cam will hit the rocker rather than push it smoothly. Any car owner should know how to adjust valves.
Specifics of the work
There is a category of drivers who strive to do all the maintenance and repair work on their car themselves.
This is especially true for owners of domestic cars, and this is commendable.
But such drivers need to realize that a number of works, especially those related to adjustments, require not only theoretical knowledge and experience, but also a kind of “feeling” that comes with time, through trial and error.
Especially such work includes all adjustments carried out on the carburetor, as well as valve adjustment and a number of other adjustments.
Therefore, if you are doing this for the first time, then call a person who has done such work on his car at least 3-5 times, and preferably on the same model as yours.
Also, before carrying out work, check the timing belt tension. It is important.
IMPORTANT: The engine should only be cold, but not lower than 30 - 40C, this is the ideal temperature.
If you have just arrived at the garage and want to adjust the valves on the same day, then it will take about 5-6 hours for the engine to cool down.
You can immediately begin removing the valve covers and other parts; this will reduce the engine cooling time to 1-2 hours, as the heat exchange between the hot engine and the environment will increase.
It’s better to proceed from the principle: arrive in the evening, carry out the work in the morning.
By the way, don’t forget about the gasket under the valve covers; in 90% of cases it has to be replaced, so you should have a new gasket on hand.
Counting cylinders and valves.
The valves are counted as follows. Stand to the left of the car in the direction it is moving, near the engine. Face the engine.
Cylinders and valves are counted from left to right of the timing chain.
The last will be the 4th cylinder and 7.8 valves, but the adjustment begins with valves No. 6 and 8.
Preparation
Before starting work, it is better to thoroughly wash the car body and clean the engine compartment from dust and dirt, so that nothing unnecessary gets into the engine after removing the cylinder head cover. Then it is very advisable to place the car on the most flat surface possible, tighten the parking brake and place chocks under the wheels. It would be useful to have good and uniform lighting. If the latter is not enough, get additional light sources.
It is not at all necessary to buy such stops; you can easily make them yourself
Next, you need to wait until the engine cools down to the recommended temperature (usually 15–25 °C) so that the measurements are as accurate as possible. Sometimes experienced craftsmen undertake “hot” adjustments, taking into account certain corrections for the increased engine temperature. But engines are different, with their own nuances and amendments, so it’s better to wait. Free time can be used to replace filters, check optics, etc.
The thermal clearances of the valves can also be adjusted with the cylinder head removed. Here, for whomever which scheme of work is more convenient, this method cannot be considered wrong. Just remember that when installing the cylinder head on the machine and broaching, the gaps may shift either to the plus or minus of the required values. Therefore, it is better to play it safe and double-check.
Two-step technique
There is a simplified method for adjusting valves in two steps.
- Set the crankshaft to top dead center.
- We combine the marks on the camshaft and the shaft bed.
- We adjust the 4th, 6th, 7th, and 8th valves.
- Immediately after this, turn the crankshaft a full turn.
- We adjust the 1st, 2nd, 3rd and 5th valves.
The two-turn adjustment technique allows you to reduce the time for servicing the gas distribution mechanism, and is also convenient for beginners to carry out this procedure with their own hands.
On a Chevrolet Niva car and a number of Niva cars, the thermal valve clearances are adjusted automatically by hydraulic compensators.
Payment
Payment to a Sberbank VISA card The most convenient and profitable payment method for you. Payment can be made through the Sberbank Online system, through a payment terminal (Sberbank ATM), provided that you have a card from this bank. If you are not a client of this bank and you do not have a card, then you can top up your balance at any bank branch through an operator; they will accept cash payment and top up your balance. Commission from 0 to 1%
Cash on delivery (payment upon receipt) Payment for the order will be made at the post office upon receipt of the goods. For cash on delivery services, Russian Post takes an additional commission - approximately 4% of the cost of the order (parcel) upon receipt. In addition to the delivery cost, the post office will also charge you a commission for the cash on delivery service.
Cashless payment This type of payment is suitable for organizations and individual entrepreneurs. An invoice for payment is generated after placing an order. A specialist will contact you to clarify details.
Cash payment You can pay in cash directly in the store, when picking up the goods.