Adjusting the valve mechanism of the 16-valve VAZ-2112 engine is a rather complicated operation, but can be done with your own hands. Thus, many motorists have come across the concept of hearing valves ringing, especially when moving from low to medium speeds. In this article, we will look at how to properly adjust the valves on a car, and also talk about some of the nuances of the process.
Video about adjusting valves on the front-wheel drive family of VAZ cars (2110-2112)
The video will tell you how to properly adjust the valves on a 16-valve engine, as well as give some tips and tricks.
Self-adjustment of VAZ 2110 valves
Let’s be clear right away: valve adjustment is only possible on an 8-valve car.
For a 16 valve machine, only replacement of hydraulic compensators is provided. This more modern system is now installed on many modern domestic and foreign cars. Car enthusiasts often ask questions: how exactly does valve adjustment occur on a VAZ 2110, why is this procedure needed, and how to do it yourself? And also, when should this procedure be performed?
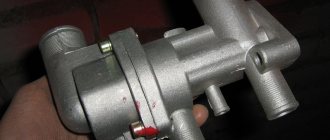
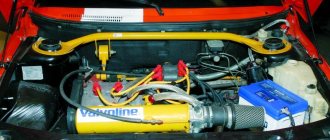
Herzog valve kit for 16 cl. engine
Device
In order to understand why there is a need to adjust the valves, you need to understand a little about the operation of the VAZ 2110. So, when the engine is cold, there is a gap between the cam and the pusher.
It is needed for the so-called compensation of thermal expansion. Simply put, we all know that when heated, all objects tend to expand.
So that there is room for expansion, and the component parts do not break or bend, there are gaps. However, they must be of a strictly defined size, otherwise instead of benefit we will get harm.
Symptoms of problems
So, the need for intervention is indicated by the following signs:
- You can hear the valves knocking;
- Compression in the engine drops, it, as they say, “does not hold up”;
- Oil “drives” from under the valve cover;
- The engine response decreases, it pulls poorly;
- “Shots” are heard through the muffler;
- The carburetor “sneezes”;
- Fuel consumption increases.
All of the listed symptoms can arise both for other reasons and “thanks to” poorly adjusted valves of the VAZ 2110. In order for them to close tightly and not knock, they need to be “brought back to normal.”
DIY adjustment
So that not a single valve on the VAZ 2110 burns out after our intervention, and accordingly, it does not need replacement, and the car works “like a clock,” adjustment should be carried out only with the help of special probes.
- We remove the hoses from the valve cover and crankcase ventilation fittings;
- Then remove the valve cover and its gasket. Remember: there are rubber bushings in the holes of the cover, you must not lose them;
- Install the adjusting device;
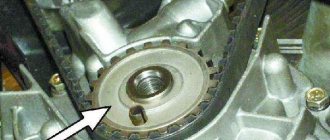
- Having placed marks on the camshaft and crankshaft, set the first cylinder to TDC (top dead center);
- We rotate the crankshaft an additional 40-50°, which corresponds to approximately 2.5-3 teeth on the camshaft pulley;
- Be sure to put your marks, which will be necessary for further work;
- We count 11 teeth from the first mark, put a new mark behind them, then put the mark at 10.5, and again after the 11th tooth;
- Now we need a special probe, which is mentioned above. In principle, every car owner should have one, but purchasing one is also not a problem. We measure the gaps one by one and select new washers. To do everything as accurately as possible, we use a formula that determines the thickness of the new washer. N (required thickness of the new washer that you will install under the pusher) = B (thickness of the old washer) + (A is the gap that you measured – C is the nominal gap). That is, H=B+(A-C). We check the thickness of the new washer with a micrometer.
There is a special table according to which you need to check the sequence of turning the crankshaft half a turn in order to adjust each valve.
The washers are replaced using a valve adjuster. It is more convenient to work with it, although some people make do with two strong flat-head screwdrivers. Using tweezers, you need to pry and remove the old washer, and install a new one in its place, always with the marking down.
After replacing the washer, you need to remove the retainer, then check the valve clearance with a feeler gauge again. If the feeler gauges 0.20 (for the intake valve) and 0.35 (for the exhaust valve) enter the gap with little force and can be moved, then the adjustment was successful.
We carry out the same adjustment with each valve of the VAZ 2110. At the same time, we look to see if it has burned out. This is followed by replacing the gasket and replacing the valve cover. Here, of course, you need to look at the condition of the gasket. If it is already worn out, then only replacement, because compression largely depends on it, as well as the “retention” of oil inside the engine. If the cover gasket is relatively new, it may still serve.
After the adjustment, start the VAZ 2110 and listen to how it works. If the valves do not knock, the car operates stably, it means that everything has been done correctly, and you can hit the road.
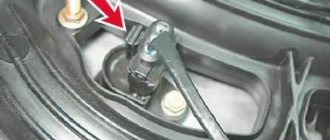
Do-it-yourself replacement of a VAZ 2107 ball joint
2. Next, using a metal brush, clean the ball joint mounts.
4. Take a “22” wrench and unscrew the nuts of the upper and lower ball joints by about one and a half to two turns.
6. As a rule, in one step, it is possible to pull out two ball joints at once: the upper one “shoots off” first, and then the lower one. If for some reason the ball does not give in and remains in place, then using a steel drift and hammer, you can help it come out. The blows must be applied to the protrusion, which is on the steering knuckle.
You might be interested in: Do-it-yourself replacement of brake fluid on a VAZ 2110
8. If the finger rotates, clamp the lever using a pry bar.
13. Before installing the ball joint, it must be thoroughly lubricated; for this use ShRB-4, Litol-24 lubricant.
14. Install the boot with the washer.
15. Now you can tighten the ball to the lever. Install the ball into the fist and tighten the nut.
17. If it doesn’t help, install an adjustable wrench in the gap between the lower arm and the fist and use it to keep your finger from turning.
18.The nut is unscrewed, you can raise your fist upward. In the cut between the upper part of the fist and the lower arm, set the key to “22”, this will make further work more convenient.
21. Take the new ball joint and check for grease in the lower part. To do this, use the key set to “7” and unscrew the plug with it.
23. Place the ball joint in place at the bottom of the lever and screw it to the knuckle.
Hello! Today I would like to talk a little about ball joints, or more precisely about replacing ball joints. Ball joints are one of the main suspension elements, which, despite their small size, perform very important functions. The ball joint consists of the following parts:
- Frame
- Finger
- Plastic liner
- Rubber boot
If we talk about ball joints, then it is worth noting that there are upper and lower ones (not interchangeable).
The main cause of wear is a violation of the tightness of the rubber boot, which protects the rubbing parts of the ball joint (liner pin). The original operating instructions for my car say that the service life of the ball joint is limited by the service life of the rubber boot
So, pay all attention to the condition of the boot, although this is unlikely to help you with the quality of today’s spare parts...
How to adjust valves on a VAZ 2115
Learn more about when it is necessary to adjust the valves on a VAZ-2115. After how many km is adjustment required? Consequences of untimely adjustment.
Necessary tools and devices for adjusting valve clearances on VAZ 2110-2115
- 10mm wrench for removing the valve cover and disconnecting the gas pedal cable
- Phillips and flathead screwdriver
- Set of probes from 0.01 to 1 mm
- A special device (rail) for recessing and fixing valve tappets
- Tweezers or long-nose pliers
- A set of shims or a certain number of necessary ones (it will become clear after measuring the gaps)
Why are thermal gaps needed?
Almost all car owners use the phrase “valve adjustment”, but if we speak correctly, the work process is called adjusting the thermal gap between the camshaft and the valve end. But, as practice shows, this name is used only in specialized technical literature. A common term is used among people.
As noted above, the thermal gap is the space between the end of the valve and the camshaft cam.
This gap is designed for high-quality closing/opening of the valve in any temperature conditions of the internal combustion engine.
It is necessary to measure the gap on a cooled motor at a temperature of no more than 20 degrees Celsius. For this, a special probe is used, which is placed in the space between the fist and the pusher adjusting washer. It is important that the camshaft cam is at the top of the pushrod.
When this gap changes, as a rule, characteristic knocking noises appear when the engine is running. Accordingly, if you notice a similar phenomenon, you need to adjust this gap.
By doing all the work yourself, you immediately save money up to one thousand rubles. All you need is to purchase special tools that you will use during your next work on the car.
Valve adjustment + adjustment instructions
So . After buying the car, the engine started to wobble. Well, I think it’s business. I changed all the consumables - spark plugs - checked the armored wires. Everything is okay . But error P0300
and
P0302
that is, multiple skips and a second boiler skip. After smoking the drive I realized either the head, or rather the valves, were burnt out or just needed to be adjusted. I hoped to get by with little bloodshed. I make an appointment with the doctor.
Waiting for the doctor.
The doctor received him at a garage cooperative. The reputation is very very good.
It cannot be adjusted for hot. We connect Carlson and go smoke.
We talked to him about what, why, why he came. After cooling, we started adjusting. As a result, 90 percent of the valves were clamped, and this, as you know, is not good...
After adjusting all the valves, we turned the engine over and checked everything again. By the way, we checked it using the sign.
We start the engine and and and and ... no, the engine is shaking. We decided to check the compression for free.
Total 10-6-8-10
But I can say one thing, the car, even with such compression after adjustment, drove just great!
Now we need to take off the head and see what happened there. burnout of one valve or change them all at once. Or buy a used head and install it, and sort through this one and put it in stock. For now we keep hanging around.
Guide to adjusting valves on VAZ 2110-2115
If you are the owner of a VAZ 2110-2115 with a conventional 8-valve engine, then you probably know about such a procedure as adjusting the thermal valve clearances. Of course, if you have a 16-valve engine, then you don’t need to do this, since you have hydraulic compensators installed and no adjustments are made. So, for conventional internal combustion engines, which are not much different from the VAZ 2108, this procedure is not carried out so often. After purchasing a new car, you can drive about 100,000 km without it, but this is not always possible and not every owner is so lucky. This type of maintenance of the VAZ 2110 can be performed either at a service station, having paid a certain price for the work, or independently, having understood this work. If this is your first time doing this, the guide below will help you with this.
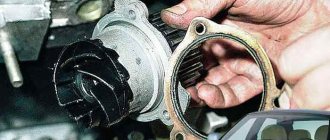
Replacing the fuel pump
The replacement process is quite easy. Just follow the instructions and you'll finish the job in no time.
- Disconnect battery power.
- Unscrew the fuel pump cap.
- Remove the connectors from the fuel pump.
- Loosen the clamp slightly, which is located directly on the fuel hose. It makes no sense to remove it completely.
- Unscrew both hoses through which fuel is supplied.
- Remove the gaskets. It is better to immediately replace them with new ones. These are consumable, cheap materials.
- The fuel pump is secured with 8 bolts. Unscrew them all and save the bolts.
- Remove the O-ring.
- Remove the fuel pump along with the float.
- Remove the seal, which is made of rubber.
- Replace the new fuel pump.
- Reassemble in reverse order.
It is hardly worth trying to repair an old fuel pump. It is difficult to vouch for the quality of the repairs performed, since one malfunction may lead to others. There is no point in taking risks. In addition, a new fuel pump is far from the most expensive pleasure for a VAZ 2110.
Doing the work yourself, the entire process of dismantling and installing the pump will take you about 20-30 minutes.
Follow the instructions, avoid any attempts at amateur activities. Please note that the cost of such a procedure at a service station will be even more expensive than purchasing the newest electronic fuel pump. Therefore, spending money on this makes no sense if everything can be done yourself.
The good thing about the VAZ 2110 is that the cost of its parts is incredibly affordable for domestic consumers. Plus, the design of the machine is quite simple, which allows you to carry out a number of repair work yourself, without fear of the consequences of incorrect repair.
Please note that if you do not have any experience in car repair and maintenance, it is not recommended to start your practice with such an activity as replacing a fuel pump. Practice on simpler tasks and over time you will learn all the joys of doing your own repairs.
Adjusting valves on a VAZ-2110 - work progress and useful tips
Valves
To prevent premature wear of the camshaft and burnout of the valves, regular maintenance of the gas distribution mechanism should be carried out. Engines equipped with a simple timing system must be periodically retuned, and therefore adjusting the VAZ-2110 valves (8 valves) is a fairly routine procedure for most motorists.
Setting rules
Any owner of a VAZ-2110 8-valve injection machine can familiarize yourself with the standard regulations specified in the operating instructions. It is worth noting that the adjustment of the VAZ-2110 valves and the 8-valve injector is carried out during the production process of the car. The car owner must perform the first adjustment after the car has completed the first 10,000 km, and this procedure is usually called running-in. After this, the procedure will need to be repeated regularly until the next 45,000 km are reached, but in some cases, engine operation does not require any additional manipulations even before 80,000 km have been traveled.
How to adjust valves on a VAZ-2110
In order to carry out the correct setup, you need:
- First, make sure that this procedure is really required by studying the behavior of the motor.
- Collect all the necessary tools to perform the work correctly.
- Perform adjustment.
Valve adjustment frequency
After using the car for a long time, its owner may notice that the engine is no longer performing as well as it was before. In principle, all changes in engine operation should always alert the driver, since this is often fraught with quite serious consequences. In most cases, adjustment of the VAZ-2110 valves (8 valves) is required if the following symptoms are present:
- excessive noise when starting the engine after the car has been idle for a long time;
- lack of compression in the cylinders (a noticeable decrease in engine power);
- oil leaks through the cover gasket;
- regular “shots” in the muffler or carburetor;
- increased fuel consumption.
Tool for adjusting VAZ valves
Before adjusting the VAZ-2110 valves (8 valves), you should acquire all the necessary plumbing tools:
- a rack with which the pushers will be pressed out;
- micrometer;
- multi-part probe.
The latter is required in order to measure the thermal gap formed between the adjusting washer and the camshaft cam. If you couldn't get the rail out, you can replace it with two powerful slotted screwdrivers.
Today, you can easily find all the necessary installation kits in any store that sells spare parts for cars. The cost of such a set in most cases ranges from 200 to 500 rubles. You should definitely get a kit, since having the necessary tools will greatly affect the success of the adjustment.
Tool for work
In addition to the everyday set of sockets and spanners, which the owner of a VAZ 10 should already have, a few more tools will be required:
- A device that presses out pushers for removing adjusting washers from them. You can get by with a couple of powerful screwdrivers, but the price issue here is not so great that you pay for the savings with less convenience. You can completely remove the camshaft - but then you will have to remove the timing belt as well, again there is no gain in time.
- A set of feeler gauges - we will use them to measure the gaps.
- Micrometer - This is not necessary, but is very useful. When adjusting, the thickness of the new washer is calculated based on the thickness of the old one and the measured gap, but what to do if the thickness marking on the washer is erased (and no one has canceled the wear?). You can borrow a 0-25 mm micrometer, fortunately you can trust it by simple mixing without calibers.
Something else useful for you:
Adjusting valves VAZ video
This video discusses the procedure for adjusting valve clearances on front-wheel drive VAZ cars with eight-valve engines - starting from VAZ 2108, VAZ 2109, VAZ 2110 and ending with cars such as Lada Kalina, Lada Granta, Lada Priora.
Do-it-yourself valve adjustment
For all these cars there will be the same procedure, since the engine is, in principle, the same and the nominal clearances are the same.
Engine valve adjustment
- First of all, the engine must be warmed up to 20 degrees, i.e. There is practically no need to heat it if you carry out the procedure in the summer. It should be cold.
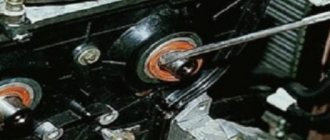
- Then we remove the valve cover - unscrew the fastening nuts on both sides, disconnect the throttle cable and pipes. Then remove the timing belt cover.
- After removing the valve cover, it is necessary to set the top dead center, i.e. The mark on the camshaft gear must be aligned with the bar.
- The 1st, 2nd, 3rd and 5th cams will be directed upward from the pusher, and we will adjust the 1st, 2nd, 3rd and 5th valves accordingly. As for determining the intake and exhaust valves, if you count from left to right, the sequence will be exhaust, inlet, inlet, exhaust, exhaust, inlet, inlet, exhaust.
Why do you need customization?
All models of the “tenth” family, starting from 2110, where power units with 8 valves are installed, require adjustment of the latter. It is not the valves themselves that are adjusted, but the thermal clearances between their pushers and the camshaft cams. It is well known that metal expands significantly when heated, which also manifests itself in the cam-pusher pair. If there are large gaps between them, the valves will not open completely, and the injector will supply less fuel to the cylinders.
If there are no gaps after thermal expansion, the round part of the cam will press on the pusher, causing most valves to be open constantly. This leads to a sharp decrease in compression and engine inoperability.
There are signs by which you can determine that it is time to adjust the VAZ-2110 valves:
Clicks when the engine is running are heard under the valve cover when the thermal gaps are too large. These sounds cannot be confused with anything; in addition, they are accompanied by a decrease in engine power and a drop in the dynamics of the rather “high-spirited” VAZ-2110 car. When there are no gaps, there is no knocking, but the engine is unstable, “troubles” or refuses to start at all. The diagnosis is confirmed by measuring compression in all cylinders.
In VAZ-2110 - VAZ-2112 cars (16 valves), there is no need to adjust the thermal clearances. These more advanced motors are equipped with devices that automatically provide optimal settings: hydraulic compensators. When one of the problems described above appears, the hydraulic compensators are replaced with new ones, and they last quite a long time, at least 100 thousand kilometers.
Technical specifications
Let's consider the technical characteristics of 8 and 16 valve engines using the example of VAZ models.
Related article Beams 1G FE Engine Specifications
| Technical specifications | VAZ 21116 | VAZ 21126 |
| Number of cylinders | 4 | 4 |
| Number of valves | 8 | 16 |
| Volume, cm3 | 1596 | 1597 |
| Cylinder diameter, mm | 82 | |
| Piston stroke, mm | 75,6 | |
| Compression ratio | 10,5 | 11,0 |
| Power, hp at rpm | 87/5100 | 98/5600 |
| Torque, Nm at rpm | 140/3800 | 145/4000 |
| Petrol | AI-95 | |
| Mixed consumption, l/100 km | 7,3 | 7,0 |
What is better, an 8 or 16 valve engine? According to technical indicators, the 16-valve engine wins in power and efficiency, but it is worth taking into account the costs that will have to be incurred for using dynamics and comfort.
When buying a car aftermarket, you can distinguish a 16-valve engine by its appearance. The engine's wide intake manifold resembles a snail, and is usually covered by a shroud with the company logo and the inscription 16Valve.
Setting rules
Every car owner can refer to the manual regulations. It is worth saying that the nominal installation of valves on the VAZ 2110 8-valve injector occurs at the factory. According to the operating instructions, it is recommended to carry out the first adjustment at 10,000 km. This mode is called running-in. And then, adjustments should be made every 45,000 km. In some cases, engines operate properly up to 80,000 km.
For reference! The installation of valve pusher washers on VAZ 2110-12 vehicles (8 valves), with injection and carburetor engines, is completely identical.
Setting procedure
The first step is to put the adjusting device in place, then by turning the crankshaft, align the mark on its pulley with the protrusion on the cylinder block. In this case, the mark on the camshaft gear should also align with its protrusion. In this position, the piston of the first cylinder is at the very top (TDC), which can be easily checked with a screwdriver through the spark plug hole.
Then proceed in the following sequence:
Upon completion of the adjustment, remove the device, replace the plastic timing belt shield and reassemble it. Next, start the engine and check its operation by ear and while driving.
Source
Preparing and disassembling the mechanism
To carry out the work, you will have to purchase a special device for pressing the pushers and a set of adjusting washers of various thicknesses - you will not be able to do without them. If you constantly plan to make adjustments yourself, then this purchase will help you save money on car service costs. With a one-time promotion, purchasing devices is impractical; it is better to immediately contact the specialists.
To disassemble and adjust the clearances under the cams, you will need the following tools:
Since during the adjustment process you will have to repeatedly turn the crankshaft, to facilitate rotation it is recommended to unscrew all the spark plugs, having first removed and put the high-voltage wires aside. Further disassembly includes:
After wiping off any oil stains on the cylinder head flange where the gasket was located with a rag, you can begin tuning.
Remember that adjustment is carried out only on a cold engine.