Fuse box VAZ 2114
Hundreds of meters of wires providing power supply to various components of the car are connected to the mounting block. Compactness and the ability to combine many electrical circuits in one place are know-how that the auto industry has been pursuing for a very long time. This approach greatly simplified the installation of electrical circuits and made it easier to troubleshoot vehicle electrical problems.
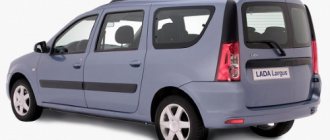
Five-door VAZ Lada 2114 - swan song of the SAMARA families
Any electrical problems in a car begin with checking the mounting blocks. Malfunctions in the operation of electrical appliances are the result of emergency situations, installation of additional equipment, or damage to wiring. The functional purpose of fuses is to protect each specific unit. Powerful consumers, such as the fuel pump, headlights or fan motors, are connected via a relay. Fuses protect most of the vehicle's electrical power circuits. A twofold excess of the rated current leads to a break in the circuit within 5 seconds, eliminating overheating of the wiring and possible fire of the car.
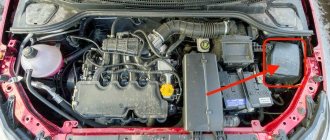
Due to the fact that the VAZ 2114 was created on the basis of the “nine”, the location of the fuse boxes in both models is almost identical. The first fuse and relay block is a “black box”, focused on the hazard warning lights and low-high beam headlights, located under the hood. Each element is responsible for the normal functioning of a specific electricity consumer.
Video about VAZ fuse box
For example, the correct operation of the headlights is ensured by four fuses, each of which protects the power supply of either the high beam or the low beam and is responsible for the operation of the right and left sides. The malfunction of one element does not entail a complete shutdown of the headlights.
The second unit is located inside the car, under the dashboard. It is equipped with: fuses for the fuel pump, radiator fan relay, electronic control unit.
ECU weight
A reliable ECU ground is very important for the proper operation of the engine management system and the engine as a whole. It would seem a primitive and reliable design that can serve for years without fail.
But in reality this is far from the case
It would seem to be a primitive and reliable design that can serve well for years. But in reality this is far from the case.
It is very difficult to list all the possible problems that can arise due to poor ECU mass, since it can affect anything. But the main problems can be divided into two points:
- Incorrect collection of information from engine control system sensors. Personally, I had to deal with incorrect MAP sensor readings. It gave inflated barometric pressure readings precisely because of the poor weight of the ECU.
- Since almost all modern engine control units are able to adapt to real operating conditions, as a result of incorrect collection of information from sensors, adaptation leads to engine malfunctions. This is why for many, after resetting the adaptations, the engine begins to work much better. But then the problems return as the ECU adapts again. And again this does not happen quite adequately.
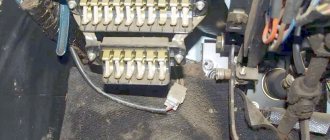
Mounting block design
On the VAZ 2114, a mounting fuse block of article number 2114-3722010 is installed, which has become a replaceable modification of the block 17.3722, which was installed in the “eights” and “nines”. The difference between the new units and the old ones is in the designation and rating of fuses, designations of connectors and relays, as well as the absence of a breaker relay for washing the rear window and an engine cooling fan relay. The last two digits complementing the article indicate that the unit is equipped with one or another relay. VAZ injection variations require the installation of a similar unit with a slightly modified connection diagram for the radiator cooling fan.
The mounting block is a know-how that the auto industry has been pursuing for a very long time
The main device of the block is:
- plastic case;
- one or more printed circuit boards;
- relay;
- circuit breakers;
- connectors for connecting the unit to the vehicle's electrical system.
The printed circuit board is made either traditionally - from foil fiberglass, or as an improved option - a plastic board with connectors. Fiberglass is more reliable, but the board can only be repaired using a soldering iron. Plastic is inexpensive, parts can be replaced without special tools and equipment.
The design and types of relays used in mounting blocks differ in operating principle into:
A conventional electromagnetic relay operates when voltage is applied and turned off. With its help, power windows, headlights, heater, etc. are turned on.
Specialized relays are equipped with an electronic unit that ensures the periodic operation of a particular component. They are connected to turn signals, hazard warning lights, and windshield wipers.
The purpose of the relay, its circuit and contacts are indicated on the body. To avoid possible errors, the cover of the mounting block also serves as an information panel; a diagram and all information about the purpose and location of fuses are located here.
Cylindrical fuses were replaced by rectangular blade fuses. The fusible link inside the fuse and two flat contacts made installation and replacement of fuses less labor-intensive. Sometimes reusable bimetallic fuses are used. Properly functioning car electrics prevent frequent fuses from blowing, but experienced drivers always have a spare set with them. Moreover, a faulty fuse can often be identified visually.
The main purpose of the mounting block is to simplify car maintenance and repair, make it more understandable and accessible to any car enthusiast with minimal knowledge of electrical engineering.
Additional ground (wires)
If the weight of the engine with the body is bad, then problems arise:
- The battery may not charge well;
- The starter turns poorly when starting the engine, or may not turn at all, only the solenoid relay will click;
- At full power consumption (high beam headlights on, heater motor running, etc.), the generator may not be charging enough.
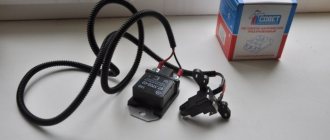
When symptoms of poor engine mass appear, there is a way out of the unpleasant situation - in this case, additional mass on the engine will help. You can install an additional wire in different ways, the most important thing is that it reliably connects the car body with the power unit. For example, one end of the wire can be attached to the stud of the upper shock absorber support, and the other to the stud of the intake manifold of the internal combustion engine
It is important that the wire has a large cross-section, preferably no less than that of the bulk itself
On new machines, problems with mass wires rarely occur. But on older models, the body studs rust. Finding a lack of ground is not so easy, so car owners use the installation of additional wires. So the additional mass on the generator helps eliminate battery charging leakage.
An additional wire is a necessity on used cars
Poor weight causes unstable engine operation. For example, a weak mass with the ECU affects the stability of the engine at idle speed. There is a loss of voltage in the circuit, and when the electric engine cooling fan is turned on, the idle speed drops noticeably, sometimes even to the point of stopping the internal combustion engine. Therefore, contact must be established and a reliable ground must be established. The problem on the new generation VAZ 2113-15 is also solved by installing an additional thick bulk wire (about 2.5 mm²) - it stretches from the negative terminal of the battery to the metal base of the center console in the car interior
Unreliable contact of the common wire of the instrument panel can affect the readings of sensors installed on the combination. In particular, when the dimensions are turned on, the arrows of the fuel level and coolant temperature indicators may deviate. It also happens that the instrument cluster is dimly lit. Behind the instrument panel itself there is a standard bolt for securing the ground; perhaps the fastening has become loose. You need to remove the shield and tighten the bolt.
Installing an additional wire from the negative of the cigarette lighter to the metal frame of the center console sometimes also solves the problem, and the instruments begin to display correctly.
Functions of mounting block components
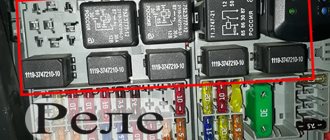
Mounting block 2114-3722010 contains up to 9 relays and 20 fuses. Experienced motorists who know the purpose and location of each element of the mounting block are able to independently diagnose and correct the malfunction. A hint in a difficult situation is the pinout - the correspondence of the functions of the contacts in the connectors according to the color of the wires to the numbers of the plugs of each electrical circuit.
VAZ 2114 was created on the basis of 2109, so the arrangement of the blocks is identical
The generally accepted designation of wires - two letter values - means: the first is the color of the wire (B - white, G - blue, F - yellow, etc.), the second is the color of the strip.
Repair and diagnostics
All possible malfunctions of the mounting block are divided into:
- fuse failure;
- relay malfunction;
- damage to conductive paths;
- contact damage.
Blown fuses are the most common reason for a car owner to begin examining the contents of a black box. Before changing the fuse, it is necessary to determine the cause of the blown. The circuit is “ringed” for a short circuit and the end devices are checked. After diagnosing the circuit and eliminating the breakdowns, the old fuse is replaced.
It must be taken into account that the fuse being replaced must have the same ampere value as its predecessor. Installation with a higher rating is possible. A lower reading of the electric current on the fuse causes its immediate blowout and, as a result, the lack of protection of the electrical circuit.
Relay failures are diagnosed by replacing fuses. Installing the relay into the mounting block on the connectors does not require soldering, and replacement is quite simple.
With conductive paths everything is a little more complicated. Possible damage is not always obvious. Modern plastic blocks require exquisite soldering skills, which are difficult to work with even for experienced electricians. Soldering wires is only permissible if separation of printed circuit boards is not required. Sometimes it's easier to buy a new unit.
There are a great many contacts in the mounting block. Corrosion or normal contamination does not always allow one to determine the functionality of the contact. The most common way is to clean the contacts with sandpaper or a regular knife. If the contact breaks off, you can try to solder it, but unsuccessful experiments with soldering lead to the need to replace the block.
The fuse being replaced must have the same ampere rating as its predecessor.
Before starting to work with electricians, it is necessary to disconnect the negative terminal from the battery. It is undesirable to use metal screwdrivers and check the circuit for a spark, because this sometimes leads to short circuits and burnout of current-carrying paths.
Despite all attempts by manufacturers to simplify the work of diagnosing and repairing the mounting block as much as possible, the abundance of parts and all kinds of wires require basic knowledge of electrical engineering. If there are none, and if you have no experience working with a soldering iron, the best option is to contact a professional auto electrician.
Locating the Fan Relay
This element is necessary for thermal regulation of the machine engine. When driving at low speed, the motor overheats, which requires forced activation of the cooling fan. The detail is responsible for exactly this.
However, the exact location and order may vary depending on the year of manufacture.
Where is the VAZ 2114 fan switch relay located?
The head fan relay is located inside the main mounting block located under the hood. The fuse is also located here.
How to test a relay
The fan relay itself is checked only by replacing the element with a known good part. Also, some car enthusiasts diagnose the relay with a multimeter, but the method is not justified due to the cheapness of the first one.
How to check the cooling fan fuse without removing it
To check the F4 fuse link, just connect a primitive continuity tester to it. Or press the horn button - both devices are powered through a single fuse and if one does not work, the second will also fail.
VAZ 2114 forced activation of the cooling fan using a button and relay
To redo the factory circuit and force the head cooler to turn on, you should stock up on the following materials:
- direct 4-pin relyushka;
- terminal
- button of satisfactory size and design;
- 5 meters of wire with a cross-section of no more than 1 mm;
- screwdrivers and wrenches.
Next, the connection principle is carried out according to the diagram:
It is also possible to mount forced switching directly, but this will quickly wear out the breakers.
Fuse box price
The functions provided by fuses in the car’s protection system from extreme situations oblige car owners to take their choice seriously. The reputation of the manufacturer, the material used - information that will help you avoid possible significant financial expenses. The cost of the fuses themselves is low, and, as a rule, does not exceed 10 rubles. A relay, depending on its purpose, costs no more than 200 rubles. The cost of the mounting block, depending on the modification, varies from 2000 to 3000 rubles.
Preparing electrical equipment for winter
Electrics in the VAZ 2114 are a weak point and are subject to seasonal inspection
As a rule, preparation for winter driving is limited to changing tires, checking the battery and keeping the car from freezing. But maximum summer temperature loads, high humidity in autumn, dust and dirty contacts negatively affect the performance of electricians. Cleanliness is the key not only to health, but also to the high-quality operation of the vehicle’s electrical equipment. Dirty or loose terminals often cause the car to be unable to start. The sensitivity of a car's electrics during the transition to more extreme operating conditions is a factor that many people forget about. Lowering the temperature and its changes negatively affect the insulation of wires and contribute to the formation of microcracks. Constant vibration leads to deterioration of contacts. Since, according to reviews from Lada 2114 owners, electrical equipment is not its strongest point, it, along with spark plugs, tires and battery, is subject to seasonal inspection.
Crash test results
The differences between the VAZ 2114 and its predecessor, the Nine, mainly affected the safety of the vehicle interior. The test result was a disappointing 3.7 points for the “nine” and an even more sad 3.2 for the 2004 VAZ-2114 out of 16 possible points. As it turned out, the “fourteenth” protects the driver in a frontal impact no better than the “nine”.
However, the concern’s pricing policy, availability and cost of consumables have made the VAZ 2114 the most popular car in the Russian fleet for police officers.
A fuse in an electrical circuit is a small-sized protective device that is designed to protect the main working parts from extreme overloads in the form of a sharp increase in current through a break in the circuit due to the melting of a special insert. The first fuses of this type appeared at the end of the 19th century and today they are widely used in electrical circuits of modern cars, including the VAZ 2114.
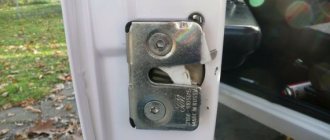
COMMON MALFUNCTIONS
In the mounting block, the cooling fan fuse often blows, as well as the cigarette lighter fuse on the VAZ 2114. The cigarette lighter on this VAZ model often shorts out on its own; you can call this a factory defect. Another reason for burnout is the installation of various devices of higher power in the cigarette lighter socket, for example, a compressor for inflating tires. But before changing the fuse for the VAZ 2114 cigarette lighter, you need to check the condition of the cigarette lighter socket itself. Often a device is inserted into the socket by twisting the plug, and the cigarette lighter block begins to dangle and short out. In this case, the wire going to the cigarette lighter may fray or break, and for this reason the fuse will constantly blow.
The fuse link (20A) of the cooling fan is also loaded with an audio signal, so you can determine a blown fuse F5 by the absence of a car horn. Another fuse link, responsible for the operation of the fan, is installed in the car interior next to the engine ECU under the dashboard. Fuses can blow due to a short circuit in the fan motor - standard fans are not very reliable and often fail.
Contacts often burn out and tracks on the mounting block burn out due to a short circuit in the electrical circuit. When moisture gets on the connector pads, the contacts oxidize. The power supply unit in the VAZ 2114 model is considered a rather weak element and requires repair or replacement. It should be noted that the mounting block 2114 is quite problematic to repair, so if a malfunction occurs in it, you should think about replacing it. The cost of a power supply unit for a front-wheel drive VAZ ranges from 2 thousand to 3 thousand rubles. But it’s better to replace a burnt-out unit than to go through the hassle of restoring it.
Often the central locking on VAZ 2113-2114-2115 cars refuses to work normally, and many drivers cannot determine the cause of the malfunction. The thing is that the central locking fuse is very cleverly installed in the electrical circuit of the car. In the area of the steering column on the wires there are two fuses in a holder, one of them responds to the activation of the central locking (15A). The contact in this clip oxidizes and the central locking system does not work. If an old-style cylindrical fuse-link is installed there, it is better to immediately change it to a new type of flat one.
Keep the mounting block clean, always close the protective cover!
Operating principle, design and characteristics of fuses
A protective device of this type consists of a housing, which is usually made of high-strength ceramics or special glass, and a fusible insert made of a conductive metal or alloy.
The body performs several functions:
- a fuse-link is built into it in a special way so that when the rated current of the insert is exceeded, it melts or breaks;
- the working thread is inserted into the chamber to extinguish the electric arc that occurs when the circuit breaks; this chamber is equipped in the housing;
- on the body, in those places and in the form as provided for by the fuse design, there are working contacts through which it must be connected to the general network.
Information about the characteristics of this protective device is printed on the housing. This is the rated current of the fuse link and the rated current of the fuse body at which it breaks.
Afterword
Car owners whose cars keep melting fuses should be sure to check all installed wiring at the first opportunity.
Very often this problem is evidence of serious damage in one or more circuits. To do this you will need detailed:
- electrical circuit;
- pinout;
- tester.
If you lack the necessary knowledge, it is better not to undertake repairs yourself, but to entrust this task to professionals. The fee for their services, of course, can be quite high, but eliminating the consequences of unqualified intervention will cost much more.
VAZ 2114 fuse box
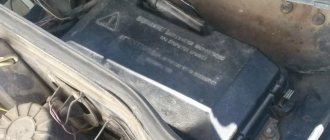
On cars of the Samara 2 series, which include the VAZ 2114, there is a mounting block that is installed in the engine compartment under the windshield on the left side.
Location of the fuse box on the VAZ 2114
It houses various relays and fuses. Because of this, it is often called the fuse box. The cover of the mounting block is secured with clips made of plastic; they snap off quite easily and it is removed. On its inner side there is a diagram of the VAZ 2114 fuses. The rated current strength that is allowed in the circuit for each protective device is indicated there.
You cannot install a charger with a current exceeding the rated values indicated in the diagram. In this case, damage to the electrical device located in the circuit is possible.
On injection machines, the relays and chargers are located as follows.
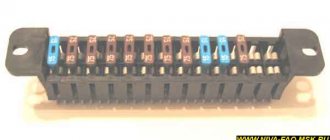
Fuse box VAZ 2114
In the upper right corner you can see a small yellow tweezer; it is specially attached there for replacing the charger.
In total, this block contains 17 active memory units from F1 to F16 and 4 reserve ones - F17, F18, F19 and F20.
In addition, the car has another block where the fuses are located; it is located in the car interior under the glove compartment and an open shelf.
The interior is equipped with:
- Charger for the fuel pump, with a rated insert current of 15 A;
- protection (7.5 A) on the fan relay, speed sensor, oxygen sensor, mass air flow sensor;
- fuse with a current of 7.5 A to protect the ECU and ignition unit.
Fuses under the right screen of the VAZ 2114 console
In order to competently operate the electrical equipment of a car and promptly respond to emerging malfunctions or failures, you need to have a good understanding of which circuits include a particular protective device.
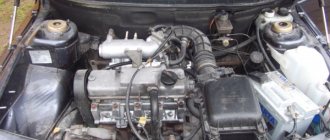
Removing the generator from the car
If you need to replace the bearing of a VAZ 2114 generator, you will need to completely remove the unit. First, be sure to disconnect the battery. Without this, repairs cannot be started - a short circuit can lead to ignition of the wiring. Then, using the key at “17”, loosen the tension of the drive belt. To do this, unscrew the nut at the top and move the housing towards the engine block. A little work with electricity - unscrew the nut from the bolt (pin “31”) and disconnect the wire going to the excitation winding.
The generator is secured at the bottom using a long bolt and nut. The latter has a plastic thread lock. At the top, the bar is screwed to the stator with one nut, and to the engine block with two bolts. Unscrew all threaded connections to remove the generator. If the threads are stuck, use a penetrating lubricant - it will get rid of dirt and rust. The generator is pulled out upwards - this turns out to be easier. But you can remove the engine protection and pull it down: on a VAZ 2114 car, the generator can be removed in two ways.
Purpose of fuses
What fuses are on the VAZ 2114? The electrical circuit of this car is designed in such a way that in front of all the main electrical units there are chargers located in the fuse box.
VAZ 2114 fuse diagram
The connection diagram of these protective devices is shown in the figure.
- F1 - rated insert current 10 A - protects the fog lamps located at the rear.
- F2 - with a current of 10 A - these are left and right turn lights, an emergency warning light, a relay-breaker for turn lights and emergency lights.
- F3 - with a current of 7.5 A - protection of light bulbs in the cabin and trunk, trip computer circuits, ignition and brake lights, "Check engine" warning light.
- F4 - with a current of 20 A - protects switches located in the heating circuit of the trunk door glass and heating elements of this glass, “carrying” contacts.
- F5 - with a current of 20 A - protects the horn circuit and its switch, as well as the electric motor of the cooling system fan.
- F6 - with a current of 30 A - this is a circuit of electric windows and their switches with contacts.
- F7 - with a current of 30 A - a protective device for three electrical units - a heater, a windshield washer and a headlight cleaner. In addition, there is also a cigarette lighter, glove compartment lighting and winding for the heating switch for the trunk door glass.
- F8 - with a current of 7.5 A - is protection for the right fog light bulb located in front.
- F9 - with a current of 7.5 A - this is protection for the left fog light bulb located in front.
- F10 - with a current of 7.5 A - protects the indicator lights on the left side, the license plate number, the engine compartment light, the dashboard lights and switches with heating levers, as well as the indicator lights for the size.
- F11 - with a current of 7.5 A - protects the right-side headlight bulbs.
- F12 - with a current of 7.5 A - a protective device for the right low beam headlight bulb.
- F13 - with a current of 7.5 A - a protective device for the left low beam headlight bulb.
- F14 - with a current of 7.5 A - protects the left high beam headlight and the blue high beam warning light.
- F15 - with a current of 7.5 A - protects the right high beam headlight.
- F16 - with a current of 15 A - protects the light bulbs and the turn switch and hazard warning lights, the white reverse light, the power supply of the instrument cluster, the trip computer, the generator winding (at startup), the lights indicating low oil pressure, brake fluid and parking brake, battery discharge.
Replacing fuses on a VAZ 2114
When any problems are detected in the operation of the car’s electrical network and engine, be it the burnout of light bulbs or the failure of some electrical devices, the driver must first check the functionality of the fuses. The procedure is as follows:
- determine where the fuses are located on the VAZ 2114, which may have failed. To do this, look in the machine’s operating manual for a diagram of the location of the protective devices and determine whether they are located in the mounting block or under the dashboard in the area where the front passenger’s feet are located;
- when working with the car's electrical system, the negative contact of the battery must be disconnected;
- open the plastic latches holding the mounting block cover;
- remove the plastic tweezers from the mount in the upper right part of the block; they can be red, transparent or yellow;
- take the protective device, the circuit of which is supposed to be broken, by the body with tweezers and pull out the fuse;
- There are rules, developed by operating experience, on how to check the fuse. First of all, it is necessary to visually determine whether the fuse-link inside the case has burned out or whether the charger is in good condition;
- if the destruction of the insert cannot be visually determined, it is necessary to check the protective device using a device;
- If confirmation is received that the fuse has blown, it must be replaced with a functional one. The price for a VAZ 2114 fuse box on the automotive market is about 2,000 rubles, and a set of separate chargers of this type will cost 150 -250 rubles.
It is strictly forbidden to install home-made devices or jumpers in place of failed chargers, as well as fuses with a different rated insert current. A short circuit or fire may occur.
When working with the mounting block, do not use metal screwdrivers or other metal tools, this can lead to a short circuit and failure of the mounting tracks of the block.
We invite you to watch this useful video:
VAZ2114 what to do so that the mounting block board does not turn green, otherwise I clean it once a month. How to disassemble the fuse box of a VAZ 2114.
Similar articles
25 comments on “How to disassemble the fuse box of a VAZ 2114. VAZ2114 what to do so that the mounting block board does not turn green, otherwise I clean it once”
Buy a new block
Cut it with obscenities.
Nothing to do. It's a disease.
Treat it with special anti-oxidation chemicals and cover the block with a salafan. Water flows into it. Place a rubber gasket under the block.
Oleg, yeah, a block of cellophane is brilliant, about the same as blocking the ventilation with cotton wool
I, too, after removing and opening both boards were “overgrown” with all sorts of crap, but everything worked, I replaced it with a new block
Denis, what do you propose to do since such a “clever guy” when the boot on the wiring is torn? Let's use the means at hand!
Oleg, replace the boot! Well, at least with sealant, but don’t wrap it in a bag. There’s no ventilation there, it’s just a greenhouse effect
Denis, what about the gap between the fuse block covers through which water flows? And by the way, this boot is not sold separately; it comes complete with oblique wiring for the wipers and wiper motor.
Oleg, you can find anything you want at a disassembly site. Sealant to help with seams
Denis, if the unit is disassembled, the terminal of the board cable will be broken if it is filled with sealant. When sold, you'll buy the same crap with cracks.
Serge, I’ve already changed the fuse box three times in 4 years. And not a sealant on the seam and nothing helps
Varnish, then sealant on the body, then a regular medical shoe cover on top of the assembled body.
Ruslan, what did you change? something didn't work? I changed it this way for prevention, because I remember that the latch was broken at the lid and something like water got inside, so the time came and I decided to look there
Serge, I'm sending you a photo. The fuse and electrical box is located in the drain(((
Ruslan, yes, I know, all the bullshit is pouring on him, you need to think of something on top of the lid, but definitely not wrap it in a bag
Serge, I also use sealant around the perimeter of the lid and along the base at the bottom where it is secured with bolts. Nothing helps. Haven't used the package yet. But I don’t think it will help either. Water and moisture will find the cracks
Ruslan, how to make a roof on top so that it protrudes 1-2cm on all sides, and at the bottom it’s just like a Hermes on the outside of the hole in the body
Serge, yes. No other way
Put on a regular shoe cover on top!! it fits just right and the elastic at the bottom tightens. I've been skating like this for two years, and before that I suffered.
First, clean everything with a special crap in a spray can, then wipe everything off and spray it generously with selecon, blow it off with air pressure and do the same with the terminals.
How to connect a new one
When figuring out how to remove the device and install a new one, you should consider the following algorithm of actions:
- After dismantling the negative terminal, it is necessary to remove the left plastic cover at the driver’s feet.
- Next, you should disconnect the contact blocks and remove the backlight bulb.
- Then you need to turn off the light filter and remove the old part from the center console using a screwdriver.
- Having completed the installation of the new part, you can proceed to assembly, starting with the installation of the backlight ring.
- At the next stage, the cigarette lighter is placed on the seat and connected to the batteries using a three-pin connector.
- All that remains is to tighten the screws responsible for fixing the facing plastic and connect the electrical wires.
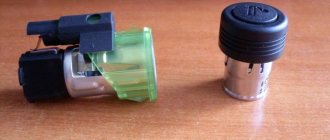
Connection diagram
Before carrying out any work to replace the cigarette lighter, you should familiarize yourself with the pinout diagram of the part on the VAZ-2114. It is necessary to adhere to the correct polarity, guided by the following wire assignments:
- Black - represents the negative terminal or ground that connects to the body.
- Red - is intended to supply voltage to the heating element and is connected using a 20 A fuse.
- Yellow is the backlight wire.
The procedure for dismantling and assembling the cigarette lighter is not complicated. The main thing is to figure out where this element is located and how to change it with your own efforts.