The VAZ 2109 fuse mounting block is made as a single unit. There is no need to look for fusible links under the glove compartment or under the steering wheel. You can find them there in rare modifications or cars with a completely redone electrical circuit. From the factory, the panel was mounted on the interior bulkhead of the engine compartment on the driver's side. The shield box for modifying the carburetor and injector does not differ in appearance. The main difference in design is the year of manufacture. Until 1998 (version 17.3722), the power supply had soldered leads and fuse links. After updating the electrics (2114-3722010-60), modern fuses and relays began to be installed.
In models 2109/21099, there is no BUBD module 21093 6512010 03 from the assembly line. The unit is mounted on the central lock and modified independently.
In the cabin
There is no installer inside the machine. Instead of the usual cabin module, it uses individual elements and relays scattered throughout the car. They can be found everywhere, under the dashboard, inside the doors, on the gearbox pipe. The reason for this decision was simple savings. The manufacturer considered that installing a separate module into the car would be too “kosher” and scattered fuses wherever possible.
Elements responsible for circuits of equipment not related to the engine are mounted here.
Video “How to repair the unit if the cigarette lighter does not work?”
The Price / Quality channel suggests in its video that you familiarize yourself with the procedure for repairing the mounting block in a VAZ 21099 car in the case where the device is the cause of the cigarette lighter device not working.
Do you have any questions? Specialists and readers of the AUTODVIG website will help you ask a question
Was this article helpful?
Thank you for your opinion!
The article was useful. Please share the information with your friends.
Yes (60.00%)
No (40.00%)
X
Please write what is wrong and leave recommendations on the article
Cancel reply
Rate this article: ( 11 votes, average: 4.27 out of 5)
Discuss the article:
In the engine compartment
The module is represented by a complete collection of fuses and relays.
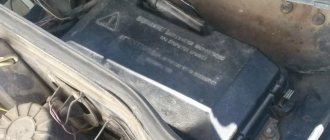
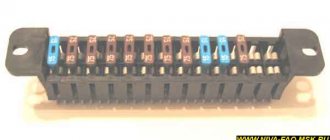
To gain access to the panel, you will need to unclip the plastic clasps of the cover and remove it from the fastenings. Inside you can find two configurations of components - this depends on the year of manufacture of the car. All elements responsible for protecting the main power circuits of the car are introduced here.
Dismantling and replacement
If one or another equipment fails, you must first check the condition of the fuse responsible for it.
In practice, removing and removing an unusable fuse or relay is not difficult. To do this you need:
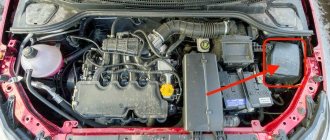
- Raise the hood and disconnect the minus from the battery. Since you are working with the fuse box responsible for electrical equipment, the car should not be energized at this moment;
- Find the mounting block. It is located in the engine compartment opposite the driver's seat directly under the windshield. The top of the block is covered with a plastic cover. To remove it, simply press the latches on the sides;
- Remove the cover and look at the back side. There is an electrical diagram showing the location of one or another fuse or relay. Just find the element that is responsible for the failed equipment according to the tables above;
- Remove the fuse. All mounting blocks are equipped with special pliers. Manually removing fuses is not recommended. The relays are removed by gently rocking up and down;
- Replace the failed component.
Fuse failure is determined by the melted filament. These are fusible elements that melt and make contacts, preventing equipment from being damaged by excessive voltage.
That's it, all that remains is to replace the fuse block element, close the cover, replace the battery terminal and check the functionality of the equipment.
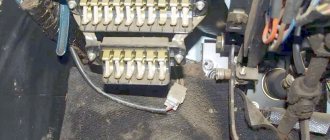
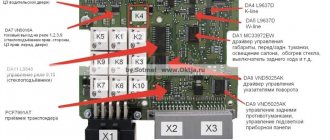
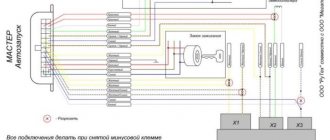
Fuse box pinout
The installer's contact chips are divided into two parts. This is due to the fact that the abundance of terminals can complicate vehicle maintenance. The figure above shows both groups, where the pins are labeled as follows.
- Ш1-4 – connection to the instrument panel module.
- Ш5/6 – front wiring harness.
- Ш7/8 – left mudguard (a large number of electrical appliances are mounted here).
- Ш9/10 – rear part of the instruments.
- Ш11 – connection of the stove box, heating system.
The wires are connected the same way, regardless of whether the panel is installed low or high. The location of the chips and connectors is always identical.
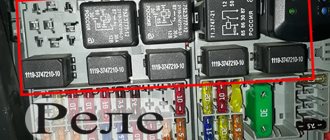
VAZ 2109 fuse box diagram
The photo above shows a schematic breakdown of the main electrical equipment, relevant for cars before 1998. Below is a complete table describing all the elements.
| Number | Purpose |
| 1 | Reserve |
| 2 | Turns, emergency lights, alarm control. |
| 3 | Stops, interior lighting |
| 4 | Heated rear windshield, cigarette lighter and auxiliary socket |
| 5 | Klaxon and its control button |
| 6 | Reserve |
| 7 | Heater fan drive, radiator fan, glove compartment lighting, rear window heating relay. |
| 8/9 | Reserve |
| 10/11 | Power supply for the left and right sides of the dimensions, respectively |
| 12/13 | Right and left side of head optics in low beam mode |
| 14/15 | Similarly for long-range lighting mode |
| 16 | Turn signals and hazard warning breaker relays, fuel gauges, controls on the dashboard, windshield wiper switch, oil pressure and antifreeze temperature lamps. |
The block also contains a set of relays.
| Number | Decoding |
| 1 | Front optics cleaners |
| 2 | Rear window washer |
| 3 | Turning lamps and light signals |
| 4 | Windshield wiper motor |
| 5 | Lighting lamps |
| 6 | Heated glass at the rear of the car |
| 8/9 | Headlight lamps in high/low beam mode |
| 11 | Power plant cooling fan. |
| 12 | Horn power supply |
In the new version, relevant for 2001, 2002 and 2003, the transcript with a description of the elements looks like this.
| Number | Decoding |
| 1-3 | Reserve |
| 4 | Fan relay, heater switches. |
| 5 | Hazard lights, turns and their indicator lamps. |
| 6 | Stop lamp switch, interior lighting |
| 7 | Illumination of license plates, dimensions, glove compartment, tidy lighting. |
| 8 | Power to the horn and radiator fan switch. |
| 9 | Left side of dimensions |
| 10 | Right side dimensions, fog lights. |
| 11 | Direction indicators and emergency lights |
| 12 | Cigarette lighter, rear socket. |
| 13/14 | High beam head optics for starboard and left sides. |
| 15/16 | Same for low beam mode |
Relays should be considered separately.
| Serial number | Description |
| 1 | Washer motor drive |
| 2 | Turn signals and emergency lights |
| 3 | Windshield wipers operation |
| 4 | Stop and side lights |
| 5 | High beam |
| 6 | Headlight washer |
| 7 | If there are electric lifts, he is responsible for their operation. |
| 8 | Sound signal |
| 9 | Cooling fan relay |
| 11 | Heated rear window |
| 12 | Optics in low beam mode. |
Starter fuse and relay
Elements of the engine starting unit are specially located outside the installer. This is justified by a significant reduction in the module size and simplification of the device design. The fuse is mounted on the cabin bulkhead, and a corresponding relay is installed nearby.
If the starter clicks but does not turn, you will need to check the retractor. Here you cannot do without removing the module. To check, you will need to completely disassemble and troubleshoot it.
Heater relay and fuse
The heater is powered through elements 7 and 4 for the old and new versions of the car. Next, the voltage goes to the power line relay. They are mounted under the dashboard on the driver's side.
Cigarette lighter fuse
It is located in different places, depending on the year of the car. in standard car configurations there are inserts 4 and 12.
Ignition
The system is simple. There is a main ignition drive, passed through the lock. The wiring goes to the main relay and from there to the coils.
Gasoline pump
The fuel pump fuse and relay will be needed if the pump does not work. The fuse link is installed under the instrument panel to the left of the steering rack, the relay is located near the pump.
Turns
Depending on the year of manufacture, fuses for light bulbs and emergency lights are mounted in positions 2 and 5. There are relays here. They are installed under numbers 3 and 2. The power supply is looped on one line along with the power button.
The relays in the system are used with three contacts, which allows them to be found in any store.
Wipers
In older versions of the car, the windshield wiper fuse is mounted at number 16. There is no corresponding relay in the system. It is placed separately under the dashboard.
In new versions of the car, the opposite is true. The fuse link was removed from the installer, and the relay was placed in position 3.
Window lifters
Most cars do not have electrical accessories installed. If the car has a similar unit from the factory, then the system fuse should be looked for in position 7 of the engine compartment mounting block.
Charger
It is regulated by a special device installed under the hood on the left wing of the car. The part is embedded in the power line running from the generator to the battery.
Generator fuse and relay
The installation voltage regulator is mounted inside the unit in the usual place for domestic cars. To access the device, you will need to disassemble it completely.
Fan
The drive for turning on and powering the head blower of the cooling system is routed through an element and relay 7/11 for each device. After updating the on-board network in 1998, the fuse was moved to the bulkhead, and the relay was mounted at position 9.
Stop signal
If the car has standard wiring, you need to look for fuses in positions 3 and 6 for the old and new versions of the unit. The circuit switch is installed on the brake pedal - standard for all AvtoVAZ modifications.
Wiper
On the first generation of the installer, only fuse 4 is available, which is responsible for the operation of the windshield washer motor. An insert under the dashboard is installed here to supply power to the windshield washer.
After the update, a wiper fuse with pause adjustment No. 3 appeared here. There is also a drive for the headlight cleaner - relay 6. The fuse for the windshield washer switch is located under the dashboard.
VAZ 2109: central locking fuse
On the 09/099 family, electronic type central locking is not installed from the factory. When installing the module themselves, users can push the element anywhere they want. The role of the relay here is also played by a self-mounted adapter.
VAZ 2109 emergency flasher fuse: where is it located?
In the old generation, until 1998, the element was mounted at position 2. In the new version, the safety insert for the alarm is installed at number 5.
Interior lighting for VAZ 2109
In the first modification, the illumination of the interior space was organized through insert 3. After reworking the panel, the fuse was moved to position 6.
Low and high beam
The first version of the machine is equipped with a group of fuses numbered 12/13 and 14/15. Responsible for the low and high beam optics for the left and right sides of the car. There is a set of relays here. Two elements No. 8/9 are designed to protect power circuits in the high and low beam modes.
After updating and reworking the modules, the manufacturer placed the corresponding inserts at positions 13/14 and 15/16. The references have been changed here. Switches are installed in positions 5 and 12.
Instrument lighting fuse
The panel lights in the first generation were installed at position 16. After updating the system, the lighting was moved to fuse 7.
Number plate illumination
The license plate lighting is done in the same way. On the 09/99 family, the lamps are powered by fuses 11 and 7 for the old and new versions.
Lamp health monitoring relay
Mounted under the dash. Since the device often burns out, jumpers are installed instead and wrapped with electrical tape.
Reverse
The switch is mounted in the gearbox. A pressure sensor is installed here, it is used as a fuse and relay.
Heated rear window
In the first generation, the heating is protected by fuse 4. Relay No. 6 is mounted here. After the update, the insert was moved from the module. The relay only changed its location on the panel. Now this is element number 11.
Radio tape recorder
The standard sound system is powered by an individual fuse installed under the dashboard
Dimensions
They are powered through 10/11 fuses for the right and left sides of the car. The power lines are routed through relays installed under the dashboard on the driver's side.
In the new version, the power is mounted through one fuse No. 7. The switches are also placed separately.
Fog light relay
Onboard PTFs are not included in the factory configuration. When installing them additionally, users mount the elements under the dashboard at the driver’s feet. This is the most convenient place to service parts.
Thermobimetallic fuse
The part is designed to protect the power line of the car and is installed under the hood of the car. It can be recognized on the left wing near the battery.
Idle relay
Appeared on the car only in recent years. The device is mounted on the cabin bulkhead or on the left wing, depending on the modification of the car. If a part constantly burns out, you need to check the ECU terminals for voltage fluctuations and contact oxidation.
ECU relay
The module is installed on the car in the area where the battery is mounted. Externally, it is a black box with wires connected to it.
Heated seats
Most cars do not have this option. The device was mounted in separate copies, and the power lines were routed under the shield. Structural protection elements are installed here.
Tachometer
Present on cars of the latest modifications. An electronic sensor is installed on the flywheel, and its protection is connected to a fuse located under the instrument panel.
Relay K4 VAZ 2109: what is it responsible for
In cars before 1998, this element is responsible for powering the wiper motor drive. In subsequent modifications, the detail already has a different meaning. Here he is responsible for the operation of the side lights and brake lights.
Fuse F4
The standard element is found in both versions of the car. In the first version, it is responsible for the heated lines for the rear window, cigarette lighter and stove. In the second, it is responsible for the radiator fan relay, the regulator of the operating modes of the heating system.
Fuse F16
The last one in the list of standard inserts for the old version of the car is responsible for a whole range of equipment:
- turn signals and hazard breaker relay;
- fuel level indicators;
- controls on the dashboard;
- windshield wiper switch;
- oil pressure and antifreeze temperature lamp.
In a more modern version of the car, the fuse has much fewer functions. Here the insert is responsible only for the operation of the right headlight optics in low beam mode.
Fuses F17, F20
The specified elements are present only in the vehicle modification - VAZ 21099. Usually they are not powered and represent a reserve for connecting additional equipment.
Relay 3761 VAZ 2109: what for
Designed to protect the forced idle economizer system. A simple relay is installed on a standard mount near the cabin bulkhead.
American women on VAZ 2109 via relay
Installed to combine turn signals and side lights. To do this, you will need to find several parts and perform a certain procedure. List of what you need:
- two semiconductor diodes type IN5819;
- a pair of capacitors at 4700 mF/25V each;
- 5 contact relays and connectors for them;
- several meters of wires;
- heat shrink of the required size;
- 10 pairs of mother-father terminal blocks.
You will also need a soldering kit and standard tools to disassemble the device.
Manufacturing procedure. In order not to cut the factory wiring once again, you will need to solder several adapters. This will allow you to quickly return everything to its place in case of emergency. The step by step process looks like this.
- You need to study the diagram according to which the device is most easily connected.
- Make adapters for other chips - this will make it possible to embed the unit into the on-board circuit without damaging the wiring.
- Install the specified adapters on contacts 85 and 88. Standard terminals should be put on the resulting tee.
- To understand the process, below is a converted mechanism that needs to be connected to the on-board circuit.
Description of power supply
First, let's look at the description of mounting blocks with fuses and relays on a VAZ 21099 carburetor or injector with a high and low panel. In the ninety-ninth VAZ models, two types of shields can be used - new and old. Devices belonging to the old-style category are marked 17.3722. These devices are equipped with finger safety mechanisms made in a cylindrical housing. They were installed by engineers on cars produced in 1997 and early years. As for the new type of blocks, they were installed on vehicles manufactured after 1998. These products are equipped with U-shaped safety elements.
Blocks of the new model on the VAZ 21099 of 1999 and later years of production can be marked with the following markings:
- 2114-3722010-60;
- 2114-3722010-10;
- 2114-3722010-18.
Reasons for premature failure of fuses
Factors can be identified.
- Moisture getting into electrical contacts. This can cause a short circuit and a voltage surge.
- Damage to on-board wiring or serviced mechanisms. In such cases, sharp surges and voltage fluctuations occur in the wiring section. As a result, the fuse blows.
- Setting the fuse element to a too low rating. Some users may mistakenly insert a fuse that is too weak into a loaded circuit. After activating the device, the insert will immediately fail.
general information
If a motorist notices that, for example, the heater fan on a VAZ-2109 car has stopped functioning properly, most likely the fault will be a blown fuse. In fact, replacing such an element is a simple process; it is much more important to find out the reason for its inoperability. A malfunction can cause a short circuit, which means the car owner will have to sort out the circuit that goes directly to the ineffective element. To check the operation of fuse F7, you need to make sure that the motor for washing the headlights, the backlight of the printing compartment and the cigarette lighter are functioning normally.