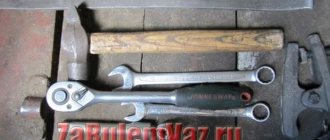
Tools:
- Medium flat screwdriver
- Ratchet wrench
- 8 mm head
- Open-end wrench 8 mm
- Open-end wrench 12 mm
- Curved box spanner 24 mm
- Bench vice
- Marker
- Large hammer
- Tool heads (for bearing rings)
- Double jaw puller
Parts and consumables:
- Wood block
- Generator bearings (if necessary)
- Generator front cover (if required)
- Generator rear cover (if necessary)
- Slip ring kit (if required)
- Sandpaper (fine grit)
Note:
Disassemble the generator to check and replace the voltage regulator, rectifier unit, rotor, stator, and bearings.
1. Press out the three clips of the plastic casing of the generator and remove it.
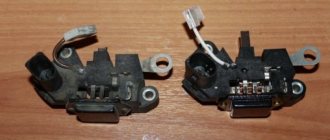
2. Using a screwdriver, disconnect the voltage regulator relay wire terminal to the rectifier block bus.
3. Unscrew the two bolts securing the voltage regulator (marked with red indicators) using a wrench with an 8 mm socket and unscrew the nut securing the voltage regulator relay terminal to the rectifier block bus (blue indicator) with a 12 mm wrench.
4. Remove the brush holder from the generator voltage regulator relay assembly.
5. Remove the three bolts securing the generator rectifier unit.
6. Using a screwdriver, press out the spring clamp and at the same time, using another screwdriver, remove the lead of the stator winding of the generator from the clamp. Perform this operation with six pins.
7. Unscrew the nut of the power bolt with a 12 mm wrench of the generator and remove the rectifier unit.
8. Unscrew the generator pulley nut with a spanner wrench, after first holding the generator pulley in a vice so that it does not turn.
9. Remove the alternator nut and pulley.
10. Mark the relative positions of the generator covers.
11. Remove the four coupling bolts located around the circumference of the generator.
12. Using a screwdriver, pry off the generator cover and remove the generator cover from the drive side (complete with the generator bearing).
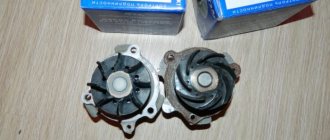
13. Remove the generator rotor shaft from the bearing. If necessary, screw the pulley fastening nut onto the rotor shaft and press the rotor shaft out of the bearing through a wooden spacer with light blows of a hammer.
14. Remove the generator stator.
15. Inspect the generator stator.
Note:
There should be no traces of the armature touching the stator on the inner surface of the stator. If wear is detected, replace bearings or caps.
16. Inspect the generator cover on the drive side (assembled with the generator bearing).
Note:
If, when rotating the generator cover bearing, you feel play between the rings, rolling or jamming of the rolling elements, the protective rings are damaged or lubricant leaks are found, replace the generator cover bearing, and if cracks are found in the cover, especially in the places where the generator is attached, replace the generator cover.
17. To replace the front bearing, press it out with a suitable tool head while applying force to the outer race of the bearing.
18. Press the new bearing into the cover using a tool head, applying force to the outer ring of the bearing.
19. Inspect the generator slip rings.
Note:
If they have burrs, marks, scratches, signs of wear from brushes and other defects, sand the ring. If damage to the rings cannot be removed with sandpaper, turn the rings on a lathe, removing a minimum layer of metal, and then sand them. If the surface of the slip rings is severely worn, replace them.
20. Check the ease of rotation of the rotor bearing on the slip ring side. If, when rotating the bearing, you feel play between the rings, rolling or jamming of the rolling elements, the protective rings are damaged or there are lubricant leaks, the bearing must be replaced.
21. Use a two-jaw puller to press the rear bearing off the rotor shaft.
Note:
When performing this operation, the puller screw should be pressed exactly into the center of the shaft so as not to damage the plastic insulator of the rotor slip rings.
22. To install the rear bearing, support the front end of the rotor shaft on a piece of wood and press the bearing onto the rear end of the shaft using a mandrel or tool head of suitable diameter, applying force only to the inner race of the bearing.
23. Reassemble the generator in reverse order.
The article is missing:
- Photo of the instrument
- Photos of parts and consumables
- High-quality photos of repairs
The appearance of a creaking or metallic grinding sound during operation of a car engine is a sign of wear on the generator bearings on the Lada Grant. The malfunction is common on domestic cars.
The reasons for the squeaking are different: defects, violation of operating rules, damage.
Fixing the breakdown will not be difficult for the average driver. The operating principle is intuitive.
In order to provide methodological assistance to inexperienced drivers, we will consider the algorithm for replacing bearings with your own hands.
Stage No. 1: dismantling the generator on the Lada Grant 8-valve
- Disconnect the terminals from the battery to prevent a short circuit in the circuit.
- We unscrew 6 bolts from under the bottom and remove the oil pan protection;
- We disconnect the rubber protective cap and unscrew the terminals from the contact board on the converter.
- The key is set to “13”, unscrew the nut of the upper fastening, and use the mounting tool to move the converter to the side. Access to the lower mount is provided.
- Unscrew and remove the lower fastening bolt.
- Using a mounting tool, we remove the generator belt from the pulleys.
- We remove the converter assembly and fix it on the surface of the workbench.
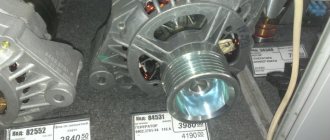
Replace the KATEK generator with a Bosch
From July 24, all Grant cars began to be equipped with new Bosch generators (2170-3701010-13 (F000 BL0 652)) with a capacity of 110A. This generator has an increased current output compared to the 2170-3701010-10 generator, especially at idle speed (55-60A at 800 rpm of the crankshaft). Another advantage is increased reliability.
Dismantling the generator on a Lada Grant with air conditioning
At the preparatory stage we will need the above tools and materials.
- We hang the front part of the car with a hydraulic jack, unscrew the bolts, and remove the wheels.
- In the opening of the wheel arch on the right side, unscrew the tension roller and the engine mount mount.
- Lower the jack a few centimeters lower until the converter is level with the wheel arch opening.
- We carry out the subsequent algorithm by analogy with the 8-valve modification of the engine.
Algorithm of actions
So, how is the procedure for replacing the RG on the domestic Lada Grante:
- First of all, open the hood - you need to get rid of the old worn out belt. If the strap is very stretched, you can simply remove it by removing it from the pulleys. If not, then use a knife and cut the RG, this option will be the most convenient.
- Next, you need to find the bolt that secures the lower mount of the generator device. Try to loosen it a little, you don't need to unscrew it completely. The bolt is unscrewed using a pre-prepared wrench.
- Using the same wrench, you need to unscrew the nut. After these steps, the screw of the upper clamp of the generator device is completely removed.
- After these steps, be especially careful. You need to try to rotate the generator device so that its upper eye can go beyond the surface of the protrusion, which is located directly on the bracket itself. When you manage to do this, the generator itself must be completely pressed against this bracket; using ordinary wire, the device must be fixed in this position. In practice, the best option would be to press the device against the cylinder head cover fixing nut.
- Then the new RG must be carefully placed on the generator pulley. The strap is also placed on the surface plane of the unit drive shaft. Do this carefully so as not to damage the belt. When the RG is in place, make sure that it is installed level; any bends in the end parts are not allowed.
- Now you need to turn on fifth speed again. Ask an assistant about this, since when you engage the gear, you need to simultaneously press the strap against the shaft itself. When this position is reached, the vehicle will need to be pushed back a little. The machine is pushed until the newly installed strap is completely in place.
- When you are sure that the generator is securely installed and fixed, you can remove the wire with which you pressed the generator to the head of the block. Using a screwdriver, the generator device is pressed away from the point of contact with the bracket. When all these steps are completed, all that remains is to replace the upper assembly fixing screw. Also, we must not forget about the lower bolt with the upper fastening nut - they need to be tightened.
As you can see, in general, the process of replacing the alternator strap on the Lada Grant is not particularly complicated, but this procedure requires a competent approach and certain skills. Therefore, the only requirement that must be observed is to be as careful and attentive as possible. And if possible, ask someone to help you - at one stage you will need an assistant.
https://www.youtube.com/watch?v=k8L4V9Y6wAM
Source
Sequence of actions when replacing Lada Granta bearings
- We place the converter on the surface of the workbench, unscrew the three mounting bolts on the rectifier block (key set to “14”).
- Using a screwdriver, release the spring clamp and hold the winding with your hand.
- We bring out six winding ends.
- Unscrew the nut on the power block.
- We remove the rectifier from the generator housing.
- We use a multimeter to determine the negative diodes. To do this, connect the positive terminal of the multimeter to the negative plate. We connect one by one to the other diodes. In good condition, the diodes have a resistance value of 550 - 640 Ohms. Deviation from the norm is a sign of a malfunction.
- If the arrow tends to infinity, the diode is broken; if the needle tends to “zero,” the diode is broken.
- By analogy, we check the positive diodes, only in this case we reconnect the terminals to the “B+” terminal.
- Additionally, we check the converter housing with a multimeter for open circuits or short circuits.
- We fix the generator in a vice, unscrew the nut from the back, and remove the pulley. We first apply markers to the relative placement of the lids.
- We unscrew the four coupling bolts, pry them up with a screwdriver, and remove the generator cover.
- Remove the rotor shaft from the bearing.
Note to the driver! If necessary, use a wooden spacer to press the rotor shaft out of the bearing race. Often, during work and rotation, parts become stuck.
- We inspect the stator and its surface. In good condition, there should be no traces of the armature touching the stator. Otherwise, replace the bearings.
- Using a multimeter we check the integrity of the converter winding.
- We inspect the cover from the drive side. When rotating the axis, you will feel some play between the rings. The latter must be replaced with new ones due to wear.
- There should be no cracks on the inside of the generator cover. We replace with new ones as needed.
- Unlock the bearing and lightly hit the spacer with a hammer to press the part out of the cover seat.
- We carry out troubleshooting of parts and the converter cover. We replace components with new ones if there are signs of wear or defect.
- Use a wooden spacer to press the new bearing into the seat of the cover. Be sure to check that the winding leads do not come into contact with the converter cover.
- Check the condition of the slip rings. If there are burrs, scratches, or signs of wear, replace them with new ones.
Note to the driver! Some craftsmen practice not replacing the rings with new ones, but grinding them with sandpaper or turning them on a lathe. We remove the minimum layer of metal and then sand it with sandpaper.
- Using a tester, we check the winding resistance by applying the terminals to the slip rings. Gravity towards infinity is unacceptable, as this indicates a break in the rotor winding. The latter requires replacement.
- Finally, we check that the housing is not shorted to the rotor. The tester's arrow goes to infinity.
- Use a three-fingered puller to press out the rotor shaft bearing.
- Using a frame we press a new, serviceable bearing onto the rotor shaft. The main force is directed to the inner ring of the bearing.
- We assemble the structure in the reverse order, having previously lubricated the bearings with graphite grease. We tighten the generator cover with a force of 39-62 Nm.
Do-it-yourself replacement of generator bearings on the Lada Grant is completed.
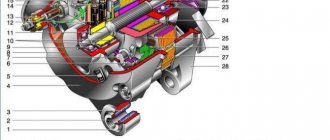
Generator drive
The Granta generator, like any other vehicle, must be driven in order to generate electricity. To rotate the generator, almost all cars use a belt, directly or through a bypass (tension) roller.
1 - Crankshaft pulley; 2 - Tension roller; 3 - Engine support; 4 - Generator pulley; 5 - Air conditioner clutch;
Generator belt
In Grant, a serpentine belt of various lengths is used to drive the alternator belt, and it depends on the additional equipment installed in the car, be it air conditioning, power steering, or the absence of them altogether.
The size of the Granta alternator belt starts from 823mm and can reach 1018mm depending on the vehicle configuration. You can read more about the alternator belt on the Grant here.
Tensioner
In some Grant engine designs, a special tension roller is used to tension the generator belt, which often tends to fail if the belt tension is incorrectly adjusted.
Incorrect tension can damage not only the tension roller, but also the bearings in the generator.
Signs of generator malfunction, solutions
| Sign | Diagnostics, elimination |
| When the engine is running, the battery low indicator indicates | Checking the belt tension and power cable contacts. Replacement with new one |
| Rapid discharge / battery charging / boiling over | Insufficient / excessive tension of the converter belt |
| Insufficient brightness of headlights | The current in the circuit is below the minimum permissible parameter 14 - 16V. Generator dismantling, winding integrity check, repair |
| Weak sound when the engine is running | —/— |
| Increasing the brightness of the headlights when the engine speed increases | —/— |
| Engine operation is accompanied by extraneous sounds, squeaking, and metallic grinding sounds. | Bearing wear, rotor shaft defects. Dismantling, troubleshooting, replace worn bearings |
Basic faults
Failures associated with the failure of the Granta generator lead to discharge or, conversely, overcharging of the battery and its boiling. In both cases, this will make further operation of the car impossible. If the belt is overtightened, problems with high bearing wear will soon arise. If the belt tension is insufficient, slipping will occur and the battery will receive too little charge.
Normally, a working generator produces 14.5 V; exceeding this value is most often due to a breakdown of the voltage regulator. Without urgent replacement of the element, constant recharging of the battery will lead to shedding of lead plates and battery malfunction. If the unit does not produce the required voltage, and it is below 13 V, then the problem may not only be with the regulator, but also with the fact that the brushes are worn out, the diode bridge or windings are damaged.
It happens that suspicious sounds occur during operation, in which case the nature of the noise is important. It’s not difficult to deal with this: just remove the wires from the generator. If the rotation of the pulley is accompanied by a howling or squealing noise, then the problem is in the bearings. If, after removing the wires, the noise disappears, then it is in the diode bridge, or a short circuit has occurred in the winding. In any case, repairs are inevitable, and sometimes only replacing the unit will help.
Typical faults and methods for their elimination:
Cause of malfunction
Remedy
The table shows the main faults. Mechanical and other damage is also possible.
Review of producer prices. Catalog articles of installed bearings
| Manufacturer article number | Price, rub.) | Resource (thousand km) |
| KZATE 9402.3701-03 | ||
| Brushes 1127014022 | From 150 | 85 – 95 |
| Voltage regulator 844.3702 | From 600 | —/— |
| Diode bridge BVO4-105-01 | From 510 | —/— |
| Bearings 6303, 6203 | From 350 | —/— |
| Bosch 0 986 041 850 | ||
| Brushes 140371 | From 200 | 85 — 105 |
| Brush holder 235607 | From 250 | —/— |
| Voltage regulator IN6601 | From 1000 | —/— |
| Diode bridge INR431 | From 1500 | —/— |
| Bearings 140084, 140093 | From 200 - 300 | —/— |
| 180302 | From 250 | —/— |
| 180201 | —/— | —/— |
*prices are current as of October 31, 2018.
Characteristics of the alternator belt VAZ 2190 dv.21126 /127, 11186 a/s, 6pk995 (luzar)
| Express delivery | from 300 ₽ * | from 1 day * | Buy with delivery |
Your review will be published after being moderated
| Brand/Article | Description | Availability | Term | Price |
| MEYLE 0500061000 | V-ribbed belt | 3 | 8 days | 474 rub. |
| BOSCH 1987947939 | V-ribbed belt 6PK995 | 1 | 8 days | 499 rub. |
| 1 | 5 days | 492 rub. | ||
| 10 | 8 days | 565 rub. | ||
| 7 | 7 days | 492 rub. | ||
| AvtoVAZ 21900104102000 | Alternator belt VAZ-2190 dv.21126 /127, 11186 A/S, 6PK995 (AvtoVAZ) | 2 | 21 day | RUB 2,090 |
| 1 | 4 days | RUB 1,053 | ||
| 12 | 1 day | RUB 1,053 | ||
| 2 | 4 days | RUB 1,053 | ||
| 1 | 4 days | RUB 1,053 | ||
| 1 | 4 days | RUB 1,053 | ||
| 17 | 21 day | RUB 2,090 | ||
| 2 | 31 days | RUB 1,053 | ||
| Contitech 6pk1000 | V-ribbed belt 6PK1000 | 67 | 4 days | 773 rub. |
| 67 | 7 days | 773 rub. | ||
| GATES 6pk1000 | Poly V-belt 6PK1000 (8653-10159) | 43 | 4 days | 924 rub. |
| 20 | 8 days | 924 rub. | ||
| 2 | 4 days | RUB 1,017 | ||
| 3 | 4 days | 924 rub. | ||
| 4 | 4 days | 924 rub. | ||
| 43 | 7 days | 924 rub. | ||
| 1 | 1 day | 961 rub. | ||
| CONTITECH 6pk1000 | V-ribbed belt | 40 | 8 days | 773 rub. |
| DAYCO 6pk1000 | V-ribbed belt | 30 | 8 days | 463 rub. |
| 10 | 4 days | 463 rub. | ||
| 2 | 4 days | 463 rub. | ||
| Contitech 6pk995 | V-ribbed belt 6PK995 | 49 | 4 days | 636 rub. |
| 49 | 7 days | 636 rub. | ||
| CONTITECH 6pk995 | V-ribbed belt | 70 | 8 days | 636 rub. |
| 2 | 3 days | 677 rub. | ||
| 7 | 4 days | 636 rub. | ||
| 3 | 7 days | 609 rub. | ||
| 2 | 4 days | 636 rub. | ||
| GATES 6pk995 | V-ribbed belt | 200 | 8 days | RUB 1,008 |
| 5 | 8 days | RUB 1,159 | ||
| 17 | 4 days | RUB 1,008 | ||
| 10 | 4 days | RUB 1,008 | ||
| 10 | 1 day | RUB 1,049 | ||
| TRIALLI 6pk995 | Poly V-belt (6PK995) for Lada Granta (10-)/Kalina II (13-) 1.6i with A/C | 3 | 1 day | 427 rub. |
| DAYCO 6pk996 | V-ribbed belt Audi / Citroen / Fiat / Ford / Honda / MB / Seat / Skoda / VW | 2 | 4 days | 548 rub. |
| KRAFT kt685290 | Alternator drive belt with air conditioning | 3 | 1 day | 367 rub. |
| LUZAR lb0192 | Alternator belt VAZ 2190 Grant A/S (6PK995) | 2 | 4 days | 384 rub. |
| 2 | 1 day | 398 rub. | ||
| LUZAR LB0192 | Alternator belt VAZ-2190 dv.21126 /127, 11186 A/S, 6PK995 (LUZAR) | 1 | 4 days | 389 rub. |
| 1 | 4 days | 389 rub. | ||
| 1 | 21 day | 771 rub. | ||
| 1 | 8 days | 369 rub. | ||
| 1 | 4 days | 389 rub. | ||
| 1 | 4 days | 389 rub. | ||
| 37 | 1 day | 389 rub. |
Show all analogues
Thank you for your attention to the project. Together we will make dvizhkom.rf better. After correcting the inaccuracies, we will send you an email telling you about the changes.
Unfortunately, now you can order more if you call us at 8-800-775-7556
Prices, product availability and delivery methods depend on the selected city.
The quantity for ordering an item must be a multiple of
We have sent you a password to the specified email address. You can change your password or other registration data in your personal account settings
Hereby, in accordance with Federal Law No. 152-FZ “On Personal Data” dated July 27, 2006, you confirm your consent to the processing of personal data by RAT LLC: collection, systematization, accumulation, storage, clarification (updating, changing), use, transfer solely for the purpose of fulfilling your order and informing about it, as well as promotions and campaigns of RAT LLC, including blocking, depersonalization, destruction.
We, RAT LLC, guarantee the confidentiality of the information we receive. The processing of personal data is carried out for the purpose of effective execution of orders, contracts and other obligations accepted by RAT LLC as binding on you.
This consent applies to the following personal data: last name, first name and patronymic, email address, postal address for delivery of orders, contact phone number, payment details.
Source
List of online stores providing goods (Moscow, St. Petersburg, Kyiv region)
| № | Name | Address |
| 1. | "NovaTon" | https://novaton.ua/ |
| 2. | "ZapchastKom" | https://www.zapchast.com.ua/ |
| 3. | "How much" | https://www.avtostore.spb.ru/ |
| 4. | "AutoWall" | https://www.avtoall.ru/ |
| 5. | "SV-Parts" | https://sv-parts.ru/ |
| 6. | "AvtoPiter" | https://www.autopiter.ru/ |
Video “The principle of operation of a car generator”
An object lesson with a detailed description of all aspects on the principle of operation of the unit is given in the video below (the video was published by Mikhail Nesterov).
Hello! Today I'll show you how I repaired my generator, which someone else would probably throw in a landfill. When I drove home yesterday, everything was on - lights, stove and music. At some point, the on-board computer beeped and the battery light on the panel came on. I immediately brought the voltage of the on-board network to the BC and was surprised - it was 11.4 volts. I immediately turned everything off and slowly drove home.
After turning off the engine the computer showed 8 volts. Having removed and disassembled the generator, it was revealed that one of the copper-graphite brushes of the relay-regulator had simply fallen off the wire. This one costs 510 rubles, but I thought it would be better to fix it myself. This is what it looks like.
After rummaging through the warehouse, new brushes from the drill were found.
They differed in width and thickness, but the length was the same. Compare:
After a little grinding, they became almost identical, only the color was different.
Then I soldered a thin copper wire to the pigtail of the brush, so that with its help in the future I would not have problems with how to tighten this same pigtail into the brush contact hole.
Afterwards the contact of the relay-regulator brush was cleaned; there were still remnants of the old braid there.
And I tinned the whole thing using tin and soldering acid.
Then I put a spring on that same wire.
And he stuck it into the contact hole of the relay-regulator brush.
After soldering this came out.
Next, I saw that the contact bushings of the generator rotor were rubbed with brushes, so much so that plastic was already visible in the grooves, that is, either the contact bushings or the rotor needed to be changed.
But since in the village where I now live I can’t find these contacts during the day and buying a new rotor (armature) doesn’t appeal, I decided to repair them too. There are no photos of the process, but I will explain it in a nutshell and with fingers. First, I tinned these same bushings, then I took thin copper wire, namely, I unraveled a copper wire with a cross-section of 4 mm and pulled out 1 core from there. If you find a thin wire from an electromagnet or transformer, remove the protective varnish from it before using it. There was no protective varnish on my wire, which made my task easier. Next, I tinned one end of this thin wire and soldered it to the bottom of the groove of the contact sleeve and just started winding it into this groove until it filled this entire groove. Then I just tinned this entire surface. In order for all this to be thoroughly soldered, I had to heat this entire kitchen with a soldering iron for quite a long time, but the results exceeded my expectations. Naturally, this whole thing didn’t turn out perfectly, namely, the surface that is supposed to rotate and come into contact with the relay-regulator brushes turned out to be rough and not quite round, it turned out something closer to an oval. An ordinary flat file No. 1 helped me solve this problem. After spending about 5 minutes on grinding, I got an almost perfect, regular circle shape. Actually, this is how it happened.
Reviews
| № | Positive |
| 1. | Vasily: drove over 80,000 km, no comments on the operation of the converter. At the 45,000 km mark the belt whistled, took it to a service center and had it tightened. Since then everything has worked like clockwork. |
| 2. | Gennady: I don’t complain about the car, since it’s a budget option. Breakdowns happen, but they are not so critical and can be fixed on your own. |
| 3. | Kirill: at 50,000 km I replaced the converter belt, the old one was defective. There are no comments on the other units. I made no investments except for the purchase of consumables and filters. |
| 4. | Ivan: during a run of 110,000 km, I replaced the generator and drive belt. I think that the interval is quite acceptable for domestic transport in the budget segment. |
| 5. | Alexander: I won’t slander Grant. Mileage over 95,000 km, no investments. Works like a watch. |
| 6. | Lesha: after a year of active use of the car, I can say that it is worth the money. There were no critical breakdowns, and I fixed small things on my own. |
| 7. | Vitaly: this is the third year after buying the car, I replaced the generator once, rebuilt the chassis, changed oils and filters. There are no complaints about the build quality of the Grant, because it is a budget model. |
| Negative | |
| 1. | Victor: the converter, along with the bearings, was not used for even 60,000 km, I bought a new one from BOSCH. I don’t know how long the Indian unit will last. |
| 2. | Vladlen: problems with the car started at 35,000 km and continue to this day. Decided to sell. Friends advised me to take Renault Logan. |
| 3. | Ivan: during the two years of operation of the car, it was unscheduledly repaired at a service station three times. Fortunately, Grant had a factory warranty and it cost minimal investment. |
How to learn how to flash an ecu. do-it-yourself ecu flashing equipment
14.03.2021
| Go to section: Equipment for ECU firmware Key and chip programmers All equipment selected by car make and model |
Well, my dream has come true - to change my “Masquerade” to something newer and more modern. The choice fell on the VAZ 2115I 1.5L 8V - enough money for the 2006 model year. Includes HBO, music, trip computer, not very good alarm system, 14mm wheels, arch protection, sump protection and worn covers.
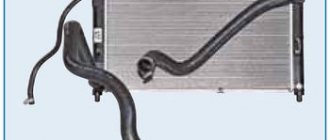
A list of priority work was quickly determined - a repair kit for the gas reducer and the whole range of work to put the gas equipment in order are needed. When running on gasoline, the car began to stall when the revs dropped (I’m not even talking about running on gas). The synchronizer for 2nd gear was worn out, an urgent oil and antifreeze change was required, the radiator dripped from below and a crack in the expansion tank was discovered.
A year of operation has passed and the list above has been supplemented by replacing the starter, purchasing a new mass air flow sensor, idle air regulator, installing a new alarm system with feedback, and replacing a pair of fog lights broken by stones. But no matter how hard you try, bugs still remain on the products of our automotive industry.
You could think about another car, but it’s a pity for the labor and money invested. True, replacement of parts was carried out only after repeated attempts to repair the next unit independently. I managed to do something, and if I have the opportunity, I will try to write articles on the following topics: repair and adjustment of the LPG gearbox, repair of the starter, installation of an alarm system.
Now I’ll focus on reflashing the ECU in order to teach the VAZ to drive. To begin with, I affirm that it is possible and even necessary to sew our domestic product. Moreover, a car that has not been serviced since birth, and I think there are 50 percent of these from the entire fleet of injection VAZs.
Flashing is very easy and simple - click a couple of icons on the computer, click a couple of toggle switches and it’s as if rocket fuel was poured into your car! But understanding how all this is done, combining different information into one whole is not given to everyone and is much more difficult.
New Lada: What kind of oil does AvtoVAZ fill at the Lada Grantu plant: engine and gearbox
Here is my respect for real masters! Alas, you most likely will not find ready-made information laid out on shelves anywhere. On the Internet you can piece this together by reading and re-reading numerous forums. It took me about six months before the first re-flashing with 2-3 “approaches to the projectile”.
Don’t think that writing this lengthy article was motivated by a desire to write, everything is much simpler: it’s just that during the first attempt to read the firmware from the ECU, I immediately failed - the car stopped starting! Having lost some of her nerves (it was almost at night, and in the morning she had to go to work), fortunately we managed to partially revive her - we managed to fill in the stock gasoline firmware (the gas part is still silent).
Before you start working on your own, you must:
I don’t pretend to be the ultimate truth, so I ask you not to criticize too much for the style and possible inaccuracies, but:
1. Usually there is a need for firmware - to fix obvious bugs in the factory software, to add car dynamics, or to save fuel. This is also necessary when using liquefied gas as a fuel along with gasoline. Another thing is to simply study better the structure and operation of the engine control system.
2. It is better to carry out preparation gradually. Don't try to cover everything at once. It is important to understand the principles of working with electrical and electronics, and to have good computer skills in terms of installing programs and drivers. For the rest, the Google search engine will help, you just need to formulate your queries more specifically. For example: Esud VAZ; controller connection diagram; instructions for ECU firmware;
K-Line adapter diagram; firmware; chip tuning of vases, etc. It is necessary to determine the types of ECUs and their markings, which engine needs which firmware and their designations. Deal with the immobilizer issue. When you realize that you have understood everything and decided that you have become a great specialist, do not hesitate and go to the service technician and try to discuss the virtual topic of replacing the firmware of your car and disabling (deactivating) the immo.
3. If your hands grow from the right place, then the adapter is not very difficult to assemble. The simplest one for a hardware COM port based on MAX232 and K1533LN1 and KT3102 can be found on the website Chip-tuner.ru. It will cost about a hundred even if you buy the entire package at a radio market.
For starters, he'll go. True, there is a trap here - not all system systems have a standard COM port, and even those that have it may not work. I have exactly the same motherboard - the COM port works, programs like POBEDIT (for satellite OPENs) work, but flashing programs do not work.
The shamanism with drivers and settings in the BIOS did not lead to anything. Installing new operating systems is the same without changes. Everything worked on someone else's computer. For such a case, an old data cable from a cell phone based on a PL 2303 chip and one MS L9637D can help.
The scheme works 100% (tested on January 7.2), you just need to add one line in the driver registry with parameters for non-standard ECU speeds. You will get a USB-K-Line adapter. If you add 2 more transistors and a couple of parts, you can also get an L-line. In order not to go to the market for one ms, I sacrificed the polite interior lighting and removed 9637 from the APS-4 immobilizer.
As a connector I used 2 blocks from a computer IDE cable without modifications. The cable was cut into 2 pieces of 10-15 cm each. On January 7.2 they fit well under the top and bottom of the ECU socket (empty 2 pins of the pads remain at the top or bottom of the block legs), just when reconnecting, do not confuse their location, otherwise you will burn the block.
I also used 3 microtoggle switches - common 12V, ignition " " and switching to programming mode " ". Before any operation, I turn off the 2nd and 3rd toggle switches, and turn them on in the order of 3 then 2. Sometimes I have to remove the general “ ” for a short time to receive communication. Power can be taken from the car, when working on a table “-” from an adapter with a current of about 500 mA.
4. To flash the firmware, you need the following programs: combiloader 2.18 and chiploader 1.6 (1.96 is more expanded in blocks). The first program is included in the Stp321-full kit (the loader is free and will start working when the adapter is connected). But sometimes he falls out of work or cannot complete the pouring process.
The second one works without problems. The first one is needed mainly to remove protection from the firmware you find and to install the same protection when uploading software to the ECU. It is not possible to read protected software from the controller - it is erased. Therefore, I advise you to prepare and have at least several (taken from different places) factory firmware.
After installation, the Stp321-full catalog contains a set of standard and tuning firmware, which may be suitable. You also need programs such as chipexploer 1.6 and Page 4.10 (with a tail). These programs will allow you to view the found firmware, edit, compare them with each other and assemble dual pr-ki.
On 2-core computers (and with the hyper-trading function), the tail falls off on Page. Somewhere I came across information about a patch for this problem, on single nuclear ones everything is fine. Be sure to carefully study the help for these programs and work with the firmware in them in order to understand the features and capabilities of the programs.
This way you will most likely weed out broken and questionable firmware. 2 more programs - Enigma for decoding software from the CTP standard and ICD for checking the adapter. It is better to take this entire set from the deposit (there are rarely non-working ones there). You will also get links to other resources when reading the forums.
If, after reading the article up to this point, you still have the desire to learn and move on (reflash your car), I will be very glad and wish you all success. Proceed with what you have planned, but keep in mind that all responsibility continues to fall on you. If you are not sure or are afraid, contact the specialists.
While I was writing the opus, I found gas software, built a dual petrol “gas” unit, filled it up and drove off. Made I203EL36/RB40, I203Ez36/RB40. Even with this software I felt a difference from my native EL35. I left any questions and ambiguities that arose until they were clarified.
← Diagnostics and repair of electrical systems of Mercedes and BMW of the 90s Frequent, typical faults of Peugeot →