The electrical equipment of a car is an interconnected complex. Generator, battery, starter, lighting, auxiliary equipment...
The entire circuit is built around a source of electricity. Therefore, breakdown and subsequent repair is a serious problem for the owner of a VAZ 2121.
The connection is the same as on other VAZ cars of those years of production. And the load is significantly higher. Modern motors add consumers such as electronic engine control modules. Electric cooling fans and additional comfort systems increase current consumption.
How much should a generator produce in the field?
There are three types of generators that can be installed on popular Russian SUVs. The output voltage is the same, but other parameters vary.
For carburetor engines, a power of 600-750 W is sufficient. The maximum current that could be removed was 40-50 amperes.
The generator for old modifications of Niva cannot be installed on new engines. Overloading will quickly damage it and require repairs.
If replacement is necessary, such a solution can only be temporary.
Injection engines produced before 2003 were equipped with power from 1100 to 2000 W. Load current from 80 to 130 amperes. Both generations were equipped with a mono-V pulley.
Generators of this type can be installed on old carburetor internal combustion engines without consequences. Modern overhead motors are equipped with similar energy sources, only the pulley is designed for a larger load - it is poly-V-ribbed, like a belt.
Removal, disassembly, inspection, assembly
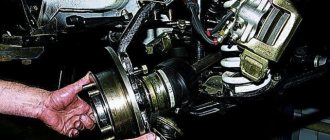
Removing the generator from a Chevrolet Niva (top location)
The battery on my beloved ShNiva began to discharge quickly in winter. I had to charge it every 2 weeks. There may be several reasons for this behavior of the battery, but since the generator bearing had already begun to whistle, I decided to start with its revision.
On my car, the generator is installed 80A 2123-3701010-01 (9402.3701-01). The generator is located at the top of the engine. This greatly simplifies the task of removing it from the car.
To remove the generator I needed:
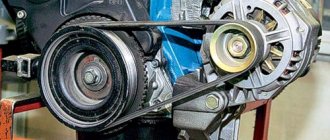
First, you need to loosen the tension on the auxiliary drive belt (some people out of habit call it the Niva generator belt, but this is incorrect because this belt also turns the pump and power steering pump), otherwise you won’t be able to reset it. To do this, you need to loosen the nuts securing the tension roller bracket (two nuts 8, one nut 10) and unscrew the adjusting bolt 10. It is difficult to reach the far nut 8 with an open-end wrench; I used a ratchet with a head 8.
First, loosen 3 nuts, and then begin to unscrew the adjusting bolt until there is slack in the belt and it can be removed from the generator pulley.
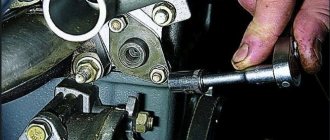
Now you can begin to remove the generator. If I have to work with electrical components or devices, I always disconnect the negative terminal from the battery. Next, you need to disconnect the wires that go to it from the generator. One wire is connected by a block to the generator terminal “D”. This is the output of the generator excitation winding. It is also necessary to unscrew the nut by 10 and disconnect the wires from the contact bolt “B”. On top of the bolt, the bolt is protected from dirt by a rubber protective cap, which must first be removed from the bolt and moved up along the wires.
Next, use a 13mm wrench to unscrew the two nuts and remove the 2 bolts securing the generator to the engine.
The photo below shows the installation location of the generator with the mounting bolts in place (so they don’t get lost).
The generator has been removed from the car and now you can disassemble and check it.
Disassembling the generator Chevrolet Niva 80A 2123-3701010-01 (9402.3701-01)
Since it was winter, I brought the generator home. After reading various articles on disassembling generators, at first I was somewhat doubtful that I would be able to disassemble it at home, “on my knees,” without pullers or a simple vice. However, I succeeded.
I started by removing the generator pulley. Here the first problem awaited me. The pulley nut did not want to come off. I couldn’t hold the pulley with my hands, and I don’t have a vice at home. After several unsuccessful attempts, I was able to secure the pulley quite well using the old accessory drive belt.
I wrapped the pulley twice with an old belt, then tied a knot with a slight indentation. I inserted a long spanner between the pulley and the assembly and turned it several times, tightening the belt on the pulley. I installed the key under the pulley in such a way that it would lock the pulley from turning when the nut was unscrewed, i.e. when moving a crooked hexagon with the head down (pictured below).
Even with the pulley secured in this way, I was not immediately able to unscrew the nut. A long, heavy key helped me. I hit it with all my might at the very end of the hexagon. After the fifth or seventh blow, the nut gave in and was then unscrewed by hand.
In the photo below is everything that was removed along with the pulley. The order (from right to left) corresponds to the order of removal from the generator.
Next, remove the plastic cover of the generator. To do this, you must first unclip three plastic latches. After this, the cover can be easily removed from the generator housing.
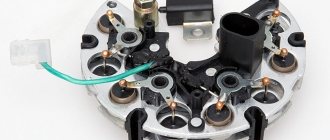
Here is a photo of the insides of my generator, which were hidden under the cover.
To replace or check the technical condition of the brushes, as well as to disassemble the generator, it is necessary to remove the voltage regulator assembled with the brush holder from the generator. It is screwed with two screws to the generator housing. It is also necessary to disconnect the wire going to it.
Unscrew the 4 coupling screws and separate the front cover of the generator and the housing.
The rotor can be knocked out of the bearing in the following way:
- Screw a nut onto the rotor axis so that if something happens you can “correct” the thread with it
- Using a hammer, carefully knock out the rotor through a wooden spacer, holding the cover vertically with your hand and resting it on the floor.
Since I initially planned to replace the front bearing of the generator (it began to creak and squeak when cold), I did not stand on ceremony with it, but simply knocked it out with a head that came to hand. However (I’ll say ahead of time) I shouldn’t have treated him like that. The new bearing I bought in the store had more play than the original French bearing, which had been on the car for almost 10 years. It would just be necessary to open it, wash it and refill it with grease.
Checking and repairing the Niva Chevrolet generator
Since my generator was working and only needed an inspection, there will be no specific advice here yet. I will just describe what I did and what I paid attention to.
- When removing the voltage regulator with brush holder, you must make sure that the brushes protrude from the brush holder by at least 5 mm. Check the ease of movement of the brushes in the brush holder. Otherwise, the regulator must be replaced.
It is also necessary to check the resistance of the generator rotor windings. To do this, we measure the resistance between the two slip rings. If the ohmmeter shows infinity, it means there is a break in the windings and the rotor needs to be replaced.
It is imperative to clean all electrical contact points. Important are the contact point of the capacitor on the generator housing (clean) and the capacitor wire (clean and tighten). It is important to securely tighten the capacitor with screws to the housing, which will ensure reliable contact.
Signs of trouble:
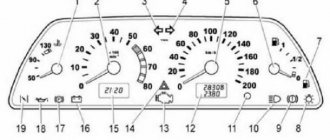
Control lamp on the dashboard. This is the most reliable indicator, since its power connection is taken from the voltage regulator.
- if the value is higher or lower than the set value, the lamp lights up or blinks. Indication details may vary between models, so please read the operating instructions carefully;
- The headlights are not as bright as during normal operation. When the starter is cranked, the voltage “drops” so much that it is noticeable by the blinking of the lamps;
- the sound of the engine changes, extraneous noises are heard;
- engine power is lost (provided that other systems are in good working order);
- the smell of burnt insulation is heard from the generator;
- at the battery terminals with the engine running, less than 13 volts.
Device Description
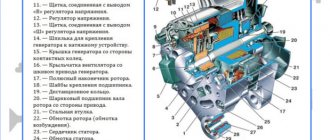
On Niva 21214 cars there is a generator of type 9412.3701, on VAZ 21213 - type 371.3701, on Niva Chevrolet there is a generator 2123. All of them are alternating current electric machines with electromagnetic excitation, having a built-in rectifier unit with silicon diodes and an electronic voltage regulator. The maximum current produced by the generator unit type 9412.3701 is 80 A, voltage - 13.2 - 14.7 V, rotation - right.
The unit covers are attached to the stator using 4 bolts. The covers have bearings installed. They rotate the rotor shaft. In the front bearing, the inner race is clamped with a nut along with a thrust ring and washer. The 2nd bearing is also pressed into the back cover.
The stator has a 3-phase winding, one of the ends of which is connected to a rectifier unit consisting of 6 diodes. Of these, 3 diodes are negative, 3 are positive. According to the polarity, they are pressed into the plates. The entire structure consists of a rectifier unit, which is located on the back cover of the generator unit covered with a protective casing.
The design of the unit also includes contact rings and brushes. On the back side of the back cover there is a brush holder, which is structurally connected to the voltage regulator. The rectifier contains a capacitor that protects the electrical network from power surges.
The “B” terminal of the generator set must be connected to the positive terminal of the battery, and the negative terminal of the battery to the vehicle ground. If the connection is incorrect, this will lead to breakdown of the diodes.
What to do if the generator fails on the road
A breakdown entails not only loss of battery charge. If the alternator seizes, the timing belt may break. In this case, all attachments of the car will lose their functionality. Further movement will become impossible.
If repair in the field is not possible, try to wait until the nearest service center on the battery. During the daytime, all lights, including DRLs, must be turned off. The comfort units must be de-energized.
Turn off one of the radiator cooling fans (unless it's too hot outside). With economical use of ampere-hours, you can drive up to 3 hours on one battery.
D) Diodes or rectifier unit are faulty
To assess the condition of the mentioned components (negative, positive and additional diodes), arm yourself with a low-power lamp and battery. Diodes are indicated by numbers in the diagram: 1. Positive
Operation is determined by connecting “” to the 30 terminal of the generator (for positive), the bolts of the rectifier block (for negative) or to 61 (for additional), and “-” to its body (for negative) or to any of the bolts of the rectifier block (for positive and additional). The glow of the lamp indicates that the diodes have been shorted, which leads to the conclusion that the diode bridge will have to be replaced. Be attentive to the indications on the instrument panel. Often the icon lights up half-heartedly and is not noticeable in bright light.
Read also: Where Does Engine Oil Go?
Generator repair
To understand how the device works, study the layout diagram:
There are three main reasons for repairs:
- The voltage regulator has burned out.
- The diode bridge has failed.
- Break or short circuit in the windings.
Replacing worn out removable brushes is not a malfunction . This is a consumable item that is checked at every maintenance. To remove the old brushes and install new ones, the entire assembly must be disassembled.
Mechanics can be easily “treated” if you have basic plumbing experience. No special tools required. A regular set of wrenches and screwdrivers. Damaged bearings can be removed using a drift or a special puller.
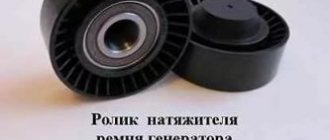
How to replace the tension roller
The design of the generator roller is quite simple. The bearing is its main part. If the belt loosens or slows down, you need to check the bearing itself by turning it by hand. A serviceable roller rotates quietly, without jerking or biting. If the roller is faulty, it is necessary to replace it, which is possible even in the garage, with a minimum set of tools.
Install a pry bar or other tool that can prevent the crankshaft from moving so that the clutch disc is blocked. By loosening the bolt that secures the roller, relieve the tension on the belt. Having completely unscrewed the axial bolt, the tension roller is removed. Then a new roller is installed and the belt tension is adjusted.
After replacing the roller, you need to re-inspect and check its operation. The instruction manual contains detailed instructions regarding the problem described.
Electrical repair
First, the generator must be removed. Before disconnecting the wiring, carefully sketch or photograph the connection diagram. Place the unit on a clean surface so that no debris can get inside. How to connect a generator in the field:
Disconnect the voltage regulator and diode bridge board. Test the diodes and connecting buses with a tester. Faulty radio components are usually visible without measurement. Their repair is impossible, only replacement. Inspect the rotor current collector tracks. The copper surface must be free of oxide deposits, cracks and other damage. If necessary, you can clean it with fine sandpaper.
Procedure for replacing the stator (winding)
In order to release the winding from the second part of the housing, it is necessary to unscrew several nuts securing it to the diode bridge (rectifier unit). There are three such nuts in total and they are clearly visible in the bottom photo:
After which it can be removed quite easily, and all that remains is to disconnect one more wire, this is shown in the picture:
If necessary, replace the winding with a new one. the price of which is no more than 500 rubles, I can’t give exact prices. We install all removed parts in the reverse order.
Source
Battery charging lamp VAZ 21214
After replacing the alternator belt, charging stopped
, as a result, the battery died and the controller stopped working. The location where the charging relay is located near the field is determined by the age of the car. Thus, a remote relay can be found on the right fender liner of a car with a classic engine compartment layout; more modern modifications of generators are equipped with a launch vehicle combined with a brush assembly.
The element is not repaired, but replaced completely. To assess the condition, you will need power supplies of 12-14 V, followed by replacement with 16-22 V, and also an incandescent lamp of 1-3 W. According to the diagram drawing, apply current to the voltage regulator in series. If the first test is characterized by the operation of the lamp, and the second - by the absence of glow, then the LV is working.
If there is a break, the lamp will not light up at all; if there is a breakdown, it will glow constantly. In addition, weak charging, as well as its absolute absence, is often explained by abrasion of the brushes (residual height less than 5 mm) and slip rings of the generator. If the first part is changed along with the brush holder, then the second is restored by grinding, grooving or removing the remains of the old rings and pressing in new ones. It is recommended to supplement the disassembly of the unit with a total cleaning.
Read news about the new Niva
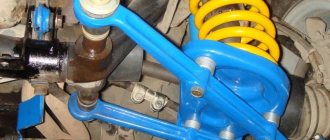
- Front axle. VAZ 21213, 21214 (Niva)
- How to bleed the clutch on a Niva? Algorithm of actions
- Replacing the drive gear oil seal of the front axle VAZ 2121 Niva 2131
- Installation and reviews of Euro handles for Niva 4x4 (VAZ 2121, 2131) » Lada.Online - all the most interesting and useful about LADA cars
- How to bleed the brakes on a Niva yourself? "
- Interior heater valve VAZ 2121 Niva 2131
- Do-it-yourself Niva 2121 elevator: drawings, dimensions
- The modernized Lada Niva Legend (4x4) 2021 was shown on the Internet