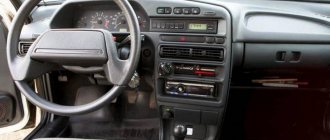
Before we look at the main topic - how to remove the cigarette lighter of a VAZ 2114, you should first find out - what is a cigarette lighter, where is it located and how to use it?
A car cigarette lighter is a special electrical device, usually located on the front panel of the car and used for lighting cigarettes (hence, as you might guess, the name), as well as connecting various electrical appliances and tools (more precisely, they are connected to the cigarette lighter socket, and not into the cigarette lighter itself, which is only a removable part. However, in most cases, both parts of this device are called the same...)
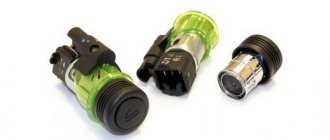
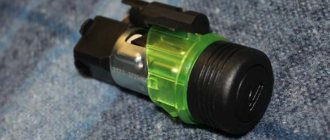
Cigarette lighter VAZ 2114
Inside the connector of this device there are two contacts, which, in turn, are connected by wires to the on-board network.
The removable part, which serves for lighting the cigarette, is also designed quite simply - it contains bimetallic contacts and a conductive spiral, which heats up when connected to the network (the vast majority of cigarette lighters also have a button that turns the heating process on and off, which protects the device from quickly burning out (in case the heating was constant...)
It should be noted right away that in addition to its main purpose, a huge number of different equipment can be connected to the cigarette lighter socket (for this it must have a suitable connector).
Among them:
- chargers for mobile phones;
- compressors for tire inflation;
- car vacuum cleaners;
- mini refrigerators;
- audio recorders;
- measuring instruments, and much more.
Thus, the cigarette lighter is a fairly universal and necessary device inside the car, which is why it is so important that it is in good condition.
Dismantling the tunnel on a VAZ-2110
To remove the tunnel you will need:
- Remove the facings by unscrewing two bolts on each.
Use a Phillips screwdriver to unscrew the screws and remove the tunnel lining.
On the right side we find and disconnect the pads.
Remove the cover under the handbrake.
Remove the cover by prying it with a flat screwdriver in four places.
Removing the cigarette lighter
To remove the cigarette lighter itself you will need:
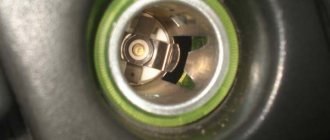
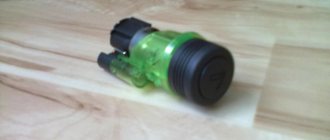
- Pull the cigarette lighter out of the socket by squeezing the connectors.
Remove the lamp screen by squeezing its claws.
Installing the cigarette lighter is carried out in the reverse order.
When installing a new cigarette lighter, observe the polarity of the terminals.
Quick method
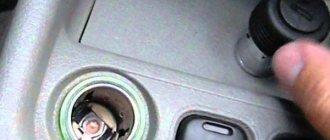
If you look at this procedure as it is described in the User's Guide, the work will seem complicated. That is why for many it is a problem how to remove the cigarette lighter from its socket without removing the tunnel itself . There is little space for such manipulation and there is no access to the cigarette lighter from different sides. But there are certain points that will help you cope with the task.
You should insert your finger into the cigarette lighter socket and pry off the cigarette lighter itself with a screwdriver. If you manage to remove the cigarette lighter from its socket, then it can be changed. Installation is also carried out in reverse order.
If the cigarette lighter socket is hanging into the hole, you may be able to remove it without dismantling the tunnel.
Exterior mirrors
Model selection
News
- [17.01.2019]
ATTENTION! From January 1, 2022, due to an increase in the VAT rate, prices for products of NPK Polytech have been changed. - [10.01.2019]
Sale of interior and additional mirrors produced by 3R! - [05.06.2017]
Since May 2022, the products of NPK Polytech have been labeled with EAN-13 barcodes.
Before asking your question, check if this question is in the top block of answers.
Question:
I installed LT-9 mirrors on a VAZ 2114. Please help me solve the problem of image shaking in the driver’s mirror?
Please indicate all possible steps to eliminate vibration so that you can find the problem step by step and fix it. There is also a problem of insufficient adjustment of the mirrors - sometimes they look down, sometimes to the side. It feels like the drive cables need to be shortened. How to disassemble the mirror to get to the cable mount? Answer:
no answer
Question: Hello. I purchased NT-10 Volna mirrors without a turn signal and heating. Installation was very easy. But there was one problem. The left mirror rattles and shakes on its own, while the right one does not shake or shake. What should I do? How can I fix this problem? Thanks in advance for your answer.
Video on how to remove the cigarette lighter without dismantling the tunnel
Messages: 2486 Registered: Dec 17, 2007, 00:00 From: defense Experience: 1996 : Awards: 1
| Rating: 14 811 |
| Reputation: +11 |
Thanked: 117 times Thanked: 151 times
Post by dino » Jul 17, 2012, 03:21 pm
Lyusha, do you want me to change it for 10 thousand?)
Added after 4 minutes 50 seconds:
Lyusha, check it out first. maybe that's not the problem))
Messages: 137 Registered: Sep 07, 2011, 00:00 From: Tyumen Experience: 2003 Car: Peugeot 307
| Rating: 137 |
| Reputation: 0 |
Post by benzin » Jul 17, 2012, 03:27 pm
Messages: 51 Registered: Sep 20, 2011, 00:00 Car: Volkswagen polo sedan
| Rating: 51 |
| Reputation: 0 |
Post by Lyusha » Jul 17, 2012, 3:27 pm
dino, well, how do I know what a fuse is? Now I looked at the pictures and realized what it was. I don’t want it for 10 thousand rubles!)) thank you!!
Added after 1 minute 6 seconds:
benzin, I don’t smoke and never use a cigarette lighter. I went on a trip and used the navigator and recorder. After which they stopped turning on - I plugged it in to check the cigarette lighter itself - and it got stuck
Specifications
Manufacturers are constantly trying to produce car mirrors with modern reflective elements, equipping them with a heating system and electric drives. All this can significantly improve the life of the owner of a Lada car. A good mirror increases safety many times over.
Modern products can be characterized by an increased level of visibility, the presence of special anti-reflective coatings, clear and high-quality images, and a convenient and reliable adjustment system.
Sufficient visibility for a car mirror is achieved using a combination of the shape, size, and level of curvature of the optical reflective element. The position of the mirror relative to the eyes is also verified. A lot depends on the overview - the higher it is, the more information about the situation the driver will receive.
Young car enthusiasts love to equip their cars with xenon optics. At night, xenon is very blinding to other drivers through the side mirrors of the VAZ-2114. To prevent even minimal glare, a special liquid crystal layer is introduced into it, which, when exposed to bright light, reduces the intensity of reflected light and helps protect the driver, thereby helping to avoid accidents.
A clearer picture, which is viewed in electric mirrors, is ensured thanks to a special reflective layer. Previously, it was applied only to the inner surface of the reflective element - even with heavy contamination, the driver saw a distorted image. Modern manufacturers produce VAZ-2114 side-view mirrors with a reflective layer on the outside.
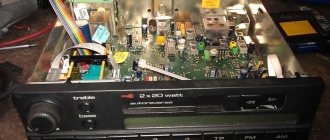
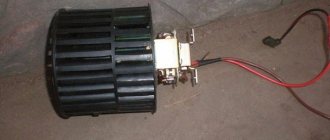
We disassemble, repair the cigarette lighter and replace its socket.
An option such as a car cigarette lighter is relevant not only for heavy smokers. For example, to connect a portable compressor to inflate tires, you cannot do without a working cigarette lighter socket. But what if it doesn't work? With a little knowledge, you can make this simple repair yourself.
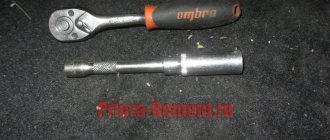
Required tool for repair.
- Forceps, small size;
- Solder;
- Soldering iron;
- Carrying or flashlight;
- Pliers;
- PVC tape
Cost of covers for Kalina mirrors
They cost on average from 500 to 1000 rubles, depending on the shape, color and method of attachment. Unpainted overlays can be purchased for only 200 rubles. Chinese cheap analogues cost very little (100-300 rubles), but are significantly inferior in quality. They are more fragile, brittle and inelastic.
Mirror covers for the Lada Kalina are the simplest but most noticeable tuning element!
The VAZ service station provides complete diagnostics and repairs of the Lada Kalina (1118) sedan.
Our car service specialists have extensive experience in maintaining and repairing VAZ vehicles, and thanks to our own auto parts store, we always have the necessary parts in stock.
View the price list for basic VAZ repair work
Prices for our car service services are significantly lower than the market average, which allows you to carry out high-quality repairs at an affordable price.
STO VAZ provides the following types of services:
- Car repair Lada Kalina (1118) sedan;
- Full diagnostics of VAZ 1118: diagnostics of the engine, brake system, suspension, compression measurement;
- Maintenance of Lada Kalina 1118 sedan: changing engine and transmission oil, replacing filters, replacing technical fluids, replacing the brake system and timing belt;
- Repair of the chassis: suspension, clutch, steering, brake system;
- Tire fitting and storage;
- Car wash;
VAZ-1118 is a new model of AVTOVAZ LLC, the production of which began in 2004. This is a five-seater passenger car with front-wheel drive, a front engine and an all-metal welded body. Lada Kalina is distinguished by a reinforced structure of the roof, sills and central pillar. Additionally, safety is ensured by bumpers made of impact-resistant polypropylene. The engine is four-cylinder, four-stroke, in-line, eight-valve, with a displacement of 1.6 liters.
In the basic configuration, Lada offers electric power steering, and as an additional set of options you can choose seat belt pretensioners, air conditioning, airbags, heated front seats, electric rear-view mirrors and an anti-lock brake system. All VAZ-1118 vehicles are equipped with special catalytic exhaust gas converters.
The exterior rear view mirror on the Lada Kalina is designed and dismantled very simply and conveniently, like everything on this model of a domestic car (in my opinion, the best in terms of price-quality ratio).
This particular mirror is suitable for both Tens and Priora. As we can see in the photo above, the mirror mounting principle is the same as on other Ladas, with one small difference. The side mirror is attached to three self-tapping screws using a shaped screwdriver (see photo above).
The side mirror itself (in this case, simple, without a turn signal repeater, with manual adjustment) consists of two parts. The main part (the mirror itself) and the protective cover. Connect these parts carefully and accurately by aligning the grooves on the mirror and the inserts on the lid and press it. It should click into place.
Next, lean the mirror on the outside of the door so that all three guides and the cable connection fall into place (photo above). Then, screw in and tighten the three screws. Make sure that the mirror on the outside of the door is level and properly positioned.
And now, that same “one small difference” - instead of the Zhiguli plastic nut that we screw onto the connection of the control cables, here it is attached to the same Zhiguli corkscrew, which on the classics secures the door lock cylinder. And finally, put on the plastic panel so that the adjustment lever fits into the rubber frame, lean the panel against the two guides in the corresponding holes and press it.
Mirror for Kalina, price 3000 rubles (with mechanical adjustment and without repeater)
Priora instrument panel backlight disappeared
Yesterday the dashboard went out in the part where the speedometer was... a month ago the 0-40km/h light stopped flashing (I thought one light was on, I didn’t even pay attention)... yesterday the whole place where the speedometer went out ((
tell me what could have happened
and also why the yellow light on the panel on the left
Comments 27
change the light bulbs to regular ones. There are two screws on top and two on the sides. You unscrew it and take out the device. just be careful, don’t tear the cable, disconnect it carefully. You unscrew the sockets and take out the bulbs... as for the bulb on the left, it has something to do with the muffler. Probably the sensor came off. Where did the muffler come off? under the hood and at the level of the steering wheel (I’m talking about two oxygen sensors.
It’s probably no secret to anyone that the reliability of VAZ “ten” leaves much to be desired. Often, the owners of these cars have to deal with certain malfunctions. One of these problems is the lack of dashboard lighting. It is clear that the breakdown should be corrected as soon as possible. After all, going somewhere at night will be quite problematic - few people will like to move, essentially, blindly, without seeing either the current speed or other, no less important indicators.
Internal
Let's start with the rearview mirror installed inside your car.
Interior rear view element
There are several reasons why the driver will want or have to dismantle this element:
Replacement
Do not rush to remove the old mirror if you have not yet purchased a new product. Sometimes you have to wait for weeks because of the speed of delivery, and sometimes it’s enough to go to the market or store, where you will immediately find the desired product.
Useful tips from experts
Without knowing how to properly adjust the side mirrors in your car, it is recommended to listen to the advice of experts:
To learn how to properly adjust the side mirrors in a car, drivers should listen to the recommendations of experts and teachers at a driving school. Mirror elements are very important for monitoring the situation behind the car when performing various maneuvers:
Not only visibility, but also road safety in general depends on the quality of adjustment of the side mirrors.
Source
Article: 62.3710
Order code: 023197
- Maybe they will be useful for you
- show more
Designation – 62.3710 Name – instrument scale lighting switch
Applicability
– cars: VAZ-2108, -2109 and mod. Application options – design options: rotary, with rheostat and fuse.
Technical properties:
– turning on and adjusting the lighting of the instrument scale; – number of positions: 2; – nominal voltage: 12 V; – rated overload current: 1.2 A; – weight: 0.049 kg.
Main manufacturer – JSC LETZ
Information applied: Avtokomplektatsiya LLC
- Passenger cars / VAZ / VAZ-21092 drawings
” href=”/catalog/vaz-3/legkovye_avtomobili-30/vaz_2109-9/pribory-205/#part34437″>Device rheostatInstruments and sensors / Instruments - ” href=”/catalog/vaz-3/legkovye_avtomobili-30/vaz_2109-9/pribory-206/#part34480″>Device rheostatInstruments and sensors / Instruments
- ” href=”/catalog/vaz-3/legkovye_avtomobili-30/vaz_2115-65/pribory-179/#part54683″>Device rheostatInstruments and sensors / Instruments
- ” href=”/catalog/vaz-3/legkovye_avtomobili-30/vaz_2114-647/vyklyuchateli__11__13__15_-155/#part1671059″>Device rheostatElectrical equipment / Switches (11, 13, 15)
- ” href=”/catalog/vaz-3/legkovye_avtomobili-30/vaz_21213_214i-1240/pribory_i_podsvetka-272/#part2991466″>Device rheostatElectrical equipment / Instruments and lighting
- ” href=”/catalog/uaz-5/legkovye_avtomobili-30/uaz_31519-439/pereklyuchateli__vyklyuchateli-175/#part1362248″>Instrument panel light switch 62.3710 with rheostat assemblyElectrical equipment / Switches, switches
- ” href=”/catalog/vaz-3/legkovye_avtomobili-30/lada_4x4_urban-1885/k310__pribory_i_podsvetka-193/#part4208299″>Device lighting switch with rheostatAccessories / K310. Instruments and lighting
- ” href=”/catalog/vaz-3/legkovye_avtomobili-30/vaz_2108-18/pribory-211/#part30523″>Device rheostatInstruments and sensors / Instruments
- ” href=”/catalog/vaz-3/legkovye_avtomobili-30/vaz_21099-79/pribory-206/#part38419″>Device rheostatInstruments and sensors / Instruments
- ” href=”/catalog/vaz-3/legkovye_avtomobili-30/vaz_2131-73/pribory-266/#part66003″>Device rheostatInstruments and sensors / Instruments
- ” href=”/catalog/vaz-3/legkovye_avtomobili-30/vaz_2113-648/vyklyuchateli__11__13__15_-155/#part1671059″>Device rheostatElectrical equipment / Switches (11, 13, 15)
- ” href=”/catalog/uaz-5/legkovye_avtomobili-30/uaz_3160-80/pereklyuchateli__vyklyuchateli-161/#part190602″>Instrument panel light switch 62.3710 with rheostat assembly Electrical equipment / Switches, switches
- ” href=”/catalog/uaz-5/legkovye_avtomobili-30/uaz_31519-844/pereklyuchateli__vyklyuchateli-188/#part2235924″>Instrument panel light switch 62.3710 with rheostat assemblyElectrical equipment / Switches, switches
- ” href=”/catalog/vaz-3/legkovye_avtomobili-30/lada_4x4_m-1456/pribory_i_podsvetka-198/#part3241966″>Instrument lighting switch with rheostatElectrical equipment / Instruments and lighting
- ” href=”/catalog/vaz-3/legkovye_avtomobili-30/lada_4x4-1887/k310__pribory_i_podsvetka-220/#part4215694″>Device lighting switch with rheostatAccessories / K310. Instruments and lighting
- ” href=”/catalog/avtokran-42/spectehnika-42/ks_6973a-817/lektrooborudovanie_kc_6973a_80_000-48/#part2159459″>Electric motorElements of electrical equipment / Electrical equipment KC-6973A.80.000
- There are no reviews for this product yet.
The series of articles “Crystal VAZs, or ordinary breakdowns of Russian cars” talks about the corresponding dilemmas and problems of cars produced by the Volzhsky Automobile Plant. Now we will talk about the front-wheel drive Samara family, as well as its modern analogues.
Source: www.avtoall.ru
We install Toyota engines
3UZ-FE (4.3 l, 300 hp) with automatic transmission (up to 5 tons, not taking into account the weight of the vehicle, only cargo) 4th environmental class
| Volume: | 4.3 l. |
| Power: | 290 hp |
| Number of cylinders: | 8 pcs. |
| Fuel: | gasoline, propane |
| Box type: | Automatic transmission |
| Engine resources: | 1000000 km |
1UZ-FE with automatic transmission (can carry up to 3.5 tons, not taking into account the weight of the vehicle, only cargo) 2 environmental class
| Volume: | 4 l. |
| Power: | 280 hp |
| Number of cylinders: | 8 pcs. |
| Fuel: | gasoline, propane |
| Box type: | Automatic transmission |
| Engine resources: | 1000000 km |
2JZ-GE with automatic transmission (up to 2.5 tons, not taking into account the weight of the vehicle, only cargo) 3 environmental class
| Volume: | 3 l. |
| Power: | 230 hp |
| Number of cylinders: | 6 pcs. |
| Fuel: | gasoline, propane |
| Box type: | Automatic and manual transmission |
| Engine resources: | 1000000 km |
1JZ-GE with automatic transmission (up to 1.5 tons, not taking into account the weight of the vehicle, only cargo) 2 environmental class
Detailer › Blog › Swap price. Let's take off our rose-colored glasses. Part 1 Contract Engine.
Despite the possibly vulgar title of today’s personal blog entry, I would like to dispel the myths and speculation that installing a different engine and gearbox will cost three kopecks...
Having read forums and advice from sofa “experts”, you are full of euphoria to “swap” your Volga, Gazelle or Toyota. But everything is not so simple at first glance. The result in most cases is sad. This is a sale of spare parts or long-term construction for many years. In this post I will only consider gasoline engines. Diesel is a completely different philosophy.
We put UZ in Volga. Everything will go now.
To begin with, you must answer yourself the question, why do you need all this? Why do you need a different engine under the hood of your car or install a non-standard gearbox? If you're just driving, then you shouldn't do a swap.
This will be better for your nerves and finances. Decide on a budget. Calculate everything carefully.
The engine costs 70,000. I have 100,000 rubles. I have enough for everything. This is what most dreamers think. What's going on there? Fill up with oil and off we go.
There will be several parts in total. Each of them is the experience of not only your humble servant, but also the experience of other people and which I want to share with you. This will help you make the right decision.
Part 1 Contract Engine,
Here we look at engine choice. Purchase methods. And the necessary actions related to maintenance.
Part 2 Selecting a gearbox
Obviously, this information could be included in the first part of the article, but there is so much experience and material that it is better to devote a separate blog entry to this.
Part 3 The swap itself into the car.
Here the main work, the necessary spare parts will be considered and, of course, the final budget for the swap will be summed up.
In each post I will provide an example price calculation. This will help you decide before starting the project and what budget you should prepare.
Gazelle with a Zhiguli engine.
Select an engine based on the technical specifications of your car.
Before spending “your hard-earned money”, you need to understand which engine to install, which engine is suitable for your car. If it is a Volga or another passenger car, JZ and UZ are suitable. If this is a commercial vehicle (Gazelle, Sable, Mercedes Sprinter, Ford Transit), UAZ SUV, Nissan Patrol, Toyota Land Cruiser, then you need to choose an engine based on the torque characteristics graph, engine size and the specifications of your work on commercial vehicles.
A small engine in a commercial vehicle or a heavy SUV with torque output at high speeds will certainly drive, but with a big appetite for fuel. This is, for example, an RB 20-25 swap under the hood of a Nissan Patrol and other similar options. A simple example of installing a carburetor from a Zhiguli to a Volga. It will drive, consumption will decrease, but the car will lose a lot in dynamics.
IvanD › Blog › Thanks to THESE tips, I adjusted my car mirrors quickly and correctly!
The question of correctly setting car mirrors is relevant for both beginners and driving gurus. After all, in many cases your safety depends on this. This is not at all easy, and you need to know the adjustment technique.
How to set up mirrors
If you look in the side mirror and see the rear wing of the car, this is a sure sign that the mirror is not adjusted correctly. With this mirror arrangement, most of the area behind the car is visible both in the side mirrors and in the rearview mirror. But the area next to the car is very poorly visible and creates the danger of an emergency.
HOW TO ADJUST THE LEFT SIDE MIRROR
Lean to the left until you almost touch the side window. Adjust the mirror so that you can see the rear wing of the car. When you sit in your seat as usual, you will practically not see the side wing of your car in the mirror.
HOW TO ADJUST THE RIGHT SIDE MIRROR
Lean to the right so that your head is in the center of the car. Thus, you should see the rear wing of your car.
HOW TO ADJUST THE REARVIEW MIRROR
The center of the rear view mirror should be in line with the center of the rear window.
-Even correctly adjusted mirrors have so-called blind spots. And sometimes it’s better to look over your shoulder when maneuvering, so as not to hit, for example, a cyclist or motorcyclist. Looking over your shoulder gives you the information you need that you will never get by looking even in properly adjusted mirrors.
-Always look in the mirrors, and not just at the moment when you want to change lanes. This will allow you to constantly be aware of the situation on the road and correctly make sudden unexpected maneuvers. For example, when you go around a pit.
It may be very unusual for you to drive with your mirrors adjusted in this way at first. But wait a couple of days and you will get used to it so much that you will not understand how you drove differently before.
Have a safe ride! Share your tips with your subscribers!
Comments 54
It's complete crap. With this setup it's like a blind kitten. In the side mirrors you can’t see what’s going on behind the car on the road at all. Whether there is a fire department, an ambulance or the police, you will see when they get close. And it’s simply impossible to control. I didn’t manage to park like that at all)))) I don’t use the rear window or rearview mirror in the winter and I don’t clean the glass, more often in the summer, but I’m used to looking at the side windows all the time. We are determined that from my place I can see the edge of the side, and not, as in the attached photo, half the car. Maybe this is a setting for older mirrors?
From what? I pointed out real statements in neighboring threads. These people certainly don't consider themselves idiots.
Many people find it convenient to not wear a seat belt and ride lying down.