Main process
Using a screwdriver, remove the windshield blower nozzles.
Then the upper fastener, consisting of three clamps and bolts holding the instrument panel, is removed. The next step will be dismantling the amplifier. After a visual inspection of the bottom of the console, remove the corresponding screws that are located at the bottom of the panel. Next, the wiring of the instrument assembly is dismantled by unscrewing the pads and clamps. The wiring system associated with the ignition switch is also inspected and removed. Together with it, the ground fastening, the power supply structure of airbags and other components with an electrical connection are disassembled. The final step is to dismantle the Priora dashboard itself with the center console. The part in question is a rather weighty part; it is advisable to have an assistant to remove it from the cabin. At this stage, the operation to remove the center console can be considered completed and further planned work can begin.
Features of dismantling
How to remove the console on a Lada Priora yourself
The process will not take much time, it is quite simple, you will not need special tools, just a cross-shaped twist. But before you find out how to remove the console on a Priora, learn about some of the features of the procedure.
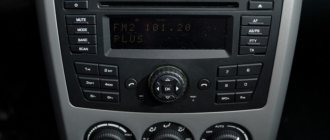
Disassembly always begins with removing the radio and disconnecting the wires. To remove it, press the special buttons on the sides of the device; you should hear a characteristic click. Pull the radio towards you, disconnect the wires.
Now you need to remove the compartment in which the radio is located, after which the car owner will see two self-tapping screws, they must be unscrewed during the process of dismantling the console.
Required Tools
In order to remove the radio, you must have special keys designed for this purpose. Users often use the Sony or Pioneer MMC editing tool. But if there are no such keys, then you can use improvised means. In most cases, a frame from windshield wiper blades is used. There are slots at the ends of the metal plates that engage with the latches of the car radio.
If there are no such devices, then you can remove the standard head unit from the Priora using nail files. The size of the tool must be such that it fits freely into the existing slots. In the case when the standard unit is replaced with a 2-din radio, you will have to remove the decorative panel. To do this you will need a screwdriver or socket wrench.
How to remove the instrument panel, tuning, modifications
Interior climate system of Lada-Priors (VAZ-2170)
Removing the instrument panel on VAZ 2110, 2111 and 2112 cars is not an easy task. But at the same time, it is possible to carry out this repair yourself, if you have the necessary tools at hand, as well as clear instructions.
Regarding the action plan, there are not many detailed guides on the Internet for removing and installing the instrument panel, and all this is due to the fact that the procedure has a number of difficulties and subtleties that not everyone can remember when writing such an article.
However, I will try to make material that will at least 90% help give the overall picture and the main points that should be taken into account when removing the panel on a VAZ 2110-2112. To perform the repair you will need the following tool:
- Phillips screwdriver, both short and long
- 10 mm head, preferably deep
- Ratchet handle or crank
- Wire cutters or sharp knife
- Flashlight if necessary
Removing and installing the instrument panel on VAZ 2110, 2111 and 2112
Before you begin this repair, you must do the following:
After this, you can proceed to further actions. We immediately remove and remove all the elements of the panel, such as: the standard clock, the heater control unit, the display unit, as well as the central deflector, and do not forget about the buttons with the radio. As a result, we get approximately the following picture:
Next, using a screwdriver, pry up and remove the plugs at the upper corners of the instrument panel mounting. In reality it looks like this.
On the other side, we do the same, after which, using a socket and an extension, we unscrew the nuts securing the instrument panel in the upper part.
Now let's move on to the remaining attachment points. At the bottom, in the left and right parts of the panel - in the corners, there is also one screw that needs to be unscrewed. The first one is shown below.
The second one is located on the right side of the panel in the same place - at the bottom in the corner. Also, immediately unscrew the self-tapping screw that secures the diagnostic block:
Now we move on to the side fastening points of the frame, which are located in the center on each side - the photo below shows the left side:
On the right everything will be the same. Next we move on to the internal frame fastenings, which are located in the following places. The first one is under the fuse mounting block, to get there we open the cover and look inside the panel:
The second one on the right is visible when the glove compartment lid is open:
Of course, the mounting block will also have to be removed so that it remains intact with the sub-panel wiring.
- We thread it inside with the instrument panel pulled back; you will also have to cut off some of the wiring fastening clamps, for example, in this place, which is shown in the photo:
- Now we are trying to remove the VAZ 2110 panel, moving it to the side on both sides, evenly, without much effort or sudden movements.
In the photo above you can see that the headlight hydraulic corrector tubes were cut off, since in my case they were simply not needed. If you need to save them, do everything carefully and remove them by pulling the control unit out of the instrument panel. Next, we finally remove the panel, of course, after first disconnecting all the wires that will interfere with this.
Installation occurs in the reverse order, connecting all wires and connectors to their places, blocks and switches, as well as other elements that were removed as a result of this procedure.
Installation of Europanel instead of the usual one on VAZ 2110, 2111 and 2112
Many owners who have owned a VAZ 2110 for a long time would like to change the boring panel to a more modern one. In this case, you can install a new type of panel from cars manufactured after 2006, or from the “Bogdan” versions, which are analogues of the tenth family, except that they were assembled in Ukraine.
With such alterations, basically you won’t have to change anything, but it’s worth considering that in this case you need to buy a complete Europanel:
- instrument panel frame assembly with trim
- instrument panel (combination)
- buttons and switches
- heater deflectors
- New heater control unit
- sub-panel wiring
- steering wheel, cover and switches
Only in this case everything becomes without any problems with minimal labor costs.
The procedure for working with the front wing of the Priora
In general, this entire action can be divided into 3 stages.
- Removing the bumper.
- Removal of sills and fender liners.
- Removing the directly required element.
Removing the bumper is a separate procedure that has been described more than once, so there is no need to elaborate. In general, unscrew the side and bottom screws on both sides and carefully remove the bumper.
The sills and fender liners are attached with self-tapping screws and can be removed without any problems. But the dismantling of the wing itself needs to be considered in more detail. So, first of all, move the side repeater a little to the side and, taking it out of the groove, remove it from the connector. Now the key to “8” is in your hands, and forward. In order. Bolts, one each, for the front and lower fastenings, through the wheel arch, two bolts for the rear fastenings, and, finally, the last four are the upper 3, connected to the body, and the headlight protection fasteners. That's it, the wing can be moved to the side.
What is the advantage of this model. The elements are not welded to the body as on previous cars, but are conveniently fastened with bolts. And they can be removed using just the keys.
Installation of a new or restored element
In principle, it is carried out completely in reverse order. Just a small caveat: you don’t need to tighten all the bolts at once. There are tolerances in the mounting holes. Therefore, you need to attach all the attraction points and align the wing so as to ensure minimal gaps with the body. Only after completely removing the gaps in the body, tighten the bolts and install the remaining parts. This completes the work.
The video below shows the final moment of replacing the Priora wing:
Removal and installation of the instrument panel Lada Priora, VAZ 2170, VAZ 2171, VAZ 2172
How to remove a torpedo on a grant video
Useful tips When installing the instrument panel, you may need clamps to secure the wiring harnesses, since in some cases it is easier to cut them when dismantling the panel. Depending on the vehicle configuration, a different number of pads with wires may be used. Therefore, when separating the pads, mark them relative to each other. This will make the job easier when installing the instrument panel. Mark the free pads separately.
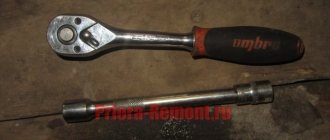
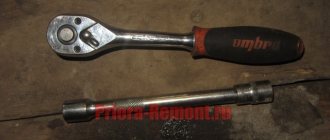
You will need: 8" and 10" socket wrenches, flat and Phillips blade screwdrivers.
1. Disconnect the wire from the negative terminal of the battery. 2. Remove the steering wheel (see “Removing and installing the steering wheel”). 3. Remove the steering column trim (see “Removing and installing steering column trim covers”). 4. Remove the VAZ 2172 steering column switches (see “Checking and replacing steering column switches”). 5. Remove the floor tunnel linings (see “Removing and installing the floor tunnel linings”). 6. Remove the lada priora instrument cluster (see “Removing and installing the instrument cluster”).
7. Remove the right and left screws securing the center console of the Lada Priora instrument panel.
8. Using a screwdriver...
9. ...remove the side window heating nozzles on the right and left.
10. Using a 10mm socket wrench, unscrew the two nuts of the upper fastening of the Lada Priora instrument panel on the left and right.
11. Turn the three latches and remove the fuse and relay box cover.
12. Remove the four screws securing the instrument panel amplifier of the Lada Priora...
13. ...and remove the amplifier.
14. Turn inside out from the bottom left...
15. ...and on the bottom right there are two screws securing the Lada Priora instrument panel.
16. Remove the screw securing the instrument panel to the left of the steering column...
17. ...and the fastening screw located on the right under the instrument panel.
18. Using a size 8 wrench, remove the bolt securing the ground wires of the instrument panel to the body bracket.
19. Move the clamps of the VAZ 2171 instrument panel wiring harness blocks to the right...
20. ...and disconnect the three harness pads from the pads installed on the bracket.
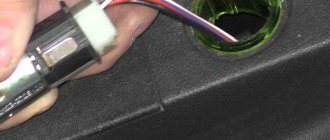
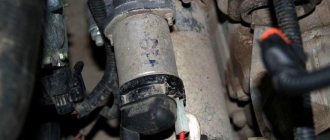
21. Disconnect the wiring harness block of the Lada Priora ignition switch (lock).
22. Disconnect the wiring harness connectors from the electric power steering.
23. Using a 10mm wrench, unscrew the nut securing the ground wire of the instrument panel harness from the bracket for the electronic units.
24. Slide the pad lock...
25. ...and disconnect the instrument panel harness from the ignition system harness.
26. Disconnect the instrument panel harness connector from the electrical accessories control unit.
27. Slide the lock...
28. ...and disconnect the instrument panel harness connector from the airbag control unit.
29. Remove the instrument panel and remove it from the interior of the Lada Priora.
Note Since the instrument panel is quite bulky and heavy, this operation should be performed with an assistant.
30. Install the VAZ 2170 instrument panel in the reverse order of removal.
Dismantling the upper and lower lining of the floor tunnel
First of all, it should be noted that the lining should be removed after cleaning the floor in the cabin, after which disconnect the “?” terminal. from the battery and perform the following steps.
1. There are two mounting screws on the right and left sides of the floor tunnel lining. Unscrew them and remove both trims.
3. The lining, which is located on the facing, is removed by pressing its front part under the parking brake lever. Take it off too.
4. Remove the gear shift lever handle by pulling it up.
5. The car gearshift lever cover is attached to latches on each of the four sides. To remove it, press out each one with a screwdriver.
6. Now you can move on to the cladding itself. Unscrew the central fastening screw.
7. Fold the front seat back, which raises the front edge. This will open access to the middle fastening of the cladding. Remove the screws on both sides of the cladding.
8. Slide backwards and remove the top lining of the tunnel. It is installed in the reverse order of removal.
9. Move the seats forward. There are air vents underneath them. They can be removed by unscrewing the fastening nuts.
10. The lower tunnel lining is secured with six nuts. Unscrew each one and remove the lining itself.
11. When the manipulations to repair the required unit have been completed. All that remains is to install the lower lining of the car floor tunnel
This is done in the reverse order of dismantling. Pay attention to the air vent pipes: both should fit into the holes on the lower lining
As you can see, there is nothing difficult in dismantling the floor tunnel lining. This event requires attention to detail and adherence to order.
Disconnect the negative battery from the terminal, and for ease of work you can remove the front seats. Then:
- Unscrew the nut of the air duct securing to the legs of passengers in the rear seat, using the socket “10”.
- Remove the air duct. Similarly, remove the second air duct on the right side.
- Raise the armrest and pry the pad onto the armrest hinges.
- Remove the armrest of the Priora Lada.
- Unclip the latches to pry open the storage container for small items. Pull it out. Unscrew it.
- tunnel 2 bolts securing the armrest hinge from the head using “10”, and remove it.
- Unscrew the 4 screws of the floor fastening tunnel using a Phillips screwdriver.
- Through the opening, press the latch and remove the block with wires from the trunk lock button control.
- Unscrew the 2 fastening tunnel nuts using a high 10mm socket.
- Place the front seats in place and move them forward as far as possible. self-tapping screw Unscrew the tunnel fastenings to the base on the left and right - similarly, using a Phillips screwdriver.
- Remove the plastic plug at the bottom of the cup holder using a flat blade.
- screwdrivers, self-tapping screw for securing the cross-shaped tunnel. Unscrew.
- self-tapping screw Unscrew the fastenings of the front part of the tunnel using a Phillips screwdriver. Unscrew the self-tapping screw on the right side in the same way.
- Unclip the latches and remove the Priora gearbox cover. Leave the frame with the cover on the lever. Unscrew.
- Gearbox 2 screws securing the tunnel to the instrument panel console using a Phillips screwdriver.
- Raise the tunnel up.
- Press the latch and disconnect the cigarette lighter plug from the wires. Remove the central tunnel of the Priora.
lining Installation of the tunnel is carried out in the reverse order.
Connecting a voltmeter to the on-board network
A digital voltmeter in a car must meet two main requirements:
- show the voltage on the battery as accurately as possible;
- turn off when the engine is not running so as not to discharge the battery while parked.
Accurate data on the voltage on the battery can be taken directly from its terminals. To do this, you need to connect the wire from the positive terminal to the installation location of the voltmeter. To prevent conductor resistance from causing a voltage drop across the device, the wire cross-section must be at least 0.5 mm.
The wire must have strong, good insulation so that a short circuit does not occur over time.
It is important that this way of connecting the wire bypasses the standard fuse box, so care should be taken to protect the circuit from overload. For safety, install a fuse between the battery and the wire going to the voltmeter
Otherwise, the wiring may even catch fire in the event of a short circuit.
It is best to lay the wire into the cabin to the place where the voltmeter is installed in the general wiring harness of the Priora. To do this, you will have to bring it into the cabin and stretch it under the dashboard.
It is ideal to dismantle the entire torpedo for this, but this is a complex and time-consuming job. The problem is solved by partial disassembly: removing the dashboard or center console. To do this, there is no need to disconnect the wiring harnesses; you just need to move the “tidy” a little to be able to pull the wire to the right place.
It is enough to connect the second wire of the voltmeter to ground where it is convenient. When connecting a voltmeter to the wires of the ignition switch, tape recorder or other wires located in the dashboard area, its readings will be lower due to the voltage drop across the contacts and connections.
In order for the voltmeter to turn off when the ignition is turned off, an electromagnetic relay must be inserted into the gap in the wire between it and the battery terminal. The relay winding should be powered from any wire on the ignition switch, on which voltage appears after turning the key.
If you have no experience or desire to tinker with laying the wire from the positive terminal of the battery to the car voltmeter
https://www.youtube.com/watch?v=YF1bygfROUw
The first step, of course, is to dismantle them. This is quite easy to do on a VAZ classic, but not so much on a Priora. In order to remove the watch, you need to remove the plastic decorative panel. Then remove two screws, and we will find a couple more under the ashtray.
But it doesn’t end there, there are still screws waiting for us, we will find them after we remove the radio. And only then can you remove the panel by gently pulling it towards you. Take a knife or flat screwdriver and press on a fairly tight latch.
Now we need to disassemble the watch, and this is easier than removing it. We see four latches on the sides; we snap them off. Now carefully remove the arrows. If desired, the arrows can be replaced, if, of course, there are other more elegant ones at hand. But you don’t have to do this, since we are annoyed by the shade of the arrows, and not by the elements themselves. Therefore, they can simply be repainted, but this must be done carefully and efficiently. To do this, we degrease the hands, and at the same time remove the annoying orange color with a solvent. Then everything is simple: as paint, you can use ordinary office putty, or, as it is also called, a touch, because buying a can of white enamel for two arrows is not constructive. In addition, moisture will not get inside the watch anyway, so the touch will fit perfectly - it gives an even white color and dries instantly.
Voltmeter selection
Of the domestic automobile voltmeters on the market, you can only find devices from UAZ and VAZ 2107. Both of them are poorly suited for installation in a Priora. The first one has a rough appearance and is more suitable for installation on a tank than in the interior of a modern car. The second does not have an external housing, and its dimensions do not allow the device to be neatly placed on the Priora panel. Therefore, it is better to find special tuned devices or use a digital car voltmeter made in China, inserting it into a button or instead of the dial of a Priora watch. Such devices are distinguished by good accuracy, low price and attractive appearance of the digital panel.
see also
Comments 11
That is, in order to change the hazard warning button you don’t have to remove the console?
It is possible, but it will require great care.
Is it possible to get the watch out without removing the panel?
no, there's a latch on the back
Is it possible to fit through the slot for the radio? By the way, are there diodes?
You can't unless you're an octopus. yes there are 2 diodes
Is it possible to get the watch out without removing the panel?
You can get it without taking it off! Today I pulled it out because the watch has stopped! And the backlight works! Just pull out the radio! Bend over and you will see the latch! And use a small L-shaped piece of iron to bend the latch! No difficulties! Easy. Can anyone repair the watch? Inside there is a round magnet and a thin winding wire... is the winding resistance of 400 ohms normal? Perhaps the magnet has become demagnetized over time... and because of this the clock does not go...
How to remove a VAZ 2110 torpedo
In the interior of the VAZ 2110, the dashboard is the most noticeable part. Every driver wants to sit in a stylish and well-maintained interior. But the standard panel looks angular and gray. This is especially noticeable after long-term use, when abrasions, scratches and cracks appear on the panel.
Motorists solve this problem in different ways - some install another standard dashboard from a VAZ 2110, other drivers prefer to install a Europanel - this is the name of the trim from a third-party manufacturer. The trim allows you to transform the interior and turn the “ten” into a foreign car, at least on the inside. Whatever you choose, removing the panel is a must.
In this material we will tell you how to properly dismantle the standard panel and install the Euro version.
This is what a standard VAZ 2110 torpedo looks like
Alternative torpedo
The alternative dashboard is softer than the standard “tens” dashboard, but the main advantage is the absence of unpleasant grinding and squeaking. Motorists decide to get rid of the standard one precisely because of the squeaking. For the VAZ 2110 car there are several types of panels that differ in design.
Lada Priora Sedan › Logbook › Removing the center console of the Priora
I’ll just tell you this for those who don’t know.
To remove the center console you need a Phillips screwdriver.
1. Remove the cover "*** Open ***" and the ashtray below. 2. Take out the buttons (they come out from the front, just pry them off with a flat-head screwdriver)
3. Take out the “emergency lights” button (the same as those buttons)
4. We take out the radio along with its box.
5. 2 bolts in place of the radio (they will be at an angle towards you)
6. 2 bolts in the pocket where the cover was *** Open *** 7. 2 bolts in the ashtray 8. Now pull the console towards you, smoothly without jerking (resistance is possible)
9. The console will not come out completely, because... the clock and control unit for the stove are connected there. The clock connector is located between the air ducts
Now turn off the control unit of the stove.
Well, that's all, we have the console in our hands, congratulations!
By the way, I want to “hoard up” a little. To remove the watch, unfasten the latches on the console
, and to remove the used stove, unscrew 4 screws from the console.
Messages 4
1 Topic by Tryberlink 2012-11-23 14:05:54 (2012-11-23 14:12:59 edited by Tryberlink)
- Tryberlink
- New member
- Inactive
- From: Volgograd region.
- Registration: 2012-11-23
- Messages: 32Thanks: 4
- Car: VAZ 21104
Topic: Resolved: How to set the clock and why it sometimes stalls
How to remove a torpedo on a Priora?
practical method and sequence of actions Please tell me how to set the clock on the instrument panel (electronic) on Europanel-1, where the mileage is shown.
And another question is why sometimes the car stalls for no reason, without load.
I forgot, I was advised to try turning the pin on the dashboard left to right, no changes
Guys, great...tell me how to set the clock on the Europanel Priora 2...I don’t know what to press anymore, damn it...((((Thanks in advance...explain in detail, please. And as luck would have it, I lost the instructions.
Voltmeter instead of a Priora watch
The current time is displayed on the Priora dashboard, so there is no particular need for a separate clock.
To install a voltmeter instead of a clock you will need:
- digital voltmeter with LED scale of suitable size;
- hot glue;
- file;
- knife or jigsaw;
- a piece of plexiglass or CD case;
- a piece of tint film.
To install a voltmeter in the body of a standard clock, you need to dismantle it and remove the mechanism. After this, you need to install the voltmeter panel into the case, slightly filing its corners. It is better to secure the panel to the housing with hot glue.
There is a hole in the middle of the glass for the time adjustment knob, so you need to find a replacement for it. You can cut new glass from a CD case or from a piece of plexiglass. To hide the “filling” of the voltmeter, the glass should be tinted before installation, for example, with a piece of tinting film. In this case, only the luminous LED display of the voltmeter will be visible from the outside.
Next, all that remains is to solder the wires to the voltmeter terminals and insert the voltmeter instead of the Priora clock. Connecting the wires will be discussed below.
Why do you need a voltmeter in the Priora cabin?
Most modern car models do not have a voltmeter on the instrument panel. Manufacturers decided that information about the on-board network voltage is not needed by the driver. This indicator is monitored by the on-board computer, which signals problems in the event of an obvious malfunction of the charging system or the vehicle’s on-board network. At the same time, a voltmeter is one of the most popular additional devices installed by car owners. This is caused by the following circumstances:
- the device allows, if necessary, continuous voltage monitoring;
- analysis of voltmeter data allows you to determine the load on the generator and its operating efficiency.
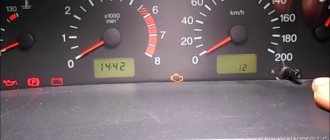
Icons on the factory dashboard
All indicators should light up like a Christmas tree for three seconds when the engine starts. If some icon remains, it means the system is signaling a breakdown. To make it easier to understand all the indicators, here is a schematic picture:
1,5,9,10 are already known scales that display the main parameters that can change. 19 – on-board computer display. Further:
- 2 – Icon indicating the operation of the braking system.
- 3 – Battery condition. If the light remains on, the battery is discharged or the charge level is too low.
- 4.7 – Doublers for direction indicators (“turn signals”).
- 6 – Oil level (indicates low level).
- 8 – Handbrake. Lights yellow when the lever is tightened.
- 11 – “Gasoline light bulb.” Lights up when there are only 10 liters left.
- 12 – Button for switching on-board computer modes.
- 13 – “Emergency”.
- 14 – Electric power steering (indicates a breakdown).
- 15 – High beam on.
- 16 – Side lights/low beam.
- 17 – Airbag condition (malfunction).
- 18 – Immobilizer (if you hear a beep and the icon itself blinks, the immobilizer is faulty).
- 20 – Seat belts not fastened.
- 21 – Unsatisfactory condition of the service brake system.
- 22 – Disabling the airbag.
- 23 – ABS malfunction.
- 24 – “Check”, “Check Engine” - engine failure.
What does the dashboard consist of?
The Priora instrument panel contains all the necessary parts that no modern car can do without:
- regulator of external lighting and internal panel lighting;
- switch for turning, side and headlights;
- signal regulator;
- car instrument cluster;
- windshield wiper and washer regulator.
This is how the dashboard works
In addition, the panel contains an ignition switch connected to the anti-theft system. It contains 3 positions. Among the secondary mechanisms, we can note the presence of regulators for the rear window heating system, alarm and interior cooling. It is also worth mentioning the glove compartment, built-in clock and radio input jack.
How to easily and quickly remove the dashboard on a VAZ 2110 with your own hands?
Without a doubt, the dashboard is the most noticeable interior detail in a car, because it is located right in front of the eyes of passengers and drivers. The need to remove the dashboard on a VAZ 2110 may arise for car owners for a variety of reasons.
So, by removing this part, you can get full access to all the electrical components of your vehicle, replace the burnt-out wiring with a new one, connect additional devices or lighting, install a Euro trim or sound insulation.
Options for replacing the standard VAZ 2110 panel:
Old-style panel trim for VAZ 2110 Panel trim for VAZ 2110 Euro-2 Panel trim for VAZ 2110 Euro-1 Panel trim for VAZ 2110 Euro-3 Panel chestnut trim for VAZ 2110 (instrument panel in the center) Panel chestnut trim for VAZ 2110 (instrument panel in the center) Trim panels VAZ 2110 Kashtan Panel trim VAZ 2110 Kashtan Panel trim VAZ 2110 Kashtan
If desired, you can cover the dashboard with various materials of your choice, thereby making the desired changes to the interior of the cabin.
Subtleties
I would like to say right away that removing and replacing a torpedo on a VAZ 2110 will require a lot of time and patience from you
In addition, all repair work must be carried out extremely carefully and carefully so as not to accidentally break the fastening, since the dashboard will not fit back as it should and will creak when driving
To work you will need the following tools:
- marker;
- self-adhesive labels;
- set of screwdrivers and wrenches.
Removal instructions
It is recommended to remove the VAZ 2110 torpedo in the following sequence:
- Interior details. Before starting work directly, it is necessary to prepare the interior, since disassembling the front panel of the VAZ 2110 is best done with room for maneuvers. Therefore, the first thing we do is remove the front seats and steering wheel of the car. It is advisable to carry out dismantling in exactly the same sequence as indicated above, since otherwise it will be extremely difficult to remove the driver’s seat. In order not to break anything, consider your strength when pulling the wheel out of the column splines; to do this, loosen the steering wheel nut a little, and then pull it towards you while loosening it from side to side;
- Transmission tunnel. After the salon is prepared and there is a place to work, we are faced with the next task - dismantling the floor tunnel in the salon. Simply unscrew the screws and push the top of the part being disassembled back. Then do the same with the bottom of the tunnel;
- Steering wheel and steering column. Unscrew the screws on the steering column casing of the VAZ 2110, and then remove the steering column switches. Mark all the wires and connectors released during disassembly with a marker or labels; this will later work to your advantage when, when assembling the torpedo, you end up with a large number of wires of different colors. It is recommended to use the marking especially for owners of cars that are already equipped with an audio system and alarm system;
- Glovebox. The next stage of work will be to dismantle the glove compartment, after which it is necessary to remove the relay and mounting block. Don’t forget to mark the wires as you work and take special care with the fragile speedometer and other dashboard elements that also require special treatment;
- Torpedo. And now we can move on to the immediate purpose of the repair - we have to remove the dashboard. To do this, it is necessary to unscrew the screws in the resulting void behind the glove compartment and unscrew the fastenings. After that, use a screwdriver to hook the air duct on the left side and remove it. Then all that remains is to unscrew the nut, holding the torpedo with your hand, the torpedo and pull it out from the studs, at the same time do not forget to mark the wires with a marker so as not to get confused.
Replacing lamps
In previous posts we figured out how to remove the instrument panel on a Priora. There is no point in writing again, go ahead, read, film. This post is only about replacing lamps.
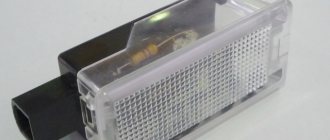
The instrument panel is illuminated by five lights. Bulbs are very easy to change. We take the base and turn it counterclockwise. You will feel the base with the light bulb come out of the seat.
Install the lamps in the reverse order. We insert the base with the lamp instead of the seat and turn it clockwise until it locks.
Video lesson
Experienced and experienced people may not read further, since this entry is for “dummies” like me, who are faced with replacing light bulbs in the dashboard for the first time. My light bulb for illuminating the coolant temperature and the amount of gasoline in the tank went out. The right side of the speedometer periodically went out and then came back to life on its own.
To replace, you will need a Phillips screwdriver, a thin flat-head screwdriver and 5-7 minutes of free time. It is better to take a shortened one (cross), as it is more convenient for it to operate in a limited space. Unscrew the 2 screws from the top.
Remove the panel under the steering column (simply snap off the top, turn the 3 plastic fasteners from the bottom). If you had to change fuses, then removing the panel will not be difficult. We see 2 more bolts (one on the left, the other on the right)
Unscrew them (be careful with the washers - they fly off quickly)
Next, remove the decorative trim that we unscrewed. Lower the steering wheel to its lowest position and pull out the trim. There is no need to remove the steering wheel!
Next we see 2 more fasteners (left and right), which secure the instrument panel itself.
We unscrew them carefully, as washers and screws can fall deep into the torpedo
Afterwards, you can pull the instrument panel towards you a little to gain access to the wiring harness and block. When you are already skilled in this matter, you will be able to change light bulbs without disconnecting the cable.
We see a green block at the back of the panel. It's easy to disconnect, but it's inconvenient the first time. Lightly press the stop tab with a screwdriver and pull the black lever up. The plug will come out of the socket on its own.
Let's take out the panel and see the mounting sockets for the light bulbs. Turning slightly counterclockwise, we pull out the burnt out light bulb. We install a new one. We reassemble in reverse order.
I bought the light bulbs completely assembled (lamp + socket), but some craftsmen replace burnt-out light bulbs, leaving the old socket. I decided to try a diode light bulb to have an idea of whether all the light bulbs should be replaced with LED ones. The diode lamp is slightly longer. Thus, it is closer to the filter and gives a light spot in the illumination area (the center is lighter, the edges are darker). The diode light bulb shines with a cold white light, which is noticeable through the light filter - the green has become brighter, more juicy. For now, I’m happy with the soft green light that came with warm incandescent lamps, so I won’t install diode lamps.
It turned out that the light on the right side of the speedometer was going on and off because it had burned out. But the shaking caused the filament to short circuit and burn again until the next bump “teared” it again. The lamp was replaced. I also bought some spare parts)))
Unfortunately, numerous car components can sooner or later fail, so car owners have to replace them. If the lamps on the instrument panel burn out in a Lada Priora or any other car, you can cope with this breakdown without the help of service station employees, which will save a lot of money. We will analyze how to change the light bulbs on the Priora’s instrument panel correctly and step by step in this article.
Experts strongly recommend replacing the failed component as quickly as possible, because it is these elements that warn car owners about the occurrence of a malfunction, which must be dealt with immediately. According to experienced drivers, it is better to replace not just one failed lamp, but the entire set at once, since the service life of these elements is approximately the same. If the first lamp burns out, you won’t have to wait long for the subsequent lamps to fail.
Removing and installing the panel (dashboard) Priora
If you decide to install sound insulation for the engine shield, or paint or reupholster the panel, then carefully study the instructions on how to remove and install the Lada Priora dashboard yourself.
A necessary tool. Phillips and flathead screwdrivers, 10mm head, pliers with narrow jaws.
Before starting work, you should disconnect the negative terminal from the battery. Then remove the steering column switches.
Remove the fuse box cover:
- Turn the three locks of the mounting block cover 90°.
- Unclip the fuse box cover.
Disconnect the wires from the ignition switch. Then remove the instrument cluster. and remove the central floor tunnel. Disconnect the wires from the electric power steering:
Then in order:
- Unclip the plastic clips and remove the left A-pillar trim. Remove the right A-pillar trim in the same way.
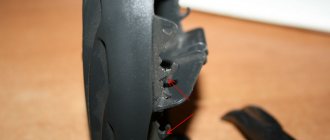
- Pry off the left door glass blower nozzle using a flat-head screwdriver with soft material underneath to avoid scratching. Similarly, remove the blower nozzle on the right side.
- Unscrew the nut of the upper fastening of the Priora panel, it is located in the cavity under the door glass blower nozzle, using a “10” socket. Unscrew the nut on the right side in the same way.
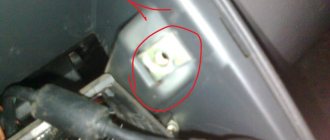
- Unscrew the bolt securing the ends of the ground wires of the dashboard using the same key.
About the console
Lada Priora was produced with an interior in two color options: gray and black. It is worth noting that a light interior was installed on the first Priora models, starting in 2007, and later a black interior with black seats and upholstery was added to it. But the center console itself was not subject to changes in color, and many owners of this car repainted or covered the Priora’s center console with film.
Modifications to the center console allowed for a more formal look that would suit the tastes of every owner. Many installed 2DIN radios with a large screen or completely replaced the standard multimedia player with something more advanced and powerful.
2DIN radio in Priora
It should be noted that when installing a 2DIN radio in a standard Priora console, you need to work with a hacksaw and cut out a completely additional capacity for various kinds of small things. But with the console from the luxury Priora, such alterations do not need to be done.