Lada Granta - repair and check of starter
Due to the high load during operation, the starter installed on VAZ 2190 Lada Granta cars cannot be called a very reliable unit. However, even if you have doubts about its serviceability, before immediately trying to disassemble and repair the starter, it is recommended to perform several simple checks...
Preliminary check of the functionality of the Lada Granta starter
First of all, it is necessary to check the condition of the mechanical part, for which, using a flat screwdriver, the ease of movement of the coupling is assessed, as well as the rotation of the drive gear (the gear should rotate without jamming and exclusively in the direction of rotation of the armature).
To check the overall performance of the starter, you will need a battery and a set of power wires, usually used for lighting (with alligator clips), while connecting the “negative” terminal of the battery to the starter housing, and connecting the “plus” terminal to the control terminal of the traction relay. When the traction relay is in normal condition, a characteristic click should be heard and the clutch should move to the forward position. If these conditions are not met, repairs will most likely be limited to replacing the traction relay.
If there are no complaints about the operation of the traction relay, disconnect the wire from its control terminal and connect it to the lower contact bolt, and the armature should begin to rotate (be careful, the rotation speed is more than 5000 rpm).
Disassembly and repair of Lada Granta starter
When performing disassembly, first of all, unscrew the nut securing the tire and disconnect the tire from the contact bolt of the traction relay. At the next stage, we dismantle the traction relay, for which we unscrew the two mounting screws. Next, slightly lifting it up (at the same time the armature loop is removed from the lever) we remove the traction relay armature from the socket.
When disassembling the starter itself, first unscrew the two mounting screws and remove the back cover along with the brush assembly. After this, we remove the armature from the housing and, by removing the cover, open the drive mechanism with the gearbox. Next, disconnect the glider gear mechanism.
During preventive inspection and repair, the condition of the teeth of the planetary gears, as well as their needle bearings, is checked. When damage is detected and obvious operation, such gears are changed. The integrity of the plastic lever support is also checked at the gearbox. It should also not be heavily worn or deformed.
To check the condition of the brush assembly, unscrew two screws in the housing cover and disconnect the brush assembly from it. Sequentially pressing the latches, remove each brush along with the pressure spring. The height of the brushes must be at least 4 mm (measurement is made from the edge of the working surface to the “pigtail of wires”), and the springs must not be too compressed or deformed (defective elements must be replaced).
As for the starter armature, there should be no signs of burning, marks or other mechanical damage on the surface of its commutator (A). If such defects are detected, the collector can be polished with fine-grain glass sandpaper. When the heart wobbles, its beat relative to the axles should be no more than 0.08 mm. Otherwise the anchor changes. At the winding (B) of the armature, the reliability of the soldering of the leads is checked, as well as the condition of the winding at the ends of the armature. It is mandatory to check the windings and use a standard ohmmeter or a test lamp with a supply voltage of 12 V for the absence of a short circuit. In the latter case, the voltage from the battery should be applied to the armature core and the collector plate (in the absence of a short circuit, the lamp should not light).
After all the above checks are completed, the VAZ 2190 starter is assembled in the reverse order, with fresh lubricant applied to the drive gear teeth, shaft screw splines, planetary gears and other moving parts. As a lubricant, you can use CIATIM-201 (202, 203) or Litol 24. Upon completion of repair and assembly, it is recommended to check the starter for operability using the technology indicated above.
Tags
Assembling and disassembling the starter for Lada Priora, VAZ 2170, VAZ 2171, VAZ 2172
Starter parts 2111.3708010-01: 1 – housing; 2 – thrust ring from the collector side; 3 – anchor; 4 – permanent magnet; 5 – nut securing the positive polarity brush bar; 6 – traction relay; 7 – drive lever; 8 – sealing ring; 9 – freewheel; 10 – return spring; 11 – tie rod nut; 12 – relay anchor; 13 – tie rod; 14 – seal; 15 – lever support; 16 – lever axis; 17 – screws for fastening the traction relay; 18 – front cover; 19 – retaining ring; 20 – restrictive ring; 21 – insulator; 22 – internal brush holder; 23 – thrust ring from the drive side; 24 – “positive” brush; 25 – pressure spring; 26 – external brush holder; 27 – internal spacers; 28 – back cover with bushing; 29 – external spacer washers; 30 – lock washer; 31 – bolt securing the negative polarity brush bar; 32 – armature shaft cover; 33 – bolt securing the armature shaft cover
Starter replacement
Many owners, at the first malfunction of the starter, change the entire unit, without understanding the causes of the breakdown itself. But in most cases, the reasons for failure are as follows:
- Failure of the solenoid relay - purchased and replaced separately
- Brush wear
- Burning dimes on the retractor relay
Each of the problems listed above can be solved much cheaper than buying a new starter for a Priora. Therefore, first you should contact a specialist who will tell you exactly what the reason is and answer whether it can be repaired or not!
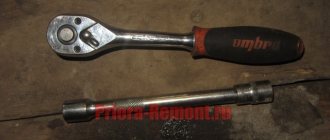
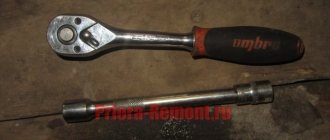
If repair is no longer possible, which is extremely rare, then a replacement must be made. To do this you will need the following tool:
- 13 mm head
- extension
- ratchet or wrench
The procedure for replacing the starter on a Priora with your own hands
This repair is very simple, so it won’t take more than 25-20 minutes. The ideal option is to work either in the inspection hole, or to remove the air filter housing from the cushions, after which very good access to the starter opens.
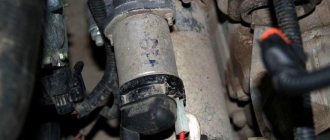
First of all, we disconnect the “-” terminal from the car’s battery, after which we disconnect all the wires from the starter, one of which is screwed on with a nut.
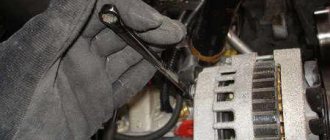
Then you need to unscrew the three starter mounting nuts, one on top:
And it’s more convenient to unscrew two from the bottom, as clearly shown in the photo below.
When they are unscrewed, you can easily remove it, since there are no more fasteners left.
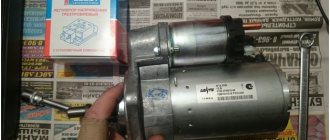
Installation of a new one during a complete replacement occurs in the reverse order, and no difficulties will arise when performing this repair.
It is important to keep in mind that the starters on the Priora were installed with both three fasteners and two (old and new). Therefore, before buying a new one, make sure which one was on your car
The price of a new 2170 can range from 3,500 to 4,000 rubles, although you can find Chinese options a little cheaper, but of relatively dubious quality. The most reliable and problem-free are KZATE factory production, which can easily cover over 200,000 km of a vehicle without repairs.
Which brushes are better – graphite or copper-graphite
Let's say everything is fine with you. The first thing we do on the starter is to do without any disassembly, completely remove and change the brushes. It's quite easy and takes minutes.
When replacing brushes, pay attention to the pressure springs. They must be in good condition - not twisted or damaged. These springs ensure good contact between the brushes and the starter motor armature.
- Graphite brushes. If, when removing the brushes, you discovered that you have graphite brushes, and these were factory supplied, then there is no need to reinvent the wheel. No matter what advice or recommendations you are given, use only graphite brushes. They are softer and put less pressure on the lamellas of the engine armature, so the lamellas are less subject to wear. Imagine, if you change brushes, your slats already have a little wear because they have worked for a certain period of time. If you install copper-graphite brushes, which are stiffer, then this wear will only increase. Thus, in the near future it will come down to disassembling the starter and repairing the armature.
- Copper-graphite brushes. Today you rarely see this, when there are graphite brushes on the starter, copper-graphite ones are still installed there. Copper-graphite brushes differ from graphite brushes in color; they are a little shiny because they contain copper additives. But the main feature is that copper-graphite brushes are not only stronger, which means they last longer, but also have lower resistivity. They have higher electrical conductivity and a lower voltage drop, which allows the starter motor to operate more efficiently. This means that preference is given to copper-graphite brushes.
Replacing the Priora starter, main faults
Home › Priorology
The car starter starts the engine. The Priora will not start without his participation. Without it, starting a movement is simply impossible. Sometimes the Lada Priora does not start because the fuse has blown, or the starter relay has malfunctioned; it is marked K3. Sometimes it clicks but doesn't turn. The reasons are in the details.
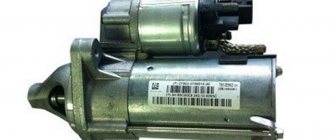
The starter on a Priora consists of the following parts: bendex, retractor relay, armature and others - for a complete list of how many parts the starter of a Priora car contains, see the article below. It is advisable for car owners to know where this mechanism is located on a Lada Priora car - it is located immediately under the air filter.
The price of the part is a starter for a Priora engine (16 valves): from 2750 to 4500 rubles. When a breakdown occurs, the device on the Priora stops turning.
Standard starter and analogues - article number and price
Unfortunately, if the mechanism does not work, the problem can only be solved by replacing it. Neither installing new parts under the body, nor any cleaning will save the situation. The standard starter for a Priora with 16 valves goes under catalog number 2111.3708010-01, its cost is about 4,000 rubles. As analogues we can consider:
- "Baker." Article 5702370800010, costs 3,700 rubles;
- "Starvolt." Article lst0190, price - 3,200 rubles;
- Valeo. Article 438285, costs from 3,700 rubles;
- For automatic transmission, article number 219002370801000, costs from 3,900 rubles;
- "BATE". Article 51323708000, costs from 2,750 rubles;
- Gearbox – 51213708000bate, costs from 2950 rubles;
- "Kzate." Article 5702370800, costs from 3,300 rubles;
- Pramo (Eltra). Article TS12E901, price – 3,800 rubles;
- Fenox gearbox. Article 2110-3708010, price – 4,500 rubles.
Lada Priora starter: device and principle of operation
As mentioned earlier, this part can be installed on Priora of two types: geared and gearless
Sometimes it may be necessary to remove the starter, note that it is located under the engine, on the right - closer to the space under the air filter
To ensure that the starter unit does not wear out so quickly, it has a special mechanism that disengages the gear from the crankshaft flywheel - the Priora starter retractor relay. If it were not there, the service life of the unit would be greatly reduced, or repairs would be required.
Geared
This mechanism is small in size. It turns out this way because the gearbox allows you to increase or decrease the torque. The planetary gearbox itself in the car in question is located between the armature and the bendix; it serves as a “buffer” and an intermediate part between them. Thus, it does not take up so much space in the case, under which there are:
- bendix;
- fork;
- anchor;
- stator;
- solenoid relay;
- mask;
- gearbox
Its main difference is that the bendix is fixed on its own shaft, and it interacts with the Priora engine through a gearbox.
Gearless
A gearless starter is much larger than its counterpart, but it does the same job of receiving electrical energy from the battery and sending it to the crankshaft to start the engine. It consists of the following components:
- relay;
- an electric motor containing the traction relay cores and winding;
- brushes and holders, “brush assembly”;
- solenoid relay;
- stator;
- fork;
- contact bolts;
- anchor;
- starter mask;
- retaining ring;
- freewheel;
- front bushing and rear bushing;
- starter bendix Priora;
- gear.
The gearbox operates according to the following algorithm:
- Power is supplied from the battery through the wiring harness.
- The anchor is retracted.
- The Bendix is attached to the gear, “thrown out”, the pin contacts are closed, and voltage is applied to them.
- The armature rotates, the torque is transmitted to the bendix, through it to the gear, and it is already in contact with the engine flywheel.
- As soon as the ignition key is released, the retractor relay disconnects the bendix and the gear.
Basic faults
Externally, a breakdown of the Priora starter can be recognized by the following signs:
- “turns” and at the same time starts the engine;
- does not “twist”;
- continues to “twist” after the key is released;
- creaks, clicks are heard;
- It spins, but for too long.
- The reason may lie in a faulty battery, in the starter itself and fuses. The most common are those that are most likely to disable
- the car – it’s worth taking a closer look.
Doesn't turn on
If the engine does not start, the problem may be:
- discharged or broken battery;
- no closure of contacts 50 and 30;
- terminals or tips are oxidized;
- interturn closure;
- short circuit to ground;
- open circuit “starter - traction relay”;
- the ignition module is faulty;
- break in the traction relay winding;
- brush wear;
- the anchor jams;
- the additional relay or the control circuit connected to it is damaged.
Starter diagnostics to determine the cause of the malfunction
In order to determine which part of the Priora starter mechanism is failing, you need to check absolutely everything - the problem could even be with a fuse that is located far from the part. Perform diagnostics in the following order:
Relay test
First, it’s worth studying the location of the Priora starter relay, which is located in the starter unit in a small housing. Checking its serviceability is carried out in two stages.
Fuse
The Priora fuse box is located above the driver's left knee. Remove the plastic cover by first unscrewing the three fastening screws. The Priora starter fuse is K3, that is, third from the left in the first “line”.
You can check the additional block, which is located under the floor tunnel lining. In this case, the 15 Ampere fuse F1 is checked - the one on the far left; sometimes it is enough to change it, since repair of this mechanism is not always required.
When is a starter check required?
During operation, the device may malfunction, and therefore the engine will be unable to start. The Lada Kalina car unit is characterized by the following signs of malfunction, suggesting the need for removal and diagnostics for the purpose of further repair or replacement:
- turning on the starter is accompanied by the shutdown of other devices operating at that time;
- when the device starts, reduced crankshaft speeds are observed, which is not enough to fully start the engine;
- turning the ignition key does not activate the starter;
- the unit shows signs of “viability”, but the motor flywheel does not rotate.
Next we will tell you how to remove and replace.
How to check the starter for performance
As you know, a starter is a device that starts a car engine. In fact, the starter is an electric motor that is powered by the battery. It is quite obvious that the failure of the starter significantly complicates or makes it impossible to start the internal combustion engine.
However, the starter rarely fails unexpectedly. In other words, certain signs indicate the occurrence of malfunctions. Next, we will look at what symptoms can be used to determine that the starter is faulty, as well as how to check the starter from a battery or with a multimeter.
Downloading a book
After successfully completing the payment (by any method) and returning to the KrutilVertel store from the payment system website, you will be taken to the successful payment page:
The book you purchased will be in your personal account, from where you can always download it.
Please note that after making the payment, you need to return back from the payment system website to the KrutilVertel website. If for some reason you did not return back to the site and closed the payment system tab with a message about the successful completion of the payment, please let us know - we will send you a letter indicating access to download the book
If for some reason you did not return back to the site and closed the payment system tab with a message about the successful completion of the payment, please let us know - we will send you a letter indicating access to download the book.
Malfunctions
During operation, various problems arise.
- Doesn't turn on. As a rule, this occurs due to a discharged or damaged battery, lack of contact closure between 50 and 30, as well as oxidation of the terminals and circuit tips. Also the cause is breakdowns and short circuits, an open circuit in the “starter - traction relay” circuit. A similar symptom is observed when the brushes are worn out or the armature is stuck.
- There are clicks, but the engine does not start. The first reason is a faulty bendix that does not engage with the engine flywheel. This also happens due to severe wear of the bushings, starter fixing bolts, as well as damage to the flywheel and gear teeth.
- The starter does not turn off and continues to rotate after the engine starts. This indicates slipping of the freewheel, a sharp and severe drop in voltage in the circuit, and oxidation of the contacts. It is also possible that the battery is damaged.
- The starter turns slowly, this is not enough to rotate the crankshaft. Again, the battery may be discharged or damaged, contacts and connections may be oxidized, and brushes may be worn out. A breakdown inside the armature or a wiring break is also possible.
Source
Principle of operation
It all works like this: when the engine is not running, the armature of the retractor relay is pulled out of the housing due to the action of the spring on it. The same spring holds the Bendix and gear through the fork in a position where there is no engagement.
When the ignition key is turned to the start position, the solenoid relay is first activated.
The electrical energy supplied to the coils of the solenoid relay ensures the appearance of a magnetic field inside the housing.
This field acts on the armature, and it, overcoming the force of the spring, enters the body, after which the retracting coil is turned off and ceases to create a magnetic field, but in the retracted position the armature is held by the holding coil with its magnetic field.
In this case, the armature pulls the fork, which in turn moves the bendix forward along the rotor shaft, and its gear engages with the flywheel ring.
The armature, entering the housing, pushes the starter relay rod, and, moving, closes the contact plates of the positive terminals with each other.
Electricity from the battery is supplied to the brushes of the starter motor, and its rotor begins to rotate. And since the gear has already engaged, the rotor begins to rotate the flywheel.
After starting the power plant and turning the ignition key back, the power to the holding coil stops, its magnetic field disappears and the armature comes out of the housing under the influence of a spring.
At the same time, it disengages the bendix through the fork and stops acting on the relay rod. He, in turn, moving away, opens the contact plates, and the starter is completely turned off.
Repair and replacement of Bendix starter in a car
The Bendix installed on the starter is an overrunning clutch. Serves for silent starting of the car and extending the life of the starter, protects the starter from impacts of the teeth of the rotating flywheel, and also allows it to rotate in the same direction without speed restrictions.
Interesting fact! The operating principle of Bendix is used not only in the automotive industry, but also in the helicopter industry, on the gearbox for the propeller. Bicycle rear wheel hubs work on the same principle.
Lada Priora - checking and repairing the starter
To preliminary check the Lada Priora starter and make a decision on its repair or replacement, you will need:
- Serviceable and charged battery;
- Power cables with crocodile lugs;
- Flat screwdriver;
- A set of keys;
- Wire brush.
- Check sequence:
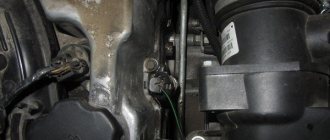
- -First of all, it is necessary to ensure free access to the starter, for which you should remove the air filter housing together with the exhaust pipe, since on the Lada Priora, as well as on some modifications of the Lada Kalina and Grant (with a lever gearbox), the starter is installed on the gearbox with side of the radiator directly below the air filter. Do not forget about disconnecting the power wires from the battery, thereby eliminating the possibility of accidental damage to the central switch;
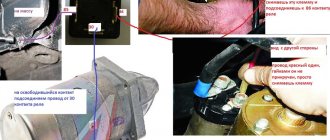
- -Next, we disconnect the thickest current-carrying wire from the starter, which is secured to the upper stud of the solenoid relay using a nut at “13”;
- -Set the gearshift lever to neutral;
- -We place the battery closer to the workplace (of course, you can use a standard battery if it is known to be in good working order) and put one of the “crocodiles” on its negative terminal, connect the other end of the wire to the starter housing (most conveniently to the bolt of the solenoid relay). For more reliable contact, we clean the connection points with a metal brush;
-Using the second wire, we connect the “+” of the battery and the contact on the back of the solenoid relay. At the moment the wire touches the “male”, the solenoid relay should operate, and the sound of a characteristic click can be heard.
If no sounds are heard, we repeat the test, only this time we attach the negative crocodile to the lower bolt of the solenoid relay (we again bring the positive crocodile to the male terminal).
If this check does not show a positive result, feel free to change the solenoid relay, and to perform this procedure you do not even have to dismantle the starter itself. If the relay works, then most likely the problem lies in the starter brush assembly.
-We continue checking, for which we again throw the crocodile “-” onto the body, and bring the crocodile with “plus” to the lower bolt of the solenoid relay. With this combination, the starter should begin to rotate, emitting a characteristic hum. If the starter turns too slowly, the brush assembly may be faulty or the armature is jammed. If the starter does not turn at all, the reason is in the winding;
-In conclusion, we carry out a general check, for which we throw the “+” terminal onto the upper pin of the solenoid relay, after which we use a screwdriver or wrench to bridge the “male” and “+” crocodile.
With this connection scheme, the starter should work, and extraneous noise in the form of crunching and clicking, which may indicate mechanical damage to the bendix or gearbox (for example, loose bushings or destruction of bearings), is unacceptable.
In such a situation, further disassembly of the starter is necessary in order to identify a specific defect.
To disassemble and repair the Lada Priora starter, you must have on hand:
- Flat and Phillips screwdrivers;
- Wrenches for 8,10,13, 15 and 17;
- Lubricant (lithol, grease, CV joint or analogues);
- Carburetor cleaning fluid, rags and wire brush.
After removing the starter from the car, you should first of all inspect it externally. There should be no visible cracks, scuffs or signs of significant wear on the gear (if these signs are present, the bendix must be replaced). There should also be no damage to the armature bushing or shaft.
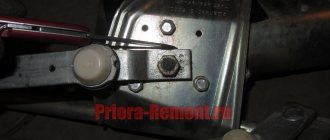
To check the bendix, turn it with a screwdriver. It should rotate without jamming, and only in one direction.
Partial disassembly of the starter is performed as follows:
- Using a 13mm wrench, unscrew the contact wire nut on the lower stud of the solenoid relay;
- Using the “8” key, the bolts securing the retractor relay are unscrewed, and the relay itself is removed, after which it becomes possible to pull the armature off the bendix lever;
- Using a “10” wrench, unscrew the nuts of the tie rods and unscrew the screws holding the brush assembly with the cover. If the lid is “stuck”, you can rip it off by prying it off with a screwdriver;
- The stator with the armature and brush assembly is removed from the studs;
- The brush assembly is removed from the anchor and its external condition is checked. If there is less than 3.5 mm left from the edge of the brushes to the copper conductor, the brush assembly is replaced as an assembly. In turn, there should be no short circuit between the winding and the shaft on the armature; in addition, there should be no scuffing or signs of severe wear on the armature. You can try to remove minor damage to the commutator using sandpaper.
Required Tools
In order to remove or install the starter on a Priora, you will need the tools from the table below.
Table - Tools required to replace the front strut
| Name | Note |
| Spanner | "at 13", "at 15" |
| open-end wrench | "at 13", "at 15" |
| Pliers | Can be replaced with pliers |
| Screwdriver | With a thin flat blade |
| Silicone Grease | If you plan to remove the air filter |
| Head | "at 13" |
| Vorotok | With extension and ratchet |
| Penetrating lubricant | For example, WD-40 |
| Rags and wire brush | To clean dirt |
Replacing the starter on a Lada Priora can be carried out without access from the bottom. If you don’t want to remove the air filter and the wires going to the sensors, then you can dismantle and install the unit from underneath. In this case, you will need an inspection hole, overpass or lift to access the place where the starter is located.
Basic faults
The starter has several basic faults that occur quite often.
- Battery;
- Solenoid relay;
- Brushes;
- Bendix;
- Rotor and stator windings;
battery
If the starter does not rotate or clicks appear when you turn the ignition key, then the battery is most likely discharged. If the battery is charged, you should check the condition of the marks on it. Poor contact or oxide on the stamps will interfere with starting the car, since the starter requires a large current to rotate the engine, and weakening the contact of the stamps or their oxidation will increase the resistance, which will make it impossible to start the internal combustion engine.
Retractor
If, when you turn the key, the starter rotates but does not start the engine, then the culprit is most likely the solenoid relay. The main culprit for relay failure is a break in its winding.
Brushes
Brushes are the most common starter element that fails. If they wear out, starting the engine is impossible, since they do not provide contact with the rotor commutator. When the brushes are worn down to 4 mm, they must be replaced.
Bendix
The Bendix is a type of overrunning clutch that engages the gears with the flywheel. Its failure is a mechanical failure of the starter. It is impossible to repair it, just replace it with a new one.
Windings
The winding fails due to increased currents generated when the engine starts in cold weather or when the bendix jams. The wire wound on laminated steel simply cannot withstand such current surges and breaks. This can be solved by replacing the rotor or stator, and best of all the starter.
What does it consist of?
The starter is an electrical machine with a fairly large power consumption. When starting, it receives power from the battery and is the main consumer that can quickly discharge it.
The starter has a common design with a brush-type DC motor.
Its main parts are: stator, rotor, brush holder and brushes, bendix, solenoid relay.
All of them are involved in the operation of the starter and the failure of one element will lead to its complete stop.
Replacing the Priora starter, main faults
Home › Priorology
The car starter starts the engine. The Priora will not start without his participation. Without it, starting a movement is simply impossible. Sometimes the Lada Priora does not start because the fuse has blown, or the starter relay has malfunctioned; it is marked K3. Sometimes it clicks but doesn't turn. The reasons are in the details.
The starter on a Priora consists of the following parts: bendex, retractor relay, armature and others - for a complete list of how many parts the starter of a Priora car contains, see the article below. It is advisable for car owners to know where this mechanism is located on a Lada Priora car - it is located immediately under the air filter.
The price of the part is a starter for a Priora engine (16 valves): from 2750 to 4500 rubles. When a breakdown occurs, the device on the Priora stops turning.
Standard starter and analogues - article number and price
Unfortunately, if the mechanism does not work, the problem can only be solved by replacing it. Neither installing new parts under the body, nor any cleaning will save the situation. The standard starter for a Priora with 16 valves goes under catalog number 2111.3708010-01, its cost is about 4,000 rubles. As analogues we can consider:
- "Baker." Article 5702370800010, costs 3,700 rubles;
- "Starvolt." Article lst0190, price - 3,200 rubles;
- Valeo. Article 438285, costs from 3,700 rubles;
- For automatic transmission, article number 219002370801000, costs from 3,900 rubles;
- "BATE". Article 51323708000, costs from 2,750 rubles;
- Gearbox – 51213708000bate, costs from 2950 rubles;
- "Kzate." Article 5702370800, costs from 3,300 rubles;
- Pramo (Eltra). Article TS12E901, price – 3,800 rubles;
- Fenox gearbox. Article 2110-3708010, price – 4,500 rubles.
Lada Priora starter: device and principle of operation
As mentioned earlier, this part can be installed on Priora of two types: geared and gearless
Sometimes it may be necessary to remove the starter, note that it is located under the engine, on the right - closer to the space under the air filter
To ensure that the starter unit does not wear out so quickly, it has a special mechanism that disengages the gear from the crankshaft flywheel - the Priora starter retractor relay. If it were not there, the service life of the unit would be greatly reduced, or repairs would be required.
Geared
This mechanism is small in size. It turns out this way because the gearbox allows you to increase or decrease the torque. The planetary gearbox itself in the car in question is located between the armature and the bendix; it serves as a “buffer” and an intermediate part between them. Thus, it does not take up so much space in the case, under which there are:
- bendix;
- fork;
- anchor;
- stator;
- solenoid relay;
- mask;
- gearbox
Its main difference is that the bendix is fixed on its own shaft, and it interacts with the Priora engine through a gearbox.
Gearless
A gearless starter is much larger than its counterpart, but it does the same job of receiving electrical energy from the battery and sending it to the crankshaft to start the engine. It consists of the following components:
- relay;
- an electric motor containing the traction relay cores and winding;
- brushes and holders, “brush assembly”;
- solenoid relay;
- stator;
- fork;
- contact bolts;
- anchor;
- starter mask;
- retaining ring;
- freewheel;
- front bushing and rear bushing;
- starter bendix Priora;
- gear.
The gearbox operates according to the following algorithm:
- Power is supplied from the battery through the wiring harness.
- The anchor is retracted.
- The Bendix is attached to the gear, “thrown out”, the pin contacts are closed, and voltage is applied to them.
- The armature rotates, the torque is transmitted to the bendix, through it to the gear, and it is already in contact with the engine flywheel.
- As soon as the ignition key is released, the retractor relay disconnects the bendix and the gear.
Basic faults
Externally, a breakdown of the Priora starter can be recognized by the following signs:
- “turns” and at the same time starts the engine;
- does not “twist”;
- continues to “twist” after the key is released;
- creaks, clicks are heard;
- It spins, but for too long.
- The reason may lie in a faulty battery, in the starter itself and fuses. The most common are those that are most likely to disable
- the car – it’s worth taking a closer look.
Doesn't turn on
If the engine does not start, the problem may be:
- discharged or broken battery;
- no closure of contacts 50 and 30;
- terminals or tips are oxidized;
- interturn closure;
- short circuit to ground;
- open circuit “starter - traction relay”;
- the ignition module is faulty;
- break in the traction relay winding;
- brush wear;
- the anchor jams;
- the additional relay or the control circuit connected to it is damaged.
Useful tips when using the Lada Priora starter
In order to avoid many starter malfunctions, follow a number of simple rules when operating it: – when starting the engine, turn on the starter for no more than 10–15 s and again after 20–30 s. Continuous operation of the starter for a long time can lead to overheating. If after three attempts the engine does not start, then you should check and eliminate faults in the engine power supply system or in the ignition system;
– after starting the engine, immediately turn off the starter, since prolonged rotation of the drive gear with the flywheel can damage the starter freewheel;
– it is not allowed to move the car using the starter, as this causes significant overload and damage.
Causes of starter malfunction VAZ 2170 2171 2172 Priora
Causes of starter malfunction VAZ 2170 2171 2172 Priora
Ways to eliminate the causes of starter malfunction VAZ 2170 2171 2172 Priora
External signs of a malfunction of the VAZ 2170 2171 2172 Priora starter
Battery is faulty or discharged
Replace, charge the battery
When the ignition is turned on, the starter armature does not rotate, the retractor relay does not operate
Terminals and tips are oxidized
Clean, stretch contacts, lubricate with grease containing copper dust
When the ignition is turned on, the starter armature does not rotate, the retractor relay does not operate
Interturn short circuit, short circuit to ground, break in the traction relay winding
When the ignition is turned on, the starter armature does not rotate, the retractor relay does not operate
Open circuit starter traction relay
Check the wires, connections, check the wire from contact 50 of the starter to the ignition switch
When the ignition is turned on, the starter armature does not rotate, the retractor relay does not operate
Guide to replacing the starter on Kalina
- First, remove the negative terminal of the battery.
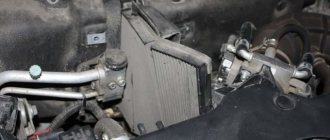
- Then you need to disconnect the power wires, one of which is located under a protective rubber cap, which you need to move away:
And use a size 13 wrench to unscrew the nut that presses the starter power wire:
We take out this wire and disconnect another one, which is located nearby. You just need to pull it to the side with a little force and it will come out without difficulty.
Now we move the plugs to the side so that they do not interfere with us and, using a 13mm wrench, unscrew the three nuts securing the starter housing. Two of which are clearly visible from above, and the third is located below, you can feel it with your hand.
After the lower nut is unscrewed, you can freely remove this part by removing it from the studs:
If your Lada Kalina needs to replace the starter, then take a new spare part and install everything in the reverse order.
Replacing the starter yourself Link to main publication
Replacement
Work on removing and installing the starter can be carried out without a higher education as a mechanic. Using the step-by-step instructions below, anyone who has ever held a key in their hands can cope with the task.
Necessary tool
- Phillips and flat head screwdriver
- Ratchet, extension and socket for “13mm” and “15mm”
- Open-end wrench for “10mm” and “13mm”
- Penetrating lubricant (WD-40)
- And the desire to repair your own car with your own hands.
Step-by-step replacement instructions
Work can be carried out both from the inspection hole and from above. We will consider the option of doing the work from above, as it is simpler and more convenient. And not everyone has an inspection hole.
- First of all, disconnect the negative terminal of the battery and remove the air filter housing along with the mass air flow sensor.
- Then, on the solenoid relay, use a 13mm open-end wrench to unscrew the power wire and remove the “mother” chip from the relay (marked with red arrows in the picture).
- Using a ratchet with a 13mm socket and an extension, unscrew the two starter mounting nuts. Below and above.
- Next, we remove the starter from the engine compartment and inspect it.
- We install it in the reverse order and check its functionality by test running the car.
Replacement from under the bottom of the car is similar to the instructions outlined above, but only to carry out work from an inspection hole or overpass it is necessary to remove the engine crankcase protection.
Source
Starter Lada Priora
The starter on a Lada Priora car is used to start the power plant. It rotates the engine crankshaft until the engine starts.
During operation, the unit gradually wears out. As a result, the starter may fail and starting the power unit will become impossible.
Therefore, it is important to pay attention to the first symptoms of a unit malfunction and promptly eliminate any identified breakdowns.
ATTENTION! A completely simple way to reduce fuel consumption has been found! Don't believe me? An auto mechanic with 15 years of experience also didn’t believe it until he tried it. And now he saves 35,000 rubles a year on gasoline! Read more"
Starter problems and their elimination
If the starter clicks but does not turn, then first of all attention should be paid to the battery. Most likely its charge is not enough to start the car.
You should also inspect the condition of the terminals. More rarely, the culprit for clicking is the traction relay.
If the starter does not turn the crankshaft of the power plant, then conditionally possible causes can be divided into mechanical and electrical. The first most often includes problems with the clutch or drive gear. If there are any malfunctions, the listed elements must be replaced.
In the electrical part, the weak point is the brushes. They are the most susceptible to wear and tear. When the remaining length of the brushes begins to be 4 mm or less, they must be replaced.
Article number and approximate price for the original Lada Priora starter
There are two types of starters installed on Lada Priora cars. They differ in power and mounting method
The units are not interchangeable, so it is important for the owner to know which starter is installed on his car
The original unit with a power of 1.4 kW has article number 21100370801002. The cost of a new product is from 3600 to 4000 rubles. At car dismantling yards, spare parts can be found with a price starting from 800 rubles. However, most used starters are in very poor condition.
The Priora uses a 1.8 kW starter. The branded unit comes with catalog number 5702370815. Its price ranges from 2300 to 4100 rubles for a new product. A used spare part will cost from 900 rubles.
Checking the starter: how to check the functionality of the starter
So, if malfunctions are noticed in the operation of the starter, it is necessary to check and troubleshoot. In this case, it often becomes necessary to do a quick check of the starter without removing it.
To perform this test, the battery must be charged, and you must also have a pair of power wires on hand. Please note that the battery cannot test the armature, starter winding or brushes. To check these elements, the starter must be disassembled and then tested with a multimeter (tester). The available methods will be discussed below.
Checking the battery starter
When it comes to checking a battery starter, this method allows you to quickly check the functionality and efficiency of the device. The fact is that if you simply try to start the engine in the usual way, the starter may click, but nothing else happens.
To check how the starter extends the gear and turns, you need to connect the negative terminal to the housing, and apply the positive terminal to the upper terminal of the relay and switching contact.
If the gear does not extend, there may be several reasons:
Normally, the bendix should move out with a characteristic click, after which the gear begins to turn by the starter motor. This method allows you to check the solenoid relay, while checking the solenoid relay from the battery is quite reliable.
Checking the starter brushes
The fastest way to check brushes is with a 12-volt test light. One terminal of the lamp is connected to the brush holder, while the other is connected to the housing. If the lamp starts to burn, the brushes need to be changed, since the protection is broken.
Description of the Priorov starter
Before we talk about how to repair a starter, let's get acquainted with the basic description of the mechanism. Let's start with the purpose and location.
Purpose and location
An electric starter is a unit used to convert electrical energy into mechanical energy, which is necessary to start the engine. In fact, this mechanism is an electric DC motor equipped with a mechanical drive. The principle of operation of the device is to close the retractor and retainer coils, as well as move the core, which helps push out the bendix. As a result, the Bendix engages with the flywheel of the power unit, and under the influence of the anchor, this flywheel begins to spin. Accordingly, this leads to the engine starting. In Lada Priora cars, the starter unit is located on the gearbox, under the housing of the engine air filter element.
Designation of structural elements of the starter assembly
Which starter is better to install on Priora?
Today you can find many models of starters on sale from various manufacturers, but they are all divided into geared and gearless. Both one and the second type have both their advantages and disadvantages. The main advantage of the gearless version is reliability and the ability to repair in case of breakdown, which is due to its fairly simple design. As for the disadvantages, such mechanisms are characterized by high voltage consumption and heavy weight.
Geared devices began to be used relatively recently; the addition of a gearbox to the design made it possible to improve the technical characteristics of the unit as a whole. The main advantage is considered to be higher reliability of engine starting, in particular at low temperatures. This advantage is achieved as a result of increased torque. The electric motor itself is smaller in size, but the rotation speed of the device is higher, and accordingly, less current is required to start the motor. In the production of geared devices, fewer expensive materials are used; accordingly, their cost is an order of magnitude lower than that of gearless ones.
As for directly choosing a starter, in practice geared devices are more reliable and fail much less frequently than gearless ones. But in this case, you need to remember that under no circumstances should you allow the starter mechanism to operate while the power unit is running. This is because the rotation frequency of the armature will be several times higher; accordingly, its conductors can come out of the grooves and touch the stationary components of the device, thus destroying its structure (video author - CompsMaster).
Several other reasons why the starter is silent
The reason that the starter does not respond to turning the ignition key may be incorrect operation of the vehicle's anti-theft systems (immobilizer or alarm). The thing is that these modules turn off the voltage supply to the starter terminals. At the same time, during the diagnostic process, it is not possible to detect any significant problems in the operation of the main components of the vehicle. Such a problem can only be detected by directly applying voltage from the power source to the starter terminals. If everything is fine with it, therefore, the cause of the breakdown is a malfunction of the immobilizer or security system.
The next step is to test the solenoid relay. If it breaks down, the starter behaves as follows:
- does not respond when trying to start the power unit;
- makes characteristic sounds and scrolls, but its power is not enough to start the engine;
- makes clicking noises, but does not turn the engine crankshaft.
Such symptoms indicate damage to the bendix, as a result of which it cannot be united normally with the flywheel and scrolls, as well as a malfunction of the solenoid relay. If the bendix fails, then a metallic crunch is heard in the area of the engine compartment, while the engine crankshaft remains motionless.
To check the retractor, you need to apply voltage to it from the battery by connecting the “plus” of the battery to the power terminal, and the “minus” to the housing. If the starter motor begins to rotate, then the traction relay is faulty. Often the cause of such a malfunction is the burning of the contact coins and is completely eliminated after cleaning them. True, this measure is temporary, and after it you will still have to replace the relay, since the nickels are coated with a special non-stick coating, which is completely destroyed during cleaning.
Summary
It is worth noting that a starter without a gearbox has a larger gap between the armature and the stator than a geared counterpart. For this reason, its permissible shaft misalignment is also greater.
And one more piece of advice. If the starter is still disassembled, then it would be a good idea to replace the brushes. The parts are cheap, so waiting for them to fail and then dealing with them separately is not worth it. Of course, for all the operations described above, at least a little experience is required. And, as you know, he is a profitable business. In the end, to get it you have to try. Go for it!