Starter replacement
Many owners, at the first malfunction of the starter, change the entire unit, without understanding the causes of the breakdown itself. But in most cases, the reasons for failure are as follows:
- Failure of the solenoid relay - purchased and replaced separately
- Brush wear
- Burning dimes on the retractor relay
Each of the problems listed above can be solved much cheaper than buying a new starter for a Priora. Therefore, first you should contact a specialist who will tell you exactly what the reason is and answer whether it can be repaired or not!
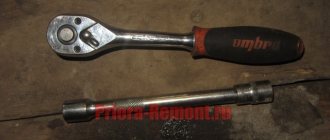
If repair is no longer possible, which is extremely rare, then a replacement must be made. To do this you will need the following tool:
- 13 mm head
- extension
- ratchet or wrench
Замена стартера
Очень РјРЅРѕРіРІРµ владельцы РїСЂРё первой же неисправносS ‚Рё стартера, меняют весь агрегат целиком, РЅРµ SЂР°Р·Р±РёСЂР°СЏСЃСЊ РІ причинаС... самой RїРѕР»РѕРјРєРё. РќРѕ РІ большинстве SЃР»СѓС‡Р°РµРІ РїСЂРёС‡РеРЅС‹ выхода РёР· строя бывают следующими:
- Р'ыход РёР· строя втягивающего реле — покупается РјРµРЅС ЏРµС‚СЃСЏ отдельно
- РР·РЅРѕСЃ щеток
- ПодгоранРеРµ пятаков РЅР° втягивающем SЂРµР»Рµ
Каждая РёР· перечисленных выше проблем SЂРµС€Р°РµС‚СЃСЏ намнРѕРіРѕ дешевле, чем купить РЅРѕРІС ‹Р№ стартер РЅР° РџСЂРёРѕСЂСѓ. Поэтому для начала стоит обратиться Rє SЃРїРµС†РёР°Р»РёСЃС‚Сѓ , который точ РЅРѕ скажет РІ чем причина, Рё ответит, подлежит ли РѕРЅ ремонту или РСет!
Если же ремонт уже невозможен, что бывает крайне СЂРµ РґРєРѕ, то необходимо РїСЂРѕРёР·РІРµСЃС ‚Рё заменСГ. RR»СЏ SЌS‚РѕРіРѕ RїРѕРЅР°РґРѕР±РёС‚СЃСЏ SЃР»РµРґСѓСЋС‰РёР№ РїРхструмент:
- головка на 13 мм
- SѓРґР»РёРЅРёС‚ель
- S‚рещотка Рели РІРѕСЂРѕS‚РѕРє
Required Tools
In order to remove or install the starter on a Priora, you will need the tools from the table below.
Table - Tools required to replace the front strut
| Name | Note |
| Spanner | "at 13", "at 15" |
| open-end wrench | "at 13", "at 15" |
| Pliers | Can be replaced with pliers |
| Screwdriver | With a thin flat blade |
| Silicone Grease | If you plan to remove the air filter |
| Head | "at 13" |
| Vorotok | With extension and ratchet |
| Penetrating lubricant | For example, WD-40 |
| Rags and wire brush | To clean dirt |
Replacing the starter on a Lada Priora can be carried out without access from the bottom. If you don’t want to remove the air filter and the wires going to the sensors, then you can dismantle and install the unit from underneath. In this case, you will need an inspection hole, overpass or lift to access the place where the starter is located.
Designation and location of fuses in the mounting block of Priora VAZ 2170
| Fuse no. | Current strength, A | "Standard" and "Norm" | “Norma” with air conditioning and “luxury” |
| F1 | 25 | Engine cooling radiator fan | Reserve |
| F2 | 25 | Heated rear window | Mounting block, rear window heating relay (contacts). Electrical package controller, contact “10” of XP2 block. Rear window heating element. |
| F3 | 10 | Right headlight, high beam | Right headlight, high beam lamp. Instrument cluster, headlight high beam indicator. |
| F4 | 10 | Left headlight, high beam | |
| F5 | 10 | Sound signal | Mounting block, horn relay. Sound signal. |
| F6 | 7.5 | Left headlight, low beam | |
| F7 | 7.5 | Right headlight, low beam | |
| F8 | 10 | Alarm signal | Mounting block, alarm relay. Alarm sound. |
| F9 | 25 | Priora heater fuse | Reserve |
| F10 | 7.5/10* | Interior lighting, instrument panels, brake light | Instrument cluster, pin “20”. Brake light switch. Brake light bulbs. Interior lighting unit. Interior lighting. The door sill light on the right front door. Additional brake signal. |
| F11 | 10/20* | Wiper | Mounting block, high speed windshield wiper relay. Switch for cleaners and washers, contact “53a”. Wiper and washer switch, contact “53ah”. Heated rear window switch. Mounting block, rear window heating relay (winding). Windshield wiper motor. Rear window wiper motor (2171,2172). Windshield washer motor. Rear window washer motor (2171,2172). Airbag control unit, pin “25”. |
| F12 | 20/10* | Terminal 15 devices | Instrument cluster, pin “21”. Electrical package controller, contact “9” of block X2. Electromechanical power steering control unit, contact “1” of block X2. Reversing light switch. Reversing lamps. Parking system control unit, contacts “11” and “14”. |
| F13 | 15 | Cigarette lighter fuse Priora | |
| F14 | 5 | Left headlight, parking light, license plate light, trunk light | Side light lamps (left side) Instrument cluster, main light indicator License plate lights Trunk light Electrical package controller, pin “12” of block X2 |
| F15 | 5 | Left headlight, parking light | Side light lamps (right side) Glove compartment lamp |
| F16 | 10 | Terminal 15 ABS | Hydraulic unit, contact "18" |
| F17 | 10 | Left fog lamp | |
| F18 | 10 | Right fog lamp | |
| F19 | 15 | Seat heating | Seat heating switch, contact "1" Front seat heaters |
| F20 | 5/10* | Immobilizer control unit | Recirculation switch (switch on) Mounting block, relay for low beam headlights and parking lights (automatic lighting control system) Heater electric fan relay Automatic lighting control switch Windshield wiper and external lighting control unit, contacts “3”, “11” Automatic climate control system controller installation, pin “1” Automatic window cleaning system sensor (rain sensor), pin “1” |
| F21 | 7.5/5* | Rear fog lights | Light switch, contact "30" Diagnostic block, contact "16" Clock Automatic climate control system controller, contact "14" |
| F22 | -/20* | Reserve | Windshield wiper motor (automatic) Mounting block, windshield wiper relay and windshield wiper high speed relay, (contacts) |
| F23 | -/7.5* | Reserve | Windshield wipers and external lighting control unit, pin “20” |
| F24-F30 | Reserve | ||
| F31 | 30 | Electrical package control unit | Electrical package controller, terminal “2” of block X1 Electrical package controller, terminal “3” of block X1 Driver’s door module, pin “6” Threshold light of the left front door |
| F32 | Reserve |
Generator for Lada Priora with air conditioning: how to remove it correctly?
Starter replacement
Many owners, at the first malfunction of the starter, change the entire unit, without understanding the causes of the breakdown itself. But in most cases, the reasons for failure are as follows:
- Failure of the solenoid relay - purchased and replaced separately
- Brush wear
- Burning dimes on the retractor relay
Each of the problems listed above can be solved much cheaper than buying a new starter for a Priora. Therefore, first you should contact a specialist who will tell you exactly what the reason is and answer whether it can be repaired or not!
If repair is no longer possible, which is extremely rare, then a replacement must be made. To do this you will need the following tool:
- 13 mm head
- extension
- ratchet or wrench
The procedure for replacing the starter on a Priora with your own hands
This repair is very simple, so it won’t take more than 25-20 minutes. The ideal option is to work either in the inspection hole, or to remove the air filter housing from the cushions, after which very good access to the starter opens.
First of all, we disconnect the “-” terminal from the car’s battery, after which we disconnect all the wires from the starter, one of which is screwed on with a nut.
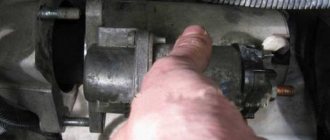
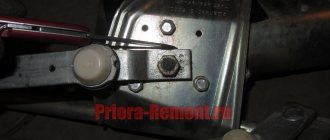
Then you need to unscrew the three starter mounting nuts, one on top:
And it’s more convenient to unscrew two from the bottom, as clearly shown in the photo below.
When they are unscrewed, you can easily remove it, since there are no more fasteners left.
Installation of a new one during a complete replacement occurs in the reverse order, and no difficulties will arise when performing this repair.
It is important to keep in mind that the starters on the Priora were installed with both three fasteners and two (old and new). Therefore, before buying a new one, make sure which one was on your car.
The price of a new 2170 can range from 3,500 to 4,000 rubles, although you can find Chinese options a little cheaper, but of relatively dubious quality. The most reliable and problem-free are KZATE factory production, which can easily cover over 200,000 km of a vehicle without repairs.
Replacing Bendix on a VAZ-2110
To carry out the work you will need the following tools, materials and devices:
Bendix for VAZ-2110 starter with nine teeth.
Stages of work
It goes like this:
- Remove the negative terminal from the battery. At the same time, the car can be placed on the inspection hole. This will make the job easier.
- Unscrew the positive wire from the starter.
Unscrew the starter cover.
Having removed the old bendix, we compare it with the new one.
Useful tips
When buying a Bendix, you will need to have the old one with you. Often, some elements of this spare part, in particular bushings, may differ on a car. You need to buy only domestically produced parts. Part numbers may be different, as the car may have a different modification. Usually, only a starter from the manufacturer is suitable for a VAZ-2110. These points should be clarified with the manager at the point of sale.
Priora starter relay where is the photo located
If the starter does not work when the ignition key is turned to position “II,” there may be a malfunction of both the starter itself and its activation circuit. To check, turn off the ignition and disconnect the wire block from the terminal of the starter traction relay windings.
Using a screwdriver, we bridge the terminal of the traction relay and the tip of the wire connected to the “positive” terminal of the battery. If the crankshaft rotates, then the starter is working, and the cause of the malfunction is a violation in its activation circuit. Otherwise, the starter or its traction relay is faulty. If it is not possible to eliminate the malfunction in the activation circuit of a working starter, then, if necessary, in this way (by turning on the ignition and closing the terminals), you can start the engine and drive to the repair site. A malfunction in the starter switching circuit can be caused by damage to: the starter relay, the power circuit or relay control circuit, the ignition switch contact group. To troubleshoot the starter circuit...
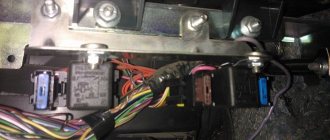
...in the car interior we remove the starter relay and fuses from the mounting block. To check the starter relay, install a known-good relay type 902.3747-11 in its place. To do this, you can use the adjacent heated rear window relay. If the starter turns on with the newly installed relay, then the starter relay has failed and must be replaced. If not, check the power circuit and starter relay control circuit. To check the power circuit, remove the starter relay from the mounting block.
We insert a jumper (piece of wire) into the sockets of the power contacts of the relay “30” and “87”. We turn the key in the ignition switch to position “II” - “starter”. If the starter turns on, the power circuit is working, if not, then we check it with a tester...
...is “+12 V” supplied to socket “30” of the starter relay when the ignition key is in position “II”. In this case, the second (“negative”) tester probe can be connected to the head of the instrument panel mounting screw. If voltage is supplied to socket “30”, use a tester to check the integrity of the circuit from socket “87” of the starter relay to the tip of the starter traction relay control wire. If voltage is not supplied to socket “30,” we check the circuit from terminal “50” of the ignition switch to socket “30” of the relay. If the circuit is in good condition, it is necessary to replace the ignition switch contact group. If the starter power circuit is working properly, check the starter relay control circuit. To do this, insert the tester probe into socket “86” of the starter relay, connect the second probe to ground. With the ignition on, check...
...is “+12 V” supplied from the main relay of the engine management system to socket “86” of the starter relay. Then we insert the tester probes into the relay sockets “85” and “86” and check...
...is there ground in socket "85" of the relay... ...connected to terminal "50" of the controller. Otherwise, we check the integrity of the starter relay control circuits: from the main relay of the control system and output “50” of the controller - respectively to sockets “86” and “85” of the starter relay.
Lada Granta - repair and check of starter
Due to the high load during operation, the starter installed on VAZ 2190 Lada Granta cars cannot be called a very reliable unit. However, even if you have doubts about its serviceability, before immediately trying to disassemble and repair the starter, it is recommended to perform several simple checks...
Preliminary check of the functionality of the Lada Granta starter
First of all, it is necessary to check the condition of the mechanical part, for which, using a flat screwdriver, the ease of movement of the coupling is assessed, as well as the rotation of the drive gear (the gear should rotate without jamming and exclusively in the direction of rotation of the armature).
To check the overall performance of the starter, you will need a battery and a set of power wires, usually used for lighting (with alligator clips), while connecting the “negative” terminal of the battery to the starter housing, and connecting the “plus” terminal to the control terminal of the traction relay. When the traction relay is in normal condition, a characteristic click should be heard and the clutch should move to the forward position. If these conditions are not met, repairs will most likely be limited to replacing the traction relay.
If there are no complaints about the operation of the traction relay, disconnect the wire from its control terminal and connect it to the lower contact bolt, and the armature should begin to rotate (be careful, the rotation speed is more than 5000 rpm).
Disassembly and repair of Lada Granta starter
When performing disassembly, first of all, unscrew the nut securing the tire and disconnect the tire from the contact bolt of the traction relay. At the next stage, we dismantle the traction relay, for which we unscrew the two mounting screws. Next, slightly lifting it up (at the same time the armature loop is removed from the lever) we remove the traction relay armature from the socket.
When disassembling the starter itself, first unscrew the two mounting screws and remove the back cover along with the brush assembly. After this, we remove the armature from the housing and, by removing the cover, open the drive mechanism with the gearbox. Next, disconnect the glider gear mechanism.
During preventive inspection and repair, the condition of the teeth of the planetary gears, as well as their needle bearings, is checked. When damage is detected and obvious operation, such gears are changed. The integrity of the plastic lever support is also checked at the gearbox. It should also not be heavily worn or deformed.
To check the condition of the brush assembly, unscrew two screws in the housing cover and disconnect the brush assembly from it. Sequentially pressing the latches, remove each brush along with the pressure spring. The height of the brushes must be at least 4 mm (measurement is made from the edge of the working surface to the “pigtail of wires”), and the springs must not be too compressed or deformed (defective elements must be replaced).
As for the starter armature, there should be no signs of burning, marks or other mechanical damage on the surface of its commutator (A). If such defects are detected, the collector can be polished with fine-grain glass sandpaper. When the heart wobbles, its beat relative to the axles should be no more than 0.08 mm. Otherwise the anchor changes. At the winding (B) of the armature, the reliability of the soldering of the leads is checked, as well as the condition of the winding at the ends of the armature. It is mandatory to check the windings and use a standard ohmmeter or a test lamp with a supply voltage of 12 V for the absence of a short circuit. In the latter case, the voltage from the battery should be applied to the armature core and the collector plate (in the absence of a short circuit, the lamp should not light).
After all the above checks are completed, the VAZ 2190 starter is assembled in the reverse order, with fresh lubricant applied to the drive gear teeth, shaft screw splines, planetary gears and other moving parts. As a lubricant, you can use CIATIM-201 (202, 203) or Litol 24. Upon completion of repair and assembly, it is recommended to check the starter for operability using the technology indicated above.
Tags
Description of the Priorov starter
Before we talk about how to repair a starter, let's get acquainted with the basic description of the mechanism. Let's start with the purpose and location.
Purpose and location
An electric starter is a unit used to convert electrical energy into mechanical energy, which is necessary to start the engine. In fact, this mechanism is an electric DC motor equipped with a mechanical drive. The principle of operation of the device is to close the retractor and retainer coils, as well as move the core, which helps push out the bendix. As a result, the Bendix engages with the flywheel of the power unit, and under the influence of the anchor, this flywheel begins to spin. Accordingly, this leads to the engine starting. In Lada Priora cars, the starter unit is located on the gearbox, under the housing of the engine air filter element.
Which starter is better to install on Priora?
Today you can find many models of starters on sale from various manufacturers, but they are all divided into geared and gearless. Both one and the second type have both their advantages and disadvantages. The main advantage of the gearless version is reliability and the ability to repair in case of breakdown, which is due to its fairly simple design. As for the disadvantages, such mechanisms are characterized by high voltage consumption and heavy weight.
Geared devices began to be used relatively recently; the addition of a gearbox to the design made it possible to improve the technical characteristics of the unit as a whole. The main advantage is considered to be higher reliability of engine starting, in particular at low temperatures. This advantage is achieved as a result of increased torque. The electric motor itself is smaller in size, but the rotation speed of the device is higher, and accordingly, less current is required to start the motor. In the production of geared devices, fewer expensive materials are used; accordingly, their cost is an order of magnitude lower than that of gearless ones.
As for directly choosing a starter, in practice geared devices are more reliable and fail much less frequently than gearless ones. But in this case, you need to remember that under no circumstances should you allow the starter mechanism to operate while the power unit is running. This is because the rotation frequency of the armature will be several times higher; accordingly, its conductors can come out of the grooves and touch the stationary components of the device, thus destroying its structure (video author - CompsMaster).
Basic faults
The starter has several basic faults that occur quite often.
- Battery;
- Solenoid relay;
- Brushes;
- Bendix;
- Rotor and stator windings;
If the starter does not rotate or clicks appear when you turn the ignition key, then the battery is most likely discharged. If the battery is charged, you should check the condition of the marks on it. Poor contact or oxide on the stamps will interfere with starting the car, since the starter requires a large current to rotate the engine, and weakening the contact of the stamps or their oxidation will increase the resistance, which will make it impossible to start the internal combustion engine.
battery
If the starter does not rotate or clicks appear when you turn the ignition key, then the battery is most likely discharged. If the battery is charged, you should check the condition of the marks on it. Poor contact or oxide on the stamps will interfere with starting the car, since the starter requires a large current to rotate the engine, and weakening the contact of the stamps or their oxidation will increase the resistance, which will make it impossible to start the internal combustion engine.
Retractor
If, when you turn the key, the starter rotates but does not start the engine, then the culprit is most likely the solenoid relay. The main culprit for relay failure is a break in its winding.
Brushes
Brushes are the most common starter element that fails. If they wear out, starting the engine is impossible, since they do not provide contact with the rotor commutator. When the brushes are worn down to 4 mm, they must be replaced.
Bendix
The Bendix is a type of overrunning clutch that engages the gears with the flywheel. Its failure is a mechanical failure of the starter. It is impossible to repair it, just replace it with a new one.
Windings
The winding fails due to increased currents generated when the engine starts in cold weather or when the bendix jams. The wire wound on laminated steel simply cannot withstand such current surges and breaks. This can be solved by replacing the rotor or stator, and best of all the starter.
Principle of operation
- When you turn the ignition key, voltage appears on the coil of the solenoid relay, which attracts the core.
- The core pulls the bendix out of the starter housing and engages it with the flywheel.
- As soon as the bendix engages the flywheel, a short circuit occurs, voltage is applied to the brush holder and causes the starter rotor to rotate.
- The rotor begins to rotate the bendix through the gearbox, thereby rotating the engine crankshaft and starting it.
- As soon as the engine starts, you release the ignition key, the voltage disappears on all elements of the starter and the retractor, under the influence of the return spring, disengages the bendix from the flywheel.
Replacement
Work on removing and installing the starter can be carried out without a higher education as a mechanic. Using the step-by-step instructions below, anyone who has ever held a key in their hands can cope with the task.
Necessary tool
- Phillips and flat head screwdriver
- Ratchet, extension and socket for “13mm” and “15mm”
- Open-end wrench for “10mm” and “13mm”
- Penetrating lubricant (WD-40)
- And the desire to repair your own car with your own hands.
Step-by-step replacement instructions
Work can be carried out both from the inspection hole and from above. We will consider the option of doing the work from above, as it is simpler and more convenient. And not everyone has an inspection hole.
- First of all, disconnect the negative terminal of the battery and remove the air filter housing along with the mass air flow sensor.
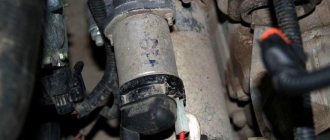
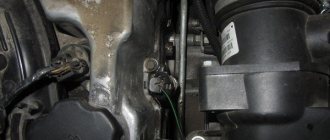
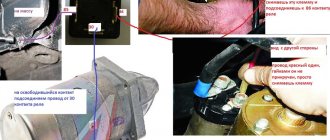
- Then, on the solenoid relay, use a 13mm open-end wrench to unscrew the power wire and remove the “mother” chip from the relay (marked with red arrows in the picture).
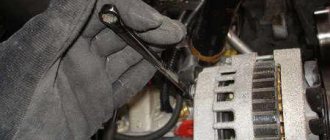
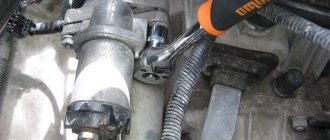
- Using a ratchet with a 13mm socket and an extension, unscrew the two starter mounting nuts. Below and above.
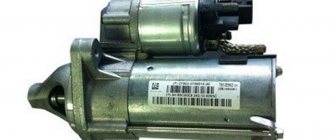
- Next, we remove the starter from the engine compartment and inspect it.
- We install it in the reverse order and check its functionality by test running the car.
Replacement from under the bottom of the car is similar to the instructions outlined above, but only to carry out work from an inspection hole or overpass it is necessary to remove the engine crankcase protection.
Lada 4×4
Remove the rear support bracket for the intake pipe by unscrewing the two bolts with a 13mm wrench.
We remove the starter protective shield by unscrewing its fastening nuts with a “13” wrench.
From the bottom of the car, unscrew the two bolts securing the starter. From the engine compartment side, move the starter forward and disconnect the block with wires.
We unscrew the nut and disconnect the wire tip from the contact bolt of the traction relay. Remove the starter from the engine compartment.
Video instruction:
[media=https://www.youtube.com/watch?v=n_PmQADIfNg]
By the way, do you know that the ignition system of LADA cars can be improved, for example, by abandoning the ignition key in favor of a start/stop button.
Keywords: lada xray starter | starter Lada Vesta | starter Lada Largus | starter Lada Granta | starter Lada Kalina | starter Lada Priora | starter 4x4 | Niva starter | universal article
1
Found an error? Select it and press Ctrl+Enter..
Replacing the Priora starter, main faults
The car starter starts the engine. The Priora will not start without his participation. Without it, starting a movement is simply impossible. Sometimes the Lada Priora does not start because the fuse has blown, or the starter relay has malfunctioned; it is marked K3. Sometimes it clicks but doesn't turn. The reasons are in the details.
The starter on a Priora consists of the following parts: bendex, retractor relay, armature and others - for a complete list of how many parts the starter of a Priora car contains, see the article below. It is advisable for car owners to know where this mechanism is located on a Lada Priora car - it is located immediately under the air filter.
The price of the part is a starter for a Priora engine (16 valves): from 2750 to 4500 rubles. When a breakdown occurs, the device on the Priora stops turning.
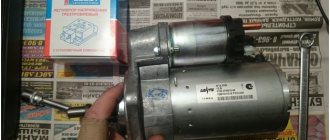
Standard starter and analogues - article number and price
Unfortunately, if the mechanism does not work, the problem can only be solved by replacing it. Neither installing new parts under the body, nor any cleaning will save the situation. The standard starter for a Priora with 16 valves goes under catalog number 2111.3708010-01, its cost is about 4,000 rubles. As analogues we can consider:
- "Baker." Article 5702370800010, costs 3,700 rubles;
- "Starvolt." Article lst0190, price - 3,200 rubles;
- Valeo. Article 438285, costs from 3,700 rubles;
- For automatic transmission, article number 219002370801000, costs from 3,900 rubles;
- "BATE". Article 51323708000, costs from 2,750 rubles;
- Gearbox – 51213708000bate, costs from 2950 rubles;
- "Kzate." Article 5702370800, costs from 3,300 rubles;
- Pramo (Eltra). Article TS12E901, price – 3,800 rubles;
- Fenox gearbox. Article 2110-3708010, price – 4,500 rubles.
Lada Priora starter: device and principle of operation
As mentioned earlier, this part can be installed on the Priora of two types: geared and gearless. Sometimes it may be necessary to remove the starter, note that it is located under the engine, on the right - closer to the space under the air filter.
To ensure that the starter unit does not wear out so quickly, it has a special mechanism that disengages the gear from the crankshaft flywheel - the Priora starter retractor relay. If it were not there, the service life of the unit would be greatly reduced, or repairs would be required.
Geared
This mechanism is small in size. It turns out this way because the gearbox allows you to increase or decrease the torque. The planetary gearbox itself in the car in question is located between the armature and the bendix; it serves as a “buffer” and an intermediate part between them. Thus, it does not take up so much space in the case, under which there are:
- bendix;
- fork;
- anchor;
- stator;
- solenoid relay;
- mask;
- gearbox
Its main difference is that the bendix is fixed on its own shaft, and it interacts with the Priora engine through a gearbox.
Gearless
A gearless starter is much larger than its counterpart, but it does the same job of receiving electrical energy from the battery and sending it to the crankshaft to start the engine. It consists of the following components:
- relay;
- an electric motor containing the traction relay cores and winding;
- brushes and holders, “brush assembly”;
- solenoid relay;
- stator;
- fork;
- contact bolts;
- anchor;
- starter mask;
- retaining ring;
- freewheel;
- front bushing and rear bushing;
- starter bendix Priora;
- gear.
The gearbox operates according to the following algorithm:
- Power is supplied from the battery through the wiring harness.
- The anchor is retracted.
- The Bendix is attached to the gear, “thrown out”, the pin contacts are closed, and voltage is applied to them.
- The armature rotates, the torque is transmitted to the bendix, through it to the gear, and it is already in contact with the engine flywheel.
- As soon as the ignition key is released, the retractor relay disconnects the bendix and the gear.
Basic faults
Externally, a breakdown of the Priora starter can be recognized by the following signs:
- “turns” and at the same time starts the engine;
- does not “twist”;
- continues to “twist” after the key is released;
- creaks, clicks are heard;
- It spins, but for too long.
- The reason may lie in a faulty battery, in the starter itself and fuses. The most common are those that are most likely to disable
- the car – it’s worth taking a closer look.
Doesn't turn on
If the engine does not start, the problem may be:
- discharged or broken battery;
- no closure of contacts 50 and 30;
- terminals or tips are oxidized;
- interturn closure;
- short circuit to ground;
- open circuit “starter - traction relay”;
- the ignition module is faulty;
- break in the traction relay winding;
- brush wear;
- the anchor jams;
- the additional relay or the control circuit connected to it is damaged.
Causes of Bendix failure
There are a lot of them, but the main one is turning the clutch gear both left and right. This may be due to:
- Reducing the size of the rollers in the Bendix housing due to a long service life. You need to buy new rollers of exactly the same size. Some motorists try to adapt drills - but this does not solve the problem - it is still better to make a purchase.
- A flat surface appears on one of the rollers. Here the situation is the same as in the previous case.
- Wear of the surfaces of the drive and (or) driven race at the points of contact with the rollers. Here recovery is impossible: the training cannot be removed. Therefore, you will need to purchase a new one-way clutch.
It should be noted that restoring a bendix is often impractical. The fact is that all its components wear out almost simultaneously. If for some reason there is a problem with one part, others will follow. That is, repairing the device will become your permanent occupation.
Starter problems and their elimination
If the starter clicks but does not turn, then first of all attention should be paid to the battery. Most likely, its charge is not enough to start the car. You should also inspect the condition of the terminals. More rarely, the culprit for clicking is the traction relay.
If the starter does not turn the crankshaft of the power plant, then conditionally possible causes can be divided into mechanical and electrical. The first most often includes problems with the clutch or drive gear. If there are any malfunctions, the listed elements must be replaced.
In the electrical part, the weak point is the brushes. They are the most susceptible to wear and tear. When the remaining length of the brushes begins to be 4 mm or less, they must be replaced.
Sources of the problem
The reasons why the Lada Priora does not start may be a malfunction in the fuel system:
- clogged fuel filters;
- failure of the fuel pump;
- lack of gasoline in the tank;
- clogged injectors;
- condensate freezing in the fuel line.
Having certain skills, every car enthusiast can fix these faults with his own hands. First you should check whether gasoline is supplied to the ramp with injectors. To do this, you need to disconnect the fuel hose from the rail and connect the pressure gauge. Then ask an assistant to start the engine. When the fuel pump is running, the pressure in the fuel line should be 2.7 atmospheres. If the pressure is lower than specified, you should look for the cause in the fuel filters.
A complete lack of pressure when a voltage of 12 V is applied means that the fuel pump has failed. To fix the problem, you need to replace the fine filter, wash or change the fuel pump filter, or replace its electric motor.
List of possible malfunctions related to the operation of electrical equipment:
- Insufficient battery charge.
- Battery terminals are oxidized.
- The starter does not work.
- The traction relay is faulty.
- The timing belt is broken.
- Malfunction of the electronic control unit.
- The valve timing is disrupted.
- Severe contamination of high-voltage wires or lack of contact.
- Pulse transformers are faulty.
- The fuses responsible for the operation of the ignition system and starter have blown.
- Spark plugs are flooded or faulty.
- Burnt ignition switch terminals.
- The immobilizer is faulty.
Before you start looking for these problems, you need to make sure that the contacts and connections of all wires are reliable, that there is no oxidation, breaks or abrasions.
How to change the solenoid relay?
One of the main parts of any starter is the solenoid relay, which is located next to it. This mechanism performs two functions at once:
- supplies voltage to the stator and rotor windings;
- moves the bendix, which engages the starter gear with the flywheel crown.
- Frame.
- Two threaded power contacts.
- There is a coil inside.
- The core is made of metal, which is affected by the electromagnetic field of the coil. It also has a kind of “hook” for connecting to the bendix.
- Contact Group.
To replace the solenoid relay you need keys 10 and 13, as well as a screwdriver. First you need to disconnect the battery.
To do this, use a 10mm wrench to loosen the terminal. Then you can proceed to disconnect the solenoid relay. To do this, use a 13 mm wrench to unscrew the two nuts on the power contacts. The relay is attached to the starter housing using 2-3 bolts (depending on the specific design). They need to be unscrewed using a screwdriver. This completes the dismantling; installation of the new relay is carried out in the reverse order.
Lada Largus
Remove the cover (if equipped) of the electronic control unit (ECM) by releasing the two fasteners (flat-head screwdriver). Unscrew the 2 nuts (No. 1) securing the expansion tank (No. 2) (10mm wrench). Remove and move the expansion tank to the side without disconnecting the hoses.
For configurations with JR5 gearbox:
- disconnect the hinges (No. 1) of the gear selection and shift cables from the gearbox (flat-head screwdriver);
- press the clamps on both sides and disconnect the stoppers of the sheaths of the selection and shift cables from the gearbox bracket.
For configurations with JH3 gearbox:
- remove the cover (No. 1) of the gearshift drive rod joint;
- Unscrew the bolt (No. 2) securing the gear shift rod, remove the spacer sleeve and disconnect the rod (10mm wrench).
Unscrew the 3 bolts (No. 1) securing the starter (head “13”).
Raise the car and unscrew the nut (No. 2) securing the bracket (No. 4) to the intake manifold (No. 3) (head “13”). Unscrew the bolt (No. 6) securing the bracket (No. 4) to the cylinder block (No. 5) (head “17”). Remove the bracket (No. 4) that mounts the intake manifold (No. 3).
Unscrew the nut (No. 2), Figure 3-7, and disconnect the harness (No. 1), Figure 3-6, of the ignition system wires from the starter (No. 3) (head “10”).
Unscrew the nut (No. 4), Figure 3-7, securing the starter wire (No. 5) ("10" head). Disconnect the starter wire. Unscrew the nut (No. 3) securing the starter electromagnetic relay wire (No. 5) (head “8”). Remove the starter.
The process is also shown in the video:
How to remove the starter for replacement or repair?
Now let's talk about the case when it is necessary to completely remove the starter on a Priora. There may be several reasons for this - from repairing the clutch to replacing the starter itself. But if the reason lies in the fact that the car cannot be started, it is worth checking whether the starter is really to blame. Quite often the reason lies in other nodes. And if the Priora does not start, the starter is not always to blame.
In order to dismantle the mechanism, you will need to perform simple manipulations:
- Turn off the power - use a 10mm wrench to loosen the terminal.
- Using a 13mm wrench, unscrew the nuts that secure the starter housing to the engine block.
- Using the same wrench, unscrew the nuts on the solenoid relay.
- Remove the wire from the relay.
- Remove the starter through the bottom or top (provided that the air purification filter housing is removed).
Typically, repairing a starter on a Priora consists of changing the brushes, cleaning the lamellas, installing a new bendix and retractor relay. If there is severe damage to the housing or windings, then it will be more effective not to repair, but to completely replace the unit.
How to check the overrunning clutch
If you're not in a hurry to change the Bendix, it's worth trying it out. To do this, block the overrunning clutch housing, which has already been removed from the starter, through a soft seal (for example, a rag), and fix it in a vice to avoid damage. Try moving the bendix left and right. It should only rotate in one direction because when you try to turn, the useful part will get stuck. If the overrunning clutch rotates, it will not engage the teeth and the starter will "thresh" without load. The functionality of the gear can be determined visually - you will immediately see that the teeth are “eaten”. But if the starter fails, you can understand this only by disassembling it. In this case, all the “internals”, including the gearbox, must be cleaned of dirt, dry grease and washed with clean gasoline. Next, you need to decide whether the bendix can be repaired or whether you will have to buy a new one.
Checking the performance of Bendix directly on the car
This can be done without removing the starter. To do this, activate any speed, press the brake pedal and turn on the starter. If the car just jerks forward, then everything is fine - most likely, your freewheel is in working order. The sound of the armature rotating indicates the bendix is slipping, which needs to be repaired or replaced with a new one.