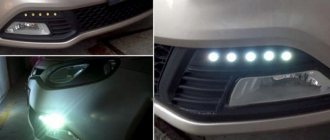
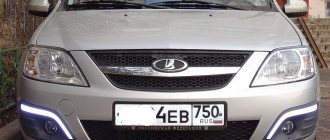
The Chevrolet Niva enjoys well-deserved success among car owners because it has excellent technical characteristics that have no alternatives in this price segment. But in order to reduce the cost, manufacturers, as a rule, remove some functions, which gives future owners ample opportunity for imagination. One of the modification options is the possibility of installing daytime running lights.
Installation of daytime running lights Niva Chevrolet
How to easily connect daytime running lights (DRL)
So the process of change is not ice... I continue to study the rules: If the timer has finished its work, that is, you have stood without moving for more than 2.5 minutes, then the light will turn on only when you start moving.
DRL Chevrolet Niva. We make daytime running lights for the Niva #AutoFormula 4x4. No Comments yet Posted…
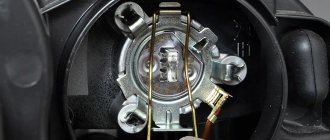
You can take the car to a specialized service. What parts and components fail most quickly on a Chevrolet Niva? The only disadvantage when installing daytime running lights in accordance with GOST of the Russian Federation, especially on cars of outdated models, is the need for mechanical intervention in the bumper design.
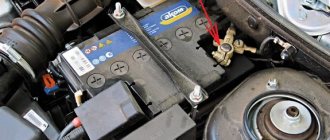
When stopping the car with the engine running, the speed signal disappears, two and a half minutes after stopping, the low beam turns off, the dimensions remain on. But when installing an additional circuit, there is a risk of forgetting to turn off the DRL, which can lead to battery discharge. The installation of daytime running lights is mandatory from January 1st.
You can use ready-made systems or buy each part yourself.
The following algorithm for connecting daytime running lights can be distinguished. When starting the engine, the tachometer pulsates. When this signal occurs, the side lights turn on.
At this moment, the engine may warm up at idle speed. The next stage will begin only when the movement begins. If the handbrake has been raised for less than 2.5 minutes, then the low beam turns on immediately, if more time has passed, then only after the start of movement.
While driving, the controller operates on the speed sensor, which powers the low beam lamps regardless of the position of the parking brake. To connect the kit, it is better to use an additional set of wires so that the system works in parallel. Also on the instrument panel it is necessary to additionally place keys for turning on the dimensions.
Also, if necessary, you can make a diagram that will provide for movement with the lights and other light sources turned off. This may be necessary for various types of cases, for example when moving, hunting or fishing, when the presence of headlights would be undesirable.
In this mode, with the engine running, it is enough to raise and lower the parking brake three times. The number of the certificate of compliance of a vehicle with changes made to its design with safety requirements is entered by a division of the Ministry of Internal Affairs of the Russian Federation in the vehicle passport.
All special notes on restrictions on the use of the vehicle contained in the certificate of compliance of the vehicle with the changes made to its design with safety requirements are also included in the vehicle passport. The presence in the vehicle passport of the number of the certificate of compliance of the vehicle with the changes made to the design of safety requirements is a necessary condition for permitting its operation.
So the process of change is not ice... I continue to study the rules: Appendix to the Resolution of May 10
Connection via 5-pin relay
Now it's time to learn how to connect running lights via a five-pin relay. The scheme is the most universal, and was assembled to eliminate the disadvantages of previous options.
First, about connecting the relay for DRLs:
- 30 – to the positive terminals of LED modules;
- 86 – on the car body;
- 87a – to “+” from the ignition switch;
- 87 – do not connect (isolate).
85 – to the positive wire of the side lamp;
Bluetooth Connection - Nivå - Help Center
If you're having trouble connecting your Nivå to your phone, follow the instructions below.
Normal Startup (See our video tutorial here) 1. Press the buttons on the headphones until you hear “Power, on” and the lights start flashing blue. This can be done by pressing right and left at the same time, or first right and then left. The left earphone should never be turned on first. 2.When they are both turned on, Right and Left will automatically find each other and connect. 3. Tap "Sudio Niva" on Bluetooth devices to connect the headphones to your phone.
If your headphones won't sync, you'll first need to restore the factory settings to re-pair. Here's how to do it: (Watch our video tutorial here) 1. Forget about headphones on your Bluetooth devices. Nivå should no longer sync with your device. 2. Turn off both headphones by pressing the buttons until you hear “Power off.” 3. Turn on the right earbud ONLY by holding the button until you hear "Power, on". 4. Release the button immediately after you hear "Power, on", and then quickly press it again 3 times. The indicator should now glow a steady, bright blue light. 5. Repeat steps 3 and 4, this time with the left earbud.
You have successfully restored your headphones to factory settings. Now let's pair them up: 6. Turn both headphones off again by pressing the buttons until you hear "Power, off." 7. Starting with the right earbud, hold the button until you hear “Power On” and DO NOT HOLD until you hear “Pairing” or the indicator light starts flashing red. 8. Repeat the operation with the left earphone. The headphones will automatically sync with each other once both are in Pairing mode. You'll know the sync was successful when the red flashing light turns blue. Left will now follow Right. 9. Turn off the headphones again and then connect to your device as usual.
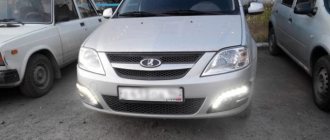
There are several basic requirements that the placement of running lights on a vehicle must meet: Therefore, after stopping, as a rule, there are no problems when undergoing maintenance. But before installing DRLs, it is also necessary, in addition to compliance with GOST, to understand how much changes will have to be made to the design of the bumper.
This is especially true for outdated models. In this case, you will have to make a cut to be able to install the DRL unit.
Scheme options
So, you can connect in several ways.
- The DRL turns on as soon as the ignition key is turned. The lights do not go out until the car engine stops. It is considered the simplest method, which does not involve the use of an on-board network. It is enough just to connect the negative from the lights to any place in the car body, and connect the positive from the lock to the output of the high-voltage module, always through a fuse.
- The same scheme, only the DRLs go out immediately as soon as the low beam is turned on. To implement this connection option, you need to adhere to the diagram described above, with the only difference being that the negative is connected to one of the positive wires of the low beam lamp. As soon as the low beam on the car is turned on, a positive impulse will appear on the minus DRL and the lights will go out. The DRLs will light up again as soon as the high beams are activated or the headlights are turned off.
- Connection diagram, which involves automatic connection of the DRL as soon as the car engine starts. It is considered the most reliable option for self-integrating LED daytime running lights. To implement this scheme, the minus of the DRL is connected to the car body, and the plus is connected to the relay contact.
Simple circuit with 4-pin relay
There is a simplicity in circuit number 1, implemented through a 4-pin relay. However, this option does not always satisfy the requirements of GOST, since the DRLs will shine separately from the head optics. The lights are not turned off by a push-button mechanism, everything happens automatically.
The photo above shows exactly this circuit, connected via a 4-pin relay. It implies the following procedure:
- when the engine starts, an impulse is sent from the generator to the relay, and the LEDs light up;
- As soon as the headlights are turned on, the DRLs turn off.
This connection method is also possible without using a generator. Then, instead, the voltage source will be the battery, the positive of which should be connected to the 30th contact in the photo.
It is also possible to connect the plus from the parking brake. In this case, as soon as the handbrake is activated, the daytime lights will go out - that's the button.
Circuit with 5-pin relay
It involves the use of 4 contacts. Ideal connection option for Priora cars. The difference from the above diagram is not only in the number of relay contacts. This circuit does not provide for the use of output 87. An alternative to ground is output 86.
The circuit with a 5-pin relay provides for the use of DRL control. The push-button mechanism is built between the generator and the 30th relay contact.
The operation of the DRL is as follows:
- the internal combustion engine is started, thereby the impulse from the generator goes to the 30th contact of the relay, and from there to the plus of the DRL;
- the lights come on, the minus is connected to any part of the car body;
- when the dimensions are used, the coil is activated, the 30th contact is integrated with the 87th, the pulse no longer arrives - the DRL is turned off.
With reed switch
The photo above shows a detailed connection diagram for the option using a generator. The plus is integrated, as can be seen from the diagram with point 30. The relay contact, marked with point 87, is integrated with the battery positive. Another relay contact, marked with number 85, is connected to the vehicle ground through the DRL.
The contact marked on the diagram with point 86 is connected to the reed switch. From the reed switch there is a connection to the plus of the generator.
Thus, the scheme implies the following. As soon as the internal combustion engine starts, the driver activates the reed switch with a button, the relay is activated, and the DRL turns on. The reed switch must be packed in thermopolymer and securely fixed to the generator.
Without reed switch
A variation of circuit number 3, only without using a reed switch. In this case, the contact marked 86 is integrated with the oil pressure lamp in the instrument panel. Thus, the option of turning on the DRL after the engine is started is supported.
It is noteworthy that this scheme is much easier to implement with your own hands than the option with a reed switch.
Video: how to connect DRL from a generator
As you can see, connecting the DRL to the vehicle’s on-board network is carried out using several circuits. The plus is taken from the output of the generator, less often from the battery.
- Absolutely legal (Article 12.2);
- Hides from photo and video recording;
- Suitable for all cars;
- Works through the cigarette lighter connector;
- Does not cause interference to radios and cell phones.
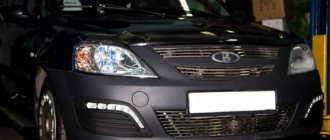
Daytime running lights (DRL) on CHEVROLET NIVA: features
The following algorithm for connecting daytime running lights can be distinguished. When starting the engine, the tachometer pulsates.
When this signal occurs, the side lights turn on. At this moment, the engine may warm up at idle speed. The next stage will begin only when the movement begins.
If the handbrake has been raised for less than 2.5 minutes, then the low beam turns on immediately, if more time has passed, then only after the start of movement.
While driving, the controller operates on the speed sensor, which powers the low beam lamps regardless of the position of the parking brake. To connect the kit, it is better to use an additional set of wires so that the system works in parallel. Also on the instrument panel it is necessary to additionally place keys for turning on the dimensions.
The operating algorithm of the device is as follows: When the engine starts, the device sees a pulsation on the tachometer wire and, based on the presence of this signal, turns on the dimensions. Nothing further happens until there is movement.
You can warm up the engine or stay in a running car for as long as you like, but the next stage of the device’s operation will begin only when the car starts moving. When a pulsation appears on the speed sensor wire, the low beam turns on - these are the running lights.
When stopping the car with the engine running, the speed signal disappears, two and a half minutes after stopping, the low beams turn off, the dimensions remain on. When driving resumes, the light turns on again. When you stop the car and turn off the engine, everything turns off, both the dimensions and the low beam.
When stopping the car without turning off the engine, another reference information signal is activated - this is control of raising or lowering the hand brake. If the handbrake is raised while the car is running in idle mode, the low beam will turn off forcibly, but the countdown timer continues to work and if the handbrake is released before the set period of time has expired, it will light up again.
If the timer has finished its work, that is, you have stood without moving for more than 2.5 minutes, then the light will light up only when you start moving.
If the handbrake is used while driving, then the device, seeing that the car is moving, does not turn off the light. The result of the device’s operation will be the automatic switching on of the dimensions, and since you didn’t turn it on yourself, you won’t forget to turn it off….
Nuances of using lights
There is a special GOST that defines and regulates installations, technical parameters and the connection itself of daytime running gears.
Thresholds on Niva: do-it-yourself installation options, photos, drawings Category: Tuning
The regulations state that the circuit should be used in such a way that the drive wheels turn on automatically when the key is turned in the ignition switch. That is, when starting the power plant. But DRLs are also required to turn off automatically as soon as the main beam headlights come on. Here, as you understand, we are talking about the headlight unit (low or high beam). There is also a rule indicating that the head light should turn on only when the headlights turn on. The exception is short-term signals to warn other drivers.
Based on the above, we can safely say that you should not output the DRL through the button. The same as through the handbrake. But you can install it in turn signals, but you will need to connect 2 additional wires from each turn signal.
How to install DRL on a VAZ 2110 and connect it to the wiring
All this is extremely important to take into account when connecting the movers. After all, you should be concerned not only with the fact that the light bulbs do not burn out
Although this is an extremely significant point.
Without a well-thought-out and competent scheme, you will definitely not be able to install DRLs yourself. After all, everything should work with a shutdown when the high or low beam is turned on.
There are a number of schemes according to which, in theory, you can install DRLs on your car if they are not included in the standard configuration of your vehicle. The only question is which scheme is better to use.
An important role is played by the voltage stabilizer, which is a subject of much debate when using diode running lights. The DRLs themselves are equipped with resistors that act as a current limiter. But during voltage surges, they are not able to maintain the voltage at a single level. Therefore, it is correct to assume that the use of a stabilizer in such a scheme will be mandatory and necessary. Otherwise, the service life of the DRL will be significantly reduced due to regular voltage drops. Although some still believe that the connection can be made without a stabilizer.
It is worth considering several schemes separately, drawing appropriate conclusions from them and making a final decision for yourself.
Choosing a stabilizer
In this form, the first and second methods will be combined. Even if your daytime running lights do not have a stabilizer, I recommend purchasing one or making it yourself.
You can buy Chinese modules at prices ranging from 50 to 120 rubles, so as not to order on Aliexpress, take a look at Avito, you can find very reasonable prices. The most common modules are pulse LM2596 and linear LM317. They are of course outdated, but they will draw a current of 1 ampere, which will be a power of 12 watts.
The XL6009, XL4015 chips are considered modern for 2016. They have higher efficiency and heat up much less. They can withstand a current of 2 Amps without a chip cooling system, this is equivalent to a load of 24 watts.
Taking into account international rules, some changes were made to Russian standards for the classification of navigation lights. Installing daytime running lights yourself requires certain skills and knowledge of the standards and requirements:
- DRLs should be placed in the front of the car at a distance of 25-150 cm from the ground.
- The minimum distance between blocks of daytime running lights should be 60 cm, and the distance from the edge of the body should not exceed 40 cm.
- The total luminous intensity should be 400-800 Cd.
- Homemade emitters should have an area of 25 to 200 sq.mm.
You must understand that car running lights are not side lights, as they have a completely different power (lighting intensity).
DRL laws in Russia: GOST and traffic rules
Since DRLs have become the most sought-after part of automotive exterior lighting, far fewer accidents have occurred. Daytime running lights are necessary to highlight and express the car during the daytime. This increases the visibility of the car and, accordingly, the safety of the driver. The lights are placed on the front of the car. But before equipping your car with such a device, you definitely need to familiarize yourself with the legislation. You need to know all the rules and regulations of traffic rules and GOST, so in this article we will provide the main nuances for working with flashlights. The law on DRLs in Russia since 2011 obliges all drivers to drive in the daytime with their headlights on. It is worth noting that today daytime running lights are classified not only as individual light elements, but also as low-beam headlights and fog lights. According to statistics, after the law on running lights was adopted, the number of road accidents decreased by almost half.
Laws and requirements regarding DRL
Today, there are requirements regarding daytime lights that are regulated by many legal and by-laws. Therefore, if you decide to install daytime lights on your car, then you definitely need to carefully read each point that is prescribed in the legislation. The first law that mentions daytime running lights is Decree of the Government of the Russian Federation No. 316 in the city of Moscow dated May 10, 2010. All changes that were made to the Resolution of the Council of Ministers - Government of the Russian Federation No. 1090 of October 23, 1993 are indicated here.
Thus, the following changes were made to the traffic rules of the Russian Federation:
- 19. Changes have been made regarding the use of external lighting devices.
- 19.5 During the daytime, all vehicles must use low beam headlights or DRLs to indicate the vehicle.
GOST for running lights R 41.87-99 prescribes that daytime running lights on motor vehicles are officially approved. Further, for daytime running lights GOST R 41.48-2004 of the same provision, but with amendments to the definition of what DRL is, based on the international standards of the UN Economic Commission for Europe No. 48 states:
“Uniform regulations concerning the certification of vehicles in relation to the installation of external vehicle lighting and light signaling devices.”
The changes were introduced on January 1, 2005, and they replace the provisions of the previous DRL standards GOST R 41.48-99. The last provision regarding the installation of DRLs according to GOST standardizes that all types of motor vehicles must have daytime lights that must comply with UNECE requirements.
According to this requirement, all types of lights, as well as on cars, must have special signs confirming the official and certified installation of DRLs. These should be designations that determine the type of DRL, and also show whether the equipment is standard or homemade.
Nuances of using lights
There is a special GOST that defines and regulates installations, technical parameters and the connection itself of daytime running gears.
Alarm Starline: instructions for selection, installation and operation
Category: Auto gadgets
The regulations state that the circuit should be used in such a way that the drive wheels turn on automatically when the key is turned in the ignition switch. That is, when starting the power plant. But DRLs are also required to turn off automatically as soon as the main beam headlights come on. Here, as you understand, we are talking about the headlight unit (low or high beam). There is also a rule indicating that the head light should turn on only when the headlights turn on. The exception is short-term signals to warn other drivers.
Based on the above, we can safely say that you should not output the DRL through the button. The same as through the handbrake. But you can install it in turn signals, but you will need to connect 2 additional wires from each turn signal.
All this is extremely important to take into account when connecting the movers. After all, you should be concerned not only with the fact that the light bulbs do not burn out
Although this is an extremely significant point.
Without a well-thought-out and competent scheme, you will definitely not be able to install DRLs yourself. After all, everything should work with a shutdown when the high or low beam is turned on.
There are a number of schemes according to which, in theory, you can install DRLs on your car if they are not included in the standard configuration of your vehicle. The only question is which scheme is better to use.
An important role is played by the voltage stabilizer, which is a subject of much debate when using diode running lights. The DRLs themselves are equipped with resistors that act as a current limiter. But during voltage surges, they are not able to maintain the voltage at a single level. Therefore, it is correct to assume that the use of a stabilizer in such a scheme will be mandatory and necessary. Otherwise, the service life of the DRL will be significantly reduced due to regular voltage drops. Although some still believe that the connection can be made without a stabilizer.
It is worth considering several schemes separately, drawing appropriate conclusions from them and making a final decision for yourself.