Nowadays, the question of which running lights is best for Kalina is quite relevant. Since November 2010, all vehicles are required to drive with low beams or fog lights on during the daytime. In accordance with the changes made to the traffic regulations, daytime running lights (DRLs) can be used. After the adoption of this resolution, car owners encountered certain difficulties. In the first place was the problem of forgetfulness: people did not turn on the lights due to lack of habit. Sometimes they forgot to turn them off.
And if in the first case, traffic police officers initially tactfully reminded about the rules, then in the second, discharged batteries caused extremely negative emotions among vehicle owners. When changes were made to the rules and daytime running lights were allowed for use, some car owners of Lada Kalina and other brands attempted to resolve the issue using homemade devices, various lamps and components from commercially available LEDs.
A variety of homemade devices of various types and qualities have appeared. But the changes made to GOST strictly regulated the requirements for DRLs. Manufacturers of lighting devices for motor vehicles did not miss their chance, and a variety of daytime running lights from various companies appeared on sale.
Basic criteria for choosing headlights
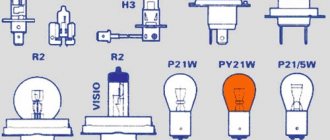
The popularity and demand for running lights is increasing over time. The various types of such lamps offered by manufacturers can not only ensure traffic safety, but also diversify the appearance of the vehicle. When choosing, you should carefully read the markings on the lamps.
Automotive lighting devices must be marked to permit their use on the territory of the Russian Federation. You should not choose devices based on the lowest cost. In addition to their low operational reliability, such lighting devices may be rejected during the next technical inspection. Then the car will be unusable until the causes are eliminated.
Markings must be clear, not exposed to external influences and located in a visible place. They must contain the country of origin code in accordance with EU requirements. The presence of a reflective element is also necessary. The selling organization is required to have a certificate for the product offered.
Parts manufactured by Hella, Philips, and Osram meet these requirements. Many of them can be installed on Lada Kalina. The cost of the kit ranges from 2,000 to 15,000 rubles. and depends on the manufacturer, design, performance characteristics and completeness.
To study the variety of shapes and lighting options when selecting daytime running lights for Kalina and preliminary evaluate design solutions, you can view photos presented in sufficient quantities in specialized magazines and on the Internet. Kits designed for self-installation are available for sale. These sets include:
- mounting brackets;
- connecting cable;
- connector;
- set of fasteners, bolts, nuts, latches;
- set of lighting fixtures.
The kit may contain a special device that, according to the rules, turns on and off the running lights when starting and stopping the engine. When purchasing such a kit, a connection diagram must be available. When installed on Kalina, running lights designed for foreign cars must be adapted to specific operating conditions.
Which lamps are best to use in Kalina
To find out which lamps are installed in Kalina during assembly, you need to remove the cover and pull out the part. The name, model and type of spare part are printed on the case. AvtoVAZ uses products from Philips as the main light. However, some models contain parts from Osram.
When searching for light bulbs in Kalina, you should be guided by proven options:
- number on the Kalina body or in the vehicle passport;
- a burnt-out sample previously removed from the lantern.
The body number is entered into a special window that pops up when you visit online resources with catalogues. Such systems independently determine the year of production, configuration and type of lighting equipment and offer a list of original spare parts and replacements for Kalina.
The number is provided to the seller in the store to accurately determine the part code. A simple and reliable way is to remove the lamp from the base and buy a new one based on the sample. In this case, you avoid purchasing the wrong part and having to go back to the store for an exchange.
The Kalina hatchback and sedan use the same lighting devices. The type of spare parts is no different for the station wagon.
When choosing a light bulb, it is important to adhere to the recommended parameters from the Kalina manufacturer. Installing a light with a higher power will lead to melting of the internal parts of the optics and damage to the contact group. After installing cheap substitutes, damage may occur due to poor quality assembly of the part and even explosion of the bulb
After installing cheap substitutes, damage is possible due to poor quality assembly of the part and even explosion of the bulb.
Method of installation of lighting devices
The installation of DRLs on Lada Kalina cars, like on all other cars, can be done at a car service center or independently. There are no restrictions in this regard either in the rules or in GOSTs. The main requirements for the location of daytime running lamps are:
- The distance between the closest inner sides of the lamps must be at least 60 cm. If the overall width of the car is less than 130 cm, a distance of up to 40 cm is allowed.
DRL installation diagram for Lada Kalina
The process of installing DRLs on the Lada Kalina must begin by removing the upper and lower grilles. If you decide to install lamps in the bumper, you need to remove it too. But the optimal place is the bottom grill, since it can use existing holes.
In the selected places, it is necessary to make markings according to the shape and size of the lamps, and carefully check for compliance with GOST requirements. Then use a regular knife or any other suitable tool to cut or widen the holes for the devices. It is advisable to be careful when working and not to exert much force to avoid damaging plastic parts.
After adjusting the holes for the devices, you need to secure them with standard fasteners from the purchased kit, lay and secure the wires along the grille. After this, the parts can be installed in place. It is not advisable to secure the lower grille or other part with fixed lamps thoroughly until the devices are fully checked after connection.
How to replace a headlight bulb on a viburnum
Replacing the front marker lamp in the left headlamp was simply not a real pleasure
!
It is no secret to Kalinovods that replacing any of the light bulbs will require iron patience and strong nerves
, but they change, and in principle, no longer than 5 minutes, but the size made you sweat, in the literal sense of the word.
It was not difficult to remove the rubber casing, but pulling out the socket with the light bulb was comparable to sheer hell. The cartridge simply doesn’t come out and that’s it!
How to solve the problem according to my version:
- remove the air filter housing from all the fasteners - remove both pipes and the plug to the sensor - remove the housing - remove the rubber housing of the headlamp - the cartridge rotates, so rest it with a screwdriver and turn it to the most convenient angle - remove the cartridge using thin pliers without squeezing it strongly - we take out the lamp, change it and reassemble it.
The removed filter housing will allow pliers to get through with ease!
pull the wires? as described in the instructions - risky, in my opinion. At least I tried to replace it in this way on a new car, it is extremely unpleasant and difficult.
The finger suffered, bleeding, and now there is a swollen callus
Parts and consumables:
- Cotton gloves without rubber coating
- Side light lamp
- Napkin
- Alcohol
Note:
Do not touch lamp bulbs with your fingers. Work in clean cotton gloves without rubber coating. Greasy fingerprints left on the lamp bulb will shorten its service life several times. If your fingers accidentally touch the lamp bulb, wipe the bulb with a clean cloth moistened with alcohol.
1. Turn off the outside lighting.
2. Remove the rubber plug from the high beam section.
3. Without disconnecting the wires, remove the side light lamp socket from the reflector.
4. Remove the faulty lamp from the socket.
5. Insert the new lamp into the socket and install the socket into the reflector.
6. Place the rubber plug on the headlight unit.
The article is missing:
- Photos of parts and consumables
- High-quality photos of repairs
The Kalina and Kalina 2 models have different headlights, so replacing the lamps in them has certain differences, and we will describe which ones in this article. Replacing the lamps yourself will not cause you any problems. Therefore, there is no point in turning to the service for help.
Connection to Kalina's on-board network
There are no restrictions or rules regarding the connection diagram in GOST. But turning on and off daytime running lights must obey certain rules. The running lights should turn on automatically when the engine starts and turn off when the engine stops. When you turn on the high or low beams, the DRLs should turn off. Sometimes Kalina car owners want to additionally turn off the daytime lights when the engine warms up.
This option is possible with certain knowledge and skills in working with automotive wiring. When installing daytime running lights on Kalina in the factory version with a diagram and instructions for connecting to the control device, usually no problems arise. The mentioned device is a relay with five terminals numbered 85-87, 87a and 30. To connect it to Kalina, you need to find any power wire from the low beam headlights and the positive wire from the ignition switch.
All these wires need to be installed with a female terminal with a small piece of wire, carefully insulating the connection points. Wires of the required length are also connected to the relay terminals, but with male terminals. Next, the wire from terminal 86 of the relay must be connected to the car body under any mounting bolt. It is advisable to immediately connect the wire marked “minus” from the DRL here.
The wire from the relay terminal with number 87a must be connected to the “plus” from the ignition switch. Wire 85 must be connected to the wire from the low beam headlights. You need to connect the positive wire from the running lights to terminal number 30. Relay terminal 87 is not used.
After installation is completed, you can check the operation of the lamps on the Lada Kalina car. To do this, you need to turn on the ignition. When the engine is running, the daytime running lights should light up. Next, you should turn on the low-beam headlights, the DRLs should go out, and the low-beam headlights should light up.
When switching to high beam, the situation should remain the same. Next, you need to turn off the high and low beams, and the running lights will light up. Then turn off the engine and the daytime running lights should go out.
Daytime running lights (DRLs) are designed to improve visibility of the vehicle from the front during daylight hours. On modern cars, for example, Lada Granta, Kalina, XRAY DRLs are installed from the factory. Other models Lada Priora, Vesta, Largus or Niva do not have DRLs, but you can install them yourself..
From the point of view of traffic rules
Clause 19.6. reads: “The fog lights turn on when the side lights are on, regardless of whether the high beam and (or) low beam headlights are on.”
First you need to understand what a fog light is in general. This is an additional light source that produces a flat and wide horizontal beam that extends directly above the road. Any deviation from this (let’s say it shines with a directed beam) turns the PTF into an additional light headlight, which, by the way, is installed on this Niva. The installation of additional headlights on the Niva is permitted by the manufacturer.
Requirements for DRL according to GOST
Functional electrical diagram:
- DRLs should turn on automatically when the engine start/stop control is turned to the “on” position.
- It must be possible to activate and deactivate the automatic DRL operation without the aid of a tool.
- DRLs must turn off automatically when the headlights are turned on, except when the headlights are turned on for a short period of time to signal road users.
DRL emitters must occupy an area of at least 40 cm and emit light with an intensity of 400 to 800 cd. Moreover, the light should be white, the number of emitters should be 2 pcs.
Self-installation of DRLs is considered as making a change to the design of the car. If the vehicle is not equipped with DRLs, either low beam headlights or fog lights should be used instead during the daytime.
How to connect daytime running lights?
Many motorists have wondered how to connect the DRLs so that they turn on when the engine is started. Garage craftsmen have found 10 ways to turn daytime lights on and off, as an example:
- From the handbrake;
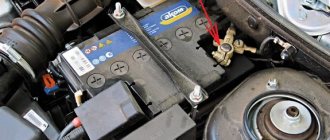
- Battery;
- Instead of fog lights, etc.
And each of the methods requires money, as well as good knowledge of wiring diagrams.
Let's watch a video on how to install and connect daytime running lights via the control unit:
One of the main schemes is to connect the DRL via a 4-5 contact relay; some craftsmen connect the wires to the pressure sensor. Since when the engine starts, the pressure sensor on the dashboard automatically lights up, which means that when the DRLs are connected to it, the lights themselves light up.
We connect the DRL via a 5-pin relay
To work we will need:
- The relay itself, for example, from an alarm system;
- Several wires with a cross section of 4 mm;
- 3 male-female terminals;
- Daytime Running Lights;
- Heat shrink.
The first way to connect DRLs is as follows:
- Take the DRL and attach it where it is most convenient for you. We solder the negative wire to the body and secure it well. The positive wire is supplied with a “mother”, insulated with heat shrink and left for a while.
- In the car wiring you need to find the wire that goes to the low beam of any headlight. We connect to it, output it, solder the “mother” in the same way and forget about it for now. The same must be done with the positive ignition wire.
- Let's move on to the relay. It has 5 contacts, we will use all but 87. You can remove it or leave it, decide for yourself. Number 86 will need to be connected to the negative on the body, 85 will be connected to the headlight, 87a will be connected to the positive from the ignition. Contact number 30 is connected to the free DRL terminal. Assess the reliability of the insulation of the terminals on the relay so that there are no short circuits and the contact is good.
Another video, installing DRLs using a five-contact relay on a VAZ 2111, be sure to watch:
That's all, check your installation to see if it works. Turn on the engine and see how the daytime lights function. Then turn on the low beam, the lights should turn off. After turning off the lights, the DRLs should light up again, and after stopping the engine, they should go out. In order for the decay to occur smoothly, it is worth placing a good capacitor in the circuit in parallel.
Connecting DRL without relay
If you don't have a relay on hand, you can do without it. DRLs are very simple in electrical terms. At the output we have only two wires, red and black. By all rules, red is a “plus”, and black is a “minus”. Open the hood and look for a “+” on any of the car systems that starts when you turn the ignition key. As an example, these could be the wires going to the fuel sensor or any others. Connect the red DRL wire to the positive terminal of your chosen vehicle system. And connect the negative wire to another contact of the same charge.
The result of such a connection scheme will be that when the ignition is turned on, the DRLs light up, and when they are turned off, they go out. Be careful, after installing the lights, check the functionality of all electrical appliances. And do not drive on the road if there are any malfunctions in the car.
Remember, not every car can have DRLs installed. And if installed incorrectly, you will be fined for changing the intended design of the vehicle.
DRL connection
How to connect daytime running lights so that they meet GOST requirements? There are many such connection methods. We decided to publish the simplest of them, which uses only one 5-pin relay. The general connection diagram for DRLs is as follows:
It is worth noting that using the connection points from the diagram, all connections are made in the engine compartment; it is not necessary to lay wires into the car interior. Electrical diagrams may also be useful (Lada Priora, Lada Kalina, Lada Granta, Lada Largus)
As a result, the DRL operating mode will be as follows:
- Once the ignition is turned on, the DRLs light up. They continue to light even after the engine is started.
- After turning on the headlights, the DRLs are turned off.
- After switching to low beam, the DRLs are also disabled.
- If you turn off the low beam and side lights, the DRLs automatically light up.
- We turn off the car and take the key out of the ignition - the DRLs go out.
Let us remind you that the easiest way to tune headlights is to install eyelashes.
Almost all car enthusiasts know how useful LED daytime running lights, or DRLs for short, are. Also called daytime running lights and DRL. After looking at the prices and assortment in stores, many people want to save money and make daytime running lights with their own hands. Usually they are made without knowing the requirements for them, then they are evaluated by photographing in the dark from a short distance. That is, they don’t even imagine their purpose, to increase the visibility of the car during daylight hours, and not at night.
Low beam lamp Kalina 2
How to replace a lamp on a Lada Kalina
During the daytime, every car owner relies on daylight, vision and reaction. But with the coming of darkness everything changes
Particular care should be taken at this time, as tragedies often occur due to negligence when visibility is poor. To prevent this, the headlights must be in good working order
If they don't work, no movement can be made. Even if you want, it won't work as the visibility will be zero
So, it is very important to make sure that the light is flawless and shines brightly
How to replace the Kalinin neighborhood light bulb on a hatchback, sedan, station wagon
Change is not easy. You do not need to have special knowledge or abilities. Even an inexperienced motorist can cope with this task. The only thing. act consistently and correctly. Therefore, replacing a lamp consists of the following steps:
- First you need
- Then turn off the power by disconnecting the battery terminal.
- The washer reservoir should also be removed for convenience.
- Then the rubber cover is removed.
- Later, the light bulb must be removed by squeezing the retainer with your fingers.
- Then the lamp is pulled out and the terminal is disconnected from it.
READ Which brand to choose battery for a car
This ends the procedure
It is very important to understand how the lamp was installed and what wires were connected to it
Video summary about replacing a low beam
right headlight on Kalina 2
, a similar replacement is carried out.
replacing the light bulb, the light (H7) flashed in viburnum 2.
Change low beam
winter lights in the cold. C. there is not enough time for both the mat and the flask
we are surprised. Despite.
Otherwise, you will not be able to connect the last headlight correctly, so you should contact a specialist. If you feel that this is not your job, the best thing to do is to immediately get your car repaired by a technician, where all the procedures will be carried out for you. Of course, you have to pay for it, but the result will be the greatest.
Install new: sequential instruction
The procedure for removing and installing a headlight on the right or left side is not much different from each other
It is only important to act correctly in accordance with the instructions. When installing the last light bulb, you only need to hold it by the base, you cannot touch it with your hands
Once removed, it can be removed completely.
READ What low beam lamps are installed on Kalina
Please note that for Lada Kalina (16 valve engine) the lamp has an H7 socket. Install the latter as follows:
- It is determined at the landing point so that the protrusion at the base aligns with the groove on the headlight. This needs to be firmly fixed. Only then will it become clear that the protrusion has fallen into the groove;
- press the clamp onto the lamp so that the center of the base is between the antenna antennas;
- lock the latch in place;
- Attach both wires to the latch and close the lid tightly.
After completing this procedure, you should turn on the lights at close range and check their operation. If everything is good, this means that the installation was completed correctly. In case of an unpleasant event, you need to take the car to the dealership and pay for it. Lamps should be purchased only in specialized stores. I prefer the most famous manufacturers and models with a guarantee. Osram H7 12V 55W headlights for Kalina Cross are very popular now.
Poor quality headlights should not be retained or stored as they will not last long and will require frequent adjustments or replacements.
It is important to understand that not only your safety, but also the safety of the pedestrian depends on these light bulbs. It is especially important that lighting is of good quality at night to avoid catastrophic consequences.
READ How to Install Radio on Priora 2
There is a special offer on our website. You can get a free consultation with our corporate lawyer by simply submitting your own question in the form below.
Main types
There are many options for making chassis with your own hands, separate or integrated into standard optics. In 2016, the technical regulations for cars became more stringent; they require legalization of all changes made to the car. Of course, they also find fault with DRLs and demand a certificate or a copy of the certificate. They can also check the markings on the body of the daytime running lights, which indicate the certification of this model. They can do such checks only at a stationary post. They especially like to find fault at the checkpoint on the way to Kazan; my friends often go there. They ask for documents for DRL, although no one is obliged to carry them with them, there are no such requirements in the traffic rules.
Main types:
- classic, in a separate building;
- from fog lights, PTF;
- from high beams;
- from side lights;
- from turn signals;
- embedded in the bumper or PTF plugs, such as an eagle eye.
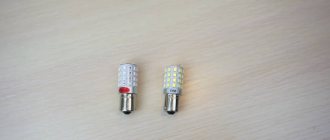
Two-color lamps for turn signals
All types, except the first, require the purchase of LED lamps. Two-color LED bulbs are used for turn signals. The Chinese sell them, promising fabulous technical characteristics and brightness. I haven’t tested the two-color models yet, but they look weak, and the LED diodes on them are of poor quality.
To make DRLs with your own hands from dimensions or turn signals, there are powerful domestic LED lamps T10 W5W and P21 with a control unit. They are produced by 2 brands, they cost from 5,000 rubles. per set, assembled on Cree. The main advantage is that they do not change the appearance of the car and have characteristics that meet the standards.
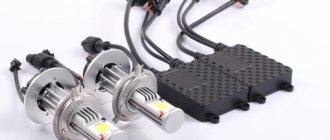
LED lamps for VAZ (Lada) Kalina 1st generation 1118 sedan (2004-2013)
| Description | |
| Voltage consumption | 12 Volt |
| Water permeability class | IP68 |
| Life time | more than 50 thousand hours |
| Material | Aluminium alloy |
| Base type | Selected by Autozs.ru employee |
| Light flow | 3000/4000/5000 lumens |
| Compatibility | Universal |
| Installation | Standard mounts |
| Compatibility | Universal |
| Equipment | |
| Lamp | 2 pcs. |
| Controller | 2 pcs. |
The main purpose of LED lamps is to provide high luminous characteristics of the vehicle's headlights. At the same time, they are an excellent alternative to halogen lamps and xenon lighting. In contrast, LED lamps provide a high degree of lighting brightness - 1800 lm for one lamp and fully comply with traffic regulations. Their long service life (50 thousand hours) guarantees operation without frequent replacement due to failure.
The main advantages of LED lamps for VAZ (Lada) Kalina 1st generation 1118 sedan (2004-2013):
- emit undispersed light, do not blind oncoming drivers and at the same time provide a large radius of illumination;
- their heating temperature does not exceed 80°C;
- thanks to instant switching on, they are able to work with maximum power almost instantly;
- Made from a solid-state crystal structure, the LED is not sensitive even to vibrations over a wide frequency range;
- excellent visibility while the car is moving, which contributes to maximum safety;
- easy installation without intervention in the structure due to the full compliance of the base with incandescent lamp standards;
- the presence of a built-in chip, which makes it possible to use them on any vehicle with an on-board computer.
From an aesthetic point of view, their advantage is a noticeable improvement in the appearance of the car; when looking at the optics, it is more noticeable among vehicles.
Main characteristics
Thanks to a luminous temperature of approximately 5000 K, corresponding to sunny weather, LED lamps create a direct stream of light and ensure excellent visibility even in adverse weather conditions.
Having low power (25 W for each lamp), LED lamps correspond to incandescent lamps with a power of 150 W, but are also significantly economical.
LED lamps consume a voltage of 12/24 Volts, which makes them suitable for use in truck optics.
LED lamps are waterproof, protected from dust and dirt, and insensitive to sudden temperature changes. The delivery set includes 2 lamps with control units
Requirements according to the regulations
The luminous intensity of daytime running lights depends on the beam angle of the LEDs with the lenses installed. Diodes without optics shine 120 degrees, that is, in all directions. Therefore, focusing the light is required, as in a flashlight. Therefore, the requirements indicate the luminous intensity in Candelas, not lumens. To measure the light intensity, place a lux meter in front of the DRL at a distance of 1 meter. The lux meter must be positioned strictly along the optical axis of the light source. Thus, the Luxes will turn into Candelas, by which the effectiveness of work can be assessed.
Required characteristics:
- each DRL should have 500-700 lumens;
- power from 6 Watt;
- shine at an angle of 35 degrees.
Simply put, if the power is below 6 watts, then it is junk, not DRL.
Requirements according to GOST:
- luminous intensity 400-800 candelas;
- glow angle 25 degrees vertical;
- angle 55 horizontally;
- The luminous area of each is at least 40 square centimeters.
On packages with DRL there are often inscriptions like “install it and you will become very visible”, but inside there is junk with a power of 2 Watts. And of course, the Chinese help, who write super-bright LEDs, powerful COB, super-powerful on any junk.
I advise everyone to go through any Chinese budget LED lighting equipment immediately after purchase. This will eliminate assembly defects, apply thermal paste and improve cooling.
How to remove the headlight on Kalina 2: adjusting, setting and replacing the low beam lamp + video
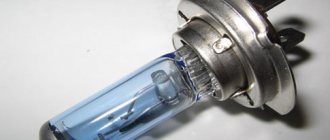
In head optics, low beam lamps most often have to be replaced. For a Lada Kalina car, the low beam lamp is a halogen lamp with an “H7” socket, the power of which is 55 watts (no more). Osram bulbs may come from the factory, but others will do. After replacement, the filament will occupy a new position, and the headlight adjustment may be lost. So, checking the settings, and, if necessary, adjusting the headlights is carried out immediately after replacing the lamps, which on the Lada Kalina is done without dismantling the headlight unit.
Step-by-step replacement instructions
Each H7 standard bulb has an iron base, which is pressed to the headlamp with a wire clamp. To bend this bracket, just get close to the plane of the headlight from behind. Let's open the hood and see what exactly will bother us.
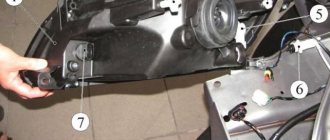
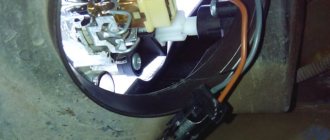
Engine compartment of Kalina-2 (VAZ-2192, 2194) A washer reservoir is installed behind the headlight on the right. It is dismantled like this: disconnect the electric motor terminals, tighten the plug harder, find one nut and one fastening bolt. The fastening elements are unscrewed with a 10mm wrench, then the tank is placed on the engine. Next we could look at how to remove the headlight on Kalina-2, but in this case this is not required. Sequence of replacement steps:
Remove the rubber cover covering the low beam lamp compartment; Disconnect both terminals from the lamp contacts; The fastening bracket is removed from the grooves by first pressing on it, then the bracket is moved to the side; They take out the lamp, install a new one in its place, and return the bracket to its place.
Next, perform steps “2” and “1” in reverse order. The connection diagram is not important - there are only two contacts, and both go to the filament. Now, if we connected LEDs, then everything would look more complicated. The bracket presses the socket to the plane of the headlight
Adjusting the headlight beam
Correctly adjusting headlights can only be done in a service station. However, let's consider how experienced craftsmen perform this operation. Kalina-2 block headlight, correct adjustment of the beam direction There are two adjusting screws on the back wall of the unit called “headlight block”. The first of them, located closer to the radiator, allows you to deflect the light beam “up and down”, and the “horizontal” direction is adjusted with the second screw. Ideally, this should happen: when the car is 5 meters from the screen, the border of the light spot touches line “2” (see figure). Line “1” is spaced from the ground at a distance equal to the height of the centers of the headlights. The second line is drawn 65 mm lower. Here are a couple more tips that will be useful:
- The centers of the beams should be on lines AE, BE;
- Line “0” has the following meaning: it intersects with line “1” at one point, so the border of the spot should pass exactly through this point;
- The caps of the plastic adjustment screws are compatible with a hex screwdriver. However, a Phillips screwdriver will also work.
So, we have fully examined how to adjust the headlights on Kalina-2. Of course, replacing lamps with subsequent adjustment is a less labor-intensive operation than connecting a radio. However, accuracy is important here. And the special equipment used to perform the settings is only available at service stations.
Question and answer: what should not be allowed under any circumstances
Q: What happens if you buy lamps that have a socket other than “H7”? A: It will not be possible to install the lamps in a standard headlight. Q: If you use a power of more than 55 Watts, will this not lead to overheating? A: Exceeding the power will lead to to the fact that the fuse in the low beam lamp circuit burns out. A separate fuse is used for each of the lamps, so it is not possible to “deceive” the automation. Q: Are halogen lamps afraid of power surges in the network? A: For incandescent lamps, excess voltage is a harmful factor. In the case of using halogen lamps, there will be two harmful factors: overheating, underheating. Actually, this is why MTBF can be considered a relative rather than an absolute value. This value depends, and depends strongly, on the stability of the voltage.
How not to do DRL
On the Internet I looked through many options for making DRLs with my own hands, but found only a couple of the right ones. For every light device in a car there are rules and technical regulations that are written in the blood of victims of road accidents. Such home-made people do not even understand the very purpose of navigation lights and make them without knowing the necessary standards.
For maximum savings, they are made from available materials, usually from LED strip or LEDs. As a result, they get decorative lighting from the tape with a brightness slightly higher than that of the dimensions, which is not noticeable during the day. To make things not so sad, they check homemade daytime running lights at night from close range. Although you need to check it during the day in sunny weather from a distance of 100 meters. After all, they are used during daylight hours. Then they boast about their poor and incorrect creation and advise others to do it.
There is no need to place the LED strip anywhere on the front of the car. A weak one does not shine, but a powerful one requires good cooling. As a result, you will get the result as in the photo below. Everyone takes photos at night, when they are visible, and they are used during the day.
How to connect daytime running lights?
Many motorists have wondered how to connect the DRLs so that they turn on when the engine is started. Garage craftsmen have found 10 ways to turn daytime lights on and off, as an example:
- From the handbrake;
- Battery;
- Instead of fog lights, etc.
And each of the methods requires money, as well as good knowledge of wiring diagrams.
Let's watch a video on how to install and connect daytime running lights via the control unit:
One of the main schemes is to connect the DRL via a 4-5 contact relay; some craftsmen connect the wires to the pressure sensor. Since when the engine starts, the pressure sensor on the dashboard automatically lights up, which means that when the DRLs are connected to it, the lights themselves light up.
We connect the DRL via a 5-pin relay
To work we will need:
- The relay itself, for example, from an alarm system;
- Several wires with a cross section of 4 mm;
- 3 male-female terminals;
- Daytime Running Lights;
- Heat shrink.
The first way to connect DRLs is as follows:
- Take the DRL and attach it where it is most convenient for you. We solder the negative wire to the body and secure it well. The positive wire is supplied with a “mother”, insulated with heat shrink and left for a while.
- In the car wiring you need to find the wire that goes to the low beam of any headlight. We connect to it, output it, solder the “mother” in the same way and forget about it for now. The same must be done with the positive ignition wire.
- Let's move on to the relay. It has 5 contacts, we will use all but 87. You can remove it or leave it, decide for yourself. Number 86 will need to be connected to the negative on the body, 85 will be connected to the headlight, 87a will be connected to the positive from the ignition. Contact number 30 is connected to the free DRL terminal. Assess the reliability of the insulation of the terminals on the relay so that there are no short circuits and the contact is good.
Another video, installing DRLs using a five-contact relay on a VAZ 2111, be sure to watch:
That's all, check your installation to see if it works. Turn on the engine and see how the daytime lights function. Then turn on the low beam, the lights should turn off. After turning off the lights, the DRLs should light up again, and after stopping the engine, they should go out. In order for the decay to occur smoothly, it is worth placing a good capacitor in the circuit in parallel.
Connecting DRL without relay
If you don't have a relay on hand, you can do without it. DRLs are very simple in electrical terms. At the output we have only two wires, red and black. By all rules, red is a “plus”, and black is a “minus”. Open the hood and look for a “+” on any of the car systems that starts when you turn the ignition key. As an example, these could be the wires going to the fuel sensor or any others. Connect the red DRL wire to the positive terminal of your chosen vehicle system. And connect the negative wire to another contact of the same charge.
The result of such a connection scheme will be that when the ignition is turned on, the DRLs light up, and when they are turned off, they go out. Be careful, after installing the lights, check the functionality of all electrical appliances. And do not drive on the road if there are any malfunctions in the car.
Remember, not every car can have DRLs installed. And if installed incorrectly, you will be fined for changing the intended design of the vehicle.
On the Internet you can find many other solutions on how to connect the DRLs so that they turn on when the engine starts. This article described only two of the most popular and less expensive methods. Other connection schemes require deeper intervention in the car’s electronics and the purchase of various materials and accessories. And, as you know, not everyone can understand intricate schemes.
Classic, option No. 1
The Chinese inexpensively sell COB LED bars with a length of 15 to 25 cm, passing them off as full-fledged DRLs. Naturally, they cannot be running lights; they have a beam angle of 120 degrees. There is no body or lens; in frosty and salty Russia they will quickly fail. They are more suitable for illuminating doors and trunk.
To make decent daytime running lights from them with your own hands, you need a housing and a long lens. The focusing optics can be replaced with a reflector. There is usually double-sided tape on the back, which holds them in place. Their power, as always, is overestimated, in reality it is from 3W to 6W, a cooling system is not required. But if you stand in hot weather in the sun in a traffic jam, you may overheat. Their quality is low, so temperatures above 60 degrees are contraindicated.
Extended optics for COB
Option No. 2
For assembly you will need 1W and 3W LEDs in the amount of 5-7 pieces per 1 block. It is impossible to set less than 1W, the light intensity will be too low and will not fit into the requirements. The basis will be an aluminum profile or an aluminum ruler with places for mounting diodes. 1W or 3W LEDs are installed on aluminum using thermally conductive adhesive.
For LEDs, a wide range of optics are sold with different luminous angles, from 10° to 90°. Lenses of 30° - 35° are required; a separate lens is installed for each LED.
Round for installation instead of PTF
DRL in the far to the floor glow on the controller
On the Internet there are many circuits and devices for high beam DRLs at full heat for 12 volts, but few for 24 volts, and most of them are complex. Below we will look at the long-range DRL controller in full heat; circuits for 12 and 24 volts will be provided. And it will be controlled by an inexpensive and accessible Attiny13A controller.
Pluses of DRL:
- You don’t have to constantly think about what you didn’t forget and turn on the lights when the car is moving. It turns on automatically.
- After the trip, you don’t need to think about turning off the lights, the DRL unit will do it for you.
- The lamps turn on smoothly, and not at full power, and this saves electricity, reduces the load on the generator by five times, and means saving fuel.
- The lamps will last much longer.
- When the ignition is turned off, the DRL unit does not consume energy; the unit is turned off.
Principle of operation:
- When the ignition is turned on, power is supplied to the DRL circuit.
- The controller gives a delay of 10 seconds.
- The controller waits until the status on port PB3 is zero. Simply put, the controller will check whether the dimensions are turned off. If they are turned off, then it moves on. If not, waits for shutdown.
- The input status of the PB4 port controller is checked. That is, it waits until one appears. Simply put, this port is connected to the handbrake and it controls the state of the handbrake. The handbrake was lowered, a 1 appeared on port PB4
- The lights are turned off and the car is released with the handbrake, only then the high beam headlights begin to light up smoothly.
- The DRLs turn off smoothly when the parking lights are turned on or the parking brake is applied.
Adjustment.
By default the block is set to 30%.
The brightness of the DRL is adjusted using a button located on the board and recorded in non-volatile memory.
To enter the setting mode, you need to press the adjustment button and hold until the headlights blink twice. We have entered adjustment mode. Each time you press the button, the brightness of the high beam headlights will change stepwise until it reaches maximum.
The next press - the headlights will go out, and pressing further the headlights will burn brighter each time. If you have reached the desired brightness, you need to write the new settings into memory, otherwise after rebooting the controller will install the old settings.
To do this, press the button and hold until the headlights blink twice. This will serve as a signal that the new settings have been saved.
Here we will also consider DRLs for cars with an on-board network of 12 and 24 volts.
The difference between 12 and 24 volts, DRL will only be in the circuit itself. A zener diode will be added to limit the voltage at the transistor's gate, and the rating of some components will be changed to 24 volts. The firmware and operating algorithm of both schemes, as well as the connection to the vehicle network, are identical.
DRL 12 volts on Attiny13A controller.
Arrangement of elements on the board, top layer. Only the power transistor is installed on the bottom layer, so we did not lay out the location of the parts of the bottom layer.
List of radio components for 12 volt DRLs
| No. P/P | Denomination | Silkscreen printing | Frame | Qty | Links to details |
| 1 | ATTINY13A-SSU | U1 | SOIC-8 | 1 | ATTINY13A-SSU |
| 2 | BC817 | Q1 | SOT23-3 | 1 | BC817 |
| 3 | 5V1 | D2 | LL-34 | 1 | Zener diode 5V1 |
| 4 | 47k | R1 | 0805 | 1 | 47k |
| 5 | 22k | R2 | 0805 | 1 | 22k |
| 6 | 1k | R3 | 0805 | 1 | 1k |
| 7 | 100n | C1 | 0603 | 1 | C 0603 |
| 8 | KEY-7.0*3.5*3.5 | KEY1 | KEY-7.0*3.5*3.5 | 1 | |
| 9 | 4k7 | R4 | 0805 | 1 | 4k7 |
| 10 | 100 | R5 | 0805 | 1 | 100R |
| 11 | IRF4905STRLPBF | Q2 | TO-263-2 | 1 | IRF4905STRLPBF |
| 12 | LL4148 | D1 | LL-34 | 1 | LL4148 |
DRL 24 volts on Attiny13A controller.
Arrangement of elements on the board, top layer. Only the power transistor is installed on the bottom layer, so we did not lay out the location of the parts of the bottom layer.
List of radio components for 24 volt DRLs
| No. P/P | Denomination | Silkscreen printing | Frame | Qty | Links to details |
| 1 | BC817 | Q1 | SOT23-3 | 1 | BC817 |
| 2 | 5V1 | D2 | LL-34 | 1 | Zener diode 5V1 |
| 3 | 110k | R1 | 0805 | 1 | R0805 |
| 4 | 22k | R2 | 0805 | 1 | R0805 |
| 5 | 2k2 | R3 | 0805 | 1 | R0805 |
| 6 | LL4148 | D1 | LL-34 | 1 | LL4148 |
| 7 | 100n | C1 | 0603 | 1 | C 0603 |
| 8 | KEY-7.0*3.5*3.5 | KEY1 | KEY-7.0*3.5*3.5 | 1 | KEY-7.0*3.5*3.5 |
| 9 | 4k7 | R4 | 0805 | 1 | R0805 |
| 10 | 51 | R5 | 0805 | 1 | R0805 |
| 11 | 10V | D3 | LL-34 | 1 | Zener diode 10V |
| 12 | IRF4905STRLPBF | Q2 | TO-263-2 | 1 | IRF4905STRLPBF |
| 13 | ATTINY13A-SSU | U1 | SOIC-8 | 1 | ATTINY13A-SSU |
Both boards were tested on the bench and will be tested on cars in the near future
Option #3
Another affordable way to make daytime running lights with your own hands. An aluminum profile of rectangular or square cross-section is required. Holes for the “eagle's eye” are drilled in it, in the amount of 5-7 pieces. Then the “eagle’s eye” is placed in profile, the wires are routed in any suitable direction. The void can be filled with sealant, and the body can be painted in any color. The main drawback, the low reliability of the “eagle eye”, quickly fails. But it can be eliminated by going through them. Using additional thermal paste, the contact of the LED with the bolt housing is improved. The lens is placed hermetically on a transparent sealant for complete protection from moisture and salt.
Connection via a 4-pin relay from a generator or oil sensor
The following two methods have a common basis and imply the operation of daytime running lights only after the engine is started. The circuit for switching on DRL from the generator is based on switching a four-contact relay and a reed switch.
The DRL relay contacts are connected as follows:
- 30 – to the positive terminals of LED modules;
- 85 – to the positive wire to the dimensions;
- 86 – to any reed switch output;
- 87 and the second terminal of the reed switch - to the “+” of the battery.
After checking the reliability of all contacts, proceed to setup. To do this, start the engine and, by moving the reed switch near the generator, achieve its activation and a stable glow of the DRL. Then the reed switch is hidden in a thermal tube and fixed in the found place using nylon ties.
At the moment of starting the engine, and then the generator, the contacts of the reed switch and relay close, supplying power to the LED running lights. In this case, the side lamps remain turned off, since the current through the relay coil is small to light them.
In the absence of a reed switch, you can power the DRL from the oil pressure sensor. In this case, pin 86 is connected to the oil pressure lamp. The rest of the circuitry is duplicated.
Both schemes have a common drawback. They cannot be used if LEDs are installed in the dimensions.