Any car enthusiast, even with little driving experience, is well aware of the importance of good lighting on the road. Especially in cases of poor visibility, which include heavy rain, dense fog and other natural phenomena. At the same time, many drivers are interested in the question of which H7 low beam lamps are the best. Most car manufacturers equip their products with this type of headlight lamps. But not every vehicle owner knows what they are.
Design Features
Kalina's light is not technologically advanced, since the optics use classic halogen elements. From the factory, the modules contain parts from Philips or Osram with the Long Life prefix, which means an increased service life.
The Kalina lighting system in the old and new body differs in the location of the modules, shape, and size. The elements used in optics are:
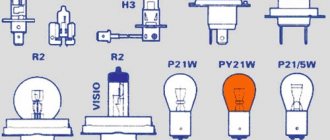
- turn signals – PY21W;
- low beam – H7/55 W;
- high beam – H1/60 W;
- fog lights – H11/55 W;
- Dimensions – W5W.
In modifications of Kalina since 2013, running lights have been added from the factory, which use parts with the index W 21/5 W.
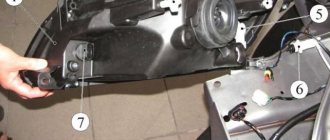
Some car owners cannot fit their hand into the cramped space between the TV and the air filter housing. In this case, the Kalina intake system is dismantled or the radiator grille and headlight are removed.
Features of replacing the high beam lamp
Although, as stated above, the LBS burns out much more often due to the longer operating time, in some cases replacement of the high beam is also necessary.
If you know how to replace the LBS, then you can handle the high beam. The steps in this process are exactly the same: first remove the boot, then disconnect the pad, and so on. There are no special nuances here, since in Kalina the headlights are arranged in the simplest possible way.
Price issue
2. Osram h7 12v 55w (price - from 270 rubles)
3. Bosch H7 12v 55w, 2 pcs. (price - from 1190 rubles)
When and why to change
The factory light is adjusted during the production process, at the time of passing technical inspection. In the new car, the modules shine with maximum power and at the peak of their capabilities. The need for replacement is determined by the following main criteria:
- Reducing light intensity.
- The appearance of yellowness and cloudy areas on the cut-off strip.
- Complete shutdown of one of the light modules.
- Increased brightness after the suspension hits a pothole or has mechanical contact with the headlight.
Kalina lamps installed on the conveyor last no more than 4 years. Cloudiness, deterioration of visibility and the appearance of unlit areas appear after the filament burns and the bulb smokes. In this case, the light does not pass through the dirt well and does not reach the desired areas of the reflector. There are yellow spots of light and darkened areas on the road.
The thickness of the light module filament is calculated by production engineers. When struck, the lamp shakes and the spiral becomes thinner. An external examination reveals a large increase in beam power. This indicates that the halogen lamp will soon fail, since the thin filament heats up above the set temperature and begins to melt. The service life of a damaged part ranges from one minute to several hours.
Installation process
If you buy a lamp for bright light in low-beam headlights of a foreign manufacturer, you can simply follow the instructions. Everything is written out very clearly in it, so changing the light bulb in the low beam headlight is not difficult.
Once you have the bulb and the headlight has been removed, you can begin the installation process. Initially, you need to remove the special rubber casing. This can be done with a regular screwdriver. This will make it easier to pry off the edges of the rubber base. The casing is located on the inside of the headlight.
After removing the casing, you can begin to dismantle the old lamp for light. First, remove the terminals from the lamp.
At this stage, it is important to remember their original location.
Next, you should remove the special metal clips that held the old light bulb. It's very easy to remove. This can be done with virtually no improvised means. Installing a new light bulb
Only after this can you remove the old lighting fixture and begin installing a new one. Please note that old burnt out lamps must be disposed of.
Before you start screwing the new device into the headlight, you need to make sure that the contacts are intact and only then insert the new bulb.
Please note that while screwing in the new element, do not allow your hands to touch the glass part. This is due to the fact that this way the lamp will fail (burn out) much faster. If this happens, you should wipe the glass part with alcohol and wait until it dries completely.
At the final stage, it is important to correctly install the terminals without mixing up the polarity (plus and minus). After this, you can install the rubber cover back and test the device.
Connecting the low beam bulb
Which lamps are best to use in Kalina
To find out which lamps are installed in Kalina during assembly, you need to remove the cover and pull out the part. The name, model and type of spare part are printed on the case. AvtoVAZ uses products from Philips as the main light. However, some models contain parts from Osram.
When searching for light bulbs in Kalina, you should be guided by proven options:
- number on the Kalina body or in the vehicle passport;
- a burnt-out sample previously removed from the lantern.
The body number is entered into a special window that pops up when you visit online resources with catalogues. Such systems independently determine the year of production, configuration and type of lighting equipment and offer a list of original spare parts and replacements for Kalina.
The number is provided to the seller in the store to accurately determine the part code. A simple and reliable way is to remove the lamp from the base and buy a new one based on the sample. In this case, you avoid purchasing the wrong part and having to go back to the store for an exchange.
The Kalina hatchback and sedan use the same lighting devices. The type of spare parts is no different for the station wagon.
When choosing a light bulb, it is important to adhere to the recommended parameters from the Kalina manufacturer. Installing a light with a higher power will lead to melting of the internal parts of the optics and damage to the contact group. After installing cheap substitutes, damage is possible due to poor quality assembly of the part and even explosion of the bulb.
Guide to replacing low beam bulbs
The replacement process is quite simple and is carried out in several basic steps.
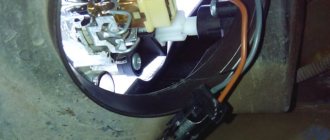
- First you need to open the hood. Find the LBS rubber boot under it and remove it.
- Next, simply remove the block and put it aside.
- The lamp is secured with a spring clip. You should simply press down on it, then move it slightly to the side and then lift it up.
- The next step is to remove the old light bulb.
- When dismantling is complete, it's time to install a new part. All installation is carried out in the reverse order indicated above.
As you can see, dismantling the old part and installing a new one can be done very simply in just a few minutes. Once you do it once, you can always repeat it. The task is also made easier by easy access to the headlight in Kalina (the author of the video is the Auto Repair channel).
How to replace the lamps yourself
Changing a light bulb in Kalina yourself is not difficult. The time spent on the work depends on the skill of the driver and the size of the hands. Some owners change light fixtures in 15-20 minutes without removing the headlight, while others suffer for more than an hour and ultimately dismantle the optics.
When replacing, cloth gloves are used. This helps protect the skin on your hands and also prevents contact with the bulb. When touched, fingerprints remain, which heat up when the light is turned on and after a while burn through the thin glass.
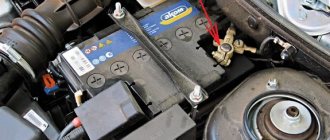
During work, the battery terminal is unscrewed to avoid a short circuit, which will lead to burnout of the fuse link in the fuse box.
Far module
Replacing the high beam lamp is easier than in the low beam module, since the cover is located closer to the radiator grille.
To perform the operation you will need:
- Turn off the Kalina engine.
- Open the hood lid.
- Remove the protective boot on the back of the flashlight.
- Carefully disconnect the plastic chip.
- Open the latch.
- Pull out the lamp.
Assembly is carried out in reverse order. When installing the terminal, you need to check the contacts and, if necessary, clean them using a flat-head screwdriver, sandpaper or a special chemical spray.
Low beam
Replacing a low beam lamp on a Lada Kalina depends on the experience of the owner and is divided into two types:
- Without removing the headlight.
- With module dismantling.
Most Kalina owners cannot replace the lamp in the left headlight due to limited space. In this case, you will have to ask a more dexterous friend or dismantle the lighting device yourself for convenience.
To change lamps on installed optics:
- Unscrew the filter housing near the left headlight and move it towards the engine.
- Disconnect the washer motor terminal, remove the screws and move the reservoir to the side.
- Open the light module seals.
- Remove the block with wires.
- Remove the spring clip.
- Remove the part.
Assembling the headlight with a new spare part is carried out in the reverse order.
To dismantle the headlights, you need to unscrew the grille, fasten the modules and disconnect the contact chip. Place the removed optics on a convenient surface and replace the light elements.
Carrying out replacement work yourself
Before replacing the lamp, a number of preparatory operations are required. In particular, during the work you will need:
- the lamps themselves (one or two);
- hand tools (set of wrenches, pliers, screwdrivers);
- thin, clean work gloves;
- a bottle of alcohol or vodka and a piece of clean cloth.
The car itself should also be prepared before changing the lamp.
It needs to be installed on a level area with the handbrake on, and chocks placed under the wheels to prevent possible rolling of the car.
The car, of course, must be turned off.
When all operations have been completed, you can open the hood and disconnect the power from the negative terminal of the battery. This is done to prevent a short circuit from occurring. When low beam, in this case it will be necessary to dismantle the headlight washer reservoir.
The lamp can be changed with or without removing the headlight from the car. When you decide not to remove the entire block, you first need to pull any petal of the rubber plug that secures the lamp in the headlight. The order in which the wires fit to the lamp must be remembered or sketched. Next, you need to carefully remove the spring clamp of the lamp itself by pressing on it and disengaging it. This must be done carefully, otherwise it may fall into the lighting fixture itself, which will entail dismantling the entire headlight unit. The lamp that requires replacement must be removed and a new one put in its place.
Installation of a new lamp must be carried out with gloves, otherwise the grease marks that will remain on the lighting device will reduce its service life. When contact does occur, the lamp must be wiped with a cloth soaked in an alcohol solution. The remaining operations to replace the lamp are carried out in the reverse order of disassembly.
When the assembly is completed, you can start the car and check the functionality of the low beam.
Recently I encountered a problem. When I turned on the low beam at night, I was surprised to find that it was simply not there. Before that, I traveled to Russia, where it is mandatory to turn on the lights during the daytime. Therefore, when the low beam disappeared and what caused it, I did not know.
The electrical circuit for turning on the low beam in Kalina is extremely simple. Along the path of electric current from the power source (battery or generator) to the low beam bulb there are fuses, a lighting unit, and a low/high beam switch.
The search began with the simplest thing - checking the fuses. They turned out to be fine. After two more causes have been ruled out (the lighting unit and the headlight switch), it is time to check the low beam lamps.
What can I say, this is a very, very inconvenient matter, especially if you are doing it for the first time and do not know all the design subtleties.
IMPORTANT! Everything stated below is my personal experience. It is not a fact that the technology described is correct. Therefore, the author does not bear any responsibility for any possible damage caused as a result of the actions described below.
I started with the right headlight. In order to get to the lamp, I had to remove the windshield washer fluid reservoir. It turned out to be quite simple. In order to remove the windshield washer reservoir you need to:
- Remove the terminals from the motor contacts (two motors, in the case of a station wagon or hatchback), first remembering how they are connected;
- Unscrew the front bolt securing the tank, which is located above the headlight;
- Loosen the nut that clamps the rear reservoir mount near the shock absorber strut;
- Carefully remove the tank without spilling its contents.
After this we get completely normal access to the headlight.
Procedure for removing the low beam headlight:
- Remove the rubber cover to access the headlight;
- Carefully remove the two headlight power wires, remembering their location;
- Gently press and slightly lift the iron latch;
- After the bracket is removed from the grooves, move it to the side;
- Carefully remove the low beam lamp by the contacts.
The procedure for installing the low beam lamp is reversed. IMPORTANT! Under no circumstances should you touch the glass part of the lamp with your hands.
, because When turned on, it will immediately burn out. If this happens, you should thoroughly wipe the glass part of the lamp with alcohol and let it evaporate completely.
Procedure for installing low beam headlights:
- Install the low beam lamp so that its protrusion on the base fits into the corresponding groove on the lampshade, thereby securely fixing it.
- After this, the most difficult part of replacing the lamp is performed - you need to carefully fix the lamp with a latch, falling exactly into the grooves, and you need to make sure that the lamp itself does not rotate in the lampshade. To do this, the latch is wound up a little from the top, then pressed lightly and lowered down.
- If everything went well, you should definitely check the reliability of the lamp so that it is securely held by the latch and does not rotate around its axis.
- Connect the wires, observing polarity;
- Close the hole to access the lamp with a rubber cover;
- Reinstall the windshield washer reservoir, securing it and connecting the wires.
After this, if necessary, you can proceed to replacing the left low beam lamp. Access to this lamp is much worse, because... It is almost impossible to remove the coolant reservoir without draining the antifreeze. Therefore, you have to dodge and act by touch.
Several years ago, the government approved a law according to which during the daytime it is necessary to drive a car with either low beam headlights or DRLs (daytime running lights). As a result, car low beam lamps began to burn out much more often. The first generation Lada Kalina is no exception. Those who do not want to drive with low beam headlights install daytime running lights. Kalina 1, unlike the second generation model, does not have DRLs, so you have to drive with low beam headlights. From our instructions you will learn how to replace the lamps in the front headlight unit, as well as the reasons why these lamps may not work.
Before you start repairs
Before changing the low beam lamp on Kalina, you need to check the integrity of the on-board network:
- When understanding the causes of failure of any component of electrical equipment, you should first make sure:
- the fuse is in good working order;
- look at the circuit connectors, which should be well secured;
- Often the causes of electrical equipment malfunctions are the oxidized ends of the pads; their terminals should be cleaned.
- Take a good look at the places where the car is connected to ground. Often, due to the lack of reliable fastening, disturbances in the functioning of electrical equipment occur, so replacing low beam lamps on Kalina may not always help with the problem.
- the equipment will help to find faulty places in the electrical circuit;
- is a combined electrical measuring device.
There are several types of such devices:
- digital, equipped with a liquid crystal display;
- analog;
- universal models, characterized by the presence of a liquid crystal screen and a dial indicator.
Multimeter
During repairs, we recommend using a digital device (in other words, a multimeter), which is small in size.
To check de-energized circuits, the device should be switched to ohmmeter mode:
- if you need to measure very low resistance (for example, within a few Ohms), you should enter a clarification - from the obtained indicator we subtract the internal resistance, the electrical resistance of the probes and multimeter wires (within 0.07 Ohms);
- to determine a more accurate value, the device is switched to the mode for measuring low resistance values (up to two hundred Ohms), then the ends of the probes should be short-circuited.
To check live circuits, the multimeter should be switched to voltmeter mode (the limits of permissible measurements are up to twenty volts). The device is capable of measuring the current consumed by electrical equipment of vehicles (up to ten amperes).
In cases where the task is to find out whether or not there is voltage in a certain section of the circuit, without resorting to measuring the value, you can use a special indicator light designed for twelve volts. You can also use a test lamp.
You can make it yourself:
- you will need a car lamp with a power of up to 4 W;
- take 2 two wires, the length of which is from 500 mm;
- solder them to the lamp.
The car is equipped with 2 headlights, in which halogen lamps are mounted. There are two screws on each to adjust the light beam. They make it possible to change its direction in the vertical and horizontal planes.
The headlights have an electric corrector, which, taking into account the vehicle load, allows you to change the vertical direction of light directly from the cabin. There is also space on the block for the turn signal lamps (orange) and the parking light. Some Lada Kalina cars are equipped with fog lights, which are installed in the holes of the front bumper.
Replacing the relay and fuse
Before repairing the fuse, you need to clarify and correct the cause of the blown.
Advice: to ensure that electrical equipment elements continue to remain in working order, it is not recommended to install homemade models or fuses with an increased rating.
Work instructions:
- Prepare the vehicle for the process and disconnect the wire from the negative battery.
- Pull the tab located on the left side of the instrument panel to open the mounting block.
- Find the required fuse for the damaged electrical circuit on the housing of the mounting block, following the sequential numbering.
- Take tweezers and pull it out of the socket.
- Squeeze the body of the fuse with tweezers. A damaged thread will indicate a used part.
- Install a new fuse, which is inexpensive, keeping the same rating as the old one.
- If you need to replace the relay, there is a puller in the mounting block that will help carry out this task. Please note that a part of the same type should be installed.
- Close the mounting block, connect the battery.
Removing the instrument panel
Dismantling the Lada Kalina instrument panel is carried out as follows:
- lower the steering wheel to the lower position so as not to interfere. The regulator is located under the steering column;
- Unscrew the two screws holding the decorative trim. They are located in the upper part, you can get to them from below;
- pull out the cover by moving it towards you;
- Using a magnetized screwdriver, unscrew the two fasteners holding the instrument panel;
- tilt the panel and disconnect the block with wires. She is there alone, no other elements hold the dashboard.
It is necessary to act carefully and ensure that fasteners do not fall inside or onto the floor.
Conclusion
Replacing lamps or restoring their functionality is not a difficult task, so it can be done without involving car service specialists right on the road. To do this, you need to make sure that you always have the necessary spare parts - a set of fuses, a relay and the appropriate light bulb. The video in this article will give you the opportunity to find additional information on the above topic.
Any car enthusiast, even with little driving experience, is well aware of the importance of good lighting on the road. Especially in cases of poor visibility, which include heavy rain, dense fog and other natural phenomena. At the same time, many drivers are interested in the question of which H7 low beam lamps are the best. Most car manufacturers equip their products with this type of headlight lamps. But not every vehicle owner knows what they are.
Replacing the marker lamp
The side light lamp on Kalina 1 is located in the same place as the low beam lamp.
Carefully take the cartridge with two fingers and pull it out of the seat
Remove the old lamp from the socket and install a new one
Turn the lamp socket counterclockwise half a turn and pull it out
Press the lamp in the socket and turn it counterclockwise half a turn, remove it and install a new one
This completes the replacement of the lamps in the front headlight unit.
When replacing low and high beam headlight bulbs, do not touch the bulbs by the bulbs. And if you touch it, the lamp bulb must be wiped with alcohol.
It burns out quite often. The reason for this is the need to keep it almost always on. Several years ago in Russia, the law obliged drivers to drive a vehicle with low beams or running lights on. Because of this, the lifespan of LBS has been significantly reduced, so every driver should know how to replace them. All about this is in our article.
Description
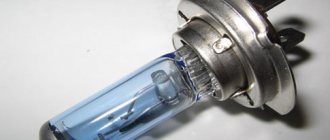
Some time ago, H4 lamps, which have two filaments, were still very popular among many car enthusiasts, which makes it possible to turn on high or low beam lighting. Now they have been replaced by a good alternative - H7. It already has one filament, and the lamp is installed in a four-headlight head optics with a separated system of reflectors for high and low beam lighting. Nevertheless, such elements are installed mainly in low-beam headlights. And for long-range lighting optics, H1 lamps are still used, which are already outdated, but have a low cost.
A characteristic difference between these products is the presence of a flange. In this case, the distance between it and the spiral is fixed and constant. Thanks to this, the filament is in focus at all times. What are the best H7 low beam lamps for Kalina or any other domestic or foreign car? Let's figure it out.
Why does the low beam headlight lamp on Kalina not light up?
If you notice that the low beam headlights on your Kalina have stopped working, there may be several reasons. To eliminate it, you should check each of the reasons in turn.
- Lamp burned out
- Poor contact of the lamp socket
- Fuse burned out
First of all, check the fuse of the headlight on which the lamp does not light. Each headlight has its own separate fuse. In Kalina it's F12
and
F13
. Pull out the fuse and check it visually; if it is intact, then the problem is in the block or the lamp itself.
Low beam sources
Modern technologies in the automotive industry allow manufacturers to produce a variety of products for head optics. At the same time, each company relies on its own developments and experience. For this reason, all lamps with an H7 base have different parameters regarding power and lighting spectrum, which can range from cold to warm tones.
As for power, according to the standard for H7 lamps it is 55 W. However, there are models with higher values on the market. It is only recommended for SUV owners to purchase them when driving outside the city. Usually in megacities the roads are well lit. Using strong lamps on a vehicle that is used primarily for driving on city streets can cause overload. And as a result, the on-board electrical system will fail.
Many drivers, especially beginners, constantly worry about which H7 low beam lamps are the best. Today there is plenty to choose from, since the modern market is filled with different types of headlights:
At the same time, lamps of some brands are distinguished by increased luminous flux, manufacturers of others assure consumers that their lamps last three times longer than their competitors, and still others can generally decorate head optics well with their appearance alone. It is worth considering each type in more detail.
Causes of low beam faults
The main cause of low beam malfunction is most often a lamp burnout. This problem can occur on a Lada Kalina car quite often, once every two months. Thus, regularly replacing a lamp can become a significant cost item for car maintenance. There may be several reasons for this:
- The headlamp is not sealed, causing dust and dirt to enter the bulb, which settles on the bulb and its reflector, which leads to excessive heating of the bulb.
- Voltage surges regularly occur in the car's on-board power system, which also accelerates the failure of halogen lamps on the car.
- The fuse that controls the external lighting circuit has failed.
- The contacts of the plugs that connect the lamp to the power wires are oxidized or burnt.
In addition to the reasons given here, lamps may fail due to poor quality manufacturing or a number of other factors. It is better to entrust the determination of the reasons in each case to professionals in the automotive repair industry, since only they can carry out a comprehensive diagnosis of the condition of automotive electronics and, based on this, identify the cause of the breakdown.
During assembly, the car manufacturer Lada Kalina 2 installs H7 modification halogen lamps in the low beam headlights, manufactured in Germany under the OSRAM brand. This type of lamp has a power of 55 watts with a power consumption of 12 volts. As replacements, the car owner can use a lamp of identical characteristics from the same manufacturer or choose a replacement from the range of products from such global manufacturers as Philips Extreme Vision or GE SportLight.
Bulbs from these manufacturers may unpleasantly surprise the car owner with their price, but their service life and luminous flux power may be higher than their analogues. If your budget does not allow you to spend a large amount on replacing a lamp, you can turn your attention to manufacturers of light sources from Russia.
Among the products produced in our country, the best price-quality ratio is observed with. Its lamp can be purchased cheaper than a foreign one, and its price and service life will not present any unpleasant surprises.
AvtoVAZ specialists do not recommend installing lighting fixtures on the Lada Kalina from manufacturers whose products do not have permits for import and sale in our country.
Standard
As a rule, high-strength glass or quartz material is used to make the lamp bulb. In its inner part there is a filament and gas with the inclusion of halogen additives. Currently, such lamps are deservedly popular due to their wide distribution. The use of such products does not require any additional equipment. They create the correct lighting and, most importantly, high-quality lighting.
There are also a number of other advantages that allow you to immediately answer the question of which H7 low-beam lamps are the best for a Priora or other car:
- compact dimensions;
- long service life;
- for the light of the quartz shell they have high strength and heat resistance;
- high light output;
- wide scope of application.
However, there is a significant drawback, which is the strong heating of the lamps during operation and poor tolerance to voltage changes. When replacing lamps, you should absolutely not touch the glass bulb with your hands. Fortunately, there are not many disadvantages, and for this reason, today more than a million cars are driven with such low beam lamps.
Xenon solutions
In appearance, one can notice the almost complete similarity of gas-discharge lamps with their halogen counterparts. However, both light sources use different technology. In this case, a characteristic feature is the complete absence of an incandescent filament, since a different principle is used.
What are the best H7 low beam lamps for the Duster? Perhaps this is exactly the case, since they have a special operating principle. The luminous flux is created due to the glow of the inert gas xenon, hence the name of the lamps themselves. It is under pressure in a glass flask. There is also a small metal plate located here, which heats the inert medium. Due to the absence of an incandescent filament, such lamps are vibration-free, which is confirmed by many tests. Compared to the classic halogen counterpart, the glow from xenon is three times brighter. This becomes especially important when driving a car in the evening and at high speed.
The best manufacturers and models of H4 and H7 halogen lamps
If we talk about the best brands, then according to testing the following models performed best:
- Koito. A Japanese company specializing in lighting technology, which produces halogen low and high beam lamps adapted for Russian conditions. Koito Whitebeam III H7 lamps (2 pieces) now cost about 1,800 rubles, and the same model for the H4 base will cost a little less - 1,500 rubles.
- Osram. Although competitors are trying to prove that the lamps from this manufacturer blind drivers in oncoming traffic, there is no official evidence or tests confirming this. On the contrary, Osram products are distinguished by quality and reliability. Car enthusiasts noted Osram SilverStar lamps as the best on the market, costing 550 rubles for the H7 base and 770 rubles for the H4.
- Philips. The eminent corporation repeats Osram's developments and produces lamps with the same light beam characteristics. However, Philips halogens also inspire confidence in quality. A Philips Visio Plus +60% lamp with an H4 base costs 550 rubles, and for an H7 about 1,200 rubles for two jokes.
- Bosch. The Hungarian manufacturer has been famous for its quality for many years now. Good luminous flux, providing the necessary illumination of both the roadside and near, as well as distant zones. A Bosch Plus 90 H7 lamp (2 pieces) will cost about 1,400 rubles, and a similar Bosch Plus 90 H4 lamp will cost 1,200 rubles.
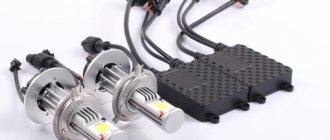
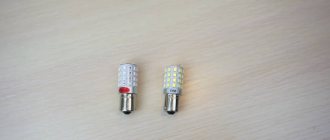
LED alternative
When deciding which H7 low beam lamps are the best for a Nexia, Ford or any other car, many experts unanimously agree that the future lies with LEDs. Moreover, this applies not only to the automotive industry, but also to most other industries where there is a need for high-quality lighting.
Such lamps are the most economical among all other analogues. Compared to incandescent elements, energy consumption is 10 times lower. As for the service life, there is an opinion that LEDs can work up to 100 thousand hours. They also withstand vibrations and shocks, and the luminous flux meets many requirements. Due to the absence of mercury, such lamps are completely harmless, so they can be safely disposed of. There is only one important detail here - their use requires special optics. Due to their characteristics, LEDs cannot shine at a point, which imposes certain difficulties, since conventional optics do not allow you to adjust the luminous flux.
What are the best H7 low beam bulbs in the rain? The choice fell on LEDs, but it is worth knowing about a number of disadvantages. The most important of them is the very high cost, due to which this market segment is not so widespread. Another equally important point is that the stated deadline is completely refuted by practice. Instead of 11 years, the manufacturer itself guarantees good performance for 3-5 years. This is due to one phenomenon called LED degradation. That is, the crystals gradually die off - first they lose their brightness, and then they become completely silent. Another drawback is the unpleasant spectrum. As experts in the field of psychology note, approximately 80% of respondents have a negative opinion regarding the use of such lamps at home.
Difficult choice
A wide variety of lamps for low beam lighting sometimes confuses when choosing a worthy product. However, it is worth highlighting important criteria for yourself and adhering to them as strictly as possible:
- luminous flux brightness;
- how comfortable the lighting is for the eyes;
- life time;
- Energy consumption;
- price.
At the same time, when deciding which H7 low beam lamps are the best, you should not be guided only by cost and purchase models that do not inspire confidence due to their low price. The personal safety of the driver and his passengers depends on the correct choice. From the total number of manufacturers, several companies can be identified that offer products of decent quality:
When giving preference to one brand or another, it is worth asking what its reputation is. Although there are pleasant exceptions, when products from a little-known company are not inferior in quality to world leaders.
Why isn't the low beam on?
There may be several reasons why your low beams have stopped working:
- the light bulb has burned out;
- problem in the contact of the device block;
- The light fuse has blown.
Before starting repair work, you need to determine what exactly the problem is
. A little research is being done on this.
First, you need to check the fuse of the headlight that is not working. Please note that each headlight has its own separate fuse. In Kalina these are fuses numbered F12 and F13.
Checking its performance is quite simple; any problems can be detected visually. If everything is fine with it, check the condition of the block and the lamp itself. In order to check the condition of the block and bulb, you will need to disassemble the headlight itself. How to do this will be discussed in this article in the “Guide to” section.
Osram
This is a leading manufacturer of lighting equipment with a worldwide reputation, which was founded just over a hundred years ago - in 1906 in the city of Munich (Germany). Osram products are widely distributed among most car manufacturers, including the popular Renault concern. The high reputation of the company allows us to once and for all close the question of which H7 low beam lamps are the best for Ford Focus 2. The lamps produced have both standard power and there are models with increased light output. By purchasing light sources for low-beam headlights with the Osram marking, you can be confident in their durable and high-quality operation.
Preparatory stage
It should be noted right away that it is very difficult to reach the headlights in the Lada Kalina. Installing a new low beam bulb is almost impossible by touch.
To make the installation process as simple as possible, you should remove all excess in the headlight area. Please note that replacing the low beam bulb on a Lada Kalina should only be done when the power is turned off. Otherwise it may not be safe. After completing all the preparatory work, you can begin the process of replacing the lamp.
If you are not sure that you will correctly replace the old low beam lamp with a new one on your Lada Kalina, it is better to contact specialists at a service station.
Philips
An equally world-famous company specializes in the production of a wide variety of products, including halogen and gas-discharge lamps. Few people know, but this particular manufacturer is involved in the production of energy-saving lamps, which are currently very popular.
In the automotive industry, Philips is the main supplier of lighting sources and optics to the assembly lines of many factories. In addition, the company supplies its products to the secondary market, significantly expanding its range with halogen, xenon and LED lamps.
Narva
Among the candidates under consideration, this is the youngest, but this does not mean at all that the company produces low-quality products. The manufacturer began mass production of halogen light sources in 1969. Since then, the Narva brand has become quite popular and recognizable all over the world, largely due to the optimal price-quality ratio. True German quality - this is exactly the phrase that is fashionable to hear from the mouths of many car enthusiasts, both among professionals and beginners.