Responsibility for faulty lighting devices
Traffic rules prohibit operating a vehicle with faulty lighting devices. This is due to safety considerations for all road users. It is also prohibited to use vehicles that use lamps that do not meet the design requirements for the operation of the vehicle.
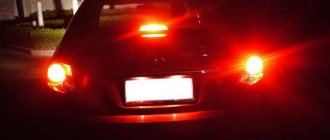
It is important to remember that you are not the only participant driving on the highway, and it is highly not recommended to install more powerful and brighter lamps in the headlights of your car. By this action you endanger traffic participants moving in the opposite direction.
All changes in the design of the vehicle or non-working lighting devices entail administrative penalties.
I filled up with gasoline instead of diesel, what should I do?
Published: 06/05/2019
Spread the love
Spread the love I filled up with gasoline instead of diesel, what should I do? Contents1 I filled up with gasoline instead of diesel, what should I do? 1.0.1 Gasoline in a diesel engine 1.1 Gasoline in a diesel engine - how to deal with it? 1.2.2 Filled up an old car with gasoline instead of diesel1.2.3 Beware of biofuels Errors when refueling happen quite often, since in Russia every year...
I filled up with gasoline instead of diesel, what should I do? Read completely "
Types of lamps used in Priora
- H7 (Low beam);
- H15 (High beam and DRL);
- PY21W (Turn signal lamp);
- P21W (Reversing lamp);
- P21/5W (Brake and parking lamp);
- H11 (PTF lamp);
- C10W and C5W (Lighting lamp: interior, glove box and trunk);
- W5W (Lamp for side lights of headlights);
- H1 (High beam lamp until 2013 without DRL);
Dorestyling
The life of the owners of pre-restyling cars was darkened by the fact that, in addition to the reduced service life, even then it was darkened by the fact that when replacing some light bulbs it was necessary to remove the socket along with the bulb - this, for example, happened when the owner wanted to replace a side light bulb. Owning a Priora became increasingly expensive; rarely did anyone think about buying another headlight - developed by other companies. Installing light bulbs from foreign manufacturers solved the problem of poor lighting well and for a long time.
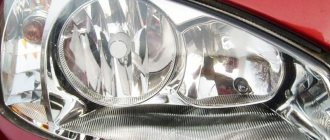
Headlight bulbs
The headlight bulbs of the Lada Priora differ depending on the year of manufacture of the car, since at the end of 2013 daytime running lights began to be installed in the Priora.
Headlight bulbs for Priora models up to 2013.
| Installation location | Lamp type | Power, W) | Number in photo |
| Low beam | H7 | 55 | 1 |
| High beam | H1 | 55 | 9 |
| Turn signal | PY21W | 21 | 3 |
| parking lights | W5W | 5 | 8 |
Headlight lamp for Priora after 2013
| Installation location | Lamp type | Power, W) | Number in photo |
| Low beam | H7 | 55 | 1 |
| High beam/DRL | H15 | 55/15 | 2 |
| Turn signal | PY21W | 21 | 3 |
| parking lights | W5W | 5 | 8 |
Replacing low and high beam bulbs in the headlight
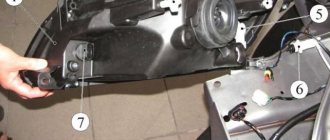
- To replace the high and low beam lamps, you must remove the rubber or plastic headlight protection covers. Then pull the connector towards you and remove it from the lamp. By pressing on the lamp clamp, release it from the clamps and remove the lamp.
Replacing the turn signal lamps in the headlight
- Replacing the turn signal lamps must be done by turning the socket counterclockwise and removing it towards you from the headlight.
Replacing the headlight bulb
- To remove the side light bulb, you need to pull the bulb socket towards you.
What to do if your car windows fog up.
Published: 01/13/2019
Spread the love
Spread the love How to avoid window foggingContents1 How to avoid window fogging1.1 Method 1: washing windows from the center of the cabin1.2 Method 2: replace the cabin filter1.3 Method 3: get rid of moisture and vacuum the interior1.4 Method 4: use air conditioning1.4.1 We in VK This year the end of the year is full of precipitation, but not snow, but rain. With such high humidity...
What to do if your car windows fog up. Read completely "
Tail lamps
The taillights also differ depending on the year of manufacture. In cars after 2013. The taillight brake lights have become LED, but the bulbs used in the lights remain unchanged.
| Installation location | Lamp type | Power, W) | Number in photo |
| Reverse | P21W | 21 | 4 |
| Brake light/dimensions | P21/5W | 21/5 | 5 |
| Turn signal | PY21W | 21 | 3 |
| Rear PTF | P21W | 21 | 4 |
Replacing tail light bulbs
- To replace it, you must remove the rear light. To do this, unscrew the 3 screws that secure the light and move it away from the car body. Then unscrew the sockets counterclockwise and remove the desired lamp.
Which model to choose
The range of light bulbs suitable for the VAZ-2170 car is quite large. At the moment, halogen lamps are in great demand. But to make the right choice, it is worth studying the main characteristics of all three types of lamps.
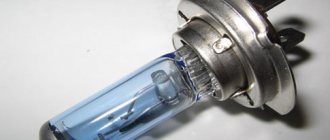
Halogen
- Brightness up to 1,550 lm;
- Service life up to 1,500 hours;
- Power 50-60 W;
- Color range 4,000 – 7,000 K;
- The price is about 700 rubles per pair. Domestic lamps are cheaper;
- High penetrating ability when driving in rain, fog, snow.
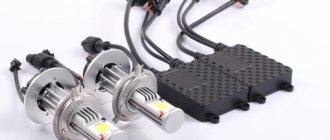
LED
- Brightness up to 2,000 lm;
- Service life up to 50,000 hours;
- Power 18 W;
- Color range 3,000 K;
- The price starts from 2,000 rubles per pair;
- Low penetrating ability of the light flux, which complicates visibility when driving in bad weather;
- Requires installation of a large reflector and cooling system;
- It is impossible to replace (install) yourself.
Xenon
- Brightness up to 3,300 lm;
- Service life up to 3,000 hours;
- Power 35 W;
- Color range 4,000 – 8,000 K;
- Price from 2,000 rubles per pair;
- Low penetrating power of light flux;
- Installation of ignition units is required;
- Ignition occurs gradually, so there is a delay in turning on the low beam.
Based on the main characteristics, it is impossible to unambiguously answer the question
“which lamps are better”
. The choice will depend on the personal preferences of the car owner, financial capabilities and region of residence. Particular attention should be paid to the weather conditions in which the car is operated.
N 7 is suitable for both Priora and West
You can buy a suitable model at any specialized store or service center. Installing the spare part takes no more than half an hour.
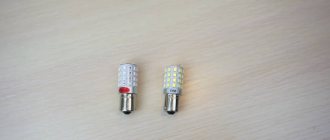
Turn signal repeaters
Repeaters are installed in the front fender, with the exception of luxury trim levels, where the repeater is installed in the side rear view mirror.
| Installation location | Lamp type | Power, W) | Number in photo |
| Turn signal | W5W | 5 | 8 |
To remove the lamp in the turn signal, you need to pull it towards you and remove it from the wing. Then turn the socket counterclockwise and remove the lamp.
Difficulties with replacement
The most convenient thing is to replace the turn indicators. In other cases, you have to twist very tightly and stand in this uncomfortable position for a couple of minutes until the job is done. This is not very convenient, because the light bulb is a consumable, but the engineers could make sure that replacing it was as easy as the plastic steering wheel insert on the “ten”.
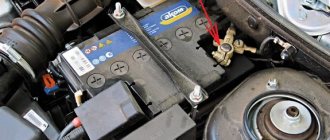
Another inconvenience is that you have to remove the battery. Nobody argues that it is better to turn off everything before starting work. But the battery is removed for reasons of rationality - the battery takes up a lot of space and interferes with working with your hands while you stand in an awkward position.
Interior lamps
Lada Priora has lighting for the entire interior, glove box, trunk and license plate lighting.
| Installation location | Lamp type | Power, W) | Number in photo |
| Number plate illumination | W5W | 5 | 8 |
| Interior lamp | C10W | 10 | 7 |
| Glove compartment lamp | C5W | 5 | 7 |
| Trunk light | C5W | 5 | 7 |
How do you know when it's time to change your tires? Several qualifiers
Published: 02/25/2019
Spread the love
Spread the love The tire itself lets you know it's time for a replacement. Contents1 The tire itself lets you know it's time for a replacement.1.1 Tire tread height - time to change tires1.2 Wheel balancing - time to change tires1.3 Consequences of poor tire condition - tires It's time to change The condition of your tires is critical to our safety. That's why choosing new tires...
How do you know when it's time to change your tires? Several determinants Read more »
Useful tips
- When choosing components, check their characteristics with the data provided by the manufacturer - the indicators must meet the specified standards.
- Mechanics strongly recommend replacing lamps in pairs. This will allow you to maintain the same glow of the headlights and will help to avoid burning out an unreplaced lamp while driving.
- At the first sign of a malfunction or difficulties with the fuse, contact a service center or replace the lamp yourself.
- When installing xenon or LED lamps, you will need to install fog lights with halogen lighting elements. This is necessary to improve visibility in bad weather conditions.
- If the low beam does not work after replacing the bulbs, check the fuses. They are located in the instrument panel to the left of the steering column.
Sources
- https://carfrance.ru/kakie-lampochki-stoyat-v-fare-blizhnego-sveta-na-priore/
- https://LadaKalina.club/repair/tsokol-lampochki-blizhnego-sveta-lada-priora
- https://RetroTruck.ru/obsluzhivanie-avto/lampochki-v-tumanki-priora.html
- https://PolomkiAuto.ru/rekomenduemye-proizvoditelem-lampy-primenyaemye-v-lada-priora.html
- https://svetilnik.info/avtomobilnyj-svet/lampa-dalnego-sveta-priora.html
- https://avto-o.ru/ts-i-remont/kakie-lampochki-stoyat-na-priore.html
- https://LampaExpert.ru/avtomobilnye-lampy/neispravnosti/lampa-bliznego-sveta-priora
- https://LampaExpert.ru/avtomobilnye-lampy/protivotumannye-fary/kak-ustanovit-na-prioru
- https://tune-priora.ru/obslujivanie/lampy-primenyaemye-v-lada-priora-i-ih-zamena.html
- https://smt-gps.ru/remont-i-tyuning/razmer-protivotumannyh-far-priora.html
- https://av-1.ru/novosti/cokol-v-tumankah-priora.html
- https://avtobak24.ru/lampochka-blizhnego-sveta-priora-kakoj-cokol-v-farah
DS111
Attention! The fog lamp is halogen. You should not touch its glass bulb with your fingers, as traces from them will lead to darkening of the lamp when heated
You can remove dirt from the flask with a clean rag soaked in alcohol.
We install the new H11 lamp in the reverse order.
If you have a Chinese car with burned out fog light bulbs and you don’t know how to replace them, then this instruction is especially for you. After all, replacing a fog light bulb is necessary for safety reasons, unless of course you want to get into a dangerous situation on the road. In principle, there is nothing complicated about this, but you still have to be patient and demonstrate your skills. I want to warn you right away that replacing the right headlight bulb will seem more difficult to you than the left one. You will ask why? Yes, because on this side the spring latches are located out of sight and you have to act by touch.
Here's a list of the tools and accessories you'll need:
- short screwdrivers (phillips and flathead);
- wrench 7;
- mirror;
- flashlight;
- a new bulb that matches your car;
This is not a difficult matter at all, and it’s not worth going to a service station for such a small thing. Any car owner can do this. And, if you have never done this, you have an excellent reason to learn something new. Replacing a fog lamp (after mandatory car washing) is carried out in several stages.
To gain access to the PTF, the first step is to free up space in the work area. To do this, turn the steering wheel all the way to the right for the right fog lamp, for the left one, respectively, to the left, while the engine must be started. Also, in order to facilitate access, you can raise the front of the car using auxiliary materials - bricks, boards, a jack, or simply drive the appropriate front wheel onto the curb. In this case, you need to be especially careful and make sure that the wheel does not jump off the ledge.
Next, you need to remove the protective plastic material located on the wing. We equip ourselves with a 7 key and unscrew the screws around the wheel. It is also necessary to unscrew the plastic bolt located on the bottom of the machine. Use a flat screwdriver to pry up the tip into which the plastic bolt was screwed. We bend the freed wing plastic until the wheel allows it. Don't be afraid to break this plastic - it's very flexible and durable.
How to adjust the light flow
In order to prepare for testing and debugging fog lights, the Priora should be placed in conditions as close as possible to real ones. You need to place a load weighing approximately 200 kilograms in the cabin, a spare tire in the trunk, and completely fill the tank with fuel.
After this, the car is installed five meters from a flat wall. The tester measures the distance from the ground to the center of the fog, and draws a horizontal line on the wall five centimeters lower. If the headlights have been adjusted correctly, the light spot will be approximately at the level of this line. You can also test and debug each of the headlights separately (to do this, you need to repeat the procedure, closing each of the headlights in turn).
In the list we have given the most common models of the selected car brand. (Abbreviation PTF - fog lights)
| Brand | Lamp type | Base |
| 1113 Oka | Near | H4 |
| Further | H4 | |
| PTF | – | |
| 1117 Kalina | Near | H7 |
| Further | H1 | |
| PTF | H11 | |
| 1118 Kalina | Near | H7 |
| Further | H1 | |
| PTF | H11 | |
| 1119 Kalina | Near | H7 |
| Further | H1 | |
| PTF | H11 | |
| 2105 Zhiguli | Near | H4 |
| Further | H4 | |
| PTF | – | |
| 2106 Zhiguli | Near | H4 |
| Further | H4 | |
| PTF | – | |
| 2107 Zhiguli | Near | H4 |
| Further | H4 | |
| PTF | – | |
| 2108 Samara | Near | H4 |
| Further | H4 | |
| PTF | – | |
| 2109 Samara | Near | H4 |
| Further | H4 | |
| PTF | – | |
| 21099 Samara | Near | H4 |
| Further | H4 | |
| PTF | – | |
| 2110 | Near | H1 |
| Further | H1 | |
| PTF | H1/H3 | |
| 2111 | Near | H1 |
| Further | H1 | |
| PTF | H1/H3 | |
| 2112 | Near | H1 |
| Further | H1 | |
| PTF | H1/H3 | |
| 2113 Samara-2 | Near | H4 |
| Further | H4 | |
| PTF | H1/H3 | |
| 2114 Samara-2 | Near | H4 |
| Further | H4 | |
| PTF | H1/H3 | |
| 2115 Samara-2 | Near | H4 |
| Further | H4 | |
| PTF | H3 | |
| 21213 Niva | Near | H4 |
| Further | H4 | |
| PTF | – | |
| 21214 Niva | Near | H4 |
| Further | H4 | |
| PTF | – | |
| 2123 Chevrolet Niva in one low/high beam | Near | H4 |
| Further | H4 | |
| PTF | H3 | |
| 2123 Chevrolet Niva split low/high beam | Near | H7 |
| Further | H1 | |
| PTF | H3 | |
| 2131 Niva | Near | H4 |
| Further | H4 | |
| PTF | – | |
| 2170 Priora | Near | H7 |
| Further | H1 | |
| PTF | H11/H3 | |
| Granta | Near | H4 |
| Further | H4 | |
| PTF | H11 |
ATTENTION. This information is for informational purposes only.
There may be differences between the installed lamps in your car and in the table. To more accurately determine the lamp base, we recommend that you check in more detail in the manual for your car, or look at the lamp markings by directly pulling it out of the headlight. Some types of headlights have a marking (or sticker) on the housing of the headlight itself.
The best manufacturers
If you decide to use alternative optics, manufacturers Osram, Koito and Philips are considered the most reliable according to drivers' recommendations. The main advantage of the products of these brands is their long service life. The marking of the optics suitable in this case is H7.
We recommend: The dashboard of the domestic “Seven” and its features
Since these are the manufacturers that car owners try to choose, the market is filled with numerous fakes that cost several times less. There are no visually incriminating differences to be found, and sellers often surprise you with their incompetence or even brazenly guarantee you that the products are original.
A car enthusiast must be able to independently find the differences between the original and the fake, and for this a series of tests have been developed.
As part of the testing, it was determined that counterfeits costing 50 rubles. lamps can be signed by any brand, but their operation is not only ineffective, but also dangerous for the safety of the vehicle.
Let's look at the pros and cons of individual manufacturers using specific examples of optics:
- OSRAM H7 . Products of this brand are counterfeited with enviable frequency. The original will fully comply with the standards.
- Philips is the standard best option for those cases where the headlight is correctly adjusted.
- H7 MEGAPOWER+30%! - the least preferred option due to a number of disadvantages: the luminous flux is not standardized, the quality of the base leaves much to be desired, and the light spot also does not meet the state standard. In addition, there is no certification according to European standards - only Russian. The use of such products is not excluded, but it cannot be permanent and long-lasting.
Diagram of correct installation of fog lights
On Priora, fog lights are installed according to the same rules as any other car. Installation is done at a height of less than half a meter from the level of the road surface. Low-mounted fog lights are out of the wet condensation zone and can actually significantly improve visibility.
If you install PTF on the roof of the trunk (as owners of jeeps often do), then they will turn out to be completely useless, especially during fog, rain, or a snow or dust storm.
Therefore, a more effective method was and remains the installation of fog lights under the bumper (for outdated metal structures) or directly into it (for the latest generation metal structures). Installation of fog lights
The fog lights that you install on your Priora must comply not only with all traffic regulations, but also with UN standards. The latest configurations correctly state that any fogs must distribute light at a wide angle and have a correctly defined upper border. The dispersion index should be 70 degrees horizontally. Only a device with such features will create an anti-fog effect.