Lada Kalina The head light of a car is a fundamental element when driving at night.
Currently, there are no vehicles left that are devoid of lighting technology. This fully applies to the Russian automaker AvtoVAZ. The bestseller of this brand is the budget model Kalina, which is in strong demand in the post-Soviet space. It is equipped with a minimal amount of additional equipment, but, fortunately, it does not lack the most important thing - front optics, without which driving a car at night is unthinkable.
After all, with the help of a headlight, the driver not only sees all road elements and is able to navigate in space, but can also identify his vehicle to other road users.
The correct operation of this structural element is controlled by special devices during regular state technical inspection. However, it is necessary to periodically adjust the headlights on the Lada Kalina.
This procedure can be easily completed on your own. To implement it, certain conditions must be met that do not require any financial costs.
Heading optics contains 4 lamps
Let's look at how the directional optics, that is, the front headlight, is designed. The block contains four compartments, each of which contains one element:
- High beam lamp (H1);
- Low beam lamp (H7);
- Combined lamp for running lights and “dimensions” (W21/5W);
- Turn signal lamp (P21W yellow - PY21W).
The standard size of the element is indicated in parentheses.
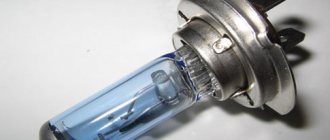
If we talk about low and high beams, standard power lamps (55 watts) are installed from the factory. It is not recommended to greatly exceed this value. Lighting fixtures of sizes H1-H7 look like this:
H1 – high beam, H7 – low beam
When making a purchase, the main thing is not to confuse an H7 lamp with a halogen lamp of a similar size (H4). Also, some companies produce 24-volt lighting devices.
When replacing halogen light sources, adhere to the following rules: do not touch the glass with hands without gloves; it is recommended to degrease the lampshade before installation. “Secunda” is suitable as a cleaner.
The following text shows the side and running lights:
Its standard size is W21/5W. Well, the turn signal bulbs in the directional optics use standard ones. They are equipped with a metal base, their standard size is P21W (PY21W).
The yellow lampshade looks like orange
Power fuses
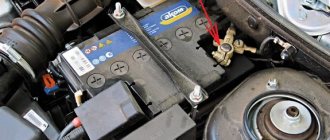
The power fuse box is located under the hood and is located between the battery, strut support and coolant reservoir. Looks like a vertically mounted box. By removing the top cover, access to the power fuses appears.
F1 (50 A) - electric power steering. If the steering wheel turns hard, also check fuse F32.
F2 (30 A) - heater fan
F3 (60 A) - generator. If the battery discharges quickly or the discharge lamp is on, check this fuse, as well as the operation of the generator itself and its brush.
F4 (60 A) - generator
F5 (30 A) - low beam headlights. Also check relay K9 and fuses F12, F13.
When troubleshooting any electrical problems, use caution. Replace fuses and relays only with the engine off and the ignition off.
If your fleet contains not only Grants, you can also read about Kalina fuses and relays.
Fuses and relays VAZ 2107
Tail lights and lamps
The following elements are used as brake light lamps in Kalina-2: lamps with a P21W socket and a transparent bulb. Replacing such an element will not be difficult.
Brake light bulb, VAZ-2192/2194
The rear turn signals are equipped with the same bulbs as discussed above. Their bulb is colored yellow (type PY21W).
The reversing light in the hatchback is provided by a lamp of the following standard size - R10W. If we talk about the station wagon, they use lamps of a different type - W16W. They do not have a metal base.
These are the reversing lamps
In conclusion, we note the following: the light of the side and fog lights in the rear lights is provided by a combination lamp. Its standard size is P21/4W. Good luck with your choice!
It is important to know! When performing any actions with electrical equipment, you must first disconnect the negative terminal of the battery. The terminal fastening is unscrewed with a 10 mm wrench.
Replacing the turn relay on Grant
First of all, we find and remove the protective cover of the fuse box (mounting block). To do this, you need to snap off the special latches. It is best to start the removal process from the upper left corner. Pick up the corner of the cover, apply force and remove the fastening clamp from the groove. Pull the decorative element towards you. After all the latches have come out of the grooves, do not make sudden movements or yank the body of the decorative cover. The thing is that there is a trunk opening button on the body, to which a contact chip with wires is attached. Therefore, in order not to damage the contacts and carry out further work, the chip must be disconnected from the button connector. After dismantling the decorative cover, we get free access to the mounting block with fuses and relays
Please note that a special plastic puller is provided for removing fuses, which greatly facilitates the entire process of work. To remove the relay, the mounting block contains the same puller, only of a larger size.
In addition, on the back (inner) side of the decorative cover there is a diagram with detailed identification of all internal components, which is very convenient when working. All elements in the mounting block have their own markings. The product called “K5” is responsible for the operation of turn signals and hazard warning lights. The relays in the block are installed quite reliably and in order to replace them you will need to use some physical force. It is best to dismantle the part using a puller. However, quite often, it is not possible to remove the relay even when using it. The ideal solution for such cases is to use pliers. Reinstalling the cover is a little more complicated than removing it. Don't forget to connect the contact chip to the connector of the rear trunk release button. We recommend starting installation from the bottom right side. Place the rightmost latch into the hole, then do the same with the central and leftmost latch. After that, move to the upper fasteners and carry out similar manipulations. With a simple push, snap the decorative cover onto the panel. This completes the removal and installation process.
https://youtube.com/watch?v=eSW_JQyzuuc
"Important. If the relays in your car are constantly failing, then there is reason to conduct a thorough diagnosis of the corresponding power supply circuit.”
Other lamps in the station wagon and hatchback
To illuminate additional equipment in Kalina-2, lamps of standard size C5W are used. They are:
- In the license plate light socket ;
- In the trunk light;
- In the glove compartment lighting module.
The interior is illuminated by a C10W lamp, and additional side lamps are equipped with T4W lamps.
Light bulbs and body turn signals
The side turn signals are equipped with incandescent lamps without a socket (W5W). And H11 lamps can be installed in the front fog lights. Successful replacement.
Options for the location of the cigarette lighter fuse and radio
There are cases when, if the car player and cigarette lighter fail to work, after checking the fuse box located inside the passenger compartment (to the left of the steering column), the required device (F4) turns out to be working. In this case, you should look for the damaged part in the engine compartment. It is there, in the area of the battery, that the second (first?) block (relay block) with a faulty safety device is located.
Having found the relay unit, open its cover and study the fuse layout printed on its back side. If you have any questions, look for the necessary information in the vehicle maintenance instructions or on our website on the Internet. We replace the burnt part.
Expert advice
Do not replace fuses with similar parts of higher or lower power. This can lead to much more serious emergency problems. And never, under any circumstances, use improvised means, so-called bugs. This lottery with the car's energy system may result in its fire. Do you need it?
When replacing parts, disconnect the battery in order (a mandatory action when performing any auto repair work), otherwise the number of fuses that need to be replaced, or even the wiring itself, will increase significantly. Of course, after you recover from the electric shock. Despite the apparent ease of the operation, treat replacing the car cigarette lighter and radio fuse with all due care and responsibility.
This is the last fuse I blew. I went to the service center, they replaced it, and now everything is fine. Now again, three months after that time, it burned down. Is it my radio that's broken? Will it also have to be changed along with the fuse?
Frequent problems with fuses were observed in the first generations of models; later engineers eliminated the defects.
Where is the power supply located: in the Lada Granta, as in previous VAZs, the mounting block is installed to the left of the steering column. The additional block is to the right of the battery, there are power fuses (hereinafter referred to as modules). The back side of the cover with a description of the pinout of each module (see photo).
ATTENTION! A completely simple way to reduce fuel consumption has been found! Don't believe me? An auto mechanic with 15 years of experience also didn’t believe it until he tried it. And now he saves 35,000 rubles a year on gasoline! Read more"
In case of failure, it is not difficult to replace faulty modules with new ones, but be careful not to violate the installation technology. Otherwise, you risk damaging the equipment.
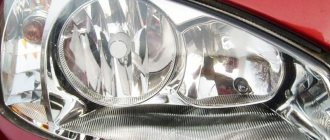
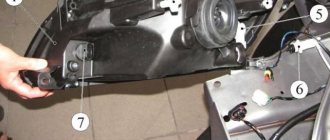
Review of block headlights Lada Kalina 2
Above is a photo of the left headlight, everything on the right is identical. 1 - ventilation tube; 2 — low beam section cover; 3 — cover of the high beam section; 4 — light beam regulator in the vertical plane; 5 — lamp socket for side light and daytime running light; 6 - electrical connector; 7 — regulator of the light beam in the horizontal plane; 8 - turn signal lamp socket
Selecting a light bulb
When you go to buy a new light bulb for your Lada Granta, you will first have to study the markings on the standard product. You need to find the part where H4 is listed. In this lighting device, the power is limited to 55 W, which is considered a significant criterion in choosing an element. Lighting parts designed to generate high beams have a power slightly higher - 60 W.
Note. Low beam bulbs for the Lada Granta are considered universal, therefore, they serve for both high and low illumination. The options used are 55 (low beam) and 60 W (high beam, respectively), type H4. This is exactly the option you need to stock up on to change the light fixture.
In addition, it is worth carefully inspecting the product to ensure that there are no weak contacts or poor soldering. Such malfunctions are unacceptable, since when driving on uneven roads they can cause the light beam to go out, and this is very unsafe.
Low beam lamp Kalina 2
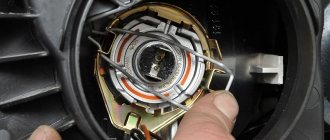
How to replace a lamp on a Lada Kalina
During the daytime, every car owner relies on daylight, vision and reaction. But with the advent of darkness everything changes. Particular care should be taken at this time, as tragedies often occur due to negligence when visibility is poor. To prevent this, the headlights must be in good working order. If they don't work, no movement can be made. Even if you want, it won't work as the visibility will be zero. So, it is very important to make sure that the light is flawless and shines brightly.
How to replace the Kalinin neighborhood light bulb on a hatchback, sedan, station wagon
Change is not easy. You do not need to have special knowledge or abilities. Even an inexperienced motorist can cope with this task. The only thing is to act one by one and correctly. Therefore, replacing a lamp consists of the following steps:
- First you need
- Then turn off the power by disconnecting the battery terminal.
- The washer reservoir should also be removed for convenience.
- Then the rubber cover is removed.
- Later, the light bulb must be removed by squeezing the retainer with your fingers.
- Then the lamp is pulled out and the terminal is disconnected from it.
This concludes the procedure. It is very important to understand how the lamp was installed and what wires were connected to it.
replacement of low beam H7 on a VAZ. Lada Kalina 2
Video summary about replacing a low beam
the right headlight is on
Kalina 2
, a similar replacement is being carried out.
replacing the light bulb, the light (H7) flashed in viburnum 2.
Change low beam
winter lights in the cold.
C. there is not enough time and the rug and flask
we are surprised. Despite.
Otherwise, you will not be able to connect the last headlight correctly, so you should contact a specialist. If you feel that this is not your job, the best thing to do is to immediately get your car repaired by a technician, where all the procedures will be carried out for you. Of course, you have to pay for it, but the result will be the greatest.
Install new: sequential instruction
The procedure for removing and installing a headlight on the right or left side is not much different from each other. It is only important to act correctly in accordance with the instructions. When installing the last light bulb, you only need to hold it by the base, you cannot touch it with your hands. Once removed, it can be removed completely.
Please note that for Lada Kalina (16 valve engine) the lamp has an H7 socket. Install the latter as follows:
- It is determined at the landing point so that the protrusion at the base aligns with the groove on the headlight. This needs to be firmly fixed. Only then will it become clear that the protrusion has fallen into the groove;
- press the clamp onto the lamp so that the center of the base is between the antenna antennas;
- lock the latch in place;
- Attach both wires to the latch and close the lid tightly.
After completing this procedure, you should turn on the lights at close range and check their operation. If everything is good, this means that the installation was completed correctly. In case of an unpleasant event, you need to take the car to the dealership and pay for it. Lamps should be purchased only in specialized stores. I prefer the most famous manufacturers and models with a guarantee. Osram H7 12V 55W headlights for Kalina Cross are very popular now.
Poor quality headlights should not be retained or stored as they will not last long and will require frequent adjustments or replacements. It is important to understand that not only your safety, but also the safety of the pedestrian depends on these light bulbs. It is especially important that lighting is of good quality at night to avoid catastrophic consequences.
There is a special offer on our website. You can get a free consultation with our corporate lawyer by simply submitting your own question in the form below.
Before you start repairs
Before changing the low beam lamp on Kalina, you need to check the integrity of the on-board network:
- When understanding the causes of failure of any component of electrical equipment, you should first make sure:
- the fuse is in good working order;
- look at the circuit connectors, which should be well secured;
- Often the causes of electrical equipment malfunctions are the oxidized ends of the pads; their terminals should be cleaned.
- Take a good look at the places where the car is connected to ground. Often, due to the lack of reliable fastening, disturbances in the functioning of electrical equipment occur, so replacing low beam lamps on Kalina may not always help with the problem.
- the equipment will help to find faulty places in the electrical circuit;
- is a combined electrical measuring device.
There are several types of such devices:
- digital, equipped with a liquid crystal display;
- analog;
- universal models, characterized by the presence of a liquid crystal screen and a dial indicator.
Multimeter
During repairs, we recommend using a digital device (in other words, a multimeter), which is small in size.
To check de-energized circuits, the device should be switched to ohmmeter mode:
- if you need to measure very low resistance (for example, within a few Ohms), you should enter a clarification - from the obtained indicator we subtract the internal resistance, the electrical resistance of the probes and multimeter wires (within 0.07 Ohms);
- to determine a more accurate value, the device is switched to the mode for measuring low resistance values (up to two hundred Ohms), then the ends of the probes should be short-circuited.
To check live circuits, the multimeter should be switched to voltmeter mode (the limits of permissible measurements are up to twenty volts). The device is capable of measuring the current consumed by electrical equipment of vehicles (up to ten amperes).
In cases where the task is to find out whether or not there is voltage in a certain section of the circuit, without resorting to measuring the value, you can use a special indicator light designed for twelve volts. You can also use a test lamp.
You can make it yourself:
- you will need a car lamp with a power of up to 4 W;
- take 2 two wires, the length of which is from 500 mm;
- solder them to the lamp.
The car is equipped with 2 headlights, in which halogen lamps are mounted. There are two screws on each to adjust the light beam. They make it possible to change its direction in the vertical and horizontal planes.
The headlights have an electric corrector, which, taking into account the vehicle load, allows you to change the vertical direction of light directly from the cabin. There is also space on the block for the turn signal lamps (orange) and the parking light. Some Lada Kalina cars are equipped with fog lights, which are installed in the holes of the front bumper.
Replacing the relay and fuse
Before repairing the fuse, you need to clarify and correct the cause of the blown.
Work instructions:
- Prepare the vehicle for the process and disconnect the wire from the negative battery.
- Pull the tab located on the left side of the instrument panel to open the mounting block.
- Find the required fuse for the damaged electrical circuit on the housing of the mounting block, following the sequential numbering.
- Take tweezers and pull it out of the socket.
- Squeeze the body of the fuse with tweezers. A damaged thread will indicate a used part.
- Install a new fuse, which is inexpensive, keeping the same rating as the old one.
- If you need to replace the relay, there is a puller in the mounting block that will help carry out this task. Please note that a part of the same type should be installed.
- Close the mounting block, connect the battery.
Replacement process
It's time to find out how to replace the low beam lamp on Kalina yourself. Due to the fact that it is not so easy to get to, some of the work will have to be done only by touch.
Replacing the left low beam lamp in a Lada Kalina occurs as follows:
- Prepare the vehicle for the list of work to be carried out by placing it in first gear, applying the handbrake, and placing a shoe under the wheel.
- Remove the negative terminal from the battery, or, as a last resort, turn off the outside lighting.
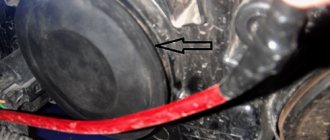
- Remove the rubber plug from the low beam section.
- Remove the block with the machine wires from the lamp output.
- Pull the ends of the spring clip out of the grooves to remove the latter.
- Remove the damaged lamp from the socket.
- Replace it with a new one, following the reverse order of work.
How to properly remove the cigarette lighter on a Lada Granta
The presented photo report will show how to remove the cigarette lighter on a Lada Granta in order to replace or repair it. You will also find out why the cigarette lighter fails.
Why does the cigarette lighter on the Lada Grant fail?
One of the main reasons for the failure of the Lada Grant's cigarette lighter is a short circuit, which can occur as a result of a malfunction in the vehicle's on-board network or due to wear of internal elements. Also, removing the cigarette lighter on a Grant is also necessary to replace a burnt-out diode (light bulb) for lighting the socket.
Which cigarette lighter to buy
If you are unable to find the original Granta cigarette lighter, then an excellent alternative would be a spare part manufactured by catalog number DA5100F0109
How to remove the cigarette lighter on a Grant
First of all, as when working with any component of a car's electrical equipment, you need to turn off the power to the battery and only then begin to remove the cigarette lighter. Carefully bend the edges so that the plastic protrusions do not interfere, and release the metal cylinder. Then you need to remove the center console of the torpedo.
Video of removing the Granta center console
After that, use a screwdriver to press the upper latch on the green plastic case and try to pull the base of the cigarette lighter out a little. Now you need to try to disconnect the connector and completely pull out the cigarette lighter Grants.
The cigarette lighter on a VAZ-2190 (Lada Granta) is replaced if it fails or to remove the instrument panel trims.
Join the discussion
You can post now and register later. If you have an account, log in to write on your behalf.
There are currently 0 users on the page
There are no users viewing this page.
Dimensions all work, turn signals and s/x too. But the backlight does not work, and the rear PTFs do not respond to the button, even the light in it does not light up. Although there are light bulbs in the PTF lights themselves. The electrics are generally naughty, but that’s a separate conversation (the turn signals, for example, sometimes blink as they should, sometimes they just start to burn, I suspect that the switch is dead). Okay, I’ll look at the light bulbs first, then I’ll tell you what’s going on.
The rear PTFs only work with low or high beam. I don’t know how it is in the new interior, but in the old one, the light in the button works from a relay, regardless of whether the lamps in the lights have burned out or not.
I was putting things in order in the trunk, there was a folded cardboard box, which I couldn’t think of a better way to put in the spare wheel niche ABOVE the spare tire, it fit into the grinding area.. Could I have touched something there and broken some kind of terminal? Or is there nothing like that there and we need to look for a break? The fuses are all intact.
There is a trunk light there, look, maybe something really was damaged there
Added after 3 minutes 6 seconds The rear PTFs do not respond to the button, even the light in it does not light up. Although there are light bulbs in the PTF lights themselves.
If I'm not mistaken, the rear PTFs are turned on when the front PTFs are turned on
Rear PTFs only work with low or high beams. Nothing like that, friend! The rear PTFs are turned on if the parking light and the front PTFs are on.. Otherwise, you won’t turn them on. And they do not depend on the near or far lights. If, of course, the wiring is factory, without amateur efforts.
Added after 25 minutes 28 seconds There is a trunk light there, look, maybe something really was damaged there. It is actually standing there deep behind the hardware. It's not that easy to damage it there. But the ground wire can fly off.
To post a reply you must log in or register.
Tips for using the car
It is important to prevent serious problems from occurring on your Grant; we suggest following generally accepted rules
Systematic inspection. The performance of the light elements should be checked before each trip. Inspect the area under the hood at least once every 4 weeks.
Close attention should be paid to firmly fixing wires and connections. Often problems occur due to loose wiring in the car that rubs against moving parts. Checking the status of devices
When you hear extraneous sounds when you turn on the lights (for example, relay clicks), it means that the steering column switch or button is not working well. It’s better to deal with the problem right away, without waiting for the unit to fail.
Attention! You cannot drive a car with broken headlight glasses, as moisture and debris will begin to get inside, and, accordingly, the internal elements will deteriorate.
Use of quality spare parts. When choosing light bulbs, you should not rush to extremely high power, this will not significantly increase the brightness of the light, but the wiring and other parts of the system will be subject to stress. Sometimes this leads to short circuits. But there is no point in saving on quality, because low cost indicates low reliability, which can provoke frequent replacement of the device. Lean renovation
When carrying out work on your own, it is important not to disturb connections, wiring and other elements.
It is quite possible to carry out work related to replacing light bulbs, eliminating minor nuances, and adjusting light without the involvement of specialists. In addition, you will save money and perform quality repairs, because you are doing this exclusively for yourself. Listen to the car and correct any problems that arise in a timely manner.
Where are the fuses for the Lada Granta?
The fuse box is located near the driver's left foot. To open the lid, pull the lower left corner of the lid (No. 1) and release the left locking point, then the middle one (No. 2) and the two right locking points (No. 3 and 6). Then release the top points (No. 4 and 5) and remove the cover.
Installing the mounting block cover is done in the following order: first snap the right side of the cover, then the lower ones, and then the upper ones. Make sure that the fastening elements of the cover are aligned exactly with the metal fasteners.
There are symbols on the plastic cover of the mounting block that indicate what each fuse (F) and relay (K) does.
Light bulb marking
Before repairing the cigarette lighter of a Lada Granta car, you need to purchase the necessary spare parts. Inside the device there is a special lamp marked A12-1.2. The element is designed for a voltage of 12 volts and consumes 1.2 watts of energy. The type of lamp base is designated as W2*4.6D.
The price on the market ranges from 10 to 30 rubles. It is advisable to buy an original VAZ lamp - this will help the Kalina illumination work for a long time and without the risk of a short circuit.
If you need to replace the cigarette lighter itself along with the cartridge, then the original catalog number is 21230-3725010-10, and the cost of the part is 300 - 600 rubles. The product must be well packaged, and inside there must be quality certificates and certificates of compliance with standards.