Lamp sockets on the Prior and their power...
Once upon a time I found this “List of Priora lamps”.
Because The recording has become popular and is often used; I designed it beautifully in Photoshop so that it would be pleasant to look at. Well, I’ll leave it in text format for copying. Lamp installation location - [Lamp type] (Power, W)
Headlight block:
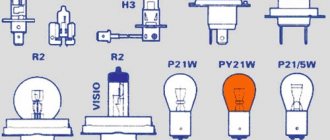
Side light - [W5W] (5) Low beam - [H7] (55) High beam - [H1 / H15] (55) Turn signal - [PY21W] (21) Turn signal - [W5W] (5) PTF - [ H3/H11] (55)
Back light:
Signal brake/gab. light - [P21W / W5W] (21/5) Add. Brake Light - [P21W] (21) Turn Signal - [P21W] (21) Reverse - [P21W] (21) Fog Light - [P21W] (21) License Lamp - [C5W] (5)
Interior lighting:
Ceiling light interior — [C5W / T4W] (5/4) Ceiling light. thing drawer - [C5W] (5) Illumination of the cigarette lighter. — [AMN13-3-1] (3) Clock backlight — [W1,2W] (1,2) Lamp lighting. trunk — [C5W] (5) Instrument lighting — [W3W] (3) Center lighting. consoles - [W1,2W] (1,2) Engine compartment lamp - [R10W] (10) Indicator lamp - [W1,2W] (1,2) Push-button switches - [W1,2W] (1,2) Switch blocks - [LEDs] Advanced brake light - [LEDs]
If you liked the article, click >> “Like”. Thank you all for your attention and good luck on the roads =)
Source
What causes the squeaking sound when you press the brake pedal?
Published: 03/11/2019
Spread the love
Spread the love Squeaking and other noises during braking. Contents 1 Squeaking and other noises during braking. 1.1 Reasons for squeaking car brakes 1.1.1 Reasons for squeaking brakes when braking 1.1.2 Brake system maintenance Screeching and squeaking of brakes is something that not only causes discomfort the driver, but also makes us feel like our car is faulty. Unfortunately, …
What causes the squeaking sound when you press the brake pedal? Read completely "
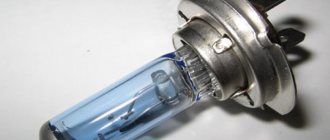
Lada Priora lamp base
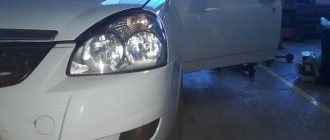
1 Low beam lamp - H7 halogen lamp with a power of 55 watts. Cylindrical in shape, with two contacts.
2 Lamp for high beam and daytime running light of Priora 2 - H15 halogen lamp with a power of 55/15 watts. Small, elongated size with one electrical contact.
3 Turn signal lamp - single-pin incandescent lamp PY21W, 21 watt orange.
4 Reversing lamp - single-pin incandescent lamp PY21W, 21 watts.
6 The lamp in the fog lamp is a H11 halogen lamp with a power of 55 watts. L-shaped lamp with a plastic base.
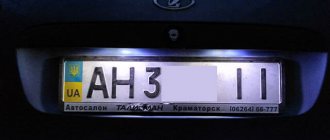
7 Trunk lighting lamp - single-pin incandescent lamp C5W, 5 watts.
8 The license plate, front marker and interior lighting lamp is a small single-pin W5W lamp with a power of 5 watts.
9 The high beam lamp of the first generation Priora is a halogen lamp H1 with a power of 55 watts. Small, elongated size with one electrical contact.
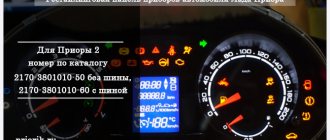
In March 2007, the first batch of Lada Priora rolled off the AvtoVAZ assembly line. Since then, more than 650 thousand cars have been produced. In September 2014, the car was restyled; changes also affected the lamps used on the Lada Priora. With the restyling, the high beam lamp changed; the first generation car used an H1 55 watt lamp. The updated Priora began installing an H15 lamp in the high beam. The new lamp combined high beam and daytime running light. Also, after the change in the brake signal lights, diode lamps began to be installed.
Lamps used in Lada Priora and their replacement
Author: Ekaterina Safonova · Published 01/11/2021 · Updated 04/28/2021
Headlights are the driver’s main safety system, allowing you to avoid crashing into another car or tree. If you don't want an accidental accident on the road, it is advisable to have a spare set for quick replacement. From this article you will find out what lamps are in the Priora.
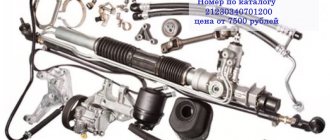
If you need to sell construction, road, and municipal equipment throughout Russia in a short time and at a good price, then you should look here, where they will buy any special equipment quickly and without unnecessary hassle.
Auto parts - analogue or original?
Published: 05/21/2019
Spread the love
Spread the love Replacement of original spare parts with analoguesContents1 Replacement of original spare parts with analogues1.1 Separation into original and spare parts by quality1.1.1 Cheap analogues of spare parts1.1.1.1 Where can I find reviews and stores offering auto parts? A car breakdown or an approaching period of major maintenance work has always raised one question among car owners, about the use of original car spare parts...
Auto parts - analogue or original? Read completely "
Headlight bulbs
On the Priora, the configuration of the front lights differs, depending on the year of manufacture. Since 2013, a new version has been released in which they were replaced.
Headlight bulbs for Priora models up to 2013.
| Type | Number | Power |
| Low beam | N 7 | 55 |
| Further | H 1 | 55 |
| Stop | PY21W | 21 |
| Dimensions | W5W | 5 |
Headlight lamp for Priora after 2013
The only difference is the high beam lamps. Instead of the H1, the H15 model with additional daytime running gear was used.
To replace the front light bulbs in a Priora, use these instructions:
Table of the best models and manufacturers
Among the highest quality, reliable and durable (400-1600 hours) lamps for the Priora car, models from manufacturers such as Osram, Philips and Bosch stand out. Let's consider their features and characteristics for the pre-restyling and restyled versions of the Lada 2170.
Pre-styling Lada Priora
| Name | Manufacturer country | Characteristics and Features | Rating on a 5-point scale |
| Bosch Gigalight | Hungary. | Fairly bright white light. 120% power compared to standard. | 5 |
| Philips Vision | Germany-Poland. | They are characterized by sufficient quality at an optimal cost. · Service life 400 hours. · Luminosity 1700 lm. · 30% better visibility compared to conventional high beam lamps. | 4 |
| Philips LongLife EcoVision | Poland. | Good quality at low price and durability. · 1.5 thousand hours of operation. · Brightness 1570 lm. · Protection from vibrations and thermal changes. | 4 |
Restyled Lada Priora
| Name | Manufacturer country | Characteristics and Features | Rating on a 5-point scale |
| Osram Cool Blue Intense | Germany. | Short service life, but high-quality blue color. · 200 hours. · 4200K. · 1350 lm. | 4 |
| Philips Standard | Germany-Poland. | Lighting characteristics are close to the standard version. · 1700 lm luminosity. · 400 hours of operation. | 4,5 |
| Osram Original Line | Germany. | Inexpensive, high-quality lamps with a good service life. · 1400 lm brightness. · 500 hours of work. · Up to 130% increased visibility. | 5 |
Tail lamps
The taillights contain the following lamps:
| Type | Number | Power |
| Reverse | P21W | 21 |
| Stop/dimensions | Р21/5W | 21/5 |
| Rotary | PY21W | 21 |
| Fog lights | P21 W | 21 |
Signal and parking lights differ depending on the year of manufacture. The first versions produced P21. After 2013 they were replaced with 5-watt ones.
Replacing tail lights is easier. It is enough to unscrew the 3 “lambs” that hold the lid and push it into the body. All light bulbs are unscrewed counterclockwise and dismantled.
Installation
There is practically no difference in the installation of PTF Priora 1 and 2. The only differences will be noticeable in making holes in the bumper for the headlights. In the SE bumper you need to cut a triangle along the contour and in a regular bumper you don’t need to cut anything.
There will be no other differences in installation.
Required tool:
- 10mm wrench;
- Screwdriver “+”;
- Insulating tape;
- Knife or jigsaw;
- Pliers;
Installation process
- Remove the negative terminal of the battery;
- We remove the car bumper; to do this, unscrew many screws from the bottom and top of the bumper, then disengage it from the fender and remove it.
- Next, use a knife to cut out a hole in the bumper for the PTF. Be careful and take your time so as not to damage the paintwork on it.
- We attach the PTF to the bumper using self-tapping screws.
- Let's start running the wiring into the cabin. We lay the wires from the PTF next to the main braid of wires on the left side of the car (in the direction of travel) behind the washer reservoir.
- Next, you need to run the wires into the car interior. The most convenient place to run the wires is in the area of the brake master cylinder. There is a hole there plugged with a rubber band, you need to insert the wires into this hole. For convenience, it is recommended to remove or move the expansion tank.
- We fasten the wires tightly so that they do not rub or come into contact with the metal. It is better to place them in a protective plastic corrugation.
- In the cabin, remove the cover of the fuse box (attached with three clips), turn them counterclockwise 90° and pull the cover towards you.
- Then we bend the sound insulation and tighten the wires under the center console.
- Remove the center console (central insert), fasten it with screws.
- Next, we proceed to connecting the wiring; for a correct and safe connection, we use the diagram from the kit or the diagram below.
- We install a button instead of a plug on the center console.
- After connecting, we check the functionality of the PTF. The main difficulties arise precisely when connecting the wiring. To avoid problems, carefully double-check the connected wires and strictly follow the connection diagram.
- Assembly must be done in reverse order.
Comments
TOP materials of the week
TOP products in the store (more)
Who services your Lada Priora?
Lada.Online
Lada (“Lada”) is a brand of cars produced by JSC AVTOVAZ. Previously, it was used only for export cars, and for the domestic market, cars were produced under the Zhiguli brand. In 2004, the management of AVTOVAZ announced the transition to the Latin alphabet for the official spelling of the names of all cars produced by the plant: Lada - instead of "VAZ" and "Lada".
Lada.Online is the largest Russian-language automotive resource with a daily audience of thousands, which is dedicated primarily to cars of this brand, the domestic automotive industry and the automotive world in general.
This site is not the official LADA website.
© 2022 Lada.Online. Copying of material is permitted only with a link to the source.
Source
Responsibility for faulty lighting devices
Traffic rules prohibit operating a vehicle with faulty lighting devices. This is due to safety considerations for all road users. It is also prohibited to use vehicles that use lamps that do not meet the design requirements for the operation of the vehicle.
It is important to remember that you are not the only participant driving on the highway, and it is highly not recommended to install more powerful and brighter lamps in the headlights of your car. By this action you endanger traffic participants moving in the opposite direction.
All changes in the design of the vehicle or non-working lighting devices entail administrative penalties.
DSG gearbox - Breakdowns, repairs and operation
Published: 01/27/2020
Spread the love
Spread the love DSG gearbox - what you need to know? Contents1 DSG gearbox - what you need to know?1.0.1 What is a DSG gearbox?1.0.2 What breaks in a DSG gearbox?1.1 How to extend the life of a DSG gearbox DSG gearbox with Dual clutches that jerk on startup are difficult to use and can fail surprisingly quickly. ...
DSG gearbox - Breakdowns, repairs and operation Read more »
Headlight bulbs
The headlight bulbs of the Lada Priora differ depending on the year of manufacture of the car, since at the end of 2013 daytime running lights began to be installed in the Priora.
Headlight bulbs for Priora models up to 2013.
| Installation location | Lamp type | Power, W) | Number in photo |
| Low beam | H7 | 55 | 1 |
| High beam | H1 | 55 | 9 |
| Turn signal | PY21W | 21 | 3 |
| parking lights | W5W | 5 | 8 |
Headlight lamp for Priora after 2013
Turn
The turn signal signal is located the highest (in relation to the hood), and to remove it you don’t even have to wrap your hand under the hood.
- Remove three screws and a self-tapping screw from the plastic cover, pry it up with a flat-head screwdriver and remove it;
- Turn the cartridge strictly counterclockwise;
- Remove the cartridge;
- It is easy to press down on the lamp and rotate it counterclockwise until it begins to fall out of the socket.
When choosing a turn signal PY21W (Voltage 21 W), you should be careful - a lamp with a similar marking - P21W - will not have orange, but colorless glass, and will not be suitable as a turn signal.