For most owners, this instruction will not be useful, since there is usually no need to open the airbag cover.
It is necessary to open the front passenger airbag cover when knocking, crickets and other creaking noises appear on the right side of the panel. If the problem is not in the panel itself, then you need to look under it; there are several parts there that can be the source of noise.
A little extra info: Marvel movie timeline for 2022.
To open the airbag cover, you will need two plastic cards or something similar. First of all, you need to pry off the upper left corner, and then the remaining latches. For more information about this process, watch the video by user Viktor T on Youtube.com.
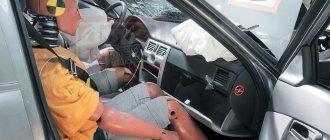
The driver's airbag (gas generator module assembly) is dismantled when the steering wheel is removed, or to replace the airbag contact ring or sound signal. If this is the first time this process is performed, it is recommended to invite an assistant. On Lada Granta, Lada Priora and Lada Kalina 2, the driver's airbag has a different shape, but the removal process is no different.
What to do if the car does not start after the airbag deploys?
On many car models (LADA Granta or Priora, Ford Focus 2, Opel Astra and others), the injectors turn off after the airbag is activated. This is made for safety and to prevent the car from catching fire.
To return the supply of fuel consistency, you should contact specialists (it is unlikely that you can return the supply of hot consistency with your own hands).
From time to time it helps to disconnect the battery for 6-10 minutes (discarding the terminal). In addition, a number of manufacturers install unlock buttons.
Fundamental differences between car models
They mainly consist of fastening elements.
Above, for example, we discussed the removal of the steering cushion on the Lada Priora. There is a difference on the Toyota Corolla - screws are not used for fastening. Fixation is made with a spring mechanism and two latches. You need to press the spring mechanism by inserting a screwdriver into the small hole. Then the pillow will immediately release on both sides.
And on the Smart model you will need to completely remove the steering wheel.
Is it possible to drive without airbags?
Car owners often ask questions regarding the operation of the car if there are faulty (opened) airbags or a malfunction indicator has been activated.
If the icon lights up, it indicates that one of the sensors has failed. This means that the possibility of the airbag not deploying in an accident is higher. The indicator also lights up when the device has already been activated and a “plug” has been installed in its place.
It is allowed to drive with such errors (the technical part of the car does not suffer). Another thing is that the level of security is falling. There remains a risk that the airbag will not fulfill its intended purpose.
How does an airbag deploy in an accident?
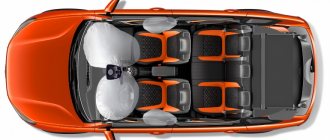
The airbag is deployed during a collision with another object or vehicle.
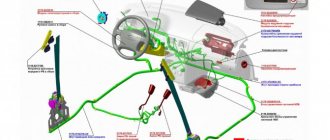
Depending on the location of the impact, the front or side airbags are activated. As the impact force exceeds the limit level (set by software), the impact sensors send a command to the control unit.
The latter collects information, analyzes it and decides whether to open the airbags or not. The described actions happen in fractions of a second.
Taking into account the analysis of the severity and type of tragedy, the whole or only part of the system works. From time to time, it is enough for the seat belt tensioners to operate alone, or they work in conjunction with the airbags.
The control unit sends a command to turn on the gas generator of a specific airbag. With all this, the response time is 30-40 ms. During this period, the gas generator guarantees the expansion and filling of the cushion with gas.
As the airbag touches the human body, it rips open and deflates.
The front airbags are activated when a number of criteria are met:
- Car fire;
- Increase in given impact force in a frontal collision;
- Vehicle fall;
- A sharp collision with the wall of a hole, a curb or the edge of a sidewalk;
- Impact to the end of the car (oblique frontal collision);
- A hard fall on the wheels after a “jump”.
It is worth knowing that the front airbags do not deploy in subsequent cases - when the car rolls over, a side impact or contact from the rear.
The car software states that before opening the airbag, the deceleration speed of the car and movement at the moment of collision, the presence of seat belts, etc. are analyzed.
Lada Granta. How to remove an airbag.
For more details on this topic, see here https://autotopik.ru/obuchenie/503-kak-rabotaet-podushka-bezopasnosti.html.
Lada Granta 2013, l. With. - with your own hands
Voronezh
Lada Granta, 2012
255 000 ₽
Tyumen
Lada Granta, 2013
110 000 ₽
Chita
Lada Granta, 2013
300 000 ₽
Krasnodar
Lada Granta, 2013
345 000 ₽
See more cars on Drome
Participate in the discussion can only registered users.
Login Register
How to remove the error?
On countless forums, car owners discuss how to remove the error after the airbags deploy. This is reasonable, because driving with a blazing lamp is a disgusting and dangerous pleasure.
When the indicator lights up, you should take the following measures:
- Check the operation of the airbag when starting the engine;
- Make diagnostics for errors, find the code. It is often possible to do such work only 100 times;
- Change or repair the airbag;
- Update the system module.
There are cases when a light bulb burns due to a missing contact or due to the absence of airbags dismantled after an accident.
The standard changes the clock spring, control unit, wiring, belts and airbag. As mentioned, costs are reduced when purchasing units from disassembly.
To temporarily “put out” the light bulb, it is possible to install a “plug” (a special resistance of 2.0 - 2.2 Ohms).
- Disconnect the battery, install the control unit and clock spring. Instead of the airbag, an equivalent resistance of 2.2 Ohms is installed;
- Connect the battery and check whether the lamp flashes or not;
- Erase the crash date from the airbag control unit;
- Go to a service center to reset the error in the control unit using a scanner. If everything is correct, then the light bulb will not glow; in other words, it lights up for a short time and goes out.
Airbag device
An airbag is a flexible base that fills with gas in the event of an accident.
The complex of components also includes a control system and a gas generator. Starch or talc acts as a lubricant for the material, guaranteeing accurate opening.
READ How to remove the ignition switch on a VAZ
The task of the gas generator is to fill the airbag with gas during a collision. Together, the gas generator and the shell form an airbag.
Airbag designs are classified:
- According to the nature of the action - with one and two-stage operation;
- In shape - in the form of a tube or dome;
- According to the type of gas formation - hybrid or solid fuel.
The base of a solid fuel generator contains a fuel charge, a squib and a housing. The airbag is charged with a special composition, based on silicon dioxide, potassium nitrate and sodium azide.
The fuel is ignited by the action of the squib, after which gas is created.
How to remove this thing? Lada Kalina
In a hybrid gas generator, the main components are a squib, a housing, a gas and a solid propellant charge.
After a collision, the airbags are filled with compressed gas, releasing a solid propellant charge.
The task of the control system is to connect the devices (control unit, shock sensors, squib) and guarantee their accurate operation.
Replacing engine power unit mounts
Replacement of supports for the power unit of the VAZ-21114 Lada Kalina engine
We carry out the work on an inspection ditch or overpass.
To remove the rear support of the power unit.
. We install a height-adjustable stop under the gearbox housing.
Using a 17mm z-shaped wrench, unscrew the two nuts securing the support to the body.
Having slightly lowered the stop, use a spanner wrench or a 19mm socket to unscrew the bolt securing the support to the rear support bracket of the power unit. . and remove the bolt from the support
Remove the rear support of the power unit. We install the rear support of the power unit in the reverse order.
In this case, the higher leg of the support should be facing the right side of the car, and between the two protrusions on the inner race of the support. ..there should be a protrusion on the rear support bracket.
When replacing the front right support of the power unit, remove the right mudguard of the power unit (see “Removing the mudguards of the power unit”) and install a height-adjustable stop under the engine oil pan.
Using a 17mm socket, unscrew bolt 1 and two nuts 2 securing the support to the body. Lowering the emphasis a little.
. Using the “E-14” head, unscrew the two screws securing the support to the cylinder block bracket.
. and remove the support. Install the front right power unit support in the reverse order. When replacing the front left support of the power unit, remove the left mud guard of the power unit (see “Removing the mud guards of the power unit”) and install an adjustable stop under the gearbox housing.
Using a 17mm socket, unscrew bolt 1 and two nuts 2 securing the support to the body. Lowering the emphasis a little...
. Using the “E-14” head, unscrew the two screws securing the gearbox bracket to the support.
Remove the front left power unit support. Install the front left power unit support in the reverse order.
The front right and left mounts of the power unit are similar in appearance, but they are not interchangeable. They can be distinguished by the holes in the inner cushion frames: in the cushion frame of the right support, the holes are smooth, and in the holes of the left support, threads are cut.
Video on the topic “Lada Kalina. Replacement of engine power unit mounts"
Removing the viburnum engine mounts
VAZ Priora replacement of engine mounts (mounts) “Future Technologies” Replacement of engine side mount 2108 2109 21099 2115
Source
What to do if the airbag deploys?
Car owners are often lost and don’t know what to do when opening an airbag. On many cars (LADA Granta and Priora, Ford Focus 2, LADA Priora, Opel Astra and others), you will have to perform the following manipulations:
- Install new airbags, replacing those that have already deployed;
- Correct the “brains” of the control system, in other words, the block that is responsible for the SRS. Instead of the error, a dump of the newest machine is installed (as if there had never been a tragedy);
- Install a special snag (plug).
The problem is that each manufacturer has classified information, which forces car owners to buy a new control unit for the airbag. In addition, airbags are often tied to the VIN number or vehicle model.
If you go to 100, then the price of restoration work will hit your wallet.
Experienced car owners copy a security system dump and write it to a remote memory device.
The data is stored until implementation. If the car is involved in an accident, it is easier for a specialist to return the system.
In this situation, a microcircuit and a programmer are purchased, after which the device is flashed. The average cost for such work is from 5-7 thousand rubles.
How to put covers on Kalina
The interior of a Lada Kalina car can be made prettier and more comfortable using fairly primitive methods. One of the most famous is the installation of seat covers. They prevent rapid wear of the seat covering and improve the appearance of the interior.
You will need
- – covers;
- – vinyl-braided wire;
- - nylon cord.
Instructions
1. Buy seat covers that specifically match your car's interior. On average, good-quality covers for Kalina cost from 2,500 rubles. It is better to choose models made of dense fabric, resistant to abrasion and nice to the touch. If funds allow, choose more expensive heated covers. In addition to providing greater comfort, they are more durable due to the internal frame.
2. Lay out the covers, remove their ties, which, as usual, are made of unsatisfactorily strong materials. Insert a vinyl braided wire of a suitable size into the holes, one that is highly durable and can be easily tightened if necessary. Braid made of similar materials helps in evenly dividing the force on the tightening. This way you will be able to protect them from possible breakage.
3. Replace the ribbons located at the edges of the covers and prepared for tensioning them with a nylon cord about 3 mm in diameter. It is quite strong, and with its help you will be able to stretch the cover much better. Sew it on to replace the old puffs. You can buy especially strong nylon cords in fishing stores.
4. Remove the seats. To do this, unscrew the mounting bolts or nuts that attach them to the floor. Put on the new covers and tighten them as tightly as possible using new ties so that they do not wrinkle or slip. Check the tightening points carefully. Reinstall the seats by tightening the bolts or nuts.
What to do after the airbag is triggered?
It is worth knowing that restoring airbags without hiring 100 craftsmen is a dangerous undertaking.
And the problem is not even that in the event of a collision the airbags are least likely to open. It’s worse if they work spontaneously.
To avoid problems, you should contact an official dealer, who will adjust the system and replace faulty components.
When servicing yourself, there are a number of points to consider:
When repairing an airbag, the following points are taken into account:
- It is imperative to remove the negative terminal from the battery, after which you should wait until the autonomous power source discharges (7-10 minutes);
- The airbag is placed with the body facing towards you.
Often, car owners do not repair the airbag and limit themselves to restoring the body. In this case, the light bulb on the dashboard is removed or a “fake” is installed instead of the pillow.
This approach is unsafe. It is better to contact an official dealer and get the system back up and running.
As for selling a car with a deployed airbag, this is possible, but the new owner should be aware of the dilemma.
If you repair the panel and turn off the “lamp”, the client is unlikely to see anything without diagnostics, but in the first accident his death falls on the conscience of the dealer.
Replacement of power unit supports
We carry out the work on an inspection ditch or overpass. To remove the rear support of the power unit.
. We install a height-adjustable stop under the gearbox housing.
Using a 17mm z-shaped wrench, unscrew the two nuts securing the support to the body.
Having slightly lowered the stop, use a spanner wrench or a 19mm socket to unscrew the bolt securing the support to the rear support bracket of the power unit. . and remove the bolt from the support
Remove the rear support of the power unit. We install the rear support of the power unit in the reverse order.
In this case, the higher leg of the support should be facing the right side of the car, and between the two protrusions on the inner race of the support. ..there should be a protrusion on the rear support bracket. When replacing the front right support of the power unit, remove the right mudguard of the power unit (see “Removing the mudguards of the power unit”) and install a height-adjustable stop under the engine oil pan.
Using a 17mm socket, unscrew bolt 1 and two nuts 2 securing the support to the body. Lowering the emphasis a little.
. Using the “E-14” head, unscrew the two screws securing the support to the cylinder block bracket.
. and remove the support. Install the front right power unit support in the reverse order. When replacing the front left support of the power unit, remove the left mud guard of the power unit (see “Removing the mud guards of the power unit”) and install an adjustable stop under the gearbox housing.
Using a 17mm socket, unscrew bolt 1 and two nuts 2 securing the support to the body. Lowering the emphasis a little...
. Using the “E-14” head, unscrew the two screws securing the gearbox bracket to the support.
Remove the front left power unit support. Install the front left power unit support in the reverse order.
The front right and left mounts of the power unit are similar in appearance, but they are not interchangeable. They can be distinguished by the holes in the inner cushion frames: in the cushion frame of the right support, the holes are smooth, and in the holes of the left support, threads are cut.
Source
LADA Kalina Station Wagon 2011 on DRIVE2
In a previous post I said that the heater was leaking. Web offers a couple of methods for replacing the radiator without removing the panel. One method is to saw the heater body, and the second is to shorten the heater radiator pipes. But it’s not that interesting, and besides, I’ve long wanted to do Shumka, because it’s terrible there, everything rattles there. Therefore, it was decided to remove the panel. There will be a lot of unflattering words addressed to those four people who signed the drawings of the viburnum panel =) But this is all in the future, but for now observations about the passenger airbag, because of which some of the nerves are wasted. More precisely, in my opinion, because of the structural defect in its connection with the panel.
Unscrewing five nuts with three different tools
And having removed the connector with the fourth tool, take out the pillow with the fifth tool
Passenger airbag space
And here the questions begin, to which you can hardly get answers. And the most important thing: why the hell?! Why the hell is this edging needed, because of which all the fuss is a waste? Because of unification? But damn, according to the Kalina there are 22 (TWENTY TWO) different assembled panels. And there is only one plastic. Why the hell then twenty-two panels? Why the hell are there three panel frames (iron tube with brackets)? And there's only one piece of plastic. Why the hell does the pillow cover snap onto this edging when it is snapped onto the pillow body and secured with staples, and only some unknown crap can rip it off from there? So that it sits straight, because crooked hands cannot mold the plastic correctly so that it doesn’t move? In short, one hell of a thing =(
Lada Kalina super car part 3 (hopefully the last one)
Now, if it weren’t for this edging, then there would be no need to remove this pillow. It could be twisted later if necessary. In short, as soon as I remove the panel lining, I’ll carefully feel everything again, and, probably, I’ll cut the hell out of this edging in order to save myself in the future from unnecessary work.
READ What Oil to Use in Honda Civic 5d
Removing and disassembling the gearbox control drive
We carry out the work on an inspection ditch or overpass. Below the car..
. Using a 13mm spanner, loosen the tightening of the nut of the coupling bolt of the clamp securing the control rod to the shank of the gear selector rod hinge.
Using a slotted screwdriver, we open the clamp and move it along the rod.
Remove the transmission control rod from the shaft of the gear selector rod hinge. Remove the clamp from the rod.
Using a 13mm spanner, unscrew the two bolts securing the torque rod to the base of the gear shift lever.
. and disconnect it from the base. In the cabin, remove the floor tunnel lining (see “Removing the floor tunnel lining”). Having unscrewed the fastening nuts, disconnect the air ducts for blowing the feet of rear seat passengers from the heater (see “Removing the instrument panel assembly with the heater”) and lift the air ducts. Squeezing the clamps of the wire block..
. disconnect it from the reverse gear lock solenoid switch block.
Use a 13mm socket to unscrew the three bolts securing the base of the gear shift lever, and unscrew the fourth bolt under the air duct with a 13mm wrench.
We remove the gear shift lever with its base, bringing the control rod into the cabin through a hole in the floor. Use an awl or a thin slotted screwdriver to pry it off.
. and remove the gear shift knob plug. Using a 13mm socket, unscrew the locknut securing the handle.
Unscrew and remove the handle from the lever. Turning the decorative cover inside out, loosen the plastic clamp securing the cover or cut the clamp.
Remove the cover from the lever. By loosening the plastic clamp securing the solenoid switch wires.
. remove the switch. If it is necessary to replace only the reverse gear lock solenoid switch, then these operations can be performed on the vehicle without removing the entire transmission control drive.
Using a 13mm spanner, unscrew the nut of the control rod axle bolt, holding the bolt axle from turning with a wrench of the same size. We take out the bolt-axle.
. and remove the metal washers, plastic bushings and spacer bushing.
Using circlip pliers, remove the circlip on the ball joint of the lever.
We remove the gear shift lever with the ball joint from the base. Removing the gear shift lever can be done on the vehicle without removing the entire drive assembly. To replace the upper rubber sealing ring (round section) of the ball joint, use a screwdriver to pry off the ring.
Remove the ball joint from the lever. Remove the lower sealing ring (rectangular section) from the ball joint.
Remove the transmission control rod from the case. The cover on the pull rod fits tightly. Therefore, to make removal easier, we moisten the rod with soapy water. If you only need to remove the drive rod.
. then using a 13mm spanner we loosen the tightening of the nut of the coupling bolt of the clamp securing the jet thrust to the tip. We unscrew the two bolts securing the torque rod to the base of the gear shift lever (see above).
Using a 13mm spanner, unscrew the nut securing the torque rod end to the gearbox bracket.
. and remove the jet rod assembly with the tip.
We remove two plastic bushings from the torque rod tip.
. and a rubber damper. Unclenching the clamp.
. remove the tip from the rod. We assemble and install the gearbox control drive in the reverse order. Before assembly, put LSC-15 lubricant into the ball joint of the lever. An assistant will be required to adjust the drive. Make sure that the switch rod in the gearbox is in the neutral position. Do not tighten the clamp bolt nut. We check the ease of axial movement and rotation of the box control rod relative to the shank of the switch rod hinge. In case of jamming, it is necessary to release the groove of the rod with a slotted screwdriver. We install the gear shift lever so that its lower part is perpendicular to the floor of the body, and the handle is located from the front passenger seat at a distance equal to 1/3 of the distance between the seats. Having installed the control rod clamp at a distance of 2-3 mm from the end of the rod, tighten the nut of the clamp coupling bolt. We check that the drive is adjusted correctly - nothing should interfere with the movement of the lever, the gears should engage easily and without jamming. Otherwise, repeat the adjustment.
LADA Kalina Sedan 2008 on DRIVE2
For a long time, I was haunted by ringing and squeaking noises throughout the entire instrument panel... I had experience with the noise of the previous Kalina with the removal of the panel, but there was no air conditioner and no airbag. Immediately everyone was afraid that it was impossible to remove the plastic cover of the panel separately; it had to be removed together with the heater. And this is the drain of antifreeze and freon... I didn’t really want to, to be honest) I understood from the design that the cushion is screwed to a metal beam in the panel and you can only get to its fasteners by completely removing the panel. But we are not looking for easy ways.
I came across this article while driving and realized that anything is possible. Thanks to SEVGA for the detailed reports. It was decided to remove it and glue it with a vibrator to make the plastic heavier, and glue all the creaking joints and ringing clips. There are quite a few articles on analysis, but I’ll focus on removing the airbag. Actually, it’s because of her that I’m writing a post, because there aren’t many posts on removing the pillow.
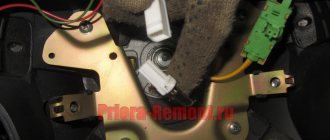
To remove the pillow, you need to take a course from a young gynecologist)) Okay, closer to the point: it is attached to a metal beam with 5 studs, screwed with 8 nuts. I selected different keys, my father-in-law adjusted the curved ones he had. Nothing fit, it was wildly uncomfortable. I was only able to unscrew the central nut with a small wrench. And I remembered that I have a flexible drive with an adapter for the head. So he helped me a lot. You will first need to remove the back wall of the glove compartment. Feel the head on the nut and turn the flexible drive. That's it, I took it off and am posting photos of the pillow with its mount for those who decide to do it.
Well, then I removed the cover itself and glued it. I checked everything I could reach, a little vibration on the air ducts, and secured them so they wouldn’t shake. By the way, air ducts are big sources of rattling noise and sit very flimsily. I wrapped the wires under the pillow and the glove compartment in Madeleine, and glued the metal fasteners and joints with the plastic with biplast. I found this surprise:
The metal clip once fell and hangs on the wires of the mounting block. How can there not be crickets here?
In general, during the Shutdown process, I found a lot of coins, washers, screws, and clips in different places on this machine. Now I’m not surprised by the presence of crickets in it.
Then I put everything back in place. Installing the pillow also caused some hemorrhoids, because... The head is short and barely fits onto the hairpin. But nothing, everything is in place and standing strong.
As a result: there is less ringing and crickets. I hear 2-3 crickets, but I already roughly understand where they are coming from, they will be fixed. The panel has gained weight, there is no empty plastic to tap. And for myself, I decided to glue only with a vibrator purely from crickets, because on the previous Kalina, after gluing the engine shield, I did not get the effect of a quiet motor. You can also hear it, many on the drive write about it. Therefore, I haven’t bothered with gluing the engine shield yet.
For those who want to remove the panel trim separately without the heater, please be patient, wildly patient. This is a terrible gynecology, but if you decide, then go for it. Good luck to all!
Dismantling algorithm
- To begin with, the steering wheel is locked by turning in any direction (there should be no key in the ignition switch).
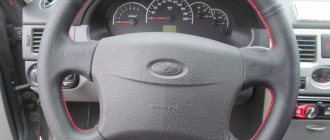
- Next, you need to pry off the trim (also called the horn) located at the top of the steering wheel. At the same time, it is recommended to listen to how the sound signal is triggered.
- After detaching the upper part of the cover from the fastening, you should pry it from below and completely remove it. The power wires are located on the button, so you don’t need to pull the cover too hard to avoid damaging them.
- Now you have to disconnect the wires by pulling them a little, thus removing them from the contacts.
Note. Depending on what year Kalina was produced, the steering wheel mounts may differ. An airbag may or may not be present. If there is one, then you need to use a Phillips screwdriver to unscrew the bolts that secure it.
- It is worth noting that the bolts are fastened quite firmly, so you need to remove them with the utmost care so as not to damage the buttons and contacts.
- Afterwards the cover can be completely detached.
- The next step is to use a socket with a wrench to unscrew the nut that secures the steering wheel to the shaft. The steering wheel must be locked.
- In a situation where the nut is difficult to rotate, you can use a ratchet, with which this can be done faster and easier. There is no need to unscrew the nut completely; it is better to leave it in place, otherwise you might get hit in the forehead when removing the steering wheel.
- The position of the handlebar should be marked with a marker or pencil so that when mounting it back, it should be set straight. Marks can be made either on the steering wheel itself or on the casing.
- Now you need to take the steering wheel with both hands and pull it towards you, removing it from the shaft splines. If he doesn’t give in the first time, you can hit him with his hands from below, alternately left and right.
- After the steering wheel has been removed, you need to unscrew the nut completely and remove the wheel.
LADA Kalina Station Wagon 2014 on DRIVE2
I decided to post a small instruction for those who have not yet decided to perform this operation.1. We dismantle the glove compartment lid by opening it slightly and pulling it out of the fastenings, then removing the lid stops from the slots by turning the lid diagonally.2. Remove the decorative trim above the glove compartment by prying it off, for example, with a plastic card.3. We remove the inside of the glove compartment by unscrewing many screws and disconnecting the wires from the lamp and limit switch.4. Here we get access to the PB
Next, do not forget to remove the terminal from the battery to safely remove the battery
To remove the PB, you need to unscrew these 2 bolts with a 13mm head
After this, the pillow is easily pushed up if you help push the latches on the cover with your fingers from the inside.5. Disconnect the wire from the PB
You need to pry this red lock with a knife, and the plug can be easily removed. to remove the cable from the battery ?
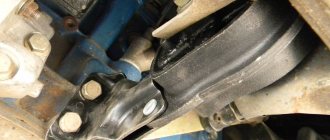
After this, we have access to the heating system pipe, which rattles when tugged lightly.
The photo shows friction points at the junction of the pipes
to remove this pipe . It is attached with a self-tapping screw in one place (it is not very convenient to crawl up to unscrew it), you also need to remove the right deflector
We remove the deflector by pressing it from the inside with our fingers; the photo shows where the latches are.
There is where the pipe is attached, the photo is already without it
We glue the joints with madeleine, on the stove side I covered the pipe completely, on the deflector side only in 4 places, completely - it didn’t fit into the joint very well
Some people here (photo taken from breeder-man) don’t have a self-tapping screw, I had one there, the car is March 2014. If someone doesn’t, then when you remove the pipe, you can still screw it in, otherwise you won’t be able to get under it. Now everything is quiet under the panel , but there were other crickets left. So it goes
READ Replacing the brake light bulb Kalina hatchback
Removing the Kalina steering wheel
We decided to replace the Kalina steering wheel with a sports one, then first learn how to remove it yourself. The steering wheel is also removed if the dashboard (panel), slip ring or steering column is removed.
First, disconnect the negative terminal of the battery. Required tool: 24mm socket.
- Press out the horn switch trim using your fingers.
- Remove the steering wheel cover.
- Disconnect the wires from the horn switch.
Before removing the Kalina steering wheel, its position must be marked with a marker relative to the shaft.
- Unscrew the steering wheel mounting nut (not all the way to avoid injury during removal) using a 24mm socket.
- While rocking, pull the steering wheel towards you. We remove it from the shaft splines.
- Completely unscrew the steering wheel nut. Remove the Kalina steering wheel.
Installation of the Kalina steering wheel is carried out in the reverse order, guided by the marks made during removal.
Similar materials
Removing the dashboard cover for Kalina or Kamastura in detail.
And so, as I already said in the previous entry, it was decided to disassemble the dashboard in order to study the internal structure and replace the heater radiator. All work was carried out during lunchtime, without any rush or rush. As it turned out, the devil is not as scary as all sorts of lazy assholes on the Internet write about him =)
To begin with, I scoured the Internet for details on removing the panel with the airbag present on the first generation Kalina. The Internet produced a couple of uninformative links; In short, he sent me to figure everything out myself =)
Aaaand... that's enough =) It feels like they don’t buy Kalina with pillows at all. Well, okay, you have the hands, the tool is for sale, so go ahead. Since it’s cold outside, before each operation we had to pre-warm the interior. This must be done so that the plastic is soft and pliable. In short, let's go =)
Since a Kalina with a passenger airbag, the first thing I need to do is remove the airbag, because it makes it difficult to slightly more than completely pull the panel off from its place =) The airbag is attached to the panel frame at five points with M5 nuts. Access to the nuts is exclusively from the glove compartment. Therefore, the first thing we do is remove the back wall of the glove compartment. To do this, you need to open the glove compartment (there is no need to disassemble the mess in it), unhook the decorative crap made of dermantine from the back wall, remove and turn off the lampshade, unscrew it, remove and turn off the button for turning on the backlight and unscrew the four screws behind the decorative crap (three hold the back wall, and the fourth panel is attached to the frame), plus unscrew the top, I think three more. No photo, I didn’t take it, why - I don’t know =) And then we push the glove compartment wall inward and a little down to release the upper left edge, by which, using a screwdriver, using force and suppressing the fear of breaking it, we pull the back wall towards ourselves =) The plastic is quite soft and bends well, although it is tight. You can also use the method indicated here: www.lkforum.ru/showthread.php?p=726162#post726162. They filmed it shorter. Let's move on. Let's take off the beard. To do this, remove the ashtray (four screws), remove the plugs near the emergency light button and unscrew two screws. Remove all handles from the heater control panel. I personally didn’t remove the radio tape recorder, I had nothing to do with it. Then we pull the beard towards ourselves and help ourselves with a screwdriver along the edges (the screwdriver must be wrapped in something soft). Pulling back the beard, we disconnect all the wires; they are long enough for a comfortable disconnection.
If you need to drive further, then remove the buttons from the beard, the decorative insert of the heater control unit, the emergency stop button and put it back.
Along the way, you can remove all the attached plastic, namely the front ski and side air ducts (also using pulling force). In short, by removing the beard and the rear glove compartment cover, we get difficult but possible access to the nuts securing the passenger airbag to the frame.
What to do with worn seat belts?
The seat belt squib often deploys along with the airbag. There are two options here - turn to specialists or do the work yourself.
In the second case, the sequence is as follows:
Move the front seat forward as far as possible; Unscrew the blind edge of the belt from the body part; Disassemble the lower edge of the rack trim (the mechanism is located there); Pick out the plug on the adjustment mechanism; Remove the rack trim to check the level of wear; Carefully unscrew the belt and push it away from the adjuster; Remove the device and discard the system connectors; Remove the cover and locking assembly; Under the steel plate there is a mechanism with a return spring. The latter, when the squib operates, is triggered, jumps out of its place and fixes the belt; Compress the springs and put everything back in place.
Removing the Kalina 2 passenger airbag, eliminating crickets behind it
I read in bortovik that the passenger side air duct can knock on bumps. I decided to check his condition myself. But all the messages I looked at were about the version without a passenger PB. That is, we open the decorative trim on the panel and get full access. I have PB. Simply opening from above is not enough. I’ll put it in order and illustrate it, maybe someone will be interested1. We remove the glove compartment. I don't have any photos here. Everything is simple there if you don’t try to unscrew the screws first. First, pull out the glove compartment trough. At the bottom it has three detachable hinges. Next, we take it out of the guide slide sideways. All fastening screws of the glove box housing are immediately visible.
The PB is attached to the cross member of the front panel and to the decorative trim. Therefore, we unscrew two bolts of 13. I was the first to see two nuts of 17 and for several minutes I was confused “how to unscrew them!”
Before pushing the PB upward, you need to carefully pull out the electrical wiring connector (the negative terminal was removed, right?!). The connector is flimsy, but it holds tightly to the PB contacts. DO NOT TRY TO SOLVE THE ISSUE BY FORCE. First, use a knife to pull out the lock
Now you can move the PB with the output cover up
I got to the air duct. Well what can I say? On Drive you need to fumble less! Yes, the connection rattles, but only if you actively “make friction” along the pipe. In a real trip, you need bumps that will destroy the suspension, and only then the air duct will “sound.”
I looked at all this and was disappointed ( more on that later
) and decided not to overthink it with a steep recovery.
Now about why I was disappointed... Assembly at AvtoVAZ is lame