Heating the seats of the Lada Largus is a very important function, especially relevant in the winter season. Almost all Lada Largus trim levels have factory heated front seats. The only exceptions are the basic Standard equipment and the 5-seater Classic version without air conditioning.
If you are the unlucky owner of these two simple configurations and really want heated seats, then in this article we will tell you how to perform a high-quality installation of this option at minimal cost. This article will also be useful to those whose standard seat heating has failed and needs to be replaced or repaired.
Seat heating circuit
The peculiarity of this option is that the buttons do not have indicators that would inform the driver whether the heating is on or not. Heating of the seat and backrest occurs cyclically. That is, after 2-3 minutes of heating, it turns off, then as the surface cools down, the heating turns on again, and so on. This operating mode is ensured by a thermostat built into each heating unit (it turns the seat heating on and off depending on the temperature).
This is interesting: Disassembly and assembly of the gear shift lever on a Lada Granta VAZ 2190
Specifications
| Characteristic | Meaning |
| Brand | Warm place |
| Heater insulation | fluoroplastic insulation, non-flammable |
| Connecting mats | parallel |
| Country of origin | Russia |
| Heated driver's seat | Yes |
| Guarantee | 1 year |
| Maximum heating temperature | up to 53°С |
| Heating element size | 29x36 cm |
| Corrosion Exposure | not susceptible |
| Total resistance | 3 Ohm |
| Heating time | 1.5 - 2 minutes |
| Point load | up to 120 kg, high tensile strength |
| Type of heating | Analogue |
| Installation under covers | Yes |
| Life time | no restrictions |
| brand, model | VAZ Largus |
| Power | 55 Watt |
| Completeness | for one seat |
| Heating type | Built-in heating |
| Heater type | The wire |
| Installation under sheathing | Yes |
| Voltage | 12 - 13.5 Volts |
| Heated passenger seat | Yes |
Kit contents
- seat heating element - 2 pcs.
- connection adapter - 1 pc.
Procedure when the seat heating does not work
- Check the serviceability of fuse F16 (15 Amperes) in the mounting block. There is no relay in the seat heating circuit;
- Check the integrity of the wiring. Pay special attention to the wires under the seat and near the temperature sensor, which is located under the upholstery of the chair near the back;
- Check the operation of the button using a multimeter;
- Make sure that the thermostat is working correctly using the same tool. It is located under the cover between the bottom seat cushion and the backrest;
- Check the serviceability of the heating mat. You can measure its resistance (should be 0.5 - 5 Ohms) with an unoccupied and occupied chair. Or try to find a break in the heating threads by visually inspecting the heating mat.
It is worth noting that many Largus owners have encountered problems with seat heating. This is connected with the marriage mentioned in this information letter.
Have you encountered a similar problem? Let us remind you that other instructions for repair and operation of the Lada Largus can be found in this category, or use the search by content.
Key words: heating Lada Largus | Lada Largus seats
9
1
Diagnostics
Consistent diagnostics of this defect will help to identify the cause of the malfunction. First of all, you should make sure that the fuse responsible for the heated seats is intact. To do this, open the fuse box located in the lower left part of the instrument panel. Find fuse F5 15A (see photo), remove it and make sure it is intact.
If it is in order, you should make sure the button is working. When the ignition is turned on, the indicator should light up. As a rule, buttons very rarely fail, so if the indicator lights up, move on.
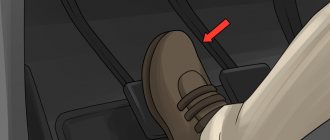
For the next step, you will need a multimeter and the ability to handle it. Almost all such devices have a function for testing electrical circuits. Now you need to get to the plugs that connect the car's wiring and the connectors on the bottom of the seat.
To facilitate access to the connections, it is recommended to unscrew the seat and tilt it in the desired direction.
After disconnecting the plug, you need to make sure that power is supplied to the car wiring wire when you press the button. Then “ring” the connector on the seat if the heating element of the whole device makes a characteristic sound.
Electrical equipment in a Largus car
The electrical circuit in a car provides for the presence of two global categories of devices: consumers of supply voltage and devices that generate current. These nodes are connected via cable lines comprising a single on-board network. The network in LADA Largus operates according to this principle. By the way, in this car there are no negative wires (to the edge of the battery), and the role of the negative contact is performed by the body itself.
Summary
The technology for installing heated front seats on the Lada Granta consists of two stages: installing heating elements under the factory seat covers and connecting them to the on-board electrical network. The proposed electrical circuit organization scheme raises doubts.
The manufacturer of the branded kit suggests connecting the heaters directly to the buttons, and powering them from the alarm control button. Since the circuit is quite loaded, it is better to organize the heating power through two relays with a separate fuse. It is also advisable to replace the buttons - they do not indicate the operating mode.
In the first part
In this article, I described the introduction of a set of heating elements from the Alamara into the Granta seats. In the second part I will try to describe how we can connect them to the car’s on-board network. Let's figure out the connection together. Many connect heating through one or two relays. I had a small diagram included with the wiring harness for connecting the heating. There were no relays marked on it, just as there were no relays in the wiring itself. And the power was taken from the alarm connector. It was also indicated there that it is necessary to replace the original 5 A fuse of this circuit with a more powerful one - 10 A. Let's check if such a connection is safe: After installing the heaters in the chairs, I connected them to a powerful 12 V power supply to check their functionality . At the same time, I decided to understand the connection in more detail and make sure that this circuit is reliable and correct. I connected an ammeter to the circuit and measured the amperage under load. You can see the results in the photo:
As you can see above, with a heating power supply load for one seat, the current consumption is in the range of 2.4-2.5 A. We look at the maximum load current of our heating button - it is equal to 5A (Stamped on the button itself). That is, the current reserve for our button is quite large. The conclusion that follows is that the buttons can be freely used without a relay.
Read more: Peugeot 308 trunk photo
Next, you need to find out the total amperage of heating consumption on two chairs. Turn it on and measure it.
We see that the amperage did not go beyond 5 A. It follows that the recommendation in the wiring diagram is correct. That is, you can take the plus (with the ignition on) from the alarm connector and increase the fuse rating of this circuit by 5A. But I decided not to pull the wires so far, and took the plus from the connector for adjusting the heater blowing speed. There is a wire with a thicker cross-section than on the emergency gang, and there is no need to pull it through the entire panel.
Now after the theoretical part, let's get down to business:
It is most convenient to connect the wiring with the seats removed. First of all, we need to remove the plastic floor tunnel. It is secured with five self-tapping screws. To begin, unscrew two screws on the right and left of the tunnel. Their location can be seen from the photographs:
130 rub.
- Description
- Reviews (1)
- Question answer
Button for turning on heated seats Lada Granta / Kalina-2 / Priora with power indicator, 5-pin
Lada Largus. Construction, maintenance, repair
repair book free
Auto repair manual for VAZ Lada Largus in electronic form. The manual will always be at hand during car maintenance and repair; to do this, just download it for free to your tablet or phone in pdf format.
Before using the car manual, check the year of manufacture and engine of the car.
Russian language
Format: pdf
Size: 44.8 Mb
File downloaded 1123 times
Download link , confirm that you have read the terms of use and download the file to your device. Please write to us if you encounter any difficulties with downloading. We will try to resolve the problem and respond to you as quickly as possible.
Learn more about how to download a book on repairing VAZ Lada Largus for free.
Yes, you can download the Lada Largus book for free. Device, maintenance, repair . This does not require any additional steps other than downloading the file directly.
Tips for motorists
Finally, such a function as heated seats has appeared on domestic cars. This provides additional comfortable conditions when operating machines in the cold season. Unfortunately, all the positive aspects of its use end when it fails to work. The culprit of such a situation may be a “trifle” that any driver can handle. But there are also cases when you have to contact a qualified specialist.
Signs of heating problems and their elimination
The fact that the heating does not work on the car is evidenced by the lack of heat in the seat cushions of this car. This problem can manifest itself like this:
- There is no heating on one of the seats;
- Failure to heat both seats.
In the second case, the search should begin by checking the serviceability of fuse F16, which is designed for a current of up to 15 Amperes. This can be easily done with a measuring device in resistance measurement mode, or simply replace it with a working one. If the fuse-link burns out again, you should look for a short circuit in the circuit. If replacing the fuse has not made any changes to the heating system, the search continues.
Under the car seats there are connectors with wires that supply power to the heaters. They should be turned off and checked with a multimeter or a test light for the presence of power with the ignition and the seat heating switch on. There is a separate switch for each of them. If power is supplied to the connector, but there is no heating, the fault is in the heater itself.
The cause of failure may be a break in the nichrome heater wire. Sometimes you can restore this contact yourself, but you will need to disassemble the car seat cushions. If one of the two airbags fails, check the condition of the connector on which power is distributed to the back and seat of the chair. It is here that loss of contact most often occurs, which can be easily restored.
When there is no power at the connector, you need to check the serviceability of the switch. It is installed on the outer trim of the sidewalls of the front seats. To check or replace it, you will have to partially disassemble this casing. There are three wires connected to the switch; the one that connects to switch terminal number two supplies power to the heaters.
Failure may be caused by unsatisfactory operation of the thermostat, which is installed directly in the heater. The operating principle of these devices is that they turn on at a temperature of 250C and turn off at 310C. It can only be checked after disassembling the pillows.
When frost sets in, we actively begin to use the “warm options” of the car. Probably the most popular of these is heated seats. The article discusses possible malfunctions that may occur with Largus heated seats.
Battery, generator in Largus
These devices, as already indicated, appear as network power sources. In Lada Largus, the entire complex of electrical equipment operates at a voltage equal to the standard 12 Volts. Each of the current collectors is connected to the battery via cable lines. This is necessary to ensure that the vehicle can continue to operate if the generator set fails. The first start of the engine is possible precisely due to the presence of the battery. For the universal LADA Largus, the manufacturer uses lead batteries, which are maintenance-free devices. They do not imply subsequent additions of electrolytic fluid. If the battery is completely discharged and it is not possible to recharge, then such a product is unconditionally replaced.
The LADA Largus generator comes to life thanks to a belt drive installed on the pulleys of the motor and the unit considered here. Electricity is generated only while moving. At the same time, the battery is recharged.
This is interesting: Control unit for the heating and ventilation system Lada Granta
Description
You can buy a VAZ Largus heating element on our website. The seat heating element of the VAZ Largus is made according to the forum: length of the heating cable - conductor resistance - mains voltage from the battery. This means that a heating filament of a given length, at a voltage of 12.0-13.7 V, is physically unable to reach a temperature higher than 53°C. Thus, the possibility of the product catching fire is completely eliminated. A special resistive alloy made of alloy steel and fluoroplastic insulation is used as a heating element. Steel adds flexibility and strength to the alloy, which in turn extends the life of the heating element to 10 years. The mat shell is made of non-flammable material. The seat heating element is designed for one LADA (VAZ) Largus seat.
Ignition system in Largus
Now the “switching baton” is passed to the ignition coil. This element directs high voltage power to the spark plugs and does this according to a specific algorithm. Plugs are necessary to create a spark inside the combustion chambers, which leads to ignition of the mixture. To make the combustion process possible and occur with sufficient efficiency, the coil generates a voltage reaching 30,000 V. The coil is powered from a standard 12-volt network.
Tips for motorists
Finally, such a function as heated seats has appeared on domestic cars. This provides additional comfortable conditions when operating machines in the cold season. Unfortunately, all the positive aspects of its use end when it fails to work. The culprit of such a situation may be a “trifle” that any driver can handle. But there are also cases when you have to contact a qualified specialist.
Signs of heating problems and their elimination
The fact that the heating does not work on the car is evidenced by the lack of heat in the seat cushions of this car. This problem can manifest itself like this:
- There is no heating on one of the seats;
- Failure to heat both seats.
In the second case, the search should begin by checking the serviceability of fuse F16, which is designed for a current of up to 15 Amperes. This can be easily done with a measuring device in resistance measurement mode, or simply replace it with a working one. If the fuse-link burns out again, you should look for a short circuit in the circuit. If replacing the fuse has not made any changes to the heating system, the search continues.
Under the car seats there are connectors with wires that supply power to the heaters. They should be turned off and checked with a multimeter or a test light for the presence of power with the ignition and the seat heating switch on. There is a separate switch for each of them. If power is supplied to the connector, but there is no heating, the fault is in the heater itself.
The cause of failure may be a break in the nichrome heater wire. Sometimes you can restore this contact yourself, but you will need to disassemble the car seat cushions. If one of the two airbags fails, check the condition of the connector on which power is distributed to the back and seat of the chair. It is here that loss of contact most often occurs, which can be easily restored.
When there is no power at the connector, you need to check the serviceability of the switch. It is installed on the outer trim of the sidewalls of the front seats. To check or replace it, you will have to partially disassemble this casing. There are three wires connected to the switch; the one that connects to switch terminal number two supplies power to the heaters.
Failure may be caused by unsatisfactory operation of the thermostat, which is installed directly in the heater. The operating principle of these devices is that they turn on at a temperature of 250C and turn off at 310C. It can only be checked after disassembling the pillows.
Other current consumers in the on-board network
The electrical circuit of the Lada Largus car contains the following current collectors:
These devices are not mandatory, but they increase driver comfort, elevating the status of the car to a higher rank. With the inclusion of these components, the load on the generator unit increases, which implies an increase in fuel consumption.
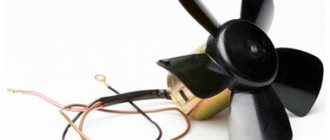
Fan replacement
If the stove fan stops working, or it makes strange sounds, then it is necessary to dismantle it, clean it or replace it. However, you should not rush to replace it; first you need to make sure that the brushes of the mechanism are intact, in which case replacement will not be required. Getting to this part is not so easy, but for cars with the Lada “tenth” family design, there is a time-tested reliable way to get to the fan:
- Release the right side of the instrument panel by unscrewing the eight screws, then the panel must be lifted.
- Afterwards it is necessary to remove the standard sound insulation of the engine shield.
- Next, you will need to take a position in the cabin so that your shoulders rest on the mat; this is the easiest way to reach the fan.
Removing the fan is quite simple. All you need is the necessary tools and a little time. By unscrewing the three screws of the casing cover and removing the frame of the radiator pipe seal, you can remove the device. But before changing a part, you need to determine whether it works or not.
After all, it often happens that a dismantled fan spins and functions normally, but as soon as it is put back in place, it immediately ceases to fulfill its direct duties. The reason for this is most often accumulated small particles that prevent normal contact in the mechanism.
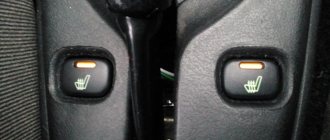
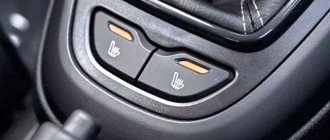
Illuminated seat heating buttons Lada Largus and XRAY
April 15, 2016 LadaOnline 23,362
If we talk about heated seats on the Lada Largus, then it is worth noting two things. The first is the unusual location of the heating button, on the side of the seat. Secondly, there is no indication of heating operation. The most interesting thing is that there is an LED in the button, it’s just not connected. There is no backlighting of buttons on the Lada XRAY either (both cars have a lot in common with Renault).
With a simple modification (5 minutes on site), you can use an existing LED, for this you should:
- Remove the button by prying it off with a small flathead screwdriver;
- We connect contacts A1 (“plus” of the LED) and B1 (yellow-black wire) in the plug using a jumper from a piece of wire;
- Snap the button into place.
Now the backlight of the seat heating button will light up after turning on the ignition, and go out when you press the button.
If you want to change the operating mode of the LED, you will have to connect the +12V wire to pin A1 of the block. For example, connect A1 to the +12V wire from the dimensions (blue wire), then the button backlight will light up:
- with the ignition off and the lights on (regardless of whether the heating is on or not);
- when the ignition is on and the heating is off (it will also go out when the heating is activated).
You can get more connection options only after you solder the LED leg to pin A3. Then A3 will be “minus”, and A1 will be “plus”.
By the way, the backlight of the seat heating button does not work from the factory not only on the Lada Largus and XRAY, but also on the Nissan Almera, which uses a similar seat design.
Let us remind you that there are also other very simple upgrades that you can do yourself, for example, replacing the washer nozzles with fan ones.
Photo: XaKeRo4ek in-flight magazine
Keywords: interior lighting Lada Largus | Lada Largus seats | heating Lada Largus | interior lighting lada xray | heating lada xray | lada xray seats
11 0
xn--80aal0a.xn--80asehdb
Remedies
If you find a blown fuse, replace it with a new one from the spare set, or buy a similar one. But here it’s worth thinking about why the old one burned out; maybe there’s a short circuit somewhere in the circuit.
If there is no indication when turned on, you should replace the button with a new one, because this part cannot be repaired. Carefully remove the toggle switch from its seat, disconnect the plug and replace the part.
If checking the seat reveals a malfunction of the heating element, you can handle it yourself. But to do this you will have to disassemble the seat by removing the top trim. Underneath you will find a glued spiral. By visual inspection, try to find the damaged area. Typically, the thread is burned out or broken.
After carefully stripping the ends of the element, twist them together, first extending the soldered parts with another conductor. This could be a piece of thin copper wire. Be sure to insulate the connection to avoid fire.
If there is no power to the car wiring, the best solution is to contact a service center, since it is quite difficult to find out the reason on your own in this case.
Mounting block relay in the engine compartment
| Convoy | Name | Consumers |
| K1 | Cooling fan high speed relay (for vehicle with air conditioning) | Cooling fan motor |
| K2 | Air conditioner relay | Air conditioning compressor electromagnetic clutch |
| K3 | Low speed cooling fan relay (for vehicle with air conditioning) or cooling fan relay (for vehicle without air conditioning) | Cooling fan electric motor (for a car with air conditioning - through a resistor) |
| K4 | Fuel pump and ignition coil relay | Fuel pump and ignition coil |
| K5 | Engine control system main relay | Oxygen concentration sensors (heating circuit); speed sensor; fuel injectors; adsorber purge solenoid valve; relay windings K1, K3, K2; Engine control ECU |
| K6 | Not used | |
| K7 | Fog light relay | Fog lamps |
| K8 | Heater Fan Relay | Heater fan motor |
In order to replace fuses or relays, you need to disconnect the negative terminal from the battery.
To access the fuses and relays in the engine compartment, press the three latches
Removing the cover of the mounting block
A faulty fuse is determined by a blown jumper visually or using a tester.
To remove the fuses, you can use tweezers, which are located on the cover of the interior block (Fig. 3).
A new fuse or relay should be installed only after the cause of its operation has been found.
It is necessary to determine why the overload occurred in this circuit.
DIY seat ventilation: testing a kit from the store
August 15, 2022 Not all cars, even expensive ones, can boast of car seats that are equipped with built-in ventilation systems. And if the heating problem has lost its relevance, then you can’t just install ventilation on the car. It was all the more interesting to get acquainted with the “Emelya UK-Lux” kit for 7,000 rubles from the “do it yourself” category, which allows you to equip one seat with both ventilation and heating.
The power of two fans (set for one seat) is about 25 W. Heating uses more - about 70 W. For comparison: Largus’s native heating consumes 60 W.
Installation kit: 1 — vibration damping gasket for the fan; 2 - adhesive plaster; 3 - adhesive tape; 4 - nozzle and corner; 5 - heating element; 6 - fan; 7 - air duct; 8 — wiring harness; 9 — 3D fabric. Installation kit: 1 — vibration-damping gasket for the fan; 2 - adhesive plaster; 3 - adhesive tape; 4 - nozzle and corner; 5 - heating element; 6 - fan; 7 - air duct; 8 — wiring harness; 9 - 3D fabric.
Wind, wind, you are powerful...
A lot of fuss. You need to dismantle the seat, remove the trim from it, carefully mark the holes for the injectors, taking into account the shape of the standard frame. If you are planning to install this ventilation, we recommend taking photographs of individual stages of work so as not to get confused when assembling the seat: it is not so simple. And when marking the seat, a metal spoke won’t hurt - it’s easier to avoid getting the cutter into a spring or other undesirable place. The kit packaging contains numerous photos showing the stages of the installation process. But they don't make the task much easier.
We do not describe the details of the electrical connection. It is quite difficult to get confused in several wires, and the specific location of the switches is determined mainly by the characteristics of the car model and the desires of the owner.
It is necessary to route the piping around the springs and seat frame on the back side of the foam. Allowance must be made for movement under load. Piping must be routed around the springs and seat frame on the back of the foam. Allowance must be made for movement under load. The fans are installed separately on the backrest frame and the seat cushion frame. The instructions unobtrusively recommend making ventilation holes or sewing a window with a mesh for air intake if the back cover is sealed. The pillow doesn’t need this, but we’ll hold off on altering the back for now.
The fans are installed separately on the backrest frame and the seat cushion frame. The instructions unobtrusively recommend making ventilation holes or sewing a window with a mesh for air intake if the back cover is sealed. The pillow doesn’t need this, but we’ll hold off on altering the back for now. The 3D ventilation fabric included in the kit is cut out onto the foam filling of the seat, secured with tape. In this case, you need to press the fabric tightly against the seat and take into account the location of the standard ties. The 3D ventilation fabric included in the kit is cut along the foam filling of the seat, securing it with tape.
In this case, you need to press the fabric tightly against the seat and take into account the location of the standard ties.
Installation of heated rear seats on LADA cars
07 September 2022 LadaOnline 29 855
The option “Heated rear seats of a car” is no longer uncommon; it can be found in the list of equipment even for budget foreign cars. AvtoVAZ is constantly improving its LADA models, but the turn has not yet come to heating the rear sofa. Let's figure out how to equip your car with this useful function with your own hands.
Installation and connection of heated rear seats for all LADA cars (XRAY, Vesta, Largus, Granta, Kalina, Priora and Niva 4x4) is carried out in the same way. There are no fundamental differences. In this example, the modification process is shown on a Lada Priora car.
Installation
Required:
- kit “heated front seats”, for example, from a VAZ 2110 or Priora (article 2170-6513010-03);
- seat heating control buttons (for example, those from the VAZ 2110 have article number 2110-3709710);
- relay 4-pin (1119-3747210-10);
- wires.
Installation of heating mats:
- Remove the rear sofa and rear seat backs (instructions for XRAY, Vesta, Granta/Kalina).
- I removed the trim from the seats (held on by rings).
- Insert heating into the backrest and sofa.
- Install the seat trim in the reverse order.
We install buttons for heating the rear seats in a place convenient for you. For example, in a floor tunnel.
Connection
Rear seat heating connection diagram:
It is better to take contact “B” from a protected high-current circuit with a fuse. Contacts “A” and “C” can be found in the ERA-GLONASS lighting lamp, in the ISO radio or cigarette lighter connector. Before starting the connection, do not forget to disconnect the negative terminal of the battery.
Installation and connection of heated rear seats on a Lada Vesta on video in several episodes:
Let us remind you that we previously told you how to connect heated windows/mirrors to an additional alarm channel on Lada Vesta and XRAY, as well as how to turn on the heated windshield through a separate button.
Photo: LadaRacing in-flight magazine
Keywords: heating Lada Vesta | heating lada xray | heating Lada Largus | heating for Lada Priora | heating Lada Kalina | heating Niva | heating for Lada Granta | Lada Vesta seats | lada xray seats | Lada Largus seats | Lada Kalina seats | Lada Granta seats | Lada Priora seats | Niva seats | Lada Vesta accessories | lada xray accessories | Lada Granta accessories | Lada Kalina accessories | Lada Largus accessories | Lada Priora accessories | Niva accessories | universal article
3 0
xn--80aal0a.xn--80asehdb
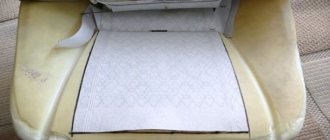
How to install
The VAZ Largus seat heating mat is installed under the covers or under the seat upholstery. When installing a heating mat under car seat covers, the element is fixed to the seat using double-sided tape. The heating is glued to the foam base of the chair: one heater to the back, the second to the seat. The adapter is included.
Possible installation location:
- To the driver's seat
- To the passenger seat
- To the rear seats
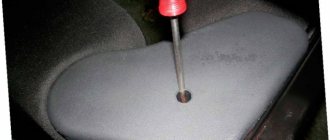
Installation photo
Chair mounting diagram
Get a free specialist consultation
Steering column switches for Lada Largus
The switches that are located under the steering wheel on a Lada Largus car are used to turn on the wipers, turn signals, turn on the signal, as well as the headlights and high beams.
The left steering column switch on the Largus serves to sound the horn, turn on the side lights, low beam, high beam and fog lights. And also for turning the turn signals on and off.
The right steering column switch has the main functions of controlling the wipers and windshield washer.
Common causes of heating failures
Many automakers install heating as standard equipment. It consists of a heating element, a shell made of carbon material or thermal fiber, connects directly to the vehicle’s on-board network and is mounted in the back and seat. Heating is controlled by temperature sensors.
During operation, devices are subject to constant mechanical stress and stress (the weight of the driver and passengers, pressure from the foot, hand, cuts, burns), so wire breaks in the heating element are a fairly common occurrence. Their restoration requires dismantling the chair and upholstery. In order not to do unnecessary work, first of all you need to make sure that other parts are intact.
A fuse is one of the most popular reasons for calling a service center to repair a car heating system. It protects electrical circuits from short circuits. If it is burned out, the heating system will not work until the element is replaced. Too frequent burnout indicates an electrical problem and is a reason to contact a service center.
Switches are another reason why heat may not be reaching the backrest and seat. In budget car models, the standard equipment is not particularly high quality, so similar problems arise. The switch stops sending the command to activate heating.
Each of these breakdowns can be easily fixed at home in the garage. If the car is under warranty, you are not good at such work, you don’t have time, or the case requires the intervention of a specialist, we recommend having the heated seats repaired in our auto center.
Principle of operation
This arrangement of switches will be the most successful from the point of view of ergonomics and comfort. As a result, after painful searches and reflections, I noticed that this board should fit perfectly into the tunnel setup.
When the button is pressed, power is supplied to its winding. Installing heating elements in the rear seats takes about the same time. The power wire was led directly from the battery through the standard hole on the left in the engine compartment into the passenger compartment. The driver's license will have to be removed to put everything back in place. It is enough to install the heating sheet and the relay in their original places. The connection diagram will remain the same, that is, installation will not cause any additional difficulties. I plopped down on the icy seat for a couple of seconds, started the car, pressed the heating button, and within a couple of minutes the seat was already warm.
And here it is, the highest pleasure - to sit in a warm chair when there is frost all around. Cheap DIY steering wheel heating.
Delivery of goods is carried out throughout Russia and the CIS:
1. Russian Post (from 350 rubles and above)
Delivery to all regions of the Russian Federation and CIS countries
2. Transport Companies (from 350 rubles and above)
Delivery throughout Russia and the Republic of Kazakhstan
- TK Energy (nrg-tk.ru)
- TC Business Lines (dellin.ru)
- TC SDEK (www.cdek.ru)
- TK PEK (pecom.ru)
- TK KIT (tk-kit.ru)
3. Pickup
The order can be picked up at the office at Tolyatti, 40 Let Pobedy 38, TD “Malachite”, 1st floor.
The waiting time for sending an order in our online store is approximately 2-7 working days, large orders 7-14 working days. days; color of bumpers, mirrors, body parts, spoilers, etc. 7-14 work. days; sewing covers, upholstery, steering wheels, gear knobs, EVA mats, etc. 7-14 work. days.
During this period, we will send you a tracking number by email. email to track the parcel en route.
Payment can be made in the following ways:
1. Payment to a Sberbank card
You can pay using the SBERBANK-Online application and other Bank applications.
After placing an order, making payment, do not indicate comments , we ourselves will understand by the amount of the order and the name of the sender. After receiving the funds, the status of your order will be changed to paid until 17.00 of the current day, or from 9.00 of the next Moscow time.