general information
Like the vast majority of modern cars, the Lada Granta is equipped with a fairly simple clutch, which contains only a few elements.
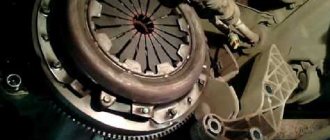
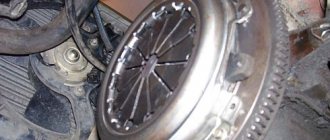
The clutch (also called the clutch basket) includes a housing, a driven disc, and a throwout bearing. The casing, in addition to itself, also includes a pressure disk; in addition, a complex part is the driven disk, consisting of a damper, friction linings and a ring.
Each Granta is equipped with a closed-type single-plate clutch, which has a special element designed to dampen vibrations generated during rotational moments during shifts. The coupling is ensured by dry friction between the driven disc and the friction linings, which is why this type of clutch is called dry.
In addition, clutches on Grants are devoid of gaps between the release bearings and the legs of the pressure springs located in the casing, which is their main distinguishing feature compared to all previous modifications.
Why has the clutch pedal become stiff?
If the car is completely new, then the so-called drive wedge may have occurred. This is the easiest fault that you can adjust yourself. But if we are talking about an older car, then perhaps the problems are more serious and affect the entire unit.
Most often, such problems occur due to poor performance of the diaphragm spring. It is possible that the fork is jamming or the bearing being pressed out is jammed. Cable scuffing often occurs. The driven disk itself may also become jammed.
If the car is in use for a long time, then cracks may appear on the drive fork. You also need to understand that over many years of driving a car, a large amount of dirt could simply accumulate in this unit.
Types of faults
All types of clutch malfunctions installed on Grants are divided into the following groups:
- The clutch cannot be completely disengaged. The reasons for this type of breakdown lie in incomplete pedal travel, vibrations and possible jamming in the driven disk hub, warpage and distortion in the pressure disk, loose rivets and faulty friction linings. In addition, such a problem is often caused by a malfunction of the drive cable, a breakdown of the compensation mechanism, or disturbances in the mechanism that compensates for the wear of the driven disk linings.
- The clutch cannot be fully engaged. This breakdown can occur due to wear of the friction linings or due to their oiling. Other reasons for this malfunction include an oily surface of the flywheel and clutch basket and jamming (or damage) on the clutch drive.
- The clutch works with jerks. This violation is caused by oily friction linings, as well as an oily flywheel and clutch basket, a stuck drive and a damaged pressure plate surface.
- An increase in noise level when the clutch is engaged is caused by a malfunction of the damper springs.
- An increase in noise level during clutch disengagement is caused by a leak from the release bearing, as well as its damage or wear.
As a rule, if the clutch pedal fails and clicking and creaking sounds are detected during its operation, most often you just need to replace the clutch cable. Exactly how this procedure is performed will be discussed below.
What to pay attention to
There are certain signs that the clutch on the Lada Grant has failed and action needs to be taken. It is worth paying attention that if the car has just been purchased, the pedal will be pressed quite easily. If this requires great effort, then this is the first evidence that the clutch needs to be adjusted or replaced.
It is also worth paying attention to the appearance of extraneous squeaks at the moment when the driver presses the pedal. In addition, it should not twitch when the car owner does not touch it.
Most often, car enthusiasts are faced with the fact that the pedal travel becomes too tight. It is worth considering in more detail the reasons for this problem.
Replacing the clutch on a Lada Grant (robot)
The process of prevention and replacement is similar to that described above. Provided the recommendations are followed, the repairman will not have any problems with the installation.
The main task is not to damage the upper actuator when dismantling/installing the automatic transmission. To make disassembling the automatic transmission easier, first remove the subframe cross member. We lower the two engine mounts, remove the automatic transmission, and replace the clutch. When finished, assemble the structure in reverse order.
Preparation for repair
To remove and subsequently replace the clutch, prepare a set of tools consisting of:
- center punch;
- extension cord;
- funnels;
- heads (8, 10, 15, 17, 19 and 30 mm);
- high head (13 mm);
- heads Torx E12 and Torx E14;
- Phillips and flat screwdrivers;
- pliers;
- curved spanners (8 and 13 mm);
- straight spanners (17 and 19 mm);
- two adjustable stops;
- metal brush;
- ratchet wrench;
- caliper;
- stands;
- hammer;
- jack;
- balloon wrench;
- torque wrench;
- centering mandrel.
In addition, you will need to apply certain parts and consumables. So, you will need CV joint-4 lubricant, a guide pin M12×1.25 mm, transmission oil, wood blocks, a technical container, a hose, rags and the clutch itself.
Removing the clutch
Replacing any part begins with dismantling the old one. When performing this manipulation, the car must be placed on a lift, after which the gearbox is dismantled. Then you should mark the marks on the flywheel, and the bolts securing the clutch should be unscrewed; at this time it is recommended to hold the flywheel with a screwdriver. Next, the clutch basket is removed from the engine flywheel together with the driven disk.
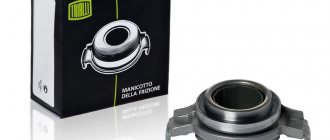
The final stage of work is removing the release bearing. First, pry up the ends of the spring holding it with a flat-head screwdriver, and then remove the part from the guide sleeve. Next, the bearing and coupling itself are removed, then the spring that previously held it should be removed.
Symptoms of malfunction, diagnostics, solutions
| Sign | Cause and remedy |
| Short pedal stroke | Adjust the length of the cable. Check the integrity of metal fibers. Most likely delamination or bending. |
| The clutch drags at speed, it is difficult to shift into higher gears. | The flywheel is bent or damaged. The gripper teeth are worn. Replacing the flywheel and related consumables. |
| Slipping when activating first gear and increasing speed with the accelerator pedal. | Replace friction linings, disk, clean the drive from old grease |
| Sharp jerks when turning on / changing gears. | The pressure plate is damaged, replace the basket. |
| Whistle when activating first and subsequent speeds | Install a new release bearing |
| Crackling, knocking, crunching noise when shifting into up/down gears | Wear out the damper spring, replace it with a new one, lubricate the entire drive mechanism. |
| The lever falls, falls, rattles | Excessive stretch of tensioner. Replace with a new one, install bushings. |
Selection of components
The clutch life on Grants depends on the operating conditions in which the car is located, and therefore can have significant differences. When using the car sparingly, the clutch is changed after 100,000 km. One of the most common types of clutch installed by the Volzhsky Automobile Plant is LUK clutches.
As a rule, clutches are sold in the form of kits, which include a clutch disc and basket, as well as a release bearing. The approximate cost of clutches for Granta starts at 2,000 rubles and can vary significantly in a particular region.
To purchase an original kit and not a counterfeit, buy parts only in specialized retail outlets, based on real customer reviews, or order the kit directly from the manufacturer (for example, using the Internet). Sometimes clutches are assembled from components made by different manufacturers.
Reviews
| № | Positive |
| 1. | Vladimir: I have been successfully using the machine for two years now, there are no comments on the work. Investments are minimal, consumables, filters, oils. |
| 2. | Gennady: I attend every scheduled maintenance according to the schedule. The car is in good condition, the technician is carrying out computer diagnostics. Soon the mileage will be 90,000 km, I hope that repairs will occur after 105,000 km. |
| 3. | Vasily: at 60,000 km I replaced the cable, it started to creak, I didn’t lubricate it, I bought a new one. There are no more comments, everything works properly. |
| 4. | Ignat: I have no special complaints about the car. Of course, Lada is not ideal, but for the budget segment it is the best solution. |
| 5. | Dmitry: at 80,000 km I replaced the repair kit for the bushings on the clutch pedal, it started to creak. Additionally, I lubricated the cable. My recommendations to motorists. All work was carried out independently, without the help of service station workers. |
| 6. | Kirill: I replaced the clutch at 95,000 km, I think that this is a very good mileage for a domestic car. The installation process is not complicated, I did the work myself. Special thanks to the store manager for recommending quality spare parts. |
| 7. | Georgy: replaced the release bearing at 105,000 km, mileage as in the instructions. There are no problems with the engine, the car runs like a watch. |
| Negative | |
| 1. | Victor: my bearing fell apart at 50,000 km, it was replaced at a service station. After 10,000 km the cable creaked and was also replaced with a new one. The Granta model is crude, has many flaws, I do not recommend purchasing it. |
| 2. | Vyacheslav: over the past six months it has undergone unscheduled repairs twice. Initially, the basket flew off after a problem with the starter. |
| 3. | Kirill: despite the manufacturer’s warranty, the clutch basket has already flown for 60,000 km. Contacted the service for diagnostics and repairs. The manufacturing quality is low, the actual service life of the parts is lower than stated. |
Replacing the clutch cable
To replace the clutch cable, you will need to perform the following manipulations sequentially:
- unscrew the nut that secures the cable to the pedal assembly (it is located under the panel);
- remove the stopper from the braid pin;
- then use pliers to remove the locking clip;
- then remove the pedal axle;
- remove the pedal bracket spring;
- Use pliers to remove the tip stop;
- release the pedal from the cable end;
- Next, you need to remove the cable sheath seal from the engine compartment;
- pull the end of the cable connected to the fork towards you, and then remove it;
- dismantle the tip driver;
- dismantle the guide bushing;
- to complete the work, it will be necessary to pull the cable through the hole located between
- engine compartment and car showroom.
Before installing the cable, it is lubricated, and a small amount of machine oil is poured between its shell and itself. Install the cable, carrying out actions similar to its removal in the sequence directly opposite to dismantling.
Clutch installation
Before you begin assembling the clutch, you must wash each removed element in kerosene. Then apply a thin layer of CV joint-4 lubricant to the guide sleeve of the release bearing and to the spline of the input shaft. The installation of parts begins with the release bearing, after which the clutch fork, spring and bushing are installed.
Next, the clutch is centered using a special frame inserted into the hole in the crankshaft end, while the driven disc is placed on the frame so that the protrusion located on the hub faces the gearbox. After this, the clutch basket is installed, and the centering frame is removed. Then you will need to install the gearbox in its proper place.
After installation, check and monitor the gear shifting process; they should turn on clearly, without clearly audible extraneous crunching sounds. In addition, ideally the car will move away without jerking.
Are problems with gearbox operation always associated with an unadjusted clutch?
Mechanical transmission problems do not always indicate a clutch that needs to be adjusted. If the clutch seems to be at fault, check the list above. We will also look at other problems with the manual transmission. Frequent malfunctions are:
- Gearbox noise. In neutral, this happens when the oil in the box is reduced or contaminated or the bearings wear out. In transmission, the problem may be in the synchronizer, licked teeth and dead bearings. When changing gears, the problem may be an unadjusted clutch, bearings, synchronizer, misalignment of the clutch housing and crankshaft, as well as deformed clutch forks and gearbox.
- Vibrations. Typical for internal combustion engines with disrupted operation in neutral or when fastenings are destroyed (including self-unscrewing of bolts).
- Leaking oil. The reason is most often in oil seals, gaskets, excess oil level or deformation of the transmission itself.
- The gear shifts with difficulty or does not shift at all. The problem here can also be in the clutch, as well as in other factors - contamination, lack of oil, wear of couplings, springs, gears.
- The transmission turns off by itself. There are many reasons - synchronizers, grooves, springs, spontaneous loosening of bolts and others.
Clutch adjustment methods
There are two methods for adjusting the clutch. When regulating it in the first way, you must:
- pick up the tip, after which it is pulled forward to the maximum possible value;
- Use a caliper to measure the distance between the leash and the fork, normally it is 27 mm;
- If you find any problems, adjust the length of the cable by tightening the thread;
- Next, you should press the clutch three times and make sure that it functions normally.
If problems arise, take new measurements with a caliper (the distance from one extreme point to the other cannot exceed 146 mm). If this indicator is exceeded, a new cable must be installed.
The second adjustment method is an alternative, thanks to which you can adjust the clutch without a caliper. The beginning of alternative adjustment is no different from adjusting the clutch in the first way. When the leash is snug against the fork, you depress the clutch three times, then open the hood to make sure that the leash is pressed to the metal as before? One of the mandatory conditions for adjustment is the complete absence of movement of the fork or its minimal mobility (not exceeding 2 mm).
Each car owner can use both the first and second methods, since the automatic adjustment system still will not relieve him of the obligation to periodically carry out the work described above. Remember - even with a properly functioning cable, you still need to open the hood of your car at least from time to time.
Don’t forget one more recommendation from experienced car owners: to make adjustments, don’t wait for obvious problems to appear in the clutch. It is best to carry it out regularly (once every 10,000 km), because adjustment will help you protect yourself from clutch problems. And when carrying out this procedure again, do not forget to also evaluate the condition of the cable. If cracks or thinning are found on it, it is recommended to replace the part immediately.
All steps from start to finish
Open the hood and find the gearbox. The starter will be located nearby. All nodes are covered with a filter that needs to be removed:
- Disconnect the negative terminal of the battery (key “10”);
- We disconnect in turn: the mass air flow sensor connector (oval), the adsorber valve (we press the tongue from below). We also loosen and remove the fastening tie for the “thick wire”;
Getting rid of unnecessary details
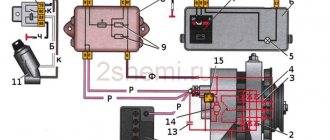
A “fork” will be attached to the top of the crankcase - a bent plate with a slot. This is the clutch fork (see photo).
Found the most important detail
Using pliers wrapped in electrical tape, try to pull the tip forward.
Clutch adjustment on Lada Granta (first method)
Here we will look at how to adjust the clutch on a Lada Grant:
- Grasping the end of the cable, pull it forward as far as it will go.
- Using a caliper, measure the distance from the fork to the plastic leash. The distance should be exactly 27 mm.
If everything is set up and checked, measure the clutch pedal travel.
We measure the free movement distance
The distance from the “top point” to the “bottom” should not exceed 146 mm.
If at the last stage it turns out to be more than 146, then the cable needs to be replaced.
Alternative clutch adjustment method (second method)
No calipers are needed here:
- Carry out step 1 as indicated above - pull the tip forward.
- Let go of the tip and look: if the leash does not fit tightly to the fork, screw it onto the rod.
- Press and release the pedal (3 times), repeat steps 1 and 2.
Achieve the following: when the pedal is not pressed, the leash should be pressed tightly against the metal, at the same time, the displacement of the fork should not be noticeable. Let the displacement be equal to 1-2 mm.
Clutch adjustment on the Lada Grant is carried out using any of two methods. And according to reviews, the need arises every 15,000-20,000 km.
How is the clutch adjusted?
So, how to properly adjust the clutch? The clutch of the modern VAZ model family has a clutch cable, along with which there are ratchet mechanisms in the structural unit. These cables do not provide for any clearance, which in theory does not imply the need for adjustment. However, the manufacturer insistently recommends performing periodic adjustment procedures on this mechanism.
To perform the adjustment on these cars, including the Lada Granta, you should stock up on a ruler (a caliper is also suitable) and a screwdriver.
The sequence of manipulations looks like this.
- Open the hood of the Lada Grant and install the clutch cable in its original position. To do this, move its lower edge forward until it stops. By moving the cable, you can feel the force created by the return spring. We do not pay due attention to this aspect and continue this manipulation.
- Taking a ruler or the same caliper, we measure the distance. The photo clearly shows the segment to be measured: between the beginning of the fork and the cable lead. For correct measurements, you will need to keep the cable in a stationary and certain position. The ideal measurement result would be 27 mm. When clutch adjustment is required, the actual parameter will differ from the stated standard. To achieve the required value (27 mm), rotate the cable lead.
- Having completed this action, insert the cable end into the groove of the fork, and then release the retained element. Please note that there is no gap.
- This completes the procedure. Now we move on to pressing the pedal multiple times to make sure the unit is functioning correctly. After completing a set of presses, we once again measure the distance along the cable and, if discrepancies appear, perform repeated adjustments.
The need to adjust the cable on Lada Granta, Kalina or Priora occurs regardless of its condition (new or has already spent a certain amount of service life).
When does the need for adjustment occur?
In such cases:
- when there are jerks from the start that are permanent;
- when an attempt to engage a gear is accompanied by a blow;
- if the pedal is stuck.
These are the most striking symptoms indicating the need for adjustment. Ideally, the level of the pedal should coincide with the brake. In this case, the full pedal travel is 125 - 135 mm. Practice shows that the stroke can be exceeded by up to 160 mm.
To properly adjust the pedal assembly, you will need to stock up on two wrenches with suitable parameters.
- Loosen the locknut holding the cable. It is located on the engine compartment side.
- Now use a wrench to rotate the second locknut to achieve the correct clearance.
- Upon completion of the process, be sure to tighten the first nut to the required torque.
Attention! If the pedal is adjusted with its position below the brake, then the moment the clutch engages will occur when the pedal itself “lifts” from the floor. When the level is above the brake pedal, seizure will occur at the end of the stroke.
We remind you that efforts should be made to achieve a uniform level in the pedal assembly (the author of the video is Time R).
Manual transmission diagnostics and repair services
The car transmission needs professional diagnostics: our auto center is equipped with the most modern equipment to detect and fix any problems. Computer testing makes it possible to accurately localize faults and determine ways to eliminate them. The employee will determine the cause of the breakdown and list the spare parts needed to restore the operation of the gearbox.
Gearbox repair is carried out in several stages:
- Diagnostics and removal from the car. After this, a complete disassembly and troubleshooting is carried out: a specialist determines the degree of damage to the parts and compiles a list of components that will have to be replaced. The owner can be present during disassembly and troubleshooting: the technician will tell you in detail about the identified damage and the cost of eliminating it.
- Installation of new components to replace worn ones. The employee will list the parts that urgently need replacement, and which it is desirable to replace in the near future.
- Assembling a manual transmission after repair and installing it on a car. After this, testing and running-in are carried out: the specialist will make sure that there are no more problems with gear shifting.
- Manual transmission repairs are completed by issuing a warranty card valid for up to 2 years. The service center bears full responsibility for the results of the employees’ work; the guarantee gives the right to eliminate repeated problems free of charge.
Replacing a manual transmission
A complete gearbox replacement is one of the most difficult types of car repair: this operation requires special equipment and tools, as well as the experience of specialists. It is necessary to change the gearbox in case of serious damage, when it is impossible to limit yourself to reinstalling only one part. To solve the problem at minimal cost, use the services of our service center specialists: you have dozens of completed orders on your account.
Replacing the gearbox is carried out with a careful selection of suitable spare parts: our technicians will install high-quality parts and carry out all the necessary settings. In many situations, a complete replacement is cheaper than a major overhaul; a specialist will suggest the most economical solution.
In order for the gearbox to last longer, it is necessary to carry out timely maintenance: this includes a professional inspection, replacing the transmission fluid, and eliminating minor problems. Replacing a manual transmission most often becomes the result of untimely and unprofessional maintenance: if the driver does not follow the manufacturer’s recommendations, the parts wear out much faster. Our employees will solve the problem in the shortest possible time. and troubleshooting will require very little cost.
Why should you contact us?
The Premium Color workshop specializes specifically in transmission repair: our auto center is equipped with all the necessary equipment to identify and eliminate problems with manual and automatic transmissions. It is beneficial to use our services for several reasons:
- Favorable prices for the installation of components, as well as for complete replacement of the gearbox. Fix any problems without extra costs, the technician will choose the most economical repair option.
- Highly qualified personnel. Our service center employs only experienced specialists who are well versed in typical malfunctions of domestic automotive products.
- Minimum lead times for orders. In order not to waste time waiting, you can call in advance and agree on a repair time with the technician. We are always ready to help you: call today and choose a convenient day.
Do not delay until later contacting a service center and troubleshooting transmission problems. Problems with gear shifting impair vehicle handling and can lead to accidents on the road. To avoid accidents and breakdowns with expensive repairs, call us and arrange a time to fix the problem. Check out our auto repair shop price list to make sure we offer affordable repairs.
Sources
- https://www.autosecret.net/lada-granta-vaz2190/transmissija-lada-granta/1356-snjatie-korobki-perekljuchenija-peredach
- https://avtozam.com/vaz/lada-granta/zamena-masla-v-korobke/
- https://remont-korobok-peredah.ru/uslugi/remont-korobki-peredach-lada-kalina-lada-granta/
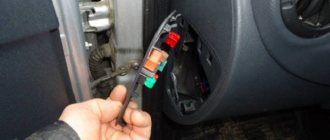
How to replace the cable in the clutch mechanism?
How to properly replace a clutch cable? Below are detailed aspects of the instructions to successfully replace the cable.
- First, we begin to unscrew the cable nut from the bracket, which is located under the dashboard. We perform this action using the key set to “8”, after which access to dismantling the bracket stop appears.
- We disconnect the locking bracket, which is located on the “finger”.
- Next, remove the body of the compensation device (use a screwdriver).
- We remove the fluoroplastic bushing from the pedal pin.
- We visually monitor the assembly element for wear. If such “artifacts” are present on the surface of the bushing, then we definitely replace it by pre-treating it with grease.
- We dismantle the cable seal, which is mounted in the technological hole of the frontal shield of the body (in the photo it can be seen from the engine compartment).
- Pull the cable end as you move until it is removed from the fork groove.
- Using the key “17” we “defeat” the nut by means of which the cable tip is held on the corresponding bracket of the transmission unit. To prevent the tip from turning, we use an additional key.
- Now we proceed to dismantling the cable end, after which we remove this element from the hole. The cable itself can also be removed.
- Having completed the indicated manipulations, we begin the installation of a new unit.
- First, we pass the cable into the previously designated hole in the front shield.
- We treat the bushing with a special compound and fix the wear compensation element on the corresponding pin.
- Now we attach the cable directly to the pedal and return the previously removed seal to its place.
- We move on to installing the tip on the LADA Granta transmission bracket. Screw the retaining nut with the required torque (do not overdo it).
- We remember the need to tighten the leash.
- We continue the installation procedure by moving the lower tip in the forward direction until a feeling of stop occurs.
- We hold the tip in the designated position and at the same time measure the distance that was illuminated by us earlier (more specifically: in the “leash-fork” section). If the parameter is incorrect, rotate the leash until the optimal value appears.
- We remember the need to lubricate the body of the leash before installing it in the knot. The surface in contact with the fork must be lubricated.
- The final action is to press the pedal to its full value multiple times. Then we again make a control measurement in the “fork – leash” sector and, if it deviates from the regulations (27 mm), we make a re-regulation. This completes the clutch cable replacement.
Features of correct adjustment of the unit
Quite often, clutch-related problems are solved by standard adjustments. However, such measures must be carried out based on the recommendations of specialists and experienced car owners. First of all, you need to turn off the engine. After this, just press the pedal several times and listen to the sounds. If no grinding or creaking is heard, then the adjustment continues.
If the Lada-Granta clutch pedal gets stuck or it moves jerkily, then its position needs to be adjusted. First of all, you need to completely squeeze it out with your hand. It is better not to use your foot, as in this case it will be much more difficult to feel minor jamming or, conversely, jerking at the moment when the lever returns to its original position.
If you manage to find out that the pedal twitches a little, then you need to arm yourself with a ruler and determine the distance from the floor to the pedal, or rather, the part that protrudes outward. After this, while continuing to hold the measuring device, the car owner must press the lever and wait until it returns to the same position. If the values on the ruler diverge or the distance is more than 14.5 cm, then in this case you need to make adjustments. It is worth noting that the full pedal travel should not be more than 146 mm. The cable guide cannot move in relation to the fork lever by more than 2.7 cm.
How do I replace the clutch assembly or its components?
Many are also interested in the question of how the clutch is replaced. Next, we will consider the features of replacing a disc or other elements in the clutch units of Lada Granta, Prior and Kalin. Choosing a clutch is not difficult, since the market is represented by many offers. This aspect is influenced not only by individual preference, but also by the price factor.
The disc replacement process is identical, regardless of the modification of the designated VAZ models, including the Lada Granta. Having decided on the choice of element, we proceed to the direct replacement procedure.
- The initial action will be to dismantle the LADA Granta transmission unit.
- If you plan to reinstall the pressure plate (basket), you will need to first mark the location of the flywheel and housing. This manipulation allows you to save balancing and install the disk in a position identical to the element previously located here.
- Next, we mount a special bushing (mandrel) into the central hole of the pressure element. If such a mandrel is not observed, then it is possible to dismantle the assembly without it, but you will need to hold the driven disk during removal in order to prevent it from falling out.
- To eliminate the risk of the flywheel turning, we arm ourselves with a locking component (screwdriver or mounting blade).
- We unscrew the 6 bolts that hold the basket on the flywheel. The action should be characterized by uniformity and without completely removing first one screw, then the second, etc.
- Now we remove the casing together with the driven disk.
- Having detected the presence of damage on the surface of the assembly elements, the next step is a complete replacement of the clutch.
- We focus special attention on the degree of wear of the friction linings on the disk in LADA Granta. When it is discovered that they are oiled or the rivets are deepening, we urgently replace such an element. We check the rigidity of the damper springs. If they are found to be damaged, the disk must also be recycled. We inspect the disc for runout. If its value exceeds 1 mm, then this fact means the part is unsuitable for use.
- We inspect the pressure element and the flywheel, especially the plane of their contact. Areas with scuff marks, signs of overheating and wear are strictly unacceptable.
- We study in detail the condition of the disc spring, on the surface of which traces of the indicated defects are also unacceptable. The contact points of the petals of this part to the bearing device (“release”), which carries out the process of disengaging the clutch of the disc with the flywheel, must be in a single plane. No defects are appropriate in this case, and the discrepancy should not exceed 0.8 mm. If this parameter is not maintained, then a complete replacement of the clutch is necessary.
- Don't forget to inspect the spring support rings. It also excludes the presence of any defects.
- When, based on the completed set of testing manipulations, the fact of the need to replace certain elements of the clutch assembly or the entire assembly structure has been identified, then before starting work it will be necessary to monitor the characteristics of the movement of the driven disk along the corresponding section of the transmission unit shaft. If, during movement, the fact of jamming, jamming, or other aspects that do not allow free movement of the disk emerges, then these negative factors must be eliminated without fail. When achieving such a result is not possible, you should resort to replacing the entire list of defective parts.
- When carrying out the installation procedure, it is imperative to take into account the issue related to the correct installation of the driven disk in relation to the pressure component of the basket.
- First, we center the disk, using the mandrel we previously designated for these purposes. This will require careful consideration to ensure the element is positioned correctly in relation to the flywheel.
- Now we fix the basket directly to the flywheel using the bolts indicated here. We proceed by analogy with the dismantling procedure in terms of ensuring reliable retention of the flywheel from the risk of turning.
- Do not forget about the correct tightening of the basket fixing bolts. The procedure involves an algorithm of actions with uniform screwing of each of the fasteners. It is impossible to fully tighten one particular bolt, since such an action may cause the basket to skew, thereby causing incorrect operation and uneven wear of the clutch elements.
- The next step involves removing the previously installed mandrel from the corresponding recess in the center of the flywheel.
- After this, you can attach the transmission unit to the engine block.
- Now we mount the lower end of such a part as the clutch cable to the corresponding bracket on the gearbox housing, after which we carry out the previously indicated adjustment. Do not forget to install the compensation device in its original position, which will allow you to return the clutch cable to its original position. This procedure is necessary so that the compensation device, shifted to its lowest position, can signal to the owner that the disc is worn out. Replacement of the clutch cable in the LADA Granta has been completed.
Replacing the release bearing Kalina 2, 1118, Cross, Sport
To make a replacement you will need to put your car on a pit or a lift. Repairs are also possible if you have reliable supports and a jack. It is worth noting that without a pit or lift, the replacement method without removing the box, which is described at the end of the article, is suitable.
How to remove the gearbox and release bearing on Kalina 2 (1.4-1.6 8kl) with your own hands
Replacing the release bearing on a Lada Kalina begins with dismantling the gearbox; this process is described in detail in step-by-step instructions with photos/videos. Perform the operations in order.
- Open the hood of the car and immediately remove the battery.
- Next, remove the air filter by unscrewing the clamp and disconnecting the fastenings to the body.
- The clutch cable is located behind the battery; you need to unscrew the nut and disconnect the cable from the fastener.
- Now disconnect the plug of the speed sensor wire, it is located behind the “engine”, in the area of the pipes.
- Next, find the upper bolts securing the gearbox to the engine and unscrew them.
- The last operations on top of the gearbox are unscrewing the starter and its terminals, as well as disconnecting the clutch cable and electrical wiring.
- Remove the front wheels and tighten the hub nuts. We disconnect the protection (mud flaps) under the wing.
- Immediately disconnect the terminal of the reversing lights wire.
- Nearby there is a suspension beam, first twist the rear nut with a 24mm wrench.
- Now we move on to the ball joints, loosen the nuts and remove them on both sides.
- On the same side of the manual transmission we find the oil drain plug, unscrew it and drain it into any container.
- Between the manual transmission and the engine there is a clutch protective cover. To remove it, unscrew the nuts around the perimeter.
- Let's move on to dismantling the gearshift mechanism. First, unscrew the two bolts and remove the cover.
- Then unscrew the screw that secures the linkage connection.
- The next step is to remove the wheel drive shafts from the gearbox on both sides.
- Let's return to the suspension. On the manual transmission side, it is necessary to unscrew the bolt securing the lever, and also disconnect the extension.
- Next, to remove the gearbox and replace the release bearing of the VAZ Kalina, unscrew the lower bolts securing the gearbox to the engine, as well as the front cushion. Before doing this, be sure to install a support under the engine.
- As a result, the housing of the high-speed unit (MKPP-2181) will be completely disconnected from the mating units, and it can be dismantled. First, use a sharp, wide screwdriver to separate the assembly from the engine.
- Then we manually dismantle the assembly. It is advisable to use a special telescopic stand or ask a partner for help, since the gearbox is not light. After removal, we proceed to replacing the release bearing on the Lada Kalina with our own hands.
How to change the release bearing on Kalina - step-by-step technology
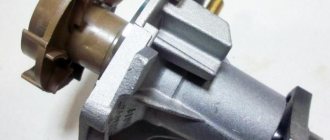
The clutch release bearing for Kalina 2, 1118, Cross, Sport (including 8 valves) is located in the crankcase (see photo at the beginning of the article), to remove the old “releaser” follow the instructions.
- First, use a screwdriver to remove the coupling spring, after which the VP will be removed from the shaft without difficulty.
- Next, inspect the fork, check for smoothness, absence of radial and axial play, as well as runout. If the fork is in working condition, then check the input shaft on which the VP is located: splines, seating surface. No nicks, cracks, or corrosion are allowed.
- After checking the unit, if the condition is normal, the coupling should be replaced. In reverse order, put the coupling on the shaft (the ear should mate with the fork without distortion). Secure the spring and check the smooth operation of the mechanism.
- When the new clutch release bearing is installed on Kalina, you can begin installing the box. The operations are performed in reverse order. To lift the gearbox to the power unit, it is recommended to use third-party assistance or a telescopic transmission stand.
Device and methods for adjusting the clutch of Lada Grants
The clutch is designed to connect and disconnect the gearbox and engine flywheel, smoothing out sudden changes in torque loads. The friction clutch allows the car to start and stop smoothly with the power unit running. If sudden braking is necessary with the clutch engaged, it slips, protecting the gearbox from possible overloads. In good condition, the mechanism should provide a reliable connection between the transmission and the power unit.
Friction clutch device
The manufacturer installs the same clutch on the Lada Granta as on the Lada Kalina. The mechanism consists of a flywheel with a basket attached to it. The task of the latter is to continuously press the disk with linings made of friction material - this is how the torque from the engine is transmitted to the transmission. A cable-type clutch means that when the pedal is pressed, the cable connected to the clutch fork becomes taut, the paddles stop pressing the disc, and torque from the engine is not transmitted to the gearbox.
Which release bearing is best for Kalina based on price and manufacturer?
We recommend choosing the clutch release bearing for the Lada Kalina according to the table presented in the article on “Replacing the release bearing on a VAZ 2114”. The list contains information on the best manufacturers of spare parts of this type (which is better, according to reviews from auto repair shops/motorists): price, number (article), manufacturer, equipment. In the table you will find out exactly how much a release bearing for Kalina costs. Before buying a spare part, look at the original photos and technical specifications, which are given there. We also recommend watching a video with an overview of push couplings.
- pressure ball bearing - 111-1601182;
- coupling assembly – 21100-1601180-02;
- bolt - 2108-1601207;
- driven disk - 11186-1601130.
Clutch adjustment methods
All diagnostic and adjustment work is carried out only with the engine turned off. To identify the need to adjust the friction clutch, you should perform a few simple steps. You need to press the pedal two or three times - no knocks, squeaks or other extraneous noises should be heard. The pedal should move freely, without sticking. If you suspect that the pedal is sticking, but visually everything is in order, you should perform the following manipulations:
- press the pedal all the way by hand;
- release the pedal, but do it in such a way that your hand is on it, thereby you can feel its movement, but not interfere with its progress.
You can feel even the slightest jamming or jerking with your hand when the pedal returns to its initial position. If characteristic twitching is observed, it is necessary to make adjustments.
Using a ruler, measure the distance from the floor to the protruding part of the pedal. You need to press it all the way so that it rests on the floor, then release it. The distance is measured again. If the ruler is more than 145 mm, then the pedal free play must be adjusted to normal values.
The pedal's full travel distance should be no more than 146 mm, less is allowed. The cable guide should move relative to the fork lever no more than 27 mm. Normally, the runout of the friction linings of the disc should not exceed 0.5 mm. There must be a distance of at least 0.2 mm between the rivet holding the lining and the lining itself; less is not allowed.
The Lada Granta is equipped with a regular clutch cable, which is no different from the cable installed on previous VAZ models. The only difference is that on modern cars the cable is equipped with an automatic tension adjustment tip. The mechanism is convenient in that as the clutch parts wear and the cable is pulled, it automatically adjusts the tension.
Finding the reason
One of the owners of a Lada Kalina (VAZ 11194) decided to check where there was such noise from the transmission in the cabin. With the help of spot wiretapping, he was able to find out that some of the vibrations from the gearbox are transmitted to the cabin through the clutch cable. This was confirmed by a simple experiment:
- raised the front wheels
- turned on first speed
- raised the speed to 4500-5000 rpm
- Reduced the speed to 1500 rpm using the brake pedal without releasing the gas pedal
Then, the same thing was done with the clutch cable disconnected from the gearbox fork. The familiar sound of “hrrrrr.” "disappeared. The sounds were recorded in an mp3 file (before the pause - with a cable, after - without it). Site users can download the file:
To download files you need to log in to the site.
Conclusion : the clutch cable is a transmitter of vibrations from the gearbox fork.
A similar situation may occur on Lada Grant and Priora cars.
Clutch cable adjustment
Adjusting the clutch of the Lada Granta begins by pulling the tip of the cable in the direction of its movement, taking into account the fact that the spring will create force. You should fix the cable in this position and start measuring from the front edge of the plastic leash to the clutch fork lever. It should be no more than 2.7 cm. Since there is not much space under the hood, you should prepare a piece of wire of the required length (27 mm) in advance and measure the distance with it.
The leash rotates to adjust the tension. After the clutch cable is released, you need to eliminate the gaps between the driver and the fork lever. Next, the friction clutch pedal is depressed several times - this is how the auto-adjustment mechanism takes its working position - the pedal should not be tight or fall through.
Judging by the reviews of Lada Granta owners, this mechanism is far from ideal and makes various extraneous sounds when you press the pedal - it starts to crunch or click. You can try to get rid of them by increasing or decreasing the distance of 27 mm. You need to select the size individually in each specific case.
Finalization
Purpose: install a gasket between the clutch cable and the gearbox fork
Procedure:
- Remove the clutch cable end from the fork.
- Unscrew the cable end, having previously measured the length of the free threads.
- Remove the clutch cable boot.
- Remove the rubber insert from the cable stop (photo No. 1).
- Instead, install a round washer made of porous rubber (diameter 32-35 mm, hole 12-13 mm) (photo 2).
- Cut a piece of rubber measuring 20x70 mm, 2.5-3 mm thick.
- Glue it (for example, with “Moment” glue) to the plastic cable stop (one turn), secure with electrical tape 1.5 turns.
- Insert the cable into the bracket on the gearbox and put on the boot.
- Screw on the tip, leaving a couple of millimeters less free threads on the stud (since the new gasket is thicker than the factory part).
- Place a 2 mm foam rubber spacer between the cable tip and the fork lever.
- Adjust the clutch pedal.
As a result: the effect was noticeable immediately. Now the rattling can only be heard with the windows open. After modifying the clutch cable fastening, the car drove more than 15 thousand km, the gearbox noise was within normal limits. Increased vibrations and noise are noticed only at a temperature of -20 o C, when the rubber gaskets become hard. The author has posted sound files (engine acceleration-braking mode at 1500-2000 rpm in 3rd gear), which shows what the noise was from the gearbox before and after modification. Site users can download the file: