Installation
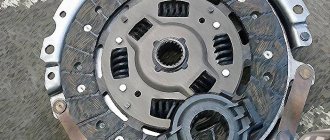
Set of rear disc brakes for VAZ 2110
As mentioned above, installing rear disc brakes is a delicate matter, but quite doable on your own. This way you can save a lot of money and achieve normal functioning of the brakes.
This is relevant, especially since car services, as mentioned, do not often pay attention to adjustments and the price for services of this kind costs about 10 thousand rubles
Purchasing a set of rear brake discs
Installed rear brake discs
It is recommended to install rear brake discs that are certified by an autonomous non-profit organization. For example, this could be a center that promotes certification or the like. You can purchase rear disc brakes on the market or by ordering online. There is another option, which involves installing rear discs from foreign cars, such as Ford Sierra or Audi A4. But again, when purchasing disks that do not have certification, you will have to make some changes, including sharpening, so that their operation goes smoothly.
Note. Additionally, some rear brake rotor kits do not include boots. In this case, they will have to be purchased separately.
Before starting the replacement process, it is recommended to watch this video. Everything is clearly shown here.
Getting ready for replacement
To get started, you will need the following components:
- brake hoses, pads and calipers, which can even be taken from the front brake kit;
- a set of brake discs (it is necessary to grind down the parts);
- bolts;
- washers;
- special fastening (faceplate).
Note. You can make a special washer for fixing the brake caliper yourself using a drawing. Although you can order this part on the Internet, as many do.
Replacement process
Begin:
- First, let's disassemble the rear brake mechanisms;
- dismantle the wheel;
- remove the brake drum;
- dismantle the pads;
- remove the wheel hub by unscrewing four 17mm bolts.
Note. Before unscrewing the bolts, it is recommended to spray them with a special product. In addition, when unscrewing the bolts, you need to act carefully so as not to tear off the edges of the bolts.
Installing disc brakes
unscrew the brake pipe.
Note. And here you will have to work hard, because if the brake cylinder has not been changed for a long time, everything is stuck there.
- We plug the end of the unscrewed tube with a piece of hose or a cap from a fitting intended for bleeding (this is done to prevent air from entering the system and loss of fuel fluid);
- we knock the hub on the beam out of its seat.
Note. To remove the hub, it is recommended to hit the support disk from the back side, doing this alternately: from above and from below.
Now we put the hub in place, but doing it in a different way than it was before.
Note. In this case, when installing the hub, it will need to be secured through a plate with a built-in brake caliper. The main thing is to make sure that all the holes match exactly
Careful attention must be paid to alignment
straighten the corner of the beam with a hammer (this is done so that the caliper does not rest against the beam);
Photo of disc brakes on a wheel
We put the brake disc on the hub, installing the bracket on the mount.
Note. Don't forget that spacers will need to be placed between the hub and the disc.
- install brake pads on VAZ 2110;
- We screw the brake hose to the caliper, and then to the tube.
Examination
After carrying out the above operations, you will need to check the entire system. The system is checked for leaks, and to do this you need to press the brake pedal. If the pedal is tight enough, then everything is in order.
Note. It is advisable to have an assistant check the brakes for leaks. You will need to ask him to step on the pedal, and at this time try to turn a component of the wheel. If it doesn't spin, then the brakes are holding properly.
Bleeding the brakes
Bleeding the brakes
This is an important operation that will allow you to get rid of the air that still gets into the system. It is worth noting that the brakes on the VAZ 2110 are pumped diagonally, as on other models of the brand. First the right front wheel is pumped, then the rear left, then the front left and rear right.
The brake failed at full speed: what to do?
First, try pressing the pedal sharply several times: perhaps its functionality will be partially restored. Next, assess the situation and identify a place where you can gradually turn. Then tighten the handbrake (don't do it too hard) and start shifting (if you have a manual transmission) to a lower gear. At the same time, when the lever is in “neutral”, press the accelerator (perform “re-throw”) to “prepare” the gearbox gears for emergency operation. As a last resort, choose the lesser of two “evils” - it is better to run into some obstacle near the road (roadside bushes are a good option) than to collide with a car.
How to replace the brake pressure regulator in a VAZ 2110?
1. The first thing to do is to release the regulator drive lever; to do this, lift the bracket up. If necessary, use a screwdriver to loosen the earring bracket. All manipulations are performed with a key of 10.
2. After disconnecting the lever, carefully remove the earring bracket.
3. Prepare a container; it needs to be placed under the junction of the regulator with the pipes; brake fluid will flow out of it. We disconnect the four tubes by unscrewing the fastening nuts. We wait until the liquid drains. We plug the holes in the tubes; this can be done, for example, with caps on the cylinder bleeder valves. It is recommended to mark the tubes so that during further installation you will not confuse them.
4. Unscrew the front bolt securing the bracket with the regulator.
5. We unscrew the rear bolt, which we hold the regulator on the side of the bracket, after which we remove the regulator (sorcerer), without unscrewing the drive.
6. If you need to replace drive parts, unscrew the bolt that holds the locking lever and disconnect the drive lever from the elastic lever.
7. When you connect the drive lever to the elastic lever, following the sequence, the clamp fork should fit into the groove on the elastic lever.
8. Next, install the brake pressure regulator in the same order as we removed it
Please note that the front mounting bolt is slightly longer than the rear
9. When replacing, it may be that the lever spring begins to protrude, thereby interfering with the installation of the regulator. To avoid problems, move the drive lever as far forward as possible beyond the protrusion.
10. Installation is complete, now crimp the earring brackets with pliers. To make sure that the system is working, pump and adjust the pressure.
Video about removing (removing) the sorcerer on a Renault Logan car:
Parking brake system drive
The mechanically actuated parking brake system acts on the brake mechanisms of the rear wheels. The parking brake drive consists of lever 2, adjusting rod 4, equalizer 5, cable 8, lever 10 (see Fig. Rear wheel brake mechanism), manual pad drive and expansion bar 8.
1 – protective cap; 2 – sensor housing; 3 – sensor base; 4 – sealing ring; 5 – clamping ring; 6 – reflector; 7 – pusher; 8 – bushing; 9 – float; 10 – fixed contacts; 11 – moving contact
Mechanical brake fluid emergency level sensor. The sensor body 2 with a seal 4 and the base 3 with a reflector 6 are pressed by a clamping ring 5 to the end of the tank neck.
A pusher 7 passes through the hole in the base, connected to the float 9 by means of a sleeve 8. There is a moving contact 11 on the pusher, and fixed contacts 10 are located on the sensor body. The contact cavity is sealed with a protective cap 1. When the level of brake fluid in the reservoir drops to the maximum permissible, the moveable the contact moves down onto the fixed contacts and closes the circuit of the hazard warning lamp on the instrument panel.
Source
checking and adjusting brakes on VAZ 2110 cars | VAZ 2111 | VAZ 2112
Checking pipelines and connections To prevent sudden failure of the brake system of the VAZ 2110, VAZ 2111, VAZ 2112, carefully check the condition of all pipelines and connections, paying attention to the following: metal pipelines should not have nicks, scratches, burrs, active foci of corrosion and should be located away from from sharp edges that can damage them; brake hoses must not have any cracks on the outer shell or signs of chafing visible to the naked eye; they should not be exposed to mineral oils and lubricants that dissolve rubber; by pressing the brake pedal firmly, check to see if any swelling appears on the hoses, indicating their destruction; all pipeline fastening brackets must be intact and well secured; loosening or destruction of brackets leads to vibration of pipelines, causing their breakdowns; Do not allow fluid to leak from the connections of the master cylinder with the tank and pipelines; if necessary, replace the tank bushings and tighten the nuts without subjecting the pipelines to deformation. When tightening piping nuts, use wrench 67.7812.9525
Eliminate any detected faults by replacing damaged parts with new ones. Flexible hoses, regardless of their condition, should be replaced with new ones after 125 thousand kilometers or after five years of operation of a VAZ 2110, VAZ 2111, VAZ 2112 to prevent sudden ruptures due to aging.
Checking the functionality of the vacuum booster VAZ 2110, VAZ 2111, VAZ 2112
Press the brake pedal 5-6 times with the engine off to create equal pressure close to atmospheric in cavities A and B (see Fig. 6-2). At the same time, by the force applied to the pedal, make sure that the valve body is not jammed. Keep the brake pedal depressed and start the engine. If the vacuum booster of the VAZ 2110, VAZ 2111, VAZ 2112 is in good working order, the brake pedal should “move forward” after starting the engine. If the brake pedal does not “go forward”, check the fastening of the hose tip, the condition and fastening of the tip flange in the booster, the hose to the tip and the fitting of the engine intake pipe, since loosening the fastening or their damage sharply reduces the vacuum in cavity A and the efficiency of the booster.
rice.
6-2. Vacuum booster: 1 - vacuum booster housing; 2 — amplifier housing cup; 3 - rod; 4 — adjusting bolt; 5 — rod seal; 6 — sealing ring of the main cylinder flange 7 — diaphragm return spring; 8 — amplifier pin; 9 — tip mounting flange; 10 - valve; 11 — hose tip; 12 - diaphragm; 13 — amplifier housing cover; 14 — sealing cover; 15 - piston; 16 — protective cover of the valve body; 17 — air filter; 18 — pusher; 19 — pusher return spring; 20 — valve spring; 21 - valve; 22 — valve body bushing; 23 — rod buffer; 24 — valve body; A - vacuum chamber; B - atmospheric chamber; C, D - channels Adjusting the brake drive of VAZ 2110, VAZ 2111, VAZ 2112
The free play of the brake pedal when the engine is not running should be 3-5 mm. The adjustment is carried out by moving the brake light switch 7 (Fig. 6-11) with nut 6 released. Install the switch so that its buffer rests against the pedal stop, and the free play of the pedal is 3-5 mm. In this position of the switch, tighten nut 6.
rice.
6-11. Brake drive: 1 — master cylinder; 2 - tank; 3 - vacuum booster; 4 — brake pedal bracket; 5 — brake light switch buffer; 6 — brake light mounting nut; 7 — brake light switch; 8 - brake pedal WARNING Adjust the free play of the brake pedal when the engine of the VAZ 2110, VAZ 2111, VAZ 2112 is not running. If the brake light switch is too close to the pedal, it does not return to its original position.
In this case, valve 21 (see Fig. 6-2), pressing against body 24, separates cavities A and B, which opens air access to chamber B, and the wheels are incompletely released when the pedal is released. If moving the brake light switch cannot eliminate the incomplete release of the brake mechanisms, then disconnect the brake master cylinder from the vacuum booster and check the protrusion of the adjusting bolt 4 relative to the mounting plane of the master cylinder flange (size 1.25-0.2 mm). This size can be set by holding the end of the rod with a special wrench, and with another wrench, tightening or unscrewing bolt 4.
If the brake pedal is pressed hard: diagnostics
As you can see, a tight brake pedal is often due to problems with the vacuum booster. At the same time, its operation can be quickly checked on the spot.
To diagnose VUT, you can use two methods. In the first case, you need to start the engine for the vacuum booster to start working. Normally, the pedal is soft; after two or three strong presses on the brake, the engine speed will briefly increase.
Another test involves pressing the brake several times with the engine off. Normally, the pedal should be soft for 2-3 presses, then it becomes hard. After this, you should press the brake and start the engine without releasing the pedal. The pedal should go down after the engine starts. If this does not happen, then you also need to look for a problem with the VUT.
General device
The VAZ-2110 brake system is designed in such a way that the pads are driven by pressure in the tubes. There are two circuits, a special pressure regulator, a vacuum booster and a liquid level sensor in the tank. If one circuit fails, the second will remain operational. Of course, braking efficiency will decrease sharply. It is also worth noting that ventilated brake discs are installed on the front wheels of the “ten”.
The design also provides for a pad wear indicator. The rear wheels are equipped with drum brakes, which are driven by a two-piston cylinder. There is also a mechanism that automatically adjusts the gap between the drum and the brake pads. The basis of the system is the master cylinder mounted on a vacuum booster. At the top of the GTZ there is an expansion tank, which has a lid with a built-in level sensor.
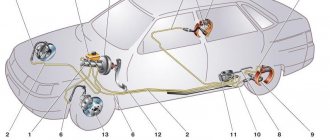
Hydraulic brake circuit diagram
1 – front wheel brake mechanism; 2 – pipeline of the “left front–right rear brake” circuit; 3 – main cylinder for hydraulic brakes; 4 – pipeline of the “right front–left rear brake” circuit; 5 – master cylinder reservoir; 6 – vacuum booster; 7 – rear wheel brake mechanism; 8 – elastic lever of the pressure regulator drive; 9 – pressure regulator; 10 – pressure regulator drive lever; 11 – brake pedal; A – flexible hose of the front brake; B – flexible rear brake hose
The car uses a working brake system with diagonally separated circuits, which ensures high active safety of the car. One hydraulic drive circuit ensures the operation of the right front and left rear brake mechanisms, the other - the left front and right rear.
If one of the circuits of the service brake system fails, the second circuit is used to stop the vehicle with sufficient efficiency.
The hydraulic drive includes a vacuum booster 6 and a dual-circuit pressure regulator 9 for the rear brakes.
The parking brake system is driven by the brake mechanisms of the rear wheels.
Problems and their solutions
There are several common problems associated with brakes on a VAZ 2110 car. The reasons for their occurrence may be different, but the solution is always the same - timely and high-quality repairs.
- The brakes have completely lost their effectiveness, pressing the pedal does not cause any reaction. In such a situation, it is categorically impossible to drive anywhere under your own power, even if we are talking about a trip to a service station? How do you brake? About a wall or pillar? Call a tow truck and start repairs. In some situations, the problem can be solved on the spot, but these are temporary measures.
- During braking, strong vibrations are observed, most often in the steering column. At the same time, when you press the pedal, it is difficult to hold the steering wheel in your hands. There may be several reasons for this:
- If you have non-ventilated discs installed, similar situations may arise during rain or when braking through a puddle. Such devices do not like moisture, so to get rid of vibrations, replace the disks with ventilated ones;
- Another cause of vibrations is faulty drums. If there are dark spots on the working surface of the drums, the unit wears unevenly. Immediate repair or complete replacement of mechanisms is required;
- Be sure to check for signs of deformation on the front brake discs. They often cause vibrations.
Pressing the brake pedal is very tight, it is physically difficult to press it properly. The reasons are also different:
The vacuum booster air filter may be clogged, causing the brake pedal to feel stiff; The vacuum booster itself is faulty, the tips and diaphragm are damaged, the movement of the check valve is disrupted, and there is damage to the connecting hose. Each of these problems causes the pedal to become stiff. The solution is to repair failed components; The pads can wear out over time, which is also often the cause of a stiff pedal. Pressing the brake causes a hissing sound. Check at what point the hissing starts. If you directly press the brake pedal, then the vacuum booster is checked first. Depending on the degree of damage, it is replaced or repaired. If there is a hissing sound when you release the brake pedal, then nothing bad happens. This is a completely natural phenomenon. Of course, if the hissing is not very loud and intense.
As you can see, the brake system of the VAZ 2110 car is far from perfect in its factory version, but it performs its functions effectively and reliably. All possible malfunctions can easily be fixed independently, but in some situations it is advisable to contact a professional service station.
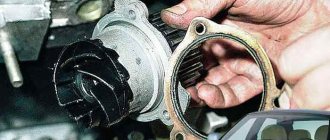
The braking system of a car is an important safety element. Its good condition can save lives in case of road accidents. One of the most peculiar components is the rear brake pressure regulator, colloquially known as the sorcerer.
Rear brake pressure regulator
The VAZ 2110 sorcerer has a catalog number starting with 2108, and is used, in addition to the tenth family, on other VAZ cars: Samara, Kalina and Priora.
Hard or soft brake pedal: what is the reason and what to do
As you know, the safe operation of any vehicle directly depends on the proper operation of the braking system. At the same time, the driver may notice that at some point the car brakes worse, extraneous noise appears during braking, the brake pedal sinks, the brake pedal becomes hard or soft, etc.
In any case, if the brake pedal is hard to press or the brake pedal is soft and does not brake the car well, you must immediately stop using the car, determine the cause and eliminate the problem. Next, we will look at why the brake pedal is hard to press, the brakes are too soft, or the brake pedal is either soft or hard.
Replacing antifreeze on a VAZ 2109 yourself. Do it
Often people are faced with such a problem as replacing antifreeze on a VAZ 2109. This need may arise as a result of repairing the cooling system, or simply occur according to plan. Approximately every 40,000 km. mileage, this fluid will need to be changed in any case. If the car is used little, then it is worth replacing every two years. Replacing antifreeze on a VAZ 2109 is quite simple. To do this, you need to stock up on a limited number of tools, as well as a wealth of knowledge, which will be provided in this article. After reading it, you will definitely learn how to carry out this procedure without any problems and in the shortest possible time. Tools and materials
- antifreeze It is advisable to take with a small reserve, although five liters is quite enough for the VAZ 2109;
- key to 8;
- hexagon 12;
- screwdriver.
So, all the tools are ready for use, which means you can start.
Instructions The cooling system of a car engine has a rather complex structure. There is not only a tank, but also a number of other equally important components. These are all kinds of tubes and hoses that allow coolant to move freely throughout the engine compartment. Moreover, it is worth noting that the system is in a sealed state. To carry out this kind of work, the tightness must be broken. This is done by simply opening the tank cap. Now you can start removing the crankcase protection. Any even unprofessional driver can handle this job. It is necessary to remove the protection so that antifreeze, which is a very toxic liquid, does not get on it.
After this, you should turn your attention to the drain plug, which is located on the radiator. It unscrews using a hexagon
Finding it is extremely easy. Every self-respecting car enthusiast knows where it is located. When the plug is removed, it is imperative to bring some kind of container to the hole, into which the already used antifreeze will be removed.
There is also a drain plug on the block head. It must be unscrewed. Here it is also worth placing some kind of container so that the antifreeze does not leak into the street. After all the liquid has been removed from the cooling system, you can screw all the plugs back in. Now you need to turn your attention to the carburetor. There is also a pipe here. It needs to be unscrewed. For this purpose, a regular screwdriver is used for standard fastening. Now you can start pouring antifreeze. This must be done extremely carefully so as not to miss the filler hole. In this case, you can use additional devices to make work easier. For example, some car enthusiasts have long preferred to carry out work through a funnel. Liquid is poured in until it begins to drip from the pipe that was unscrewed earlier. This measure will eliminate excess air from the cooling system, which can lead to stagnation of antifreeze, and this has a detrimental effect on the operation of the engine as a whole.
After the liquid has flowed through the pipe, it can be replaced. Then antifreeze is poured into the expansion tank to a certain level. It's best to stick to the maximum cutoff. Now you can warm up the engine. In this case, there is no need to close the hood, because you need to look to see if there are any leaks that could have formed during the work. If smudges are visible anywhere, they must be eliminated immediately. To do this, use a screwdriver to tighten all the clamps securing the pipes and hoses. Are there other mounts? They should be adjusted. So, now everyone knows how to replace antifreeze on a VAZ 2109. As you can see, this process is quite simple. The most important thing is to strictly follow the instructions, then all the work will be done as quickly and efficiently as possible.
Soft brake pedal: reasons
Having figured out why the brake pedal can be hard, you should pay attention to an equally common problem when the brake pedal has become soft. In such a situation, the brakes may be weak and perform poorly, which is no less dangerous than a hard pedal.
In extreme cases, the brake pedal may not rise after being pressed or may sink to the floor when braking. Naturally, in the case of a “cotton” pedal, owners are interested in what is the cause of the malfunction, why the pedal is soft after bleeding the brakes, and also how to make the brake pedal harder.
Master brake cylinder
Now let's talk about the master brake cylinder on a VAZ 2110 car. If you do not want to allow the brakes to fail while driving, they should be checked periodically, and if problems arise, take appropriate action immediately.
A common reason for replacing the master brake cylinder of a VAZ 2110 is precisely the fact that the brakes are lost.
Symptoms of a problem
Of course, brakes can completely lose their effectiveness for various reasons, but now we are talking specifically about the master cylinder. If the reason lies therein, then it can be determined by the following signs:
- The master cylinder shows signs of brake fluid leakage;
- The pedal has an idle motion, that is, when it is pressed, no force is created;
- The brake pedal simply won't press.
Replacement
To repair the master brake cylinder of a VAZ 2110, you will need to first disassemble it and then install a new element.
The most difficult process is disassembly. Therefore, let's talk about it in more detail.
Carefully disconnect the master cylinder from the pipeline. Disconnect the block, which is equipped with wiring, from the emergency brake fluid indicator. The connection to the “ten” is made by terminals. Cover the pipe and assembly openings with something to prevent brake fluid from leaking. It will pollute the interior space, which is undesirable. Now remove the cylinder along with the reservoir. To do this, simply unscrew the fastening nuts that connect the element to the vacuum booster. After removing the brake fluid level sensor, drain the brake fluid present from the cylinder and the cylinder itself. If there is no serious need, you should not remove the tank. But for complete assembly, the tank is removed and then installed in place in strict order. Before reassembly, each element is washed with purified brake fluid.
A good alternative is isopropyl alcohol. Do not forget to dry the parts with a compressor and wipe with a clean, dry cloth. Carefully avoid contact of the main cylinder with fuel or kerosene. Pay special attention to the O-rings. If you wash them with special alcohol, do not keep the rings in this liquid for more than 20 seconds.
After processing, immediately dry and wipe the seals. Treat the surface of the piston and mirror to remove all rust. When replacing the master cylinder, new O-rings must be installed, regardless of their current condition. Check the elasticity of the piston springs under load. Refer to the VAZ 2110 repair manual, which indicates the appropriate loads and forces for testing. When free, the length of the spring should be 59.8 millimeters. If the indicator deviates from the norm, be sure to replace the springs.
https://youtube.com/watch?v=gYLFHjMr2Fk
Leveling up
If you think that after replacing the brake master cylinder you can safely go out on the roads, then you are mistaken. In fact, a complete repair of brake cylinders on a VAZ 2110 includes bleeding.
Proper bleeding will ensure the efficiency of the newly installed master cylinder.
The procedure is not complicated, but requires following the instructions.
- Find someone who will help you in this matter. One will be near the car, and the second will be directly in the cabin.
- Inflate the brake pedal by pressing it several times.
- The assistant presses the pedal, and meanwhile you slightly unscrew the fitting on one of the brake system pipes.
- This should release air, as well as a small amount of brake fluid. Don't be alarmed by leaks, this is completely normal.
- Retighten the fitting using the same wrench as when unscrewing - 10.
- Command your assistant to lower the part.
- The procedure is repeated until air bubbles begin to come out when unscrewing the fitting.
- Each of the four circuits is pumped using similar actions.
- First make sure that the brake fluid in the expansion tank is filled to the required level.
Actually, at this point the repair work related to the master brake cylinder can be considered complete. Experience in operating a car like the VAZ 2110 suggests that you should always store a container of brake fluid in the trunk. All sorts of situations happen on the road, and you need to be prepared for them.
Loading …
Why is the brake pedal higher than the gas pedal?
Drivers often wonder why on many models all the pedals in the car are not on the same plane. As a rule, on a car with an automatic transmission, the brake pedal is noticeably higher than the gas pedal. On cars with manual transmission, the clutch and gas are also often lower than the brake.
Let us note that there is a lot of debate on this matter and there are a number of conjectures and assumptions. Some car enthusiasts claim that this is inconvenient, others complain that if the pedals were in the same plane, it would be easier to control the car, etc.
Let’s also add that some owners believe that the brake pedal is placed higher in order to increase its travel, and also taking into account the need for more force (lever).
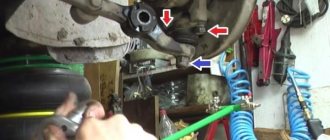
Adjustment
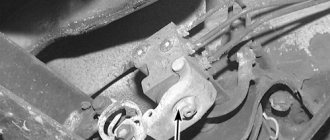
The work of the sorcerer on VAZ cars depends on the position of the body. Therefore, adjustment must be performed not only during each maintenance, but also when replacing shock absorbers and springs, after repairing the rear beam and, of course, replacing the sorcerer itself.
The car is placed on an overpass or inspection hole, to set the suspension to a balanced position, the trunk is rocked a couple of times by hand. Use a 13mm wrench to loosen the fastening bolts to the bracket; the front bolt is not visible from below, you need to find it by touch.
By moving the regulator, a gap of 2 mm is achieved between the elastic plate (the rod rests against it) and the lever. The spring resistance is high, you need to use a “mounter” or a special device. The bolts are tightened and the gap is checked with a feeler gauge. If you don’t have a probe, you can use a drill with a diameter of 2 mm and even a two-ruble coin.
Further verification is carried out on the fly. When braking from a speed of 40 km/h, on your own or with the help of a partner outside the car, evaluate the moment when the rear mechanisms begin to operate in comparison with the front ones.
How to properly bleed the brakes on a VAZ 2110 yourself
Self-bleeding the brakes of a VAZ 2110, 8 valves or 16 – it doesn’t matter (as well as the type of power supply, carburetor or injector), is available in three ways:
- exposure to pressure;
- exposure to rarefaction;
- by gravity.
Self-pumping under pressure
On the VAZ 2110, bleeding the brakes under the influence of external pressure is possible using additional equipment.
You will need:
A device for bleeding the brakes for one person (a cap with a nipple to create pressure in the system). Can be used as a special device such as a pump, compressor, inflated wheel (chamber)
- compressor, pump or tank with compressed air (a spare tire will do);
- air supply hose;
- nipple for tubeless wheel;
- TZ tank cap without sensor (from Zhiguli);
- drill of a diameter corresponding to the fitting diameter of the nipple.
Before you bleed the brakes on a VAZ 2110 yourself, you need to take the reservoir cap and drill a hole in it. The nipple should be inserted into it so that it sits there tightly. This cap must be screwed onto the GTZ tank, after adding fluid to the maximum.
Then you need:
- Get to the brake fitting, remove the cap from it, put on a 8 or 10 key and a hose, immersing its end in a container (as described above).
- Connect the air supply hose to the nipple in the reservoir cap.
- Apply pressure to the tank through the nipple by pressing the compressor gun, pumping the pump or putting the hose on the spare tire.
- Unscrew the fitting to bleed air bubbles from the brake circuit.
- Wait until the fuel fluid flows through the hose in an even stream without bubbles.
- Tighten the fitting and stop the pressure supply.
- Repeat steps 3-6 for the remaining wheels.
Bleeding the brakes with vacuum
Instead of excess pressure, vacuum can be used to bleed the brakes of the VAZ 2110. To do this, you will need a large syringe (from 100 cubic meters) and a hose to connect it to the fitting.
The procedure is as follows:
- Open the reservoir on the GTZ and fill in the maximum amount of liquid.
- Place the key on the fitting and connect the fitting to the syringe with a hose.
- Open the fitting and pull the syringe plunger towards you, creating a vacuum in the brake circuit.
- After filling the syringe, close the fitting and drain the fuel fluid into the container.
- Repeat the manipulations from steps 2-4 until the liquid begins to flow into the syringe in an even stream without bubbles.
- Repeat steps 2-5 for all wheels, following the order of bleeding the VAZ 2110 brakes.
This method is less efficient and consumes more fuel fluid, so it is used when pumping with pressure is not possible. It should be remembered that it is not worth reusing the pumped-out fuel fluid, due to the presence of contaminants from the circuit and atmospheric moisture in it.
Bleeding VAZ 2110 brakes by gravity
Bleeding brakes 2110 by gravity is the simplest, but most expensive method in terms of using brake fluid. All you need is hoses, drainage containers and a DOT-4 bottle. Pumping is carried out in this order:
A dropper with which it is convenient to bleed the brakes yourself
- Open the GTZ tank.
- Place the hoses on the fittings and insert their free ends into the containers under the drain.
- Unscrew the fittings on the brake cylinders.
- Start pouring fresh fuel oil into the GTZ tank, while simultaneously observing the streams from the fittings.
- When the liquid begins to flow through the hoses smoothly and without bubbles, tighten the bleeder fittings one by one.
If, as a result of pumping, the liquid in the tank does not reach the Max level, you need to top it up. If there is too much TJ, the excess must be pumped out with a syringe. It is not recommended to reuse the fuel fluid drained from the fittings; it must be disposed of.
How to bleed the brakes of a VAZ 2110 without removing the wheels
It is not necessary to remove the wheels to bleed the brake system. This is necessary to facilitate access to the fittings, but you can do without this item if:
- drive the car into a pit or overpass;
- raise it on a lift;
- use a high jack.
Since you can pump the front brakes on a VAZ 2110 purely by turning them out, this operation can be performed on any flat surface. To access the fitting for the left wheel, you need to turn the steering wheel all the way to the right, and for the right wheel, turn it all the way to the left. The gap between the wheel and the arch will be quite enough.
A pit, overpass or lift is needed to access the rear wheel fittings. You can use a jack to raise the rear end and straighten the strut spring to its highest position. The wheel will lower relative to the arch and the resulting gap will be enough to reach the fitting by hand. But since it is more convenient to unscrew 4 bolts, it is better not to “reinvent the wheel” and pump the brakes by removing the wheel.
Vacuum booster diagnostics
Often, a sign of depressurization is unstable engine operation (tribbing). This happens due to air entering the intake manifold. It sharply depletes the air-fuel mixture entering the cylinders. If the pedal does not press when the car is running, first of all you should check the reliability of the connections
.
In addition, when the system depressurizes while the engine is running, a characteristic hissing sound is heard from the vacuum booster.
To pinpoint the problem, turn off the engine and wait a few minutes without pressing the pedal. If after this time the pedal remains hard, the most likely cause is a broken check valve.
It is very easy to diagnose the correct operation of the vacuum booster
. To do this, without starting the car, you should “pump” the pedal, then, continuing to hold it, start the engine. If the vacuum seal is working properly, the pedal will go down.
Procedure for replacing the front brake cylinder on a VAZ 2110-2112
Video instruction
The video was made using the example of a VAZ 2110 car and is equally suitable for both 2111 and 2112. The only way the car parts may differ externally is the brake discs: ventilated or not, as well as their sizes.
Photo report
First of all, we will need to remove the front wheel of the car, after first lifting the car with a jack. After this, using a hexagon, you need to unscrew the two bolts securing the caliper bracket.
Now you can remove the bracket and remove the pads:
Then you can rip off the brake hose with a wrench, but you don’t have to unscrew it completely.
Next, we unscrew two more bolts securing the cylinder to the caliper, having previously bent the two locking plates under them using a screwdriver.
And we move the cylinder to the side, since nothing else holds it.
The hose can now be unscrewed completely by turning the brake cylinder itself several times counterclockwise.
To avoid excessive losses of brake fluid, it is advisable to fix the hose as high as possible, and always with the fitting facing up. You can also substitute a container if liquid suddenly leaks out.
A new front one costs about 500 rubles, so this price is quite acceptable. But the assembled caliper already costs about 2,000 rubles, which is already significant if you suddenly have to change the entire assembly. Installation of this part occurs in the reverse order.
Solving the problem of a soft pedal
So, the most common problem is poor, low-quality fluid, due to the fact that it may not be suitable for a certain car model, and corrosion of the hoses may gradually appear. Rubber elements are not able to withstand such liquid; they delaminate and increase in diameter, which leads to loss of tightness. If the brake pedal has become soft, it is best to undergo diagnostics of the entire brake system and defective elements.
The second reason is rust in the rods. There is only one way out - replacing them completely. You can determine such a malfunction by holding down the brake pedal; if it remains down and you have to “lift” it with improvised tools, there is definitely a problem in the rods.
The incorrect gap between the pedal and the cylinder is also determined by the pedal being clamped. If pressing immediately occurs easily and smoothly, and at the end the applied force has to be doubled, most likely the gap is incorrectly adjusted; the pressure present does not allow the pedal to be lowered and raised normally. You will have to adjust and bleed the brakes.
Air locks also cause a lot of trouble, appearing due to wear and tear of the hoses; they lead to breakdowns in the vacuum pump. The brake cylinders lose some of the pressure, the pads do not move apart, and therefore cannot press against the disc. The pads should be checked to see if they are damaged.
Finalization
Many, believing that the brakes are bad and repairs do not help them, decide on significant alterations and tuning. For example, tuning the brake system of a VAZ 2110 may include replacing the rear drum mechanisms with disc ones.
It is especially important to know here that braking of the rear wheels should be softer and occur a little later than the front wheels to prevent skidding. Another possible tuning idea is to replace the vacuum booster and the brake master cylinder
Instead of standard ones, they are installed from Lada Priora. This usually helps, first of all, in that vibration is not felt and the pedal works with optimal force.
Another possible tuning idea is to replace the vacuum booster and the brake master cylinder. Instead of standard ones, they are installed from Lada Priora. This usually helps, first of all, in that vibration is not felt and the pedal works with optimal force.
And do not forget - after each intervention in the brakes, they need to be pumped.
What to do if there is no result
Sometimes motorists are faced with situations in which tightening the cable does not improve the quality of the handbrake. In this case, it is necessary to deal directly with the brakes. The main culprit is the brake pads. They can:
- wear out;
- “get stiff” and not respond to handbrake commands.
Installing new brake pads will help achieve normal results. Experts recommend dismantling the brake drums and checking the movement of the brake pads. If they don't move, it means they're stiff. If there is still movement, the problem must be looked for in other nodes. The primary culprit may be a stretched handbrake cable. If all else fails, it is best to turn to professionals.