On the vast majority of vehicles, the domestic VAZ-2112 is no exception, the clutch plays one of the most key roles. Without it, it is impossible to move off smoothly; changing the speed while the car is moving without some effort is also a problem. In general, you can’t go anywhere without a clutch! Constant load increases the risk of wear of parts, so monitoring the required functionality is the responsibility of every car enthusiast. Lack of attention will result in big trouble.
What the VAZ-2112 clutch is, how it is replaced and adjusted, will be discussed further. And first you need to understand the principle of operation of this unit. The clutch mechanism disconnects the gearbox input shaft from the engine crankshaft. This action allows you to start driving and change gears.
What is clutch?
Before you go to a car service center in Moscow or another city, try to figure out how to properly replace the clutch on a two-wheeler. As you can see, there is nothing complicated in the work procedure. You can complete all repairs yourself in a few hours.
The clutch is a mechanism that allows you to disconnect the engine crankshaft and the primary gearbox. As a result, the engine can work, the gearbox lever can be in a gear position, and the car will stand still.
A clutch is needed in order to change gears while the car is moving. If it were not there, then changing gears would be problematic - the lever is very difficult to move from one position to another. And all because the engine crankshaft and the wheels of the car are rigidly connected. And it is the clutch that allows for a kind of disconnection of the power units.
When repairing a car in a car service center in Moscow or any other city, you need to carefully ensure that the technicians complete all the work to the highest possible quality.
What is a handbrake for?
According to the current Traffic Rules, the handbrake of a VAZ must hold the vehicle on a slope of up to 25%. When lifting the lever up, it should produce from 2 to 8 clicks. If the car has been in operation for more than three years, then it is necessary to check the parking brake system. You can go to a car service center, where qualified specialists will carry out high-quality diagnostics. You also need to do this process yourself. Having stopped the car on a level surface, the lever rises all the way up with a smooth movement. In this case, the clicks are counted; there should be no more than 8 of them. When leaving the cabin, you need to apply force from behind, trying to move the car. If it rolls, then you will have to adjust the handbrake. After tightening the cable, the result is the same, which means that only one thing remains - to completely check the condition of the rear brake system.
Basic clutch elements
Now let's look at what main elements are included in the design:
- VAZ-2112 clutch drive disc (usually called the “basket”). It is installed on the flywheel and secured with bolts.
- Driven disk. It stands inside the “basket” and is connected to the gearbox input shaft using a splined connection.
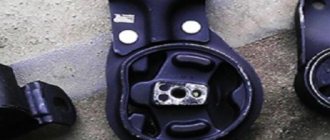
- The release bearing is an element that allows you to act on the petals of the basket. With its help, the slave disk is disconnected from the master disk.
- Clutch cable - allows you to transmit force from the pedal to the release bearing.
- The clutch pedal, which the driver operates with the force of his foot.
These are all the basic elements that are present in the design of a car clutch. It is worth noting that the “two-piece” uses a cable drive system, which is much cheaper than a hydraulic one. But it is much worse in terms of convenience - the pedal is tight, this is especially noticeable on older cars. And if you want the clutch on your car to be as soft as possible, change the cable in a timely manner, do not wait until it breaks.
Symptoms of a node malfunction
Before replacing the clutch on a VAZ-2112, you need to figure out whether it needs to be done at all.
Among the signs of malfunctions are the following:
- When you press the gas pedal, you can hear the engine picking up speed, but the car does not go faster. This indicates that the clutch is slipping, there is practically no connection between the driven and driving discs.
- Extraneous sounds are heard when the car moves - this may indicate the destruction of some system components. As a rule, at the same time as these sounds, the system also fails.
- A hum is heard when you lightly press the pedal - a clear sign of a faulty release bearing.
- The pedal falls through - most likely the VAZ-2112 clutch cable has broken. This is the most harmless thing that can happen.
- If the cable is intact, but the pedal falls and the clutch does not release, then the release bearing has collapsed. Unfortunately, this also happens sometimes.
Knowing all the signs of breakdowns, you can begin repairs. Replacing the clutch on a VAZ-2112 with your own hands is not difficult. You just need to know the order of the work.
Is noise a sign that replacement is needed?
Not really. If noise occurs, this does not mean that you should immediately replace the element. But it is strongly not recommended to delay repairs. Let's just say this is a signal for certain actions, which you will have some time to complete before the consequences become catastrophic.
In some cases, the noise occurs when the engine is started, and it persists until the car warms up, after which it disappears. In other cases, the noise returns every time you try to disengage the clutch.
The worst option is a grinding sound. This sound indicates that the element is rubbing against the leaf spring, and wear will form on the petals. If you are “lucky enough” to encounter such a situation, there is no time. Replacement needs to be done quickly.
By the way, there is no point in repairing it. Release bearings cannot be repaired, so the only solution is replacement.
Dismantling the gearbox
The most important thing is to remove the gearbox. Therefore, it is best to carry out all work on an inspection hole or overpass - it’s really more convenient. Procedure:
- Remove the left wheel, unscrew the nuts from the ball joint and the tie rod end. You will need to move the box to the side; the drive on the left should come out without any problems.
- Loosen the nut securing the rocker and remove it from the gearbox shaft.
- Remove the starter, having first disconnected the battery and all wires from it.
- Unscrew the fastenings of the pillows holding the box. It is recommended to place a jack or reliable support under the gearbox housing before doing this.
- Disconnect the speedometer cable, disconnect the wires from the reverse sensor, as well as the ground bus.
- Unscrew the three bolts and nut that secure the gearbox housing to the engine block.
- Carefully move the box to the side; the right drive must be removed.
Clutch installation and assembly
Replacing the clutch on a VAZ-2112 is carried out according to the following algorithm:
- Unscrew all the bolts that secure the basket to the flywheel. If you plan to install it again, then you need to unscrew the bolts evenly, crosswise. The main thing is not to damage the basket.
- Remove the basket and disk, install new elements in their place.
- Tighten all the bolts (be sure to use new ones, since the old ones are threaded) and install the guide sleeve.
- Tighten the bolts evenly, crosswise.
- Remove the old release bearing and install a new one.
- Reassemble everything in reverse order.
This is a short tutorial, but the hardest part is lifting and lowering the box, as it is quite heavy.
Installing a new element
When you have completed the entire range of dismantling work, you can move on to the final stage - installing a new component.
- The first thing to do is check the condition of the new clutch release bearing. For some reason, many car owners forget to make sure that the bearing that replaced the old one is actually in good working order. This is easy to check. Rotate the bearing, pull it in different directions. If there is no jamming during rotation, and there is also no play, then you bought a really serviceable, good release bearing.
- Insert the new part into the coupling. This must be done so that the protruding part of the inner ring is directed towards the coupling.
- After inserting the element, secure it using the holders.
- Before inserting the new release bearing onto the bushing (guide), do not forget to lubricate it with a grease. The layer of lubricant should be thin, do not overdo it.
- Secure the coupling and bearing using a spring lock.
- Place the gearbox and other dismantled elements in their rightful places.
- The entire repair process is completed by adjusting the clutch.
Replacing the release bearing yourself is not very difficult. The main problem is removing the gearbox. All other events cannot be called difficult
However, you will need to be careful, consistent and careful.
Do not ignore the most useful thing that you can need when repairing your favorite VAZ 2110 - the instruction manual. Literally everything a car owner needs to know is described in detail there. With its help, you can even perform complex repairs, the cost of which at a specialized service station would be prohibitive.
Loading …
Replacing the clutch cable
The price of replacing a clutch on a VAZ-2112 is quite high - you will have to pay about 3,000 rubles for more or less high-quality spare parts, and at least the same for labor. But if you do everything yourself, you can save a lot of money.
Replacing the cable is much easier. The old one needs to be dismantled, and the new one needs to be fixed on the pedal and fork. The most difficult thing is to stretch it from the engine compartment into the cabin: the hole is quite small, and there are no amenities. But everything is doable, and all the work will take you, including preparation, no more than half an hour.
When replacing the clutch release bearing of a VAZ 2110, the main difficulties are that you additionally have to dismantle several more components and the most labor-intensive process is the process of removing the gearbox. In a word, to replace a small bearing, you need to disassemble almost the floor of the car.
Set for VAZ 2110
All work is best done on an overpass.
Units and parts to be dismantled:
- accumulator battery;
- air cleaning element together with a box and an air flow sensor;
- clutch cable;
- Transmission.
Replacing a VAZ 2110 clutch without removing the box and draining the oil
The main function of the clutch in a car is to connect the transmission with the engine. This part of the internal combustion engine accounts for most of the loads that occur during the transmission of torque to the gearbox. This is the reason for its rapid wear. Moreover, no car owner will be able to avoid this. That is why the clutch is considered a consumable item.
Signs of bearing failure
The main sign of a bearing failure on a VAZ 2110 is a slight knocking sound when the clutch is depressed. If this sound occurs in the summer, there is almost a 100% guarantee that a replacement will have to be made. If in winter, then this may be a simple change in the dimensions of the bearing cup due to a decrease in temperature. The metal from which the release bearing is made is extremely durable, so even if a knocking noise occurs, you can do nothing for a couple of days and just watch to see if it gets stronger.
Replacement instructions
If you are still sure that the release bearing of the VAZ 2110 has failed, then you need to get to work without delaying for long, having first purchased the same new bearing and other components that will be needed during the work.
Tools
- a set of keys;
A set of keys
- Screwdriver Set;
- container for draining transmission fluid;
- rags;
- new transmission fluid (if we plan to replace it at the same time).
Stages
In order to get to the release bearing, you will need to partially or completely remove several fairly large components of the car.
Preliminary work
Unscrew the left nut and loosen the right one that secures the hub. After the wheels are loosened, we lift the car on a lift or jack it up until its front wheels leave the ground. During this procedure, observe safety precautions and place the vehicle only on very strong supports.
- We dismantle the wheels.
- Remove the motor protection.
- We loosen the fastening on the transmission drive rod (after marking the previous installation location in order to simplify the adjustment of the gear shift lever during assembly).
- We disconnect the gearshift drive rods from the gearbox.
- Turn off jet propulsion.
- We dismantle the starter.
- We dismantle the suspension arm and ball joint located on the left.
- Remove the cover on the clutch housing.
- Disable the speed meter.
- We remove the left drive, leave the right one in place, just loosen the hub nut on it.
- We hang the motor (after placing a reliable support under it), which will make it possible to prevent the motor from moving and a possible break in the heater hose. We unscrew the fastenings of the supports located on the gearbox and disconnect the clutch housing from the cylinder block. We move the box away from the engine and remove it.
Other cases in which dismantling of the cylinder head is required
Of course, it is not necessary to remove the cylinder head for every breakdown. This is only necessary if major repairs are needed. Such “major” cases include:
- Gasket wear.
- Formation of carbon deposits on parts.
- Valve deformation.
- Need to replace guide bushings.
- Failure of the camshaft, etc.
Of course, repairing it yourself or through a service in any case involves certain financial costs. To ensure smooth operation of the engine, regular diagnostics of the cylinder head are necessary. It is recommended to use high-quality fuel. In addition, try to prevent the car from overheating - because of this, the cylinder head may lead.
If some points remain unclear to you, then you can visually familiarize yourself with the process of replacing valves by watching the video:
Video “Replacing the release bearing”
This video shows the bearing replacement process. An experienced auto mechanic talks in detail not only about how to change this unit, but also describes the principle of its operation.
VAZ 2112 clutch disc replacement, basket, driven disc and release bearing VAZ
Replacing the clutch disc of a VAZ 2112 seems to many to be a very complicated process, and therefore they are afraid to do it themselves; they prefer to pay “professionals” to the service station (to tell the truth, not every professional there is). This article will prove the opposite to you and will help you learn step by step how to replace the clutch disc on a VAZ 2112 yourself. What actions to perform in what sequence and what should be taken into account.
We change the clutch on a 16 valve VAZ-2112 with our own hands
Car : VAZ-2112. Asks : Anzorin Maxim. The essence of the question : How to replace the clutch on a VAZ-2112 yourself?
Hello! Please tell me how to properly replace the clutch on a VAZ-2112? I want to replace it because it seems to me to be very worn out. Sometimes I press the pedal and then when I release it, it somehow doesn’t grab right away. And the service announced a price of 3,000 rubles.
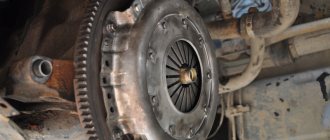
Clutch on VAZ-2112
This is what the VAZ-2112 clutch diagram looks like in disassembly.
The clutch on any car, including the VAZ-2112, plays a very important role. So, without his participation it would simply be impossible to transmit torque from the engine to the gearbox.
Due to the fact that this element bears a large load, it can absolutely be called a consumable material, because its main elements require immediate replacement if they are severely worn.
Video about replacing the clutch on a VAZ 2110-2112 family
It is impossible to influence the condition of the clutch in any way, and it is also impossible to control its condition visually, so its malfunctions will only appear when one of the elements begins to fail.
Tool for replacement work
To make the work easier, you need to prepare all the tools in advance.
- Inspection hole or lift.
- Jack.
- Wheel chocks.
- Set of socket wrenches.
- Mount or extension tube.
Step-by-step work order
Replacing the clutch without removing the gearbox
Before proceeding directly to replacing the clutch, you need to remove the gearbox. How to do this quickly and efficiently is written in this article.
When the clutch is dismantled, we continue work:
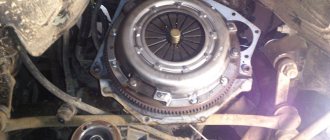
Clutch basket assembly
We remove the dismantled bolts to the side.
Care must be taken when dismantling.
The bearing is in place.
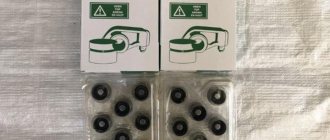
New basket, disc and bearing.
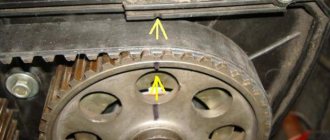
The blue arrow indicates the place where the mandrel is fixed, and the red arrow indicates the mandrel itself.
This completes the entire clutch replacement. As you can see, there is nothing complicated in such work.
Clutch adjustment
After the replacement is made, it is necessary to adjust it. This article is written about this in more detail.
Choice (poll)
When is replacement necessary (symptoms)?
You can understand that the clutch needs replacement by the following signs and behavior of the car:
Symptoms of a problem
I think you understand that doing the replacement quickly with your own hands will not work, but you can save a lot and spend money only on the necessary spare parts. When asked when a VAZ 21124 clutch disc needs to be replaced, we answer - in order to reduce the chances of getting into an accident, you should detect and fix problems in a timely manner, and the clutch is no exception. Let's look at the main signs of the need to repair or replace the clutch disc:
Necessary conditions and tools
Replacing clutch discs on a VAZ 2112 requires certain conditions and tools:
- Inspection pit, or overpass, or lift
- Set of sockets, set of keys
- Special centering mandrel, or old gearbox input shaft
- Slotted screwdriver (flat)
- Stops or “shoes” for wheels
- Pliers
- Clean rags
- A little grease for the gearbox input shaft
- An assistant (firstly, it will speed up the work, and secondly, removing and installing the box alone is a violation of safety regulations)
Let's move on to withdrawal
To remove clutch discs from a VAZ 2112, perform the following steps:
- We install our car on the inspection pit (or whatever you have instead - an overpass, a lift)
- We remove the gearbox from the car, first disconnect the wires from the battery
- Without this we cannot get to the clutch, let me briefly remind you of the procedure:
- Draining the oil from the gearbox
- Removing the starter
- Disconnect the block with wires from the speed sensor by squeezing the spring clips to do this.
- We unscrew the bolt that secures the bracket holding the ignition module, then the bolts (there are two of them) securing the top of the gearbox to the engine
- Disconnect the wiring block located at the bottom of the car from the reverse sensor
- We unscrew the bolt of the clamp securing the shift rod bracket and pull it off the hinge, sliding it back
- Removing the wheel drives
- Instead of one of them, be sure to insert a plug so that the differential does not fall apart
- The plug should be tied so that it does not accidentally fall out during the process of removing the gearbox.
- It will be enough to pull the right drive out of the box and move it to the side, fasten it to the body with wire so that it does not interfere
- Then unscrew the bottom nut securing the box to the motor (it is located on the motor side)
- You should be careful, because on car models with a gasoline injection system, a bracket supporting the intake pipe is attached under this nut; it must be removed
- You can loosen the top nut of this bracket if you can’t just remove it
- After unscrewing the three bolts, remove the lower cover of the clutch housing
- Then we unscrew the lower left bolt, which also secures the gearbox to the engine, and hang the engine using a board or hoist
- Unscrew the nut of the left engine mount from below
- Then two nuts that secure the rear cushion to the engine
- Unscrew the bolts securing the rear engine mount to the gearbox
- We insert a screwdriver into the gap between the clutch housing and the engine block, and slide the box away from the guide bushings
- It is necessary to hold it
- We move the box as far back as possible so that the rear cover passes over the brace coming from the front suspension (its input shaft comes out of the clutch)
- When the input shaft is not released from the clutch, push the engine to the side
- We lower the front end of the gearbox and pull it out from under the car (you need an assistant here), photo below
How to remove clutch 2112
To replace the VAZ-2112 clutch, after first dismantling the battery, it is necessary to remove the air filter along with the casing and mass air flow sensor. Using a flat-head screwdriver, pry the latches and pull them out of their regular places. After this, unscrew the starter to have access to the gearbox mounting to the engine. After this, unscrew the bolts and disconnect the gearbox speed sensor.
Place a jack under the engine and place a pre-prepared board. It is needed to avoid damage to the crankcase. Raise the jack and support the engine. Remove the jet rod, and then loosen and dismantle the rocker.
Having gained access to the clutch, unscrew the mounting bolts with a wrench or socket 8 and remove the basket. In this case, it is necessary to unscrew the bolts one by one and evenly. First, unscrew the 1st bolt one turn, then the next fastener in a circle. Then again unscrew the 1st one by one turn and so on until all the bolts have been unscrewed. After unscrewing the bolts, remove the basket and disk, remembering its position.
Clutch adjustment
After installing a new or repairing a clutch, it always requires adjustment; our instructions will help you. There is nothing complicated here and, after reading this article, everyone will be able to adjust it independently. So:
- Usually the need to adjust the clutch is determined by the movement of its pedal, when the pedal begins to rest against the mat (covering) - this means that the linings on the driven disk are worn out
- The maximum allowable value for pedal travel is 160mm
- Check the pedal travel in your car, if it is not correct, then you need to urgently adjust the clutch
- First, determine the distance from the clutch pedal to the mat (covering), to do this, use a regular ruler
- Place the ruler on the floor so that the angle next to the pedal is 90 degrees
- And we measure the distance, if this distance exceeds 160 millimeters, we make adjustments
- To adjust, it is necessary to loosen the lock nut, which is located on the tip of the cable; this tip is located near the clutch fork in the engine compartment
- To set the full clutch stroke of 120 - 160 millimeters, we will need to rotate the nut in a circular motion
- By unscrewing the nut, we reduce the pedal stroke, and by screwing it on, on the contrary, we increase it
- After adjustment, press the pedal all the way at least three times, then check with a ruler from the pedal (its top platform) to the mat
- If the adjustment is incorrect or insufficient, then adjust the pedal stroke with the nut, then secure the nut with a lock nut
- At the last stage, all that remains is to move the fork limit sleeve until it stops, and the adjustment will be completed
Loading, Please Wait!
This may take a second or two.
| If your clutch pedal suddenly falls down, then one of the reasons for such a breakdown may be a broken clutch cable. You can replace the clutch cable in various ways. In addition, after replacing the cable, you need to adjust the clutch pedal. |
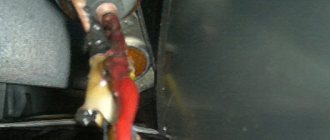
The other day, while changing gear, my clutch pedal suddenly dropped. My first thoughts were that either the clutch cable broke or the clutch cable came off the fork. I opened the hood, saw the broken clutch cable and sighed with relief.
The fact is that failure of the clutch pedal does not always mean replacing the cable. It happens that the clutch fork breaks, then you need to remove the box and change the fork, and that costs 1000-2000 rubles just for the work. Stupidly, I towed my car home when it was possible to drive without a clutch.
I just didn’t know that you could start in first gear and start driving right away. In addition, you can change gears without a clutch; to do this, you need to shift the throttle at the moment of shifting.
The price of a VAZ 2110 clutch cable is approximately 220-280 rubles.
At the store I ask jokingly that I need a clutch cable for tens that will never break! They answer me: change the car :) I bought a clutch cable for a VAZ 2110 in Balakovo.
Of all, he was the most expensive. You can replace dozens of clutch cables in various ways:
- Remove the frill and the windshield wiper (to make it easier to get to the attachment of the cable end to the clutch pedal)
- Without removing the frill (method for those who are able to take the lotus position)
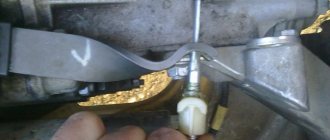
The standard instructions for replacing the VAZ 2110 clutch cable involve removing the frill and the windshield wiper, but I decided to take the shortcut and not disassemble anything. Also, after replacing the cable, the clutch needs to be adjusted. We unscrew the clutch cable fastening using a 19 key. Next, you need to remove the cable tip from the clutch release fork, but since The cable was torn, so we didn’t have to remove anything :) We move into the cabin and unscrew the nut securing the cable near the clutch pedal using a 8mm wrench. Unhook the bracket securing the cable tip to the clutch pedal. To do this, you will need to raise the clutch pedal as much as possible and use a screwdriver to pick up the clip (if you removed the “jabot” and the windshield wiper, then you need to remove the bracket in a more convenient way from under the hood). We pull out the clutch cable through the interior. I have some wires running in the channel along with the clutch cable, about which nothing is said in the replacement manual. Because of this, the cable didn’t want to get through, the large cable fastening washers in the engine compartment were in the way, I unscrewed them.
We push the new clutch cable from the interior under the hood. We fasten everything in the reverse order.
The most difficult moment here is to put back the bracket that secures the cable end to the clutch pedal. The fact is that it is very difficult to get there, which is why the standard instructions recommend removing the frill and the windshield wiper. But I decided to replace the staple with my own clip, which I made from a regular paper clip. I carefully fastened my clip into the recess of the pedal mount and clamped it with pliers for reliability. If you wish, you can lubricate the clutch cable with engine or transmission oil, but it is better to use grease (such as a CV joint) so that it does not freeze in winter. However, lubricating such a cable inside the casing with thick lubricant is problematic. In fact, replacing the VAZ 2110 clutch cable with your own hands is quite simple. I did this procedure for the first time. The replacement was carried out in the winter outside in the evening with a flashlight in hand. I spent 2 hours replacing the clutch cable. I spent most of my time in the pedal area when removing and installing the cable. The clutch pedal travel (all the way to the mat) should be 125mm (+-5mm). The maximum permissible pedal stroke is 160 mm. To adjust the clutch, you need to unscrew or tighten nut No. 2, after completing the adjustment, tighten lock nut No. 1. Tighten the rubber washer as much as possible to the fork.
You can adjust the clutch so that the pedal is lower than the brake pedal, then it will grab almost immediately after the pedal leaves the floor. If you make the clutch pedal high (higher than the brake pedal), then when you lower the clutch it will grab almost at the very end. A pedal that is too high can accelerate wear on the basket.
Replace the clutch cable on the “ten” yourself..
Photo source:
- mylada.net
- avtozam.com
- luxvaz.ru
- xn--2111-43da1a8c.xn--p1ai