As practice shows, replacing the cable connecting the clutch drive with the gearbox on a Lada Priora is very rarely required. It breaks quite infrequently. The most common problem with it is the threads; its components become frayed. For this reason, the clutch mechanism begins to jam regularly and the pedal eventually does not want to return to its place.
The replacement procedure is not particularly complicated, but it does require time and some effort. For work you will need the following tools and materials:
- a set of keys;
- flat screwdriver;
- cable clamp.
You can get to it in Priora only through the engine compartment. To do this, of course, you will need to open the hood. The cable itself is located next to the gearbox.
In what cases does an element need to be replaced:
- when broken;
- due to jamming;
- due to stretching;
- in case of failure of the mechanism regulating its length.
Do-it-yourself Lada Priora clutch cable replacement step-by-step instructions
We change the muffler on a VAZ-2112 with our own hands
. As practice shows, replacing the cable connecting the clutch drive with the gearbox on a Lada Priora is very rarely required. It breaks quite infrequently. The most common problem with it is the threads; its components become frayed. For this reason, the clutch mechanism begins to jam regularly and the pedal eventually does not want to return to its place.
The replacement procedure is not particularly complicated, but it does require time and some effort. For work you will need the following tools and materials:
- a set of keys;
- flat screwdriver;
- cable clamp.
You can get to it in Priora only through the engine compartment. To do this, of course, you will need to open the hood. The cable itself is located next to the gearbox.
In what cases does an element need to be replaced:
- when broken;
- due to jamming;
- due to stretching;
- in case of failure of the mechanism regulating its length.
Removal process
First of all, you will need to dismantle the air filter:
- remove the cable itself, using a leash to remove it from the fork of the drive that disengages the clutch;
- using 17 keys (2 pieces), partially unscrew the two nuts holding its shell on the gearbox crater bracket and pull it out;
- under the dashboard, located directly in the car interior, tighten the nut with an 8mm wrench from the pedal itself.
You just have to remember that getting to the place where the lower part of the cable is attached to the pedal will be quite difficult.
Access is hampered on one side by the engine compartment partition, and on the other by the lower edge of the instrument panel. The work space is significantly limited. But performing the required operation is quite simple - using a flat-head screwdriver that fits the length.
It will be much more difficult to remove the staple. To make it easier to operate, the pedal is raised as high as possible. Ideally, the bracket should appear above the opening. The main thing is to remove the fastening from the cable itself. In the future, it is easy to put on the bracket either using pliers with long lips, or from the side of the power unit with your hands.
Next you will need:
- remove the expansion tank of the engine cooling system;
- dismantle the thermal insulation of the engine on the left side;
- Unscrew the bolts and remove the fastening brackets holding the rubber boot in place (both on the left and on the right) and remove it completely;
- Using a screwdriver, carefully remove the retaining bracket from the fastening axis of the cable guide;
- the latter, in turn, is removed from the foot drive finger.
It is important not to lose the plastic sleeve installed there. Without it, the cable cannot be attached. If it becomes unusable, you need to put a new one on your finger.
If it becomes unusable, you need to put a new one on your finger.
Finally, all that remains is to pull out the mat holders (there are 2 of them). This must be done carefully, since they are plastic and break easily.
After this, you need to remove the rubber cover installed in the partition of the engine compartment and finally pull out the damaged cable.
How to install
Before installing a new cable, you need to thoroughly lubricate both the bushing and pin on the pedals. The plastic composition Litol-24 is best suited for this.
Then the end of the cable is threaded into a hole located in the bulkhead of the engine compartment on the passenger compartment side of the car so that it ends up in the engine compartment. The rubber cover is also tucked in there.
The gear tip driver is put directly onto the clutch drive pin and secured with a bracket.
The end of the shell is secured with a nut to the pedal bracket. Make sure that the fixation is secure. It is unlikely that anyone will like to, if something happens, climb there again due to a poor-quality connection.
Next, under the hood, the lower part of the shell is stuck into a special hole on the gearbox bracket.
The leash is screwed onto the end of the cable (there is a thread there) - the latter should protrude approximately one turn outward, but no more.
Now comes the time to adjust the clutch drive. Upon completion of this process, the pedal is pressed all the way two or three times and then the setting is repeated.
The working surface of the tip driver must be treated with the above-mentioned lubricant.
All that remains is to make sure that the entire mechanism is now working properly and install all previously removed parts in place.
You can learn more about the process in the video below:
How much does it cost to install a new clutch on a Lada Priora?
The VAZ 2170 is a car of a domestic manufacturer, which means it has a minimum of electronics and no complex systems. It is necessary to change the clutch if the following symptoms appear when pressing the pedal:
- The pressure became much tighter.
- Clicks appeared.
- The release bearing began to rattle.
It is not at all necessary to seek help from a car service, since this service will cost the owner an amount equal to 3,000 rubles.
You can replace this element yourself. To do everything correctly, you must follow the following algorithm:
- Place the car on a jack and raise it.
- Remove the left strut to make it easier to remove the gearbox and put it back.
- Remove the gearbox.
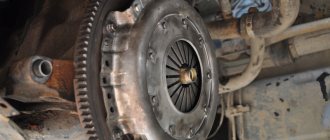
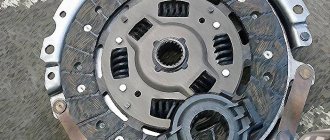
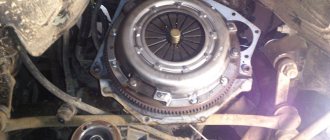
- Decide whether the old pressure plate will be installed or a new one. If it remains old, then it is necessary to mark the position of the disc and flywheel relative to each other (to maintain balance).
- While holding the flywheel, use a 8mm wrench to unscrew the six bolts securing the pressure plate housing to the flywheel. This must be done evenly, one turn for each bolt, until the bolts are unscrewed.
- Remove the clutch cover along with the pressure plate.
- Remove the driven disk together with the mandrel.
- Carefully evaluate the external condition, checking all gaps according to the manual.
- When installing the clutch, it is necessary to install the driven disc using a mandrel.
- Install the pressure plate housing onto the three pins and screw in the bolts to secure the housing to the flywheel.
- Tighten the bolts and remove the mandrel, install the gearbox.
- Adjust the clutch cable.
- Return the left pillar to its original place.
Read more: Kia Sportage luxury equipment
You can purchase this item at any auto parts store.
A caring attitude towards the clutch is instilled in driving school. Gently pressed, switched gears, gently released. The clutch is the unit connecting the gearbox and the motor. Adjustment is needed after replacement. As a rule, clutch replacement can be done in a garage. Lada Priora is generally a repairable car. At a service station, work will cost 1500-2000 rubles. The price of a set of original clutch costs approximately 2000 rubles. On foreign cars the price of the unit is more expensive even with replacement and adjustment. With the purchase of your first car, your understanding of the full value of the clutch increases significantly. On the Priora - one of the most popular city cars - many learned to drive (for real, without an instructor!) and perhaps changed the unit in the garage.
The Priora clutch is simple in design, but, nevertheless, it must always be in good working order - the health of the car and traffic safety depend on it. Therefore, you need to know everything about replacing a unit on a Lada Priora - after all, it’s not just a clutch pedal, it’s a whole mechanism. Which is involved in setting the car in motion - the gearbox and the engine are on friendly terms.
As an example, everyone understands that to disengage the clutch the pedal must be depressed. What happens if the machine does not respond to this? Will it bite or stall in the middle of the road? You shouldn’t listen to advice at all, trying to torture the gearbox without a clutch, “catch” the speed. There is only one way out of this situation: learn a good lesson and worry about the “health” of your “friend” in time. Read the article to the end and you will be safe - this unit will definitely not let you down on the road!
Replacing the clutch cable of a VAZ 2110
Replacing the clutch cable of a VAZ 2110 with your own hands
The other day, while changing gear, my clutch pedal suddenly dropped. My first thoughts were that either the clutch cable broke or the clutch cable came off the fork. I opened the hood, saw the broken clutch cable and sighed with relief. The fact is that failure of the clutch pedal does not always mean replacing the cable. It happens that the clutch fork breaks, then you need to remove the box and change the fork, and that costs 1000-2000 rubles just for the work.
Stupidly, I towed my car home when it was possible to drive without a clutch. I just didn’t know that you could start in first gear and start driving right away. In addition, you can change gears without a clutch; to do this, you need to shift the throttle at the moment of shifting.
The price of a VAZ 2110 clutch cable is approximately 220-280 rubles. In the store I ask jokingly that I need a clutch cable for a dozen that will never break! They answer me: change the car. I bought a clutch cable for a VAZ 2110 in Balakovo. Of all, he was the most expensive.
You can replace dozens of clutch cables in various ways:
- Remove the frill and the windshield wiper (to make it easier to get to the attachment of the cable end to the clutch pedal)
- Without removing the frill (method for those who are able to take the lotus position)
The standard instructions for replacing the VAZ 2110 clutch cable involve removing the frill and windshield wiper, but I decided to take the shortcut and not disassemble anything.
Replacing the VAZ 2110 clutch cable without removing the frill
We unscrew the clutch cable fastening using a 19 key. Next, you need to remove the cable tip from the clutch release fork, but since The cable was torn, so we didn’t have to remove anything. We move into the cabin and unscrew the nut securing the cable near the clutch pedal using a 8 key. Unhook the bracket securing the cable tip to the clutch pedal. To do this, you will need to raise the clutch pedal as much as possible and use a screwdriver to pick up the clip (if you removed the frill and the windshield wiper, then you need to remove the bracket in a more convenient way from under the hood). We pull out the clutch cable through the interior. I have some wires running in the channel along with the clutch cable, about which nothing is said in the replacement manual. Because of this, the cable didn’t want to go through, the large cable fastening washers in the engine compartment were in the way, I unscrewed them. We push the new clutch cable from the passenger compartment under the hood. We fasten everything in the reverse order. The most difficult moment here is to put back the bracket securing the cable tip to clutch pedals. The fact is that it is very difficult to get there, which is why the standard instructions recommend removing the frill and the windshield wiper. But I decided to replace the staple with my own clip, which I made from a regular paper clip. I carefully fastened my clip into the recess of the pedal mount and clamped it with pliers for reliability. If you wish, you can lubricate the clutch cable with engine or transmission oil, but it is better to use grease (such as a CV joint) so that it does not freeze in winter. However, lubricating such a cable inside the casing with thick lubricant is problematic.
In fact, replacing the VAZ 2110 clutch cable with your own hands is quite simple. I did this procedure for the first time. The replacement was carried out in the winter outside in the evening with a flashlight in hand. I spent 2 hours replacing the clutch cable. I spent most of my time in the pedal area when removing and installing the cable.
Adjusting the clutch pedal VAZ 2110
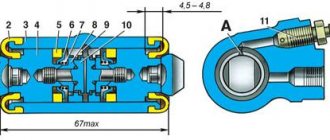
The clutch pedal travel (all the way to the mat) should be 125mm (+-5mm). The maximum permissible pedal stroke is 160 mm. To adjust the clutch, you need to unscrew or tighten nut No. 2, after completing the adjustment, tighten lock nut No. 1. Tighten the rubber washer as much as possible to the fork.
You can adjust the clutch so that the pedal is lower than the brake pedal, then it will grab almost immediately after the pedal leaves the floor. If you make the clutch pedal high (higher than the brake pedal), then when you lower the clutch it will grab almost at the very end. A pedal that is too high can accelerate wear on the basket.
Replace the clutch cable on the “ten” yourself..
Price of spare parts and repairs
Do-it-yourself clutch adjustment of a VAZ 2110 video
First of all, you should decide whether you will repair it yourself or go to a service station. The cost of a hood cable depends on the make and model of the car; in many modern ones, an entire electronic mechanism is installed instead of a handle.
On average, the price starts from $2-3 for domestic cars and from $10-15 for foreign cars. Mechanisms in the cabin will cost depending on the model, regular mechanical ones are about 5-10 $ per set for domestic cars and 15-20 for foreign cars. If electronics are installed, then such a set will cost from $30.
The average cost of replacing a car hood cable at a service station, including the procedure of opening the old one, will cost from $15. Not to say that it is expensive, but there is not much work for such a price. At home everything will be much cheaper.
Video of opening the hood with a broken cable:
No one will dispute the essential role of the friction clutch in the operation of a car transmission. The efficiency of using the traction of the power unit and even safety directly depend on the quality of the clutch.
It is important for VAZ 2170 owners not only to replace the components for transmitting torque in a timely manner, but also to configure their control system extremely correctly
Level control and topping up
Replacing the VAZ 2114 clutch with your own hands
To diagnose the fluid level you will need a white napkin:
- Start the car engine and drive for 10 minutes, this will allow the transmission to warm up.
- Checking the level is carried out on a flat surface. Stop the engine and wait about ten minutes until the transmission fluid drains into the pan.
- Open the hood and locate the dipstick to check the level. It is located on the right side of the engine compartment.
- Wipe the dipstick with a napkin and reinstall it in the hole, then remove it. If the fluid level is normal, it will be located between the two marks on the dipstick.
The service station channel in Simferopol published a video demonstrating the procedure for changing the lubricant in a Solaris automatic transmission.
Removal process
First of all, you will need to dismantle the air filter:
- remove the cable itself, using a leash to remove it from the fork of the drive that disengages the clutch;
- using 17 keys (2 pieces), partially unscrew the two nuts holding its shell on the gearbox crater bracket and pull it out;
- under the dashboard, located directly in the car interior, tighten the nut with an 8mm wrench from the pedal itself.
Access is hampered on one side by the engine compartment partition, and on the other by the lower edge of the instrument panel. The work space is significantly limited. But performing the required operation is quite simple - using a flat-head screwdriver that fits the length.
It will be much more difficult to remove the staple. To make it easier to operate, the pedal is raised as high as possible. Ideally, the bracket should appear above the opening. The main thing is to remove the fastening from the cable itself. In the future, it is easy to put on the bracket either using pliers with long lips, or from the side of the power unit with your hands.
Next you will need:
- remove the expansion tank of the engine cooling system;
- dismantle the thermal insulation of the engine on the left side;
- Unscrew the bolts and remove the fastening brackets holding the rubber boot in place (both on the left and on the right) and remove it completely;
- Using a screwdriver, carefully remove the retaining bracket from the fastening axis of the cable guide;
- the latter, in turn, is removed from the foot drive finger.
It is important not to lose the plastic sleeve installed there. Without it, the cable cannot be attached
If it becomes unusable, you need to put a new one on your finger.
Finally, all that remains is to pull out the mat holders (there are 2 of them). This must be done carefully, since they are plastic and break easily.
After this, you need to remove the rubber cover installed in the partition of the engine compartment and finally pull out the damaged cable.
Replacing the release bearing of Priora
In order to change the part, you will have to remove the gearbox. You can find detailed instructions for removing the gearbox here (link to page).
After removing the box, you need the following:
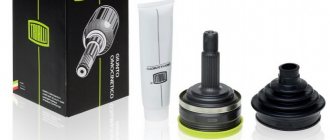
The first step to removing the bearing is to find the antennae of a special spring retainer. Next, we remove the two ends of the antennae from the bearing holder. To do this, you need to apply a little force and pull the antennae out of the two holes. Now the bearing together with the holder can be easily removed from the guide sleeve. In order to inspect or replace the part itself, you will need to remove it directly from the holder
To do this, use a flat-head screwdriver to press out the four metal tabs in several places on the case. Now the part can be removed and replaced with a new one. When installing a new bearing, pay attention to its visual condition (there should be no defects or cracks). After installation and lubrication, unscrew the part while checking its operation for any extraneous noise.
In addition, no noticeable backlash should be recorded. Reinstalling the gearbox.
Now you know how to change the release bearing on a Priora!
Important points
Please note that there are counterfeit auto parts on sale today. Please note that most new, original release valves contain light-colored factory-applied lubricant.
In addition to the above, we recommend that you purchase release levers that are made only of metal. In addition to the presence of a metal body, make sure that in the places of fastenings, the so-called lugs (clamps), the metal coating is of a uniform color without signs of hardening at high temperatures. Pay special attention to checking the part for the so-called backlash (should be absent or minimal). Rotate the product, listen to see if there is any noise when it rotates.
In order to choose a Priora clutch release bearing, you need to know what clutch system you have installed (which manufacturer). For example, Valeo also has its own, original bearings that are not interchangeable. And on the contrary, it guarantees full compatibility and correct operation with various clutch systems on Kalina and Priora cars. Plus, there are good reviews about the quality and long service life.
Adjustment instructions
The Lada Priora is equipped with a clutch cable with a ratcheting mechanism. The cable is backlash-free and does not require adjustment, but manufacturers recommend this be done during every maintenance.
Clutch cable
To adjust the cable on the Lada Priora, you need to prepare a screwdriver and a ruler. The procedure then consists of the following steps:
- To perform work, you must open the hood.
- First you should disconnect the mass air flow sensor and.
- After this, a cable will be visible, at the end of which there is a plastic clip.
- Before adjustment, it is necessary to set the cable to its original position: overcoming the resistance of the spring, push the cable clamp forward until it stops in the direction of movement of the car.
- This clamp should be pulled towards you and the distance between it and the plug should be measured, it should be 27 mm.
- The distance is adjusted by turning the tip counterclockwise. In this way, an increase in distance can be achieved.
- Twist the clamp until the distance is 27 mm. Accuracy is very important here.
- Now you can release the cable and place it in the fork.
- After completing the steps, you need to get behind the wheel and press the pedal three times until it stops.
- Then again you need to measure the distance, it must be exactly 27 mm, otherwise we adjust until the desired distance is achieved.
- Next, you should insert the tip into the groove of the mechanism fork and release it. Thanks to the spring, the tip driver clamp is installed without any gap.
- After adjusting the cable, you need to return everything to its place, start the engine and check the operation of the mechanism.
After adjustment, the clicks disappear and the clutch release pedal operates softer.
Clutch pedals
When the clutch pedal travel is large, the clutch is not completely disengaged, so it still comes into contact with the flywheel of the power unit. When the stroke is low, the driven disk does not turn on completely, which leads to slipping and loss of torque.
You should measure your pedal stroke if the following symptoms occur:
- jerks appear when starting to move;
- noise and shock when shifting gears;
- the pedal gets stuck.
The symptoms described indicate that the mechanism requires adjustment. You can diagnose its operation on Priora yourself. To do this, start the engine, slowly release the PS and start moving. If, when the PS is released, the car immediately begins to move, this means that there is no free play. If the car does not budge even with the pedal fully released, then its travel exceeds the norm. The brake pedal should be at the same level as the brake pedal. In this case, its full stroke will be in the range of 125-135 mm. Fluctuations up to 160 mm are possible.
We measure the free play of the pedal
When making adjustments, loosen the first cable adjusting locknut located in the engine compartment on the bracket.
Locknuts for adjusting free play
By tightening the second locknut, the distance and stroke of the PS are adjusted. Thus, the desired result is achieved. After completing the procedure, the first locknut is tightened.
If you adjust so that the brake pedal is located above the brake pedal, then the clutch will barely leave the floor. If it’s lower, it will set almost at the very end. If the PS is located too high, the basket wears out faster. The ideal option is that the brake and clutch pedals should be at the same level.
Loading …
In order to extend the life of any mechanism, you should use it carefully. You should not constantly keep your foot on the PS; it is better to place it on the left on the floor. During each technical inspection of the Lada Priora, it is recommended to monitor the free movement of the PS and the clarity of gear shifting and, if necessary, make adjustments.
Features of clutch adjustment
Vehicles Lada Priora, Kalina and Granta are equipped with clutch cables equipped with ratcheting devices. By their design, the cables are backlash-free, so their adjustment is theoretically not necessary, but in fact, the manufacturer recommends that car owners periodically adjust the device.
To correctly adjust the cable on Lada Kalina, Priora and Granta cars, prepare a screwdriver and a ruler (or caliper) and follow these steps:
First you need to open the hood, after which the cable should be installed in its original position. To do this, you need to move the lower part of the cable a little forward, that is, in the direction of its movement, this must be done until it stops. When moving the cable, you may feel a slight force on the return spring; this should not scare you.
Next, using a ruler or caliper, you should measure the distance. Which one is shown in the photo, you need to mark the distance from the beginning of the fork to the cable lead. To do this correctly, you must also hold the cable and fix it in one position. Take a measurement, ideally it should be 2.7 cm, but of course, if you are faced with the need to adjust on a Lada Priora, Kalina or Grant, then this distance will be either larger or smaller. Therefore, you should bring it to the required parameter; to do this, you need to rotate the cable lead in one direction or the other.
After these steps, you will need to insert the tip of the cable into the groove of the fork, then the element itself can be released
Please note that there should be no gap at all.
In general, the cable adjustment procedure is completed. Now you only need to press the pedal a few times to make sure everything is working properly
After several presses, measure the distance on the cable again; if necessary, adjust the device again.
No matter how new the clutch is, the owners of Lad Prior, Grant and Kalin periodically need to make adjustments to the pedals.
The need for adjustment may occur when:
- constant jerking when starting to move;
- the appearance of shocks when trying to turn on one or another speed;
- sinking of the pedal itself.
These symptoms indicate that the pedal needs to be adjusted correctly. Ideally, the clutch pedal should be located at the same level as the brake - then the full stroke should be about 12.5-13.5 cm, but in practice this figure can be increased to 16 cm. To correctly adjust the pedal, prepare two wrenches of the appropriate sizes.
- Using a wrench, loosen the cable lock nut, which is installed in the engine compartment.
- Next, you need to use another wrench to start tightening the second locknut, so you can correctly set the required gap. When the process is complete, the first locknut should be tightened until it stops.
Please note that if you set the pedal so that it is lower than the brake, then the grabbing will appear when the pedal just leaves the floor. Accordingly, if the brake pedal is lower, then the clutch will occur almost at the end. Ideally, these two pedals should be located at the same level (video by Time R).
DIY replacement instructions
How to replace an oxygen sensor:
- The car is driven into a pit, the engine protection is dismantled.
- Locate the wiring from the regulator so you can get to the device.
- Next, the clamp is cut and the plugs are disconnected. Wait a few minutes for the motor to cool down.
- Using a 22mm wrench, the regulator is unscrewed.
- The new controller is installed in place of the old one, the assembly steps are repeated, only in the reverse order.
Price issue
The cost of the device depends on the manufacturer. On average, prices for oxygen sensors range from 1300 to 2600 rubles.
What is an oxygen sensor, or as it is also called a lambda probe, can be found out in the article. This publication will discuss how to replace this sensor if it breaks down on a car. The technological process is not particularly difficult, so even the most ordinary car owner can dismantle and subsequently install the DC on his car.
Replacement algorithm
Location of the clutch cable under the hood.
- Open the hood and remove the air filter housing. To do this, remove the sensor (mass air flow sensor), unscrew the clamp and remove the housing itself from the mounting holes.
Scheme for dismantling the air filter housing.
We use a key set to 17. Spray with WD-40 if it’s difficult.
We carefully pick up this bracket with a screwdriver.
Installing the cable is not all because you need to adjust its tension. To do this, you need to pull the cable all the way forward by the threaded end. Taking a caliper, measure the distance from the clutch release lever to the cable. It should be 27 mm .
Next, we assemble everything in reverse order.
How to know when it's time to change the cable
The following signs indicate the need to replace the clutch cable:
- Clicking sounds appear when you press the clutch pedal. They can be eliminated by tightening the cable. If such manipulations do not help, the part will have to be replaced.
- Periodic pedal jamming .
You should not delay replacing the cable, because it can break at the most inopportune moment. In such a situation, you can engage first gear and start from the starter. The car will roll forward with the starter and start, you will have first gear to get to the service station or parking lot! But this is dangerous and we do not recommend doing this. Moreover, this can be bad for the starter.
Source
How to Identify Incorrect Clutch Adjustment
As drivers say, the clutch can be in two wrong positions.
- Weak.
- Overstretched.
What does it mean? When the clutch is “weak”, it means that the release bearing is not fully pressing on the “petals” of the drive plate. This means that separating them is difficult. Accordingly, an unpleasant grinding sound of the box will sound. It will become very difficult to shift into gear. There is a risk of the gearbox shaft gears breaking. When the clutch is tightened, the picture is somewhat different, the gear engages perfectly, no difficulties arise. But! Under heavy loads, the disks begin to “slip.” That is, the engine roars with all its might, but the car does not pick up the required speed. There is a smell of burnt friction material. This means that the cable is too tight and the adhesion between the discs is broken.
Attention! Both options for incorrect adjustment lead to breakdowns and costly repairs later. Therefore, at the slightest sign of a violation, it is necessary to properly regulate the clutch drive.
How to install
Before installing a new cable, you need to thoroughly lubricate both the bushing and pin on the pedals. The plastic composition Litol-24 is best suited for this.
Then the end of the cable is threaded into a hole located in the bulkhead of the engine compartment on the passenger compartment side of the car so that it ends up in the engine compartment. The rubber cover is also tucked in there.
The gear tip driver is put directly onto the clutch drive pin and secured with a bracket.
The end of the shell is secured with a nut to the pedal bracket. Make sure that the fixation is secure. It is unlikely that anyone will like to, if something happens, climb there again due to a poor-quality connection.
Next, under the hood, the lower part of the shell is stuck into a special hole on the gearbox bracket.
The leash is screwed onto the end of the cable (there is a thread there) - the latter should protrude approximately one turn outward, but no more.
Now comes the time to adjust the clutch drive. Upon completion of this process, the pedal is pressed all the way two or three times and then the setting is repeated.
The working surface of the tip driver must be treated with the above-mentioned lubricant.
All that remains is to make sure that the entire mechanism is now working properly and install all previously removed parts in place.
You can learn more about the process in the video below:
Removal, replacement, installation of the crankshaft and its bearings
Symptoms: the clutch pedal has moved to its lowest position, the free play of the clutch pedal has increased.
Possible cause: Clutch drive cable is damaged.
Tools: socket set, wrench set, flat screwdriver, solid oil.
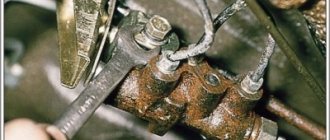
1. In the car interior, under the dashboard, unscrew the fastening nut of the clutch cable support to the pedal bracket using an 8-mm wrench. Remove the stop from the bracket.
2. Disconnect the locking bracket and the housing of the driven disc lining wear compensation mechanism from the clutch pedal pin (use a screwdriver).
3. Remove the plastic bushing from the pedal pin. Inspect the bushing for wear and, if present, replace the bushing after applying grease to it.
4. Remove the clutch release cable seal from the hole in the front panel (in the engine compartment of the car).
5. Pull the tip of the cable in the direction of straight-line movement of the car, and then remove it from the groove located on the clutch release fork.
6. Unscrew the fastening nut of the cable end to the bracket on the gearbox using a 17mm wrench. Prevent the cable end from turning by holding it with a second wrench.
7. Remove the cable end from the slot in the bracket, and then pull the cable out of the hole in the front panel.
8. Remove the clutch cable from the vehicle.
9. To install a new clutch drive cable, first pass it through the hole in the front panel, and then fasten the housing of the driven disc lining wear compensation mechanism to the clutch pedal pin.
Note. Before installing the wear compensation mechanism on the clutch pedal pin, lubricate the pin bushing with grease.
10. Fix the cable sheath stop on the pedal bracket.
11. Install the sealing element of the clutch cable sheath into the slot in the front panel.
12. Install the cable end into the gearbox bracket, and then tighten the cable nut.
13. Screw the driver onto the lower tip of the clutch drive cable so that the tip protrudes relative to the driver end to a height of 0 - 1 mm.
14. Install the clutch release cable to its original position as follows:
– move the lower tip of the drive cable all the way forward in the direction of straight-line movement of the vehicle;
– hold the tip in an extended position;
– measure dimension L (the distance between the clutch release fork and the driver). The distance L should be 27 millimeters;
– if the permissible value does not correspond, set it by rotating the leash in the desired direction.
15. Insert the end of the drive cable into the groove located on the clutch release fork, and then release it. The leash must be installed on the fork without play under the action of a spring.
Note. Before installing the tip guide on the clutch release fork, lubricate its surface that contacts the fork with grease.
16. Depress the clutch pedal all the way three times, then measure distance L again (see point 14).
17. Repeat the adjustment if necessary.
How to adjust the throttle cable of a Lada Priora?
- The adjustment is carried out using a clamping bracket, which we previously removed. This bracket is a tensioner for the casing in which the cable moves.
- Remove the bracket and tighten the throttle cable so that it sags about 1-2 mm near the throttle drive.
- Now you need to install the fixing bracket into place in the casing. Make sure that the cable is tensioned optimally and that the throttle valve is not open when the gas pedal is at zero position. A cable that is too tight will cause the idle speed to be constantly elevated. Squeeze the gas pedal several times and check how everything works.
- Start the engine and make sure the throttle cable is adjusted correctly and the idle speed is normal.
NOTE Adjustment of the throttle valve drive is shown on the VAZ 21124 (1.6i) engine.
Features of adjusting the throttle valve drive on the VAZ 2112 (1.5i) engine are indicated in the text. RECOMMENDATION It is necessary to adjust the throttle valve drive after replacing the drive cable, after removing and installing the throttle assembly, and also after performing work related to dismantling the intake module. Throttle actuator adjustment may be necessary if the vehicle's engine may not be able to produce maximum power due to the throttle valve not being fully opened.
An assistant will be required to perform the adjustment work. Adjustment sequence
1. We prepare the car for work (see paragraph 2a Preparing the car for maintenance and repair). 2. Remove the decorative trim of the engine (see Decorative trim of the engine - removal and installation). 3. After loosening the three clamps, remove the air supply hose to the throttle valve. 4. We control the position of the throttle valve: with the gas pedal pressed (all the way to the floor), the valve should be completely open,... . and when the gas pedal is released, it is completely closed.
5. The position of the closed throttle valve is adjusted with a stop screw, rotating it with a slotted screwdriver with a thin blade. The throttle valve should close completely without sticking. The position of the open throttle valve is adjusted by changing the tension of its drive cable.
WARNING When adjusting the open throttle valve, do not overtighten the cable, as this may damage the drive elements.
6. On the VAZ 2112 (1.5i) injection engine:
Using two 13 mm wrenches, rotating the adjusting nuts (1 and 2), we adjust the cable tension (small sagging of the cable is allowed in the area between the throttle valve drive sector and the end of the casing).
On the VAZ 21124 (l.6i) injection engine:
a) Use pliers to remove the locking plate of the cable sheath. b) By moving the cable sheath in the rubber holder, we adjust the cable tension (in the area between the throttle valve drive sector and the end of the sheath, a slight slack in the cable is allowed). c) Install the locking plate in place. 7. Check the operation of the throttle valve drive. If necessary, repeat the adjustment. 8. Install all the removed parts on the car in the reverse order of removal.
Mechanics
Mechanically, the clutch operation process is extremely simple. Let's analyze it from the moment the movement begins. After starting the engine, the car is in neutral gear (starting the engine in gear is bad manners). The clutch is depressed all the way - this means that it is turned off, the driven and pressure plates have separated, that is, a moment is created to change gear. The gearshift lever is moved to position 1, and first gear is engaged.
The pedal is smoothly released (the clutch is engaged), at this moment the most important thing happens: the distance between the pressure plate and the driven one is constantly decreasing, and the force transmitted by the engine has already set one disk in motion, which makes the moment of “collision” of the two disks become difficult. If the pedal is released abruptly, they will quickly touch, which means that the disc will stop (imagine that you are walking and tripping on a stone - much the same thing happens to the engine)
The engine may stall, or in the best case, the car will simply “bite.” At such moments, the “petals” on the driven disk suffer greatly - the more “flattened” they become, the closer the time for replacing the “hitch” is. If the discs come into contact smoothly and the driven disc is slowly set in motion, the car starts from a standstill.
Replacing the clutch cable on a VAZ 2110
In most cases, a breakdown of a manual transmission on a “ten” is not associated with any serious problems in the box itself. The most frequently broken component in a tens manual transmission is the clutch cable, which can be replaced on your own. Therefore, next we will talk about how to properly replace the clutch cable (see the video “How to remove and adjust the clutch cable on a VAZ 2110, 2111, 2112” below).
Why does the clutch pedal fail?
On a “ten” that has a solid mileage, the clutch pedal often begins to fail, and there may be two reasons for this:
- Broken clutch cable;
- Malfunction of the clutch fork.
Clutch cable rupture on a VAZ-2110 occurs when the vehicle is not used properly for a long time, for example, in extreme conditions. This part cannot be repaired, and therefore it is simply replaced. How to open the hood if the cable is broken? At the same time, even if the clutch cable breaks, you can get to the desired location without towing. To do this, you need to set the first gear, start the car and start driving. The transition from one gear to another, in this case, occurs when the gear is set to neutral. Having reached the desired location, it will be possible to replace the clutch cable without removing the gearbox.
If the clutch fork malfunctions, then dismantling the manual transmission will be required.
Clutch cable replacement process
Even an inexperienced car enthusiast can replace the clutch cable on a “ten”. However, if you carefully study the repair manual that came with the car, there is a clear indication that you should first dismantle the windshield wiper and remove the panel under the wipers (the so-called frill). Once these parts are removed, you can proceed to the clutch cable replacement procedure.
DISASSEMBLY OF A BROKEN ROPE
- Using two 19mm wrenches, the broken cable is removed from the bracket located on the gearbox by unscrewing the nut holding it;
- After the cable tension is loosened, it is pulled out of the fastening;
- Fix the clutch fork with one hand, and pull out the cable with the other.
UNLOCK THE CABLE FROM THE CLUTCH PEDAL
If the panel under the wipers and the windshield wiper were removed in advance, then further removal of the cable will occur only in the engine compartment. This is due to the fact that access to the casing protecting the clutch pedal is open. This casing is located next to the hydraulic brake booster.
- We unscrew, using a Phillips screwdriver, the fastening screws of the casing, and dismantle it;
- Using the same screwdriver, you need to hook and pull out the locking bracket that secures the cable head to the pedal bushing;
- We dismantle the cable.
If the panel under the wipers and the windshield wiper were not previously removed, the retaining bracket will have to be removed directly from the car interior, and not from the engine compartment. This work is very inconvenient, but, nevertheless, it is done like this:
- Raise the clutch pedal to the highest point of its trajectory, after which the bracket is dismantled, and then the cable itself;
- Using the “8” key, twist the support plate and pull the cable into the car interior.
INSTALLING A NEW CLUTCH CABLE
- Dismantle the bushing located on the clutch pedal pin - the old cable was put on it (if the bushing is very worn, it should be replaced);
- Using lithol, lubricate the cable guide and clutch pedal pin;
- The end of the clutch cable is threaded from the car interior into the engine compartment;
- Attach the cable to the pedal;
- Hook the cable and clutch fork;
- Secure the cable in the bracket on the gearbox.
How to adjust the clutch cable
After the clutch cable has been replaced on a VAZ 2110, it is necessary to adjust it. The point of this procedure is to set the correct pedal stroke. The free play of the pedal, which is measured by the distance from the floor of the car to its top point, should be in the range of 12.5 - 13 cm. If such measurements are not very convenient, then it is recommended to simply adjust the clutch pedal so that it is level with the other pedals.
- Slightly unscrew the nuts securing the cable (they are located on the gearbox bracket);
- Using adjusting nuts, adjust the location of the cable tip, fixing it and checking the trajectory and position of the clutch pedal;
- After the pedal is adjusted, tighten the fastening nuts.
At this point, all adjustment steps required after replacing the clutch cable are completed.
Video: How to remove and adjust the clutch cable on a VAZ 2110, 2111, 2112
It wouldn't hurt to know
What do most owners of new Lada Priora do? Naturally, they treat the body with Movil or something similar against corrosion; they don’t have any more problems at the initial level. However, there were complaints about squeaking when pressing the clutch pedal; sometimes it was present when the engine was warm, sometimes only when it was cold - the essence is that there is a problem.
Of course, everyone immediately starts reading the “primer book” on how to correctly adjust the clutch on their Priora, which sometimes helps, but the fact of the matter is that sometimes. After this, owners can try several more methods, after which the squeak may disappear:
- Replace the drive cable, some drivers praise the “tenth”.
- Check the presence of a spring in the automatic tension mechanism; sometimes the effect can be achieved after replacing the standard part with a spring with greater elasticity.
- A certain percentage of car enthusiasts get rid of the crackling noise by lubricating the fork and the plastic cable nut.
- Lubricate the installation site of the plastic bushing on the pedal bracket with lithol.
- Remove the boot from the fork lever and lubricate the gearbox input shaft with graphite grease from a can.
It is worth considering another effective method, shown in the video, which is used by experienced car enthusiasts. Its essence is as follows:
- Disconnect the mass air flow sensor and remove the air filter.
- Remove the clutch release rod plug.
- Release the cable from the clutch fork.
- Pour 30-40 ml of gear oil from a syringe.
- Move the fork back and forth 10-15 times.
- Reinstall the cable, plugs and filter.
Using the example of the second part of the article, it becomes clear that adjusting the clutch drive does not always bring the desired effect in the fight for acoustic comfort. Although, from a technical point of view, the procedure is necessary, since it ensures productive operation of the car.
It will be useful: Where is the VAZ-2114 fuel pump fuse: diagram
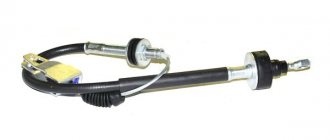
Why do you need a clutch cable and when to change it?
Thanks to the clutch, torque is transmitted from the transmission to the power unit. The gearbox is connected to the engine by a vehicle, which is a metal cable. It is with the help of the vehicle that the car starts, gears are changed and braking is carried out. Thanks to this lever mechanism, the car moves.
Lada Kalina is equipped with a ratcheting mechanism, thanks to which the length of the cable is adjusted. During clutch operation, the friction linings of the disc are constantly worn out, and the tension of the vehicle changes. The tension is adjusted using a ratchet mechanism.
In theory, the ratchet mechanism works as follows:
- due to the tension of the cable, the clutch release fork (VVS) rotates, causing the spring to compress;
- when compressed, the spring causes compression of the clamps located on the tip of the vehicle;
- Thus, the tip is released, the vehicle is tensioned.
In reality, drivers often have to make frequent manual adjustments.
Clutch cable and adjustment mechanism
Signs that your vehicle needs adjustment or replacement:
- the appearance of extraneous sounds when the clutch is disengaged;
- gears shift poorly;
- insufficient traction;
- the clutch does not disengage completely;
- The clutch pedal (PS) has failed.
Before you start adjusting the vehicle on the Lada Kalina, you should check its condition. The vehicle requires replacement if it is rusty, torn or has any damage. To check the condition of the vehicle, it is necessary to remove the air filter.
Automatic tension cable
The design of the clutch cable with automatic tension differs from the usual one only in the tip attached to the pedal. Otherwise, the entire structure remains unchanged. Installation of a tip with auto tension first appeared in 2007 on the Lada Priora. Subsequently, such a cable was borrowed by Niva, Grant, Kalina and Vesta cars.
The principle of operation of such a tip is based on a ratcheting mechanism; over time, when the cable is stretched, the spring of the tip automatically jumps over the “tooth” on the ratchet mechanism, thereby producing tension.
This design principle allows the car owner not to resort to adjustments for a very long time.
The cost of the cable in stores starts from 400 rubles and above, depending on the manufacturer and store.
Flaws
The main disadvantage of the cable is the increased noise level. According to reviews from owners of cars with an automatic clutch tension adjustment mechanism, the cable can make cracking and grinding noises when pressing the pedal.
Correctly adjusting the cable or replacing it with a new one will help get rid of this symptom.
About working on the clutch cable on LADA Priora
Initially, on domestic passenger VAZs with a rear-wheel drive system, the clutch was engaged thanks to an ordinary hydraulic system. The principle is exactly the same as that of the brake drive: all the pressure from the main cylinder is supplied to the so-called working cylinder. Only modern cars, such as, for example, the Lada Priora we are considering, received a front-wheel drive system; the specialists of the automobile manufacturer abandoned this principle of operation of the device in question, which greatly facilitated maintenance. The company has developed a reliable and very simple system for engaging a car clutch using a cable, now it is the main one in the entire system. The principle of the rocker arm, so to speak, is applied here, that is, when pressing the lower part of the corresponding pedal while sitting in the car, its working part, located at the top, passing through the rod (the so-called base), certainly begins to go in a completely different direction, plus everything else at this time she pulls the cable straight and, of course, behind her.
The second end of the cable is located on the drive fork of the clutch system. When the pedal is pressed, the clutch is released, thus directly enabling shift/on. transfer.
Step-by-step instruction
Disassembled clutch pedal
To change the clutch cable, you will need a set of screwdrivers and wrenches. Initially, the air filter, which is located in the engine compartment, is removed. The clutch cable is pulled forward. Then it is removed with a leash from the groove of the lever.
Using a “17” wrench, unscrew the nut securing the tip of the shell of this unit to the bracket several turns. You will need to hold it with a hex wrench. The tip is removed from the bracket. The last element is located in the Priora's interior.
The nut that secures the bracket is unscrewed with an “8” key. Since replacing the cable on a Priora is carried out in difficult conditions, to facilitate the work, it is recommended to firmly pull the clutch pedal. Using a screwdriver, pry up the rear edge of the last element. Then the pedal is dismantled.
The next step involves pulling the cable sealing boot out of the hole. After dismantling it, turn away and remove the leash from the tip. If the Lada Priora clutch sensor fails, it is replaced with a new device. As for installing the clutch cable, this procedure is carried out after checking the condition of the plastic bushing on the corresponding pin. If it is worn out, a new unit is installed. The pin and bushing will need to be lubricated with a special substance.
Installation of the clutch cable on the Priora begins with passing this element through the hole in the shield from the car interior into the engine compartment. Then the sealing cover is mounted, and the housing of the corresponding cable mechanism is put on the finger. After fixing it, the cable sheath is secured.
It is screwed onto the tip of the wires so that its end is flush with the similar element of the leash. The last element is installed in place. Next, adjust the clutch drive on the Priora. This procedure involves pulling the cable forward by its tip until it stops completely. In this position, the distance from the lever to the end is measured. This figure should be 27 mm.
On the first models of Russian VAZ passenger cars, with rear-wheel drive, the clutch was engaged using a hydraulic system. That is, as with the brake drive, when the pressure from the master cylinder is transmitted to the working, actuating mechanism. When developing a new series of VAZs with driving front wheels, this scheme was abandoned. A simple and reliable system for engaging the clutch mechanism using a special cable was developed. The principle of the rocker arm works here. When you press the lower part of the pedal, the upper working area, through the base (rod), goes in the opposite direction and pulls the cable along with it.
The other end of the flexible connector is attached directly to the clutch drive fork. When you press the pedal, the clutch disengages, making it possible to engage or change gear in the box.
↑ Route planning
In the CityGuide system, the route is built to the final destination, with the ability to add intermediate stop addresses. To get directions, you first need to select the map you need. You can enter your destination in several ways:
- through the search string;
- by specifying the address;
- from the POI menu;
- in history;
- from saved points to favorites.
- indicate a location on the map by touching the device screen;
- select a route from those previously saved in the navigator’s memory.
The choice of the finishing point is a signal for constructing a route. After completing the work, the system displays the result on the screen, visualizing the path and hints. Navigation of the Lada Vesta car provides for the construction of two types of routes: the shortest and the optimal. The construction of the optimal route is carried out for optimization reasons, taking into account distance, speed limits, class of roads and the possibility of avoiding potential traffic jams. You can set the route type in the navigation menu. If along the way there is a need to deviate from the specified trajectory, the route is automatically rebuilt.
Replacing the clutch cable "Priors"
To remove and install this element of the clutch drive, you need a small set of tools:
- mount;
- screwdriver;
- pliers;
- wrenches 8 and 17.
The operation of dismantling the drive begins from the Priora interior. It takes two people to do this.
One presses the clutch fork, and the second removes the core mounting bracket from the pedal. Of course, you can do it alone, but it’s more difficult. Then, using a size 8 wrench, unscrew the housing fastening near the pedal. Using a screwdriver, carefully push the hole seal into the engine compartment and remove the cable there.
Now work under the hood of the Priora. First of all, disconnect the battery terminal, since you will have to work near the starter wire. Then remove the air filter. This will provide free access to the mechanism fasteners. Now that he has left the interior area, release the shell lock with the key 17. When the core is loosened, the tip is freely removed from the socket in the clutch engagement fork. Remove the casing from the groove, and the entire drive is free. It can be changed.
Signs of a clogged damper
How to change the fuel pump on a Priora
When the throttle valve becomes clogged, the engine begins to operate in an unstable mode. Typical signs of a malfunction in this case are:
- increased idle speed;
- delayed engine response to pressing the accelerator pedal;
- while the car is moving, jerks are observed, and sometimes the vehicle changes speed independently, without the driver’s participation;
- abruptly releasing the gas pedal causes the power plant to stop.
In some cases, the CHECK indicator on the instrument panel will light up. Sometimes tar deposits settle on the throttle shaft, causing it to seize. Then the gas pedal is pressed with noticeable force.
Before moving on to solving the problem of how to adapt the throttle valve on a Skoda or any other car, you need to make sure that the diagnosis is accurate by conducting a visual inspection of the mechanism. To do this, you need to remove everything that is possible in order to open access to the module. Be careful not to accidentally disconnect the cooling system pipes.
How does an automatic cable tensioner work?
In the release drive on the VAZ 2170, there are no gaps as a concept, hence the name - backlash-free clutch. The ratchet mechanism serves to compensate for the working length of the cable as the driven disk linings wear out
To understand the process, it is important to accept the following data:
- During operation, the driven disk wears out and its linings become thinner - as a result, the release bearing and basket springs shift towards the gearbox.
- Accordingly, the fork at the place where the cable is attached moves towards the radiator.
- The spring located on the bushing of the adjusting mechanism is compressed at this time and tightens the clamps of the cable tip.
- As a result, the tip is pulled out of the driver, due to which the wear of the disc linings is compensated.
For those who don’t yet know how to adjust the clutch on a Priora themselves, it is important to take into account the moment when the linings are new. In this case, when releasing the pedal, the ratchet bushing will only lightly touch the bracket without releasing the clamps
Therefore, the toothed tip of the cable will not move relative to the housing.
Criteria for which clutch is better to install on a VAZ 2107 car of a classic design
Based on the recommendations of experts and reviews from car enthusiasts, it is possible to draw up basic principles that must be taken into account when choosing parts for the gear shift control unit. In general terms, the picture resembles wheel alignment adjustment, when any useful recommendation greatly facilitates the process
In addition to the manufacturer's brand, when purchasing a driven disk, you should pay attention to the following factors:
- The plane of the friction linings must be uniform; during visual inspection, scuffs, cracks and chips are unacceptable.
- The presence of oil stains on the disc is strictly prohibited.
- Visually assess the quality of the rivet; the edge of each rivet must be the same; uneven riveting along the edges is unacceptable.
- The splines must be undamaged.
- Check that there is no play on the springs, dampers and linings. The presence of play indicates low-quality assembly of the unit.
Separately, it is worth considering the criteria for choosing a pressure plate for the classic VAZ “Seven”:
- To evaluate the quality of the basket casing, conscientious companies make them using the stamping method. The presence of deep scratches and cuts is a sign of a low-quality part.
- Inspect the quality of the riveting.
- Inspect the level of manufacturing of the cast disk and the machining of its mirror. The presence of microcracks, cavities and unevenness is unacceptable, and, conversely, an ideal surface indicates high-quality material and high-tech processing of the part.
How to install
Then the end of the cable is threaded into a hole located in the bulkhead of the engine compartment on the passenger compartment side of the car so that it ends up in the engine compartment. The rubber cover is also tucked in there.
The gear tip driver is put directly onto the clutch drive pin and secured with a bracket.
The end of the shell is secured with a nut to the pedal bracket. Make sure that the fixation is secure. It is unlikely that anyone will like to, if something happens, climb there again due to a poor-quality connection.
Next, under the hood, the lower part of the shell is stuck into a special hole on the gearbox bracket.
The leash is screwed onto the end of the cable (there is a thread there) - the latter should protrude approximately one turn outward, but no more.
Now comes the time to adjust the clutch drive. Upon completion of this process, the pedal is pressed all the way two or three times and then the setting is repeated.
The working surface of the tip driver must be treated with the above-mentioned lubricant.
All that remains is to make sure that the entire mechanism is now working properly and install all previously removed parts in place.
You can learn more about the process in the video below:
How to adjust the Priora clutch: removing clicks
To adjust the clutch, when clicks are constantly heard while driving, you need to use a seemingly simple object - an ordinary ruler. Mostly the clicks come from the clutch control unit. To prevent this you need to do the following:
- open the car hood;
- inspect the area to the left of the battery;
- to inspect it, you need to pull it out of the plug;
- using a regular ruler, you need to measure the distance between the base and the adjustable screw;
- the distance must be 27 mm, if more or less, the clicking will continue.