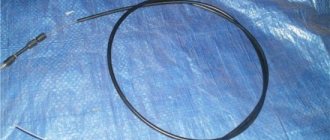
Pedal travel adjustment
Now a little more detail:
- 1. If the vehicle begins to move towards the end of the pedal stroke, a small adjustment will be required. Under the hood of the VAZ 2114 there are the already familiar two nuts securing the cable holder. To reduce the pedal stroke, you need to unscrew the inner screw and tighten the outer one a little. To increase the stroke, you will have to do the opposite with the screws, that is, tighten the inner one and loosen the outer one. Before tightening the locknuts, it is advisable to treat the threaded connection with a rust converter;
- 2. After all the settings, you need to check the operation of the clutch. As a result of correctly performed work, the pedal travel should be from 125 to 135 millimeters. We measure with a ruler. This is exactly the gap that should be from the floor to the pedal on a VAZ 2114.
If after replacement there are no changes in the operation of the mechanism, then a complete repair of the mechanism will be required. This procedure is quite labor-intensive, requires dismantling the gearbox, and an inexperienced owner would be best advised to seek the help of a car service center.
Why change the cable?
The VAZ 2114 clutch cable must be replaced when the first signs of its malfunction are detected: the pedal sticks, moves slowly or has completely fallen.
Otherwise, the operation of the clutch will be disrupted, and damage to the gearbox and other transmission elements may occur. And this is a more complex repair and completely different costs. If during disassembly you find that the cable is not damaged, but its movement is nevertheless tight, it is necessary to develop the part. Pour oil into the casing and pull it toward and away from you until the movement weakens.
Buying a new clutch cable will cost 120-170 rubles. Replacing a cable at a car service costs from 700 rubles. Naturally, it is better to replace the cable in a timely manner than to have the clutch subsequently damaged by it, which will cost 2,000 rubles.
Step-by-step instruction
First, find the place where you will make the replacement. You may also need help. Of course, you can do without it, but an extra pair of hands won’t hurt.
- Having done this, open the hood and disconnect the battery terminals.
- Next, we find the clutch cable: we need to disconnect it.
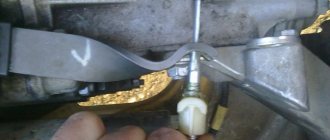
To do this, using wrenches set to “17”, disconnect the nuts securing the lower end of the cable to the attachment point. After this, the element can be pulled out of the bracket and removed from the clutch fork. Unscrew the nuts securing the element under the hood - The remaining steps will need to be performed in the salon. First, remove the carpet from the driver's seat and remove the carpet in the pedal area.
- Once you do this, you will see where the clutch cable attaches to the pedal.
You need to disconnect it. It is put on with the eye of one end on the hook. Eyelet of one end of the element - When all elements are disconnected from the cable, it needs to be pulled out. To do this, push it away from you towards the engine compartment. If the cable is pushed very hard, then it is most likely soured and needs to be worked out by pouring a little motor fluid into the sheath. Now it just needs to be developed by moving it back and forth. Here you may need the help of a friend - when you develop the cable from the inside, he should pull it towards himself from the engine compartment.
- When the old cable is removed, a new one can be installed in its place.
Before installation, you need to remove the bushing on which the cable is held from the pedal. It should be examined carefully. If you think that the bushing has almost reached the end of its service life, then it is better to replace it, and it is better to lubricate the fastening on the pedal and on the cable. Installing the element at the mounting location in the engine compartment of the VAZ 2114
At this point, the process of replacing the cable is completed, but the work cannot be considered completed, since now the clutch must be adjusted and tightened. The car must be parked on a level surface. Get behind the wheel and start the engine.
After this, engage the gear and try to start driving while releasing the clutch. This needs to be done smoothly: you need to determine the position of the pedal at the moment the vehicle begins to move.
- If you realize that your VAZ 2114 starts to move only at the end of the pedal stroke, then you will need to adjust it.
To do this, open the hood again and find two “17” nuts that hold the cable bracket. It won’t be difficult to find these nuts, since you have already unscrewed them before. With their help, the full travel of the pedal is adjusted. In the event that you are trying to reduce the full pedal travel, you need to slightly unscrew the screw that is located inside the bracket. Accordingly, the outer screw will need to be tightened slightly. Adjusting the inner and outer nuts of the cable after installing it using wrenches to “17” - If the full stroke of the pedal needs to be increased, then the inner screw of the bracket must be tightened and the outer one must be loosened. While unscrewing the nut, you may have noticed that its threads are covered with rust. Then take WD-40 and lubricate it before screwing it in. If you don’t have WD-40 on hand, you can lubricate the threads with engine or brake fluid.
- Finally, when the clutch cable has already been adjusted, you need to check its operation. If everything is done correctly, the clutch pedal travel should be from 125 to 135 mm. This is where a ruler comes in handy. 125 - 135 mm is the distance that should be from the pedal to the floor of your VAZ 2114.
If after all these steps your vehicle continues to slip, then it most likely needs a complete replacement of the clutch, and not just the cable. At this point, the work of replacing this element can be considered complete. If you have any questions, please check out the video provided.
Clutch pedal adjustment
Periodic adjustment of the VAZ 21014 clutch pedal is carried out for the following reasons:
- When driving on a non-adjustable clutch pedal, subsequent repairs are possible, because exaggerated energy costs for incorrect operation of the mechanism will cause malfunctions of other components of the car.
- Due to improper functioning, the clutch pedal periodically does not function. This leads to the fact that the pressure plate of the unit is forced into “engagement” with the motor flywheel, as a result of which they are subject to accelerated wear.
- If the pedal stroke is insufficient, the vehicle slips, i.e. the required torque of the wheel pair is lost.
To carry out diagnostic work on adjusting the clutch pedal, you need to use an arithmetic ruler to measure the length of the pedal stroke to the floor. If it does not correspond to 16 cm, then adjustments are necessary.
Signs of incorrect operation of the clutch mechanism: there is no possibility of a smooth start from a standstill, movement from a standstill is accompanied by jerks and jolts, when changing gears the transmission makes increased noise, the pedal of the mechanism falls to the lower position. In practice, it turns out this way: if the vehicle began to move from the moment the pedal began to be lowered, then the free play does not correspond to the required value. When the pedal is completely released, the vehicle does not move, which means there is no free movement in the car.
Clutch pedal adjustment:
- Unscrew the nut located under the clutch pedal.
- Tighten the locknut located below until it stops.
- Next, screw in the fasteners located under the clutch pedal.
- We tighten the rubber washer to the clutch fork as far as possible.
- To increase the pedal stroke, you need to screw the fastener onto the tip. To reduce the pedal stroke, you need to unscrew this fastener. The VAZ 2109 clutch pedal is adjusted until the limit of 12-13 cm is reached.
- After completing the pedal adjustment operations, you need to: depress the pedal three times, measure the length of the pedal stroke, adjust the operation until the required stroke length is achieved.
To adjust the hydraulics you need:
- Remove the spring from the mountings of the working cylinder and the clutch fork.
- Adjust the fasteners located on the clutch cylinder rod.
- The recommended free play value is 0.5 cm.
Often, a large pedal stroke depends on the height of its location from the driver's floor, and this creates certain difficulties. To adjust the height, a series of simple plumbing operations and a wrench set to “12” are required:
We find two fasteners on the steering column shaft, one is a thrust screw that limits the height adjustment position, the second is a lock nut that changes the movement of the pedal.
- Unscrew the stop screw.
- We give it rotation until the pedal movement normalizes.
- Screw in the locknut.
If slippage is observed after adjusting the clutch, then the following operations must be performed:
- Remove the stem locknut.
- Move it until there is no free movement.
- Return the rod one full turn.
- Determine whether the clutch has free play.
- Test the operation of the transmission gears. If there is an incomprehensible noise, you need to perform the above operations again.
- Screw in the locknut.
Replacement
If all these steps do not help, you will have to perform a complete clutch replacement. This procedure will take quite a lot of time, since the clutch will first have to be removed and then installed back.
It is strongly not recommended to start this work without experience and skills. But if you are confident in yourself, we offer instructions for replacing the unit.
- Unscrew the lower nuts that hold the drive cable body.
- Remove the lower part of the cable from the bracket.
- Disconnect the contact from the switch plug, remove the locking bracket, and then completely disconnect the cable from the pedal.
- Remove the rubberized buffer and clip from the casing.
- To dismantle the clutch pedal, you will have to perform the following actions: remove the springs of the brake and clutch pedals, pull the locking bracket off the pedal pin and disconnect the contact from the plug that pushes the vacuum booster. Now the bracket is removed and the beam is removed. All that remains is to remove two pedals - brake and clutch.
- To remove the passive disc, remove the gearbox, loosen the clutch bolts to the flywheel, and then remove the boot and pressure disc.
- Before reinstalling, check the condition of the splines. Do not apply too thick a layer of lubricant on it, otherwise the splines will damage their own driven disk.
- Treat all internal surfaces. WD40 is great for this.
- Gradually, carefully reassemble the knot in the reverse order. It is advisable to make notes or notes at the dismantling stage in order to remember how and in what position which part was located.
- If you forget something or make a mistake when assembling a new clutch, and then start driving the car without proper inspection, all the effort and money spent on purchasing a new clutch may be in vain.
How to change: sequence of actions
- The car is installed on the inspection hole. Wheel chocks are placed under the rear wheels. The front wheels are jacked up and removed.
- The hood opens and both terminals are removed from the battery.
- Using open-end wrenches, the air filter and the sensor next to it are removed.
- Access to the clutch cable is provided. This cable is disconnected with a 10mm spanner. The clutch cable that needs to be disconnected
- Now the starter is removed and the bolts on the upper part of the clutch housing are unscrewed (there are 4 of them).
- The gear shift drive and the support located to the right of the gearbox are unscrewed. After this, use a 10-mm open-end wrench to unscrew the flywheel protective cover.
- Using a spanner, unscrew the fastening bolts of the ball joints. Next, the drive shafts are disconnected from the gearbox and the oil is drained. The fastening bolts of the ball joints are unscrewed
- Removing the box begins with unscrewing the bolts holding the box to the cylinders. The bolts are unscrewed using a socket head 8. A wooden beam tied to a rope is placed under the box, on which it is hung next to the engine. Next, using the same 8mm wrench, unscrew the bolts that secure the pressure plate to the flywheel. The pressure plate is unscrewed with an 8mm wrench
- The clutch pressure and driven discs are removed. The clutch discs are ready for removal
- Using a screwdriver, pry up the release spring holding the release bearing, after which the bearing is removed. The gearbox input shaft is cleaned of dirt.
- Access to the gearbox input shaft is provided. It is thoroughly cleaned of residual grease and contaminants. The release bearing and spring are installed in place (replaced with new ones if necessary), then the shaft is centered using a mandrel. Only after this are the clutch driven and pressure plates installed on it. Then all components of the car are reassembled.
Analogs
Clutch cable
In addition to the original part, you can find analogues that are recommended for installation on the VAZ-2114. So, what non-original parts can be found on the spare parts market:
- Adriauto 0101 is an Italian manufacturer that offers high-quality clutch cables. The average cost is 1000 rubles.
- ABS K22120 – part made in the Netherlands. High quality and not expensive. The average cost is 1200 rubles.
- TRW GCC 3123 – German spare part. The company is known for its wide range of products for domestic cars, as well as the excellent quality of parts. The price will be 1500 rubles.
Which cable to choose?
Operating a vehicle with a faulty clutch cable is not prohibited by law. But this defect makes driving the car inconvenient and uncomfortable. A part may suddenly break at the most inopportune moment. And then driving will become almost impossible. There is also a high risk of an emergency if an element breaks. Therefore, if a malfunction is detected in the operation of a part or its external damage, it is necessary to replace it within a reasonable time. You should contact a specialist for this only as a last resort, when you were unable to carry out the replacement yourself.
The original part has the article number 2109-1602210-10. It now costs about 1,000 rubles, depending on the region and place of purchase. Spare parts are almost always available in stores. There is usually no need to pre-order it.
Analogs are also sold in auto stores and on the Internet. They are often cheaper, but the quality is in no way inferior to the original. The average cost of such spare parts is 350 – 400 rubles. They are produced by many Russian manufacturers. The products of the DAAZ brand have proven themselves well. Sometimes on the Internet you can find offers for the sale of used items. It is not worth buying such used parts. It may be dangerous. After all, it is very difficult to assess their condition from photos. An unexpected breakage of a part while driving can lead to dire consequences. And a new spare part is inexpensive. Therefore, such dubious savings are undesirable.
Replacement instructions
When replacing the VAZ 2114 clutch, you can resort to a simplified option - without changing the oil and removing the right CV joint. But if it is necessary to replace the fork or release bearing, then you cannot do without draining the lubricant.
Also note that if the gearbox is removed, the car is in a suspended state, which makes access to the space under the hood difficult. To simplify further work, while the vehicle is still on wheels, unscrew or disconnect everything that will subsequently interfere with dismantling the box.
Tools
- keys, heads are better;
- removable key for ball;
- wheel wrench;
Balloon wrench
- jack;
- beam for hanging the motor;
- rope;
- pry bar or small crowbar;
Mount
- screwdriver;
- a mandrel used to center the driven disk.
Stages
- Disconnect the negative terminal of the battery.
- We dismantle the air purification system and sensor.
- Disconnect the clutch cable. Taking the opportunity, you can replace it if necessary.
Cable
- Remove the starter and unscrew the bolts on top of the clutch housing.
- We tear off and slightly unscrew the bolts holding the wheels.
- Loosen the hub nuts.
- We jack up the car and place pre-prepared supports if the work is not carried out on a pit or a lift.
- We remove the wheels.
- Unscrew the left hub nut.
- Remove the motor and clutch housing protection.
- We loosen the fastenings.
- We disconnect the transmission rods.
- Disconnect the wires of the reverse indicator and the speed sensor.
- Remove the left lever. It is preferable to remove it together with the ball and stretcher included.
- At this stage, you can drain the oil if necessary.
- The box can be moved away. There is a video on our website showing how this is done correctly.
- If necessary, remove the left CV joint.
- Remove the left drive and install the plug.
- Before unscrewing the support, unscrew all the bolts and nuts that secure the clutch housing to the cylinder block.
- We are hanging the power unit.
- Unscrew the left support.
- Using a pry bar, we remove the box and free up access to the clutch system.
- To remove the basket, you need to install a mandrel in the hole in the input shaft.
- We tighten the bolts that hold the clutch basket.
- Remove the basket with the driven disk.
- We install a new set.
- Subsequent assembly work is carried out in the reverse order.
When replacing the clutch, it would be useful to inspect the condition of other systems and, if necessary, replace or adjust them.
In conclusion, it can be noted that the process of replacing the clutch system is simple. If you do it yourself, then your time will not be wasted, but will later pay off in spades, and the experience gained will be useful for a possible subsequent replacement.
Replacing the clutch cable of a VAZ-2110
This procedure is simple and will not take much time.
- It is recommended to remove the windshield wiper and frill, this makes access easier, but you can do without it.
- There is a mounting bracket on the gearbox; you need to pull the cable out of it. To do this, you need 2 “19” keys, which are used to loosen the cable fixing nuts. The tension weakens and the cable can simply be removed from the mount.
- While holding the clutch fork, release the cable from it.
- You need to unhook the cable from the clutch pedal.
- The clutch pedal protective cover can be easily unscrewed with a Phillips screwdriver. This can be done if the frill and windshield wiper are removed. Without removing them, you can get to the support bracket (which is the next step) from the interior in an awkward position, raising the clutch pedal all the way.
- Use a screwdriver to pick up and pull out, together with the cable, the locking bracket that secures the cable head to the pedal.
- Use a 10 key to unscrew the support plate.
- You need to evaluate the integrity of the bushing on which you will put the new cable. If it is severely worn, it requires replacement.
- Installing a new cable is done in the reverse order.
- The cable requires lubrication; the ideal option would be a grease that protects against freezing.
- The final step is adjusting the pedal. The distance between the pedal and the floor should be 125-130 mm. To begin with, the clutch pedal should be at the same level as the others. Loosen the cable fastening nuts on the gearbox bracket. Using the adjusting nuts, the new position is adjusted: the lock nut is unscrewed to the maximum distance, and the second one is unscrewed until the pedal moves freely. The rubber bushing slides up to the fork. The locknut is tightened.
This completes the installation.
Algorithm of actions
To understand how to change the clutch cable on a VAZ 2114, you need to remember the following algorithm:
- Open the hood.
- Remove the negative terminal from the battery.
- Find the cable under the hood.
- Using a 17 key, unscrew the fastenings of the element.
- Remove the part from the clutch fork and bracket.
- Move into the car interior.
- Remove the driver's foot mat and lift the carpet.
- Remove the cable eye from the pedal mount. The locking bracket, which allows you to release the element, sometimes causes difficulties for some VAZ 2114 owners.
- Pull the element out from under the hood into the interior. It is not advisable to remove it from the engine compartment, as there is a risk of damage to the wiring and other parts of the machine.
- Disassemble the housing and remove the cable.
- Place the new part in the housing and assemble.
- Perform the previously described steps in reverse order.
- Adjust the cable tension. It is necessary to ensure free movement of the pedal. But it should not be pressed too tightly or too lightly.
You can replace the part yourself. It is recommended to work in a garage, especially in the cold season. It is not necessary to contact a car service to check and replace the element. This may only be necessary as a last resort if the cause of unusual clutch behavior cannot be found. Perhaps it was not the cable that failed, but other parts of the mechanism that broke.
Replacement
For the work we will need a 17 mm wrench, lubricant, a ruler and a new clutch cable.
- Open the hood and disconnect the engine terminals.
- Unscrew the nuts holding the lower end of the cable using a wrench.
- We pull out the cable and remove it from the clutch fork.
- Let's go to the salon.
- We remove the carpet under the driver's seat.
- We remove the carpet under the pedals.
- We take out the corkscrew ring and pull out the finger holding the cable on the pedal.
- Remove the cable eye from the pedal hook.
- We pull out the cable. To do this, we push it away from us; if it doesn’t go, it means it’s gone sour. We fill in the special liquid and start pulling back and forth. Help from the other side of the hood would not be superfluous, but if there are no volunteers, you can do it on your own.
- Lubricate the mount on the pedal and the new cable with grease, insert the clutch cable in place of the old part.
The cable installation is complete, but that's not all.
Preparation
To prepare for repair work you will need:
- 17" socket or open-end wrench of the same size;
- Spare set of spare parts;
- Lubricant (Litol is best);
- Yardstick;
- Rust converter or “liquid” key (“WD-40” for example). Well, or, as a last resort, brake fluid will do;
- Replacing the clutch cable on a VAZ 2114;
- First you need to decide on the location of the work. Having an assistant will also not be superfluous, but you can do without it.
Further:
- The first step is to disconnect the battery terminals;
- Now you need to remove the cable. Using wrenches, loosen the nuts securing the lower part of the cable. Next, the cable is pulled out of its socket and removed from the plug;
- The driver's side carpet is removed and the interior floor insulation in the area of the pedal assembly is folded back;
- Remove the cable eye from the pedal hook where it is attached.
That's all, you can push the cable towards the hood. There is one nuance here: if the element is suddenly pushed out of the shell with difficulty, you need to drop a little oil or brake fluid there. Next, you need to develop the stroke of the cable, moving it forward and backward. This is where the hands of an assistant will be needed. After this procedure, pushing out the element will not be difficult.
Removing the element through the casing
So, the old cable has been removed, now we install a spare one in the free space. While the element is not installed, it is necessary to inspect the pedal bushing. If a part is heavily worn, it must be replaced and all rubbing areas lubricated.
At this point, we can say that the procedure is completed, but this is not so, because now the clutch mechanism needs to be adjusted in accordance with the factory recommendations. The machine is installed on a horizontal surface. Now you need to get into the car, start the engine and try to move away. When the machine starts moving, you need to notice the position of the pedal at the moment of planing the machine.
How to replace the cable on a VAZ-2110?
There are two ways to replace a torn drive, one of which is more time-consuming and requires removing additional elements from the car, but is more convenient.
With the second method, you don’t need to remove anything from the car and everything is done faster, although the ease of execution is worse. At the same time, the algorithm of work for both methods is the same, so let’s look at how everything is done using the first method, it is still more convenient and also does not take much time:
We place the car on a flat surface or the side of the road (when performing work on the road) and immobilize it with a handbrake or wheel chocks placed under the wheels. Let's see if the cable is really torn, or if the reason for the failure is a broken release bearing fork. For ease of work in the engine compartment, the battery can be removed from the car; We release the cable in the engine compartment. If it is torn, then you can immediately pull part of it out of the winding simply by disengaging it from the lever with the clutch fork. In the case when the replacement is carried out due to “fluffing”, then first unscrew the nuts securing the cable braid (they are also adjusting) from the mounting bracket located on the gearbox housing. We take two keys for 19 and loosen them, after which we take them out through the slot. Then we loosen the two nuts (8 and 10) of the clutch release drive and only after that we pull out the tip, for which we press the fork lever with our hands and remove the cable together with the thrust bushing. Remove the windshield wiper bracket; to do this, you need to unscrew two nuts. Pay attention to which direction the plane of the bracket is directed; Since the drive is removed through the passenger compartment, from the part of the cable running in the engine part, we remove everything that can prevent it from being pulled through the technological hole - the thrust bushing, nuts 19 and washers. Let's go to the interior. It is necessary to remove the cable end from the mounting rod on the pedal. To do this, we climb under the dashboard and find a fixing plate that keeps the tip from jumping off the rod. It is located under a protective cover. To get to it, you will have to hold the pedal in its original position with one hand, and pry the lock with a screwdriver with the other, and this must be done carefully so as not to lose it after removal. After this we remove the tip from the rod
It is also advisable to remove and check the plastic bushing installed on the rod, and if signs of severe wear are noticeable, replace it during assembly; Unscrew the nut of the cable braid fastening bracket located under the panel and remove it from the stud; We pull the cable into the cabin, and carefully, since on many models wires pass through the technological hole for pulling the drive and it is important not to damage them or tear them away from the contacts; We run a new cable through the hole, fasten its bracket, put the tip on the pedal rod and fix it with a plate. If the latch gets lost during the removal process, you can use a thin wire or paperclip; We fix the cable braid on the gearbox bracket and then insert the tip with the thrust bushing into the fork lever
At this point, the replacement is completed and all that remains is to make the adjustment; Do not forget to lubricate the clutch pedal pin and the driver with LITOL 24 grease or an equivalent.
This replacement sequence is identical for all models of the 10th series - 2110, 2111, 2112. Therefore, their cables are interchangeable.
But on earlier models - 2108-21099, the cable is different, and the sequence of work is somewhat different.
Signs of a poorly adjusted chain
When they talk about a poorly adjusted chain, they usually mean a loose and sagging chain. Because a highly tensioned chain does not show any signs of breakage. She's just bursting. Here are the main signs that the timing chain has become loose:
- after starting the engine, a loud grinding and knocking noise is heard from under the hood, the frequency of which increases as the crankshaft speed increases. This occurs due to the fact that the slack chain continuously hits the damper and the tension shoe;
- the car reacts poorly to pressing the gas pedal: the engine begins to increase speed only one or two seconds after pressing. This is due to the fact that due to a sagging chain, the synchronism of rotation of the timing shaft and the crankshaft is disrupted;
- There are power failures in engine operation. Moreover, they can occur both when accelerating and when the engine is idling. Due to the desynchronization of the shafts, which was mentioned above, the operation of the cylinders in the engine is also disrupted. In this case, one cylinder either does not work at all, or works, but not at full strength;
- increase in fuel consumption. If the cylinder block is not working properly, this cannot but affect fuel consumption. It can increase by a third, and in especially severe cases - double.
If the driver notices one or more of the above signs, this only means one thing: it’s time to remove the timing chain and check for wear. If it turns out to be very worn, it will have to be replaced. If the wear is minor, the chain can simply be tightened slightly.
ABOUT THE CLUTCH DEVICE
Its design on this car is similar to mechanisms 2113 and 2115. It is made of a dry, single-disc mechanism. It is produced with a device that dampens torsional vibrations, and also has a pressure spring. The VAZ 2114 clutch device is shown in the figure.
Clutch components
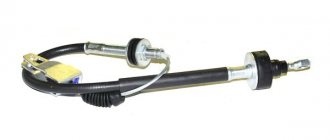
The VAZ 2114 clutch consists of (see picture):
- Cable with a casing;
- Cable tip (lower);
- Adjusting nut;
- Housing for attaching the shell to the gearbox;
- Separating washers;
- Nut for adjustments;
- Rubber protective shell;
- Cable lead;
- Shutdown plug;
- Basket;
- Bolts securing the basket to the flywheel;
- Pressure disk;
- Flywheel;
- Driven disk;
- Gearbox input shaft;
- Shield;
- casing;
- Spring (pressure);
- "Squeeze";
- Pad;
- Release housing;
- Cable end;
- Cable thrust washer;
- Cable fastening unit;
- Pedal axle;
- Release spring;
- Off pedal.
As can be seen from the mechanism diagram, there are two working units, one of them will be the master, and the second will be the slave. The second includes a disk with linings riveted on both sides and damper springs installed. It is installed and moves along the splines that are present on all gearbox input shafts. When the pedal is pressed, the driven disk is pressed against the flywheel by the pressure disk.
The drive unit includes a pressure disc with a clutch housing, which is attached to the flywheel with six bolts. To center it, there are pins on the flywheel and guide holes in the housing. The clutch has a backlash-free design and is operated by a cable.
To turn it off, a clutch drive is installed, which operates by pressing the pedal. The cable is hingedly attached to it with its upper tip. The lower end of the cable also has a hinged connection with the shutdown fork. With its movement, the “cable” turns it, and it moves the “releaser”.
Mechanism design
Structurally, the clutch on the VAZ 2114 consists of a total of 15 elements. Namely:
- Main shaft bearing having rollers;
- Clutch protection housing;
- Fork support bushing;
- Switch, also known as bearing;
- Press disk;
- Pressure spring;
- Secondary disk;
- Flywheel;
- Scale;
- Gearbox main shaft;
- Second bushing-switch;
- Carter;
- Plug switch;
- Fork toggle switch;
- Flywheel mounting bolt.
The clutch design on the “fourteenth” model cannot be considered very complex. In practice, you need to know four main points from him:
- Clutch with one disc brake;
- Type dry, closed;
- The driven disk has a device that dampens vibrations;
- The pressure spring is diaphragm.
How to replace the throttle cable on a VAZ 2114
In order to begin the process of replacing the cable, you first need to find it. If a car enthusiast does not know how to remove the throttle cable on a VAZ 2114, then he should act exactly according to the instructions below.
Usually the cable is located between the throttle sector and the gas pedal. Finding the sector will not be difficult, because if you look closely, you will notice that the tip of the cable is attached to it. The cable runs in the area of the car's engine compartment and front shield.
The process of replacing the throttle cable
Additional Information. The front shield refers to the metal shield that separates the car's body and engine. It can be difficult to locate the cable, so in order to find it, you should be as careful as possible during your search.
When the cable needs to be replaced
- One of the most common reasons for cable replacement is that it wears out over time. When this happens, it starts to seize. This is quite dangerous, because in such a situation the car may not respond correctly to pressing the gas pedal. If a driver encounters a similar problem, he needs to immediately address it, otherwise he may get into an accident.
- Also, the cable should be replaced as soon as possible if it cannot be adjusted. In such a case, it will be almost impossible to open the damper.
If the cable is already worn out, this can be determined by indirect factors. In particular, the cable begins to cling to the shell. He also begins to fray. Incorrect response to the gas pedal is the most serious consequence of a faulty cable. In such a case, due to pressing the clutch pedal, the car begins to make loud noise, but does not accelerate. It also happens that after the driver takes his foot off the gas pedal, the car still continues to gain momentum.
All of the listed malfunctions pose a serious threat to both the driver himself and other road users, so it is necessary to replace the faulty element that is the cause of all of these malfunctions as soon as possible.
Advice. This element is not expensive, so the cable must be replaced as quickly as possible, otherwise the car owner risks getting into an accident.
conclusions
Replacing the clutch cable on a VAZ-2114 car is quite easy and simple. So, anyone, even a novice car enthusiast, can do this on their own in 1 hour in their garage. Particular attention should be paid to product selection and quality.
So, a high-quality part will serve for a long time and will last its entire resource. If the replacement process itself seems complicated and impossible, it is recommended to contact a car service.
If you find an error, please select a piece of text and press Ctrl+Enter.
Source
Malfunctions and reasons for their occurrence
But this type of drive is also not eternal and problems with it will only be a matter of time.
Over time, the cable threads corrode and break, which is why at one point when you press the clutch pedal, it remains in the depressed position and does not return to its original position.
For the same reason, it happens that pressing the pedal and returning it is difficult, and a grinding noise can be heard. This is a consequence of the “fluffing” of the cable - rotted metal threads rest against the braid, significantly complicating movement.
All these malfunctions occur for one simple reason - moisture gets inside the braid, which leads to corrosion.
And although manufacturers are trying to combat this problem by applying a polyethylene protective layer over the cable, such measures can only extend the service life.
And here, too, everything is simple - while moving, the cable rubs against the braid and over time the protective layer wears off. Lubricating the cable also provides only temporary protection.
Corrosion is not necessarily the cause of the burst. Very sharp squeezing of the pedal, for example, during a difficult traffic situation when the driver kicks it with all his might, can also lead to destruction of the cable.
In any case, if problems arise with the drive, the cable must be replaced, since it cannot be repaired.
Note that the cause of the failure of the clutch pedal can be not only the cable, therefore, if such a malfunction occurs, first of all you need to make sure that the drive has broken.
The fact is that there are cases when the clutch release bearing control mechanism breaks, which is a much worse problem than the destruction of the cable. After all, in case of such a malfunction, you will have to remove the gearbox from the car in order to repair the mechanism.
But a cable break is a malfunction that can be very easily eliminated if you have a spare element.
And since such a problem on a VAZ can appear at any time, it is recommended to always carry a new cable with you in the trunk.
Basic faults
The main reasons why cable replacement is required:
- souring (rust and dirt inside);
- break;
- tight movement;
- damage (unraveled).
A breakdown can be detected by the following faults:
- The clutch pedal does not disengage completely and you have to press it several times to return it to its original position.
- The clutch pedal slips or goes to the floor. When driving uphill, the car seems to lack power.
- Extraneous sounds when pressing the pedal.
- The pedal does not return to its original position at all, it just fell to the floor - this indicates a break in the clutch cable.
- A change in pedal travel is a sign that it is time to replace the clutch cable.
Replacing the clutch cable on a Daewoo Matiz
Replacing the clutch cable on a Volkswagen Golf
1). We insert a screwdriver between the steering column and the clutch pedal and bring it to the return spring. Press the clutch pedal and disconnect the return spring from the clutch pedal by removing the floor covering on the left side (driver's side).
2). We remove the clutch pedal all the way several times in a row so that the automatic gap adjustment mechanism works.
3). Remove the clutch cable (1 and 2 – position of the locking bracket when removing the clutch cable).
4). We are working in the engine compartment. We move the locking bracket at the top of the protective rubber boot of the adjustment mechanism to position 1, and mix it with the slot along the cable.
5). We grab the top and bottom of the adjustment mechanism and squeeze it. We put the side ends on the protrusions on the sides of the adjustment mechanism. If the mechanism cannot be compressed, this tells us that the cable is damaged. We carry out dismantling by breaking it out.
6). Raise the clutch release lever and disconnect the clutch cable from it along with the stops and rubber shock absorber.
Note. If there is no longer a locking bracket on the clutch cable, then you can use a homemade one, making it from a piece of electrical wire.
7). Remove the facing panels under the steering column and disconnect the mounting block from the mounting screws.
8). Disconnect the clutch cable from the assembly (1 – clamp; 2 – locking element; 3-plate).
9)
We release the electrical cables from the clamp (1), put them on the snap locking element (2) towards the pedal axle bracket and carefully remove the plate (3) located between the mounting block body and the pedal axle bracket, pressing it in the direction indicated by the arrow, in side of the dashboard until it releases from the clips. Note
We remove the plate by moving it down, while making sure that none of the wires are broken or stretched.
Note. We remove the plate by moving it down, while making sure that none of the wires are broken or stretched.
10). Disconnect the clutch cable from the pedal and pull the cable through the rubber bulkhead guide into the engine compartment.
eleven). We release the cable from the fastenings and remove it from the engine compartment.
12). We install the clutch cable in the reverse order of removal.
Symptoms: the clutch pedal has dropped sharply, the clutch does not respond to pressing the drive pedal, the clutch efficiency has decreased.
Possible cause: Clutch cable is damaged or torn.
Tools: flat screwdriver, 17mm wrench (2 pieces).
Carry out adjustment work in an inspection ditch or on a lift.
1. Loosen the nuts securing the lower end of the cable sheath to the bracket (use two 17mm wrenches).
2. Remove the cable from the bracket socket.
3. Remove the cable guide from the clutch release fork.
4. In the passenger compartment, under the dashboard, pry the clutch pedal pin retaining bracket (use a screwdriver).
5. Remove the bracket.
6. Remove the upper cable end from the clutch pedal pin.
7. Remove the clutch cable through the hole in the front panel.
8. Install a new clutch cable.
9. Reassemble in reverse disassembly sequence.
10. Adjust the clutch:
10.1. Loosen the nuts securing the lower end of the cable sheath to the bracket (use two 17mm wrenches).
10.2. Change the position of the cable sheath tip by rotating the nuts. This way we set the required clutch pedal travel.
10.3. Press the clutch pedal all the way down several times to check the amount of travel.
10.4. Tighten the fastening nuts.
Note. The amount of travel of the clutch pedal to the floor should be in the range from 125 to 135 mm.