First of all, I would like to note that such a malfunction is far from critical, so it requires elimination only at the moment when the car owner needs to gain access to the engine compartment.
If the cable breaks in the lock area, the problem of opening the hood can be temporarily resolved by pulling the remaining cable through a special hole in the hood of the car. It is covered with a grill made of plastic.
Nevertheless, constantly using this method will be quite problematic, and therefore the cable break will still have to be eliminated. The first thing you need to do is, of course, purchase a new cable, and then proceed to replace the old one. Experts recommend carefully inspecting the locking mechanism before installing a new cable. The fact is that if it is in poor condition, then this particular part could cause the cable to break. Without eliminating this cause, you should be prepared for the fact that the new cable will soon have to be replaced.
To replace the hood cable with a new one, you will need the following tools:
After the hood has been opened, the procedure is as follows:
- it is necessary to remove the ends of the plastic clamps from the existing holes. This is done using a flat-head screwdriver. Thus, the old cable is freed from its fastenings on the metal partition located between the space under the hood and the interior;
- The bent end of the cable should be straightened and the sleeve that secures it should be moved away. Thanks to this action, the cable will be disconnected from the mechanism;
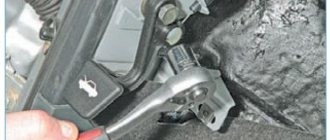
- Taking the 10mm wrench in your hands, unscrew the two nuts that secure the mechanism to the body. Attention! Before performing this work, we recommend marking the position of the lock on the partition. This is done so that after replacing the cable the lock does not have to be adjusted;
- Inside the car, we remove the torn piece of cable that sticks out of the handle responsible for opening the hood. It is located on the right under the dashboard.
- in the partition between the engine compartment and the passenger compartment, remove the casing.
After the entire procedure described above has been completed without deviations, you can begin assembly.
By the way, it is done in the opposite direction:
- the cable is inserted all the way from the passenger compartment into the hole located in the lock control handle;
- The cable is put into the casing from the side of the engine compartment;
- the mechanism is put on the studs and fixed with two nuts in exactly the position in which it was noted earlier;
- the tip of the cable is connected into a single unit with the mechanism. You can fix it in this position using a special bushing, but only when it is in a tense state;
- the rest of the cable is bent in such a way as to prevent its spontaneous loosening.
The work of replacing the hood cable on a VAZ-2107 can be considered completed. The only thing left to do is to check whether the cable was tensioned properly. To do this, with the hood open, you must first pull and then release the hood release handle several times. If after this the movement in the lock tongue has decreased somewhat, the cable will have to be tightened again.
Purpose and causes of malfunction
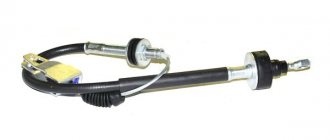
Hood lock cable for VAZ 2107
Hood locking mechanism diagram
The cable transmits the force applied by the driver from the hood release lever to the hood lock. Situations in which replacement is necessary are listed below.
- Over time, the cable began to move poorly inside the plastic jacket.
- Several threads of the cable broke, as a result of which it became longer and the force simply did not reach the hood lock.
- The hood latch is rusty, its parts have lost mobility, as a result, the driver is forced to pull the hood opening lever harder, which ultimately leads to a break.
Price of spare parts and repairs
First of all, you should decide whether you will repair it yourself or go to a service station. The cost of a hood cable depends on the make and model of the car; in many modern ones, an entire electronic mechanism is installed instead of a handle.
On average, the price starts from $2-3 for domestic cars and from $10-15 for foreign cars. Mechanisms in the cabin will cost depending on the model, regular mechanical ones are about 5-10 $ per set for domestic cars and 15-20 for foreign cars. If electronics are installed, then such a set will cost from $30.
The average cost of replacing a car hood cable at a service station, including the procedure of opening the old one, will cost from $15. Not to say that it is expensive, but there is not much work for such a price. At home everything will be much cheaper.
Video of opening the hood with a broken cable:
How to replace the cable
- The hood of the car opens.
- The hood lock is outlined with a marker so that after its removal it can be seen in what position it was originally.
We outline the lock on the hood of the VAZ 2107 with a marker
The hood cable clamps of the VAZ 2107 are removed with a screwdriver
Using narrow-nose pliers, move the cable locking sleeve
Removing the VAZ 2107 hood cable from the jacket
Video: how to change the hood release cable on a VAZ 2107
As can be seen from the article, replacing a broken hood cable is not particularly difficult. The main thing to remember is that a plastic shirt must be handled carefully, since it is not durable. If it is damaged, the cable will eventually begin to get stuck again, and the work of replacing it will have to be done again.
The hood lock of a VAZ can be easily removed by unscrewing two bolts
It is necessary to remove the hood lock on a VAZ 2107 when it is broken or does not work well, or it interferes with the progress of repairs, for example, painting, in which it is simply impossible to do without removing it. Before removing the hood lock on a VAZ 2107, you need to trace its outline using a colored marker, this will make it easier to install it in place and help prevent unnecessary time spent adjusting the lock. The hood lock initially serves to protect the car from theft, so that the thief cannot reach and disarm the alarm, and so on. However, it is not difficult for modern car thieves to open the standard hood lock on a VAZ 2107 in a matter of seconds, so owners tend to replace the standard locks with special ones that are protected from opening without breaking. The installation of such locks is a completely different topic, but we will look at what to do if the hood lock on a VAZ 2107 is broken and the hood does not open, and replacement in case of breakdown.
VAZ 2107 hood - why is it needed?
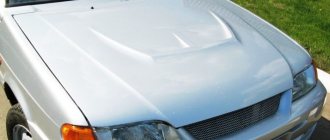
The part of the VAZ 2107 body that covers the engine compartment is called the hood. The main purpose of the engine compartment cover is not only to cover, but also to protect the engine compartment from various external factors, increasing the aerodynamics of the car and absorbing noise from the engine. The material used for the hood is the same metal that is used for the entire body.
The connection of the cover to the body is ensured through hinges and bolted connections. The body part itself is made of two panels, which are connected to each other by rolled edges and fastened by welding. The joints and seams are sealed with mastic. To adjust the hood on the “seven” there are holes in the hinges, which are larger in diameter than the fastening elements.
A car hood is a part that covers the engine compartment and protects it from environmental influences.
Hood dimensions
The hood cover on the VAZ 2107 has the following dimensions in mm: 950x70x1420. The weight of the part is 14 kg. Despite the fact that the element is hinged, it still has considerable significance in the geometry of the entire body.
How to soundproof a hood
The hood is soundproofed for obvious reasons - to reduce the level of noise that spreads from the engine not only to the outside, but also penetrates into the car interior. To soundproof the hood of a “Seven” or any other classic car, you will need the following tools and materials:
- construction hair dryer;
- stitching roller;
- rags;
- cutting knife;
- scissors and a piece of cardboard;
- vibration isolation;
- sound insulation.
Vibroplast or Vizomat MP, Bimast Super can be used as a vibration-absorbing material; Splen 4–8 mm thick can serve as a noise insulator. Before starting work, it is necessary to clean the inner surface of the hood from dirt and degrease it, for example, with white spirit. If there is rust, it is cleaned down to the metal, then a layer of primer is applied and waited for it to dry. When performing sound insulation of body elements, you should always adhere to the following rule: use vibration-absorbing material as the first layer.
Vibration-insulating material is applied between the hood stiffeners on the prepared surface
To cover the surface most accurately, you should make patterns from cardboard: cut out the material from them, remove the film and roll the elements with a roller. Vibration insulation is applied only between the stiffening ribs of the engine compartment cover. What can be noted about the second layer (soundproofing): as a rule, there is no special need for it, since the first layer copes with the task perfectly. NOISE insulation is mostly used as a heat insulator.
The noise insulation layer is used as a heat insulator
Installing the air intake on the hood
Installing an air intake on the hood of a VAZ 2107 allows you to solve two problems simultaneously: the first of them has a functional meaning, and the second relates to changing the appearance of the car, i.e. tuning. When installing a part such as an air intake, a greater air flow is provided, which allows you to not turn on the heater fan when the car is moving, regardless of the time of year. In addition, the element improves the design of not only the hood, but also the entire car as a whole. Whether to install this accessory on your car or not is up to you.
Air intakes made of plastic are the most common. Some craftsmen make such parts with their own hands. The installation of the element in question will require a minimum of time: installation is carried out using self-tapping screws through the ventilation grille on the hood. First, the fasteners are simply attached, the plastic part is aligned, and then finally screwed on. Since there are two grilles on the hood of the VAZ 2107, the same number of air intakes will be needed.
Installing an air intake provides better air flow into the cabin and improves the appearance of the car
Hood adjustment
If the hood on a VAZ 2107 is located with a different gap around the perimeter, the part needs adjustment. To do this, you need to outline the contours of the hinges and disconnect the stop from the bracket, and then loosen the fastening of the hinges. Enlarged holes in the hinges make it possible to adjust the position of the hood. After the procedure, tighten the fasteners and install the stop in place.
To adjust the position of the hood you will need to loosen the hinges and move the cover in the desired direction
Hood stop
A part such as a stop allows you to hold the hood in the open position when repairing or maintaining the car. The rod is attached to the body and hood using special brackets. In the upper part, the stop is fixed with a cotter pin, and in the lower part, thanks to a rubber tube, it fits tightly into the bracket. If there is a need to dismantle the rod, you need to remove the cotter pin with pliers, remove the washer and rubber bushing.
The hood stop allows you to hold the engine compartment lid in the open position when repairing or maintaining the vehicle.
Some owners of "sevens", improving their car, install a gas stop, for example, from a VAZ 21213, instead of the standard one.
Photo gallery: installing a gas stop on a VAZ 2107
On the hood, the gas stop is mounted in the hole of the standard stop.
The gas stop is attached to the bottom using a homemade bracket
The gas stop holds the engine compartment lid in place perfectly.
Its fastening does not cause any difficulties: on the hood it is fixed into the factory hole, and a homemade bracket is installed on the radiator frame.
Video: installing the hood gas stop on a VAZ 2107
Hood seal
The hood seal on the seventh model Zhiguli, as well as on other “classics”, is designed to tightly fit the body element and eliminate its vibration while driving. The standard seal is a soft rubber product with a metal insert inside to provide rigidity. Replacement of the element in question is required if it is worn out and comes down to removing the old seal from the special side and installing a new one. Many motorists are faced with situations where water accumulates in the air duct cavity, flowing under the hood during precipitation. Moisture, as you know, does not lead to anything good. To avoid this unpleasant situation, you can use a seal from the “seven” doors, which is secured along the upper edge of the engine compartment.
To prevent water from entering the air duct cavity during precipitation, some VAZ 2107 car owners install an additional seal
Removing the lock
The procedure for removing the hood lock from a VAZ 07 is as follows:
- We open the hood (see Do-it-yourself fly swatter for the hood of a VAZ), so that it is already written above, trace its outline
- Then, using a flat screwdriver, we remove the holders (clamps) from the seats that hold the lock cable
- After removal, unbend the bent end of the cable and remove the fixing sleeve
- Then, after removing the bushing, there is nothing stopping us from easily getting the lock cable
- Take a wrench “10” and unscrew the two nuts that secure the lock on the hood of the VAZ 21074, remove the nuts and washers located under them
- Remove the lock from the studs and put it aside
- When we need to replace the lock cable, then to do this we need to disconnect the cable from the lever handle inside the car and pull it out of the shell
- Nowadays, cables with a sheath included are now being sold in spare parts stores.
- As soon as we have pulled out the cable, we look for a hole in the engine compartment through which the shell will pass, then remove the rubber sealing sleeve and pull out the shell itself
- The new cable is replaced in the reverse order
- Having removed the hood lock from the VAZ 2107, we check the functionality of its levers and latches; they should not dangle
- It is worth checking and, if necessary, replacing the lock spring
- Then lubricate the entire mechanism and put it aside
- Before putting the lock on the hood of the VAZ 2107 in its place, we check the condition of the threads of the studs and the condition of the metal adjacent to the lock
- Perhaps the paintwork has cracked, this often happens, we eliminate the detected defects, after which you can replace the lock, follow the outlined outline
- After installation, it is necessary to adjust the lock on the hood of the VAZ 2107 and achieve high-quality closure
- During the process of adjusting the lock, closing the hood without tightening the nuts securing the lock may cause difficulties when opening it
Replacing the hood lock drive.
Removing the hood lock drive.
We release the drive jacket from the plastic retainer using a screwdriver. Most likely it will break.
We release the bent end of the drive by moving the tube - clamp using pliers. DO NOT THROW AWAY the tube. It probably won't be on the new drive.
Straightening the loop at the end of the drive
In the cabin, in the hollow hood release handle, we hook the drive with pliers and pull it out into the cabin.
Then we pull the drive jacket into the hood, often it pulls the seal along with it.
Installing the hood lock drive.
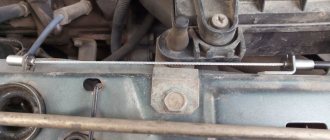
Hood release mechanism.
Currently they sell drives in a spring braid covered with plastic. This drive comes with two additional thrust bushings – number 3 in the picture.
We disassemble the purchased drive - remove the wire from the jacket and remove the thrust bushings.
First, install one of the thrust bushings at the hood release handle and hold it with your right hand. Bend under the steering wheel, with your left hand we pass the free end of the drive wire through the hole in the hood lock release handle and through the installed thrust bushing. Next, we use wire to get into the hole leading into the engine compartment. To make it easier to do this, place some kind of light source under the hood, then a ray of light will shine through the hole into the interior. Focus on it. We pull out all the wire and put a shirt on it - number 2 in Fig. I pre-lubricated the wire itself with Graphite.
Opening the hood if the cable breaks
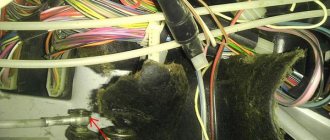
Several times I personally had to deal with the problem of how to open the hood on a classic. The lock is frozen, or the rod is rusty, or the cable is completely torn. The problem is how to open the hood with your own hands? So that you understand what we are talking about, here is a picture of the classic hood lock drive.
VAZ classic lock drive diagram
If the traction cable has stretched out over time, and the plastic jacket has broken or slipped through, the traction cable itself has rusted and therefore does not move well in the shirt, the lock has become difficult to open or is simply frozen - in such cases, opening the hood lock of the VAZ 2107 in the usual way, using a lever, will not work . A couple of helpful tips before you start opening:
- To make it a little more convenient for you to work, I suggest lifting the hood a little on the driver’s side and placing a centimeter (or even two-centimeter) wooden block or something like it; the block can be wrapped with a rag to preserve the delicate paintwork
- Through the resulting gap, you can successfully monitor what is happening in the engine compartment, then when you hook our pimp
- The main thing is not to overdo it with pulling the locked hood, so as not to break it, then the wire will no longer be needed and the cost of repair will increase
- The hood grille, the one through which you will fish for pimples, needs to be wrapped with tape or several layers of electrical tape, in the very places where you will insert the wire
- This measure will help you protect the hood grille coating from scratches and chips.
- After a detailed understanding of the essence of the issue, it turns out that you can open the lock on the hood of a VAZ 21074 with a broken cable in thirty seconds and a couple of attempts
- Until the moment of understanding what and how to do, it took two hours of attempts and trials, the most important thing was to figure out that the wire hook is bent upward
- There is zero information on the Internet about such a basic thing.
- Although people are constantly faced with such nonsense, both acquaintances and friends
- I’ll add an important clarification - if you pull the wire in the direction of the driver’s seat, as the standard cable pulls, then luck is on your side
- I hope the tips in this article will help you save a couple of hours of personal time and allow you to preserve the hood and its covering
How to open the hood
To perform the replacement, you will first need to lift the engine compartment cover of the seventh VAZ model. But with the breakdown in question, this can become a problem. There are many ways to help in this untidy situation. So, in particular, it is quite possible to pull the cable out through the air duct. This is done using a wire hook. Use it to hook the piece and carefully remove it.
If the end is too short, you will have to use the above-mentioned tool through the crack that is formed when the hood is lifted slightly. True, the hook here will need to be longer - about half a meter. It is better to take steel wire - with a less hard one you will suffer.
In more complex situations, the cable is removed after removing the crankcase protection. It is more convenient to carry out the operation on a ramp or pit. Here you will need pliers, a long screwdriver and a standard set of keys.
The procedure is as follows:
- remove the protection and boot;
- use a screwdriver to try to reach the lock;
- press down on its latch, pushing it away from the cab.
Please note that sometimes the tip of the cable remains in the cabin. If so, try grabbing it with pliers. Then pull it towards you and the hood will open.
Replacing the cable for safe vehicle operation
Like any part, if the cable fails, it must be replaced. But if this is not possible at a given moment, then the VAZ 2107 can work without this component. The only problem may arise when you need to open the hood. But this can also be solved by removing the plastic grille from it and temporarily tensioning the cable manually.
You shouldn’t put off replacing this, albeit small, but still important part for your car. Choose high-quality components, securely clamp and fix the parts. After installing the new cable, check its functionality. To do this, just pull the hood release handle several times. If the mechanism opens and closes properly, then the cable replacement was successful, and the car will serve you for many years to come.
Removing, checking and installing the lock
To remove the lock, you must perform the following steps:
- Open the hood.
- Trace the outline of the lock with a marker (this will make subsequent adjustments easier after installation).
- Remove the lock cable clamps using pliers.
- Install a new hood cable (with sheath).
- Check the functionality of the lock. Levers and latches should not be loose.
- If necessary, replace the lock spring.
- Lubricate the lock mechanism.
- Check the condition of the threads on the lock mounting studs, the geometry of the studs themselves and the condition of the hood metal in areas adjacent to the lock.
- If necessary, repair defects in the paintwork.
- Using the outline outlined by the marker, place the lock in place.
- Fix the lock cable and adjust the lock, ensuring easy and reliable closing/opening.
Note: when adjusting the lock, the fastening nuts must be securely tightened, otherwise difficulties may arise when opening.
Lada 2107 ☭What the boys drive › Logbook › Replacing the hood cable
As usual with everyone, sooner or later, the braid cracked, frost set in, the cable got stuck, and the hood couldn’t be opened. I went to the store and picked up an “Autopartner” braided rope. The warm box at work saved me)). Half an hour of work and as a result a softer and more cheerful opening without much effort.
I will note a couple of points during installation:
— For easier replacement, remove the left speaker grille. — Do not remove the O-ring from the hood side, into which the braid and cable are inserted into the passenger compartment. For easier penetration)), simply lubricate the rubber band with oil, the cable braid will slip through easily. No way without lubrication))
— When adjusting the length of the cable at the lock, be sure to tighten the loop clamp at the pin itself. Straight until it stops and tighten. Otherwise, the loop will fly off when you close the hood and you will learn the science of fishing. I got caught in this)) And I had to open it with an old hard cable.
The only problem I noticed was the length of the braid itself. It turned out to be a little short. The black tips, which should cover the ends of the braid at the lock and in the interior, remain free to move.