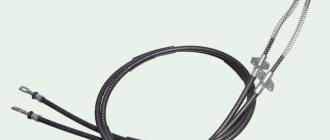
Replacing the Priora hood cable
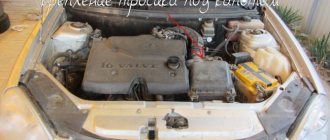
Before working on replacing the cable, you must disconnect the ground terminal from the battery. Otherwise, when working in the engine compartment, and especially under the instrument panel, you can create a short circuit. It is also necessary to remove the front bumper from the Priora. Replacing the Priora hood cable is performed as follows:
- Mark with a marker the position of the bolt washers securing the hood lock to the body panel (this will allow you to easily adjust the hood later);
- unscrew the bolts securing the lock to the body;
- remove the lock from its mounting location;
- remove the end of the rod (cable), having first straightened it;
- remove the metal sleeve from the cable;
- remove the cable from the slot in the lock by first sliding the end of the braid;
Important: adjusting washers are installed at the tip of the shell, which may be needed in the future. Therefore, they must be carefully removed and not lost.
- remove the end of the hood lock cable sheath;
- unscrew the nut securing the cable sheath holder;
- remove the holder from the stud and from the cable braid;
- press inward and remove the plastic hood cable holder;
- tie a wire or rope to the end of the cable (which will simplify the installation of the new hood cable);
- remove the mounting block under the dashboard to facilitate access to the hood release handle;
- press the hood handle located under the dashboard, then remove the hood cable from the slot in the bracket;
- remove the tip of the hood cable from the hole in the hood release lever;
- remove the braided cable into the interior so that the rope does not come out with it, but remains in its place;
- untie the rope from the hood pull rod;
- pull the new hood cable out of the braid and lubricate it, or pour a little oil into the braid for lubrication;
- tie the end of the rope to the new hood cable;
- by pulling the rope, blow the hood rod (cable) into the engine compartment.
- Installation of a new hood cable is carried out in the reverse order of its removal.
Practical guide
To complete the work you will need:
- nylon cord at least 5 m long;
- ballpoint pen body;
- a piece of thin steel wire 10 cm long or a paper clip.
To replace the hood lock drive rod (together with the shell), it is necessary to perform labor-intensive work - remove the instrument panel. Here we describe a method that allows you to replace the hood lock rod with minimal disassembly of the car. On vehicles equipped with an air conditioner, the work is made difficult by the condenser installed in front of the radiator of the cooling system.
If the rod moves easily in the sheath, but you have to change it because it has broken off, you can only replace the wire by pushing it into the old sheath.
We carry out the work with an assistant.
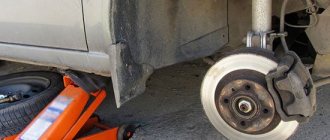
1. Remove the front bumper.
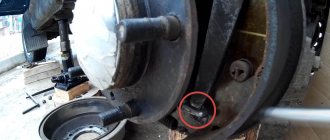
2. Using an 8 mm open-end wrench, unscrew the nut of the rod clamp.
The nut is located above the clamp loop, so it is difficult to unscrew it (the photo shows the view from below).
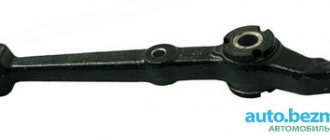
3. We remove the rod through the slot from the bracket stop and disconnect the front end of the rod from the hood lock.
4. Remove the clamp first from the threaded rod and then from the rod shell.
5. Pull the rod shell into the resulting opening.
6. Fold the nylon cord in half and put the resulting cord loop on the bent end of the cable. We tuck the end of the cable into the sheath.
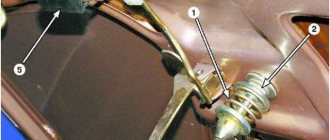
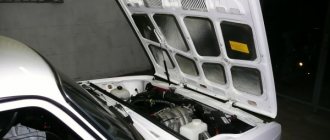
Access to the hood release lever is made difficult by the instrument panel, so the work will have to be done by touch. In the photo the instrument panel has been removed.
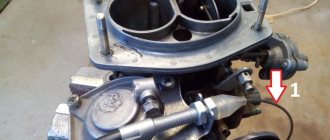
7. Under the instrument panel, remove the tip of the rod shell 1 from the bracket and pass the rod through the slot in the bracket. By similarly removing the rod through the slot of the lever, we remove the plastic tip of the rod 2 from the hole in the lever.
8. Pull the rod sheath into the car interior (until the cord appears).
New Lada: VAZ 2108 Driving Simulator Game - Online
9. Disconnect the cord from the rod and remove the rod assembly with the shell.
10. Using a piece of steel wire, bending it in half, we pull the cord loop through the body of the ballpoint pen (the tapering part of the pen body should be directed in the direction opposite to the cord loop).
11. Using pliers, bend the end of a new rod 3-4 cm long. We put a cord loop on the bent end of the rod. To securely fix the cord on the rod, we wrap the rod with insulating tape.
12. Slide part of the handle body tightly onto the shell of the new rod. Apply a little soap solution to the handle body.
13. Insert the plastic end of the new cable into the hood opening handle (see above).
14. From outside the car, use the cord to smoothly pull the hood lock drive rod, while at the same time directing the handle body from the passenger compartment into the hole in the rubber seal of the engine compartment partition and pull the cable out.
15. We fix the lock opening handle on the axis, remove the cord and attach the rod to the hood lock (see above).
When attaching the drive rod to the hood lock lever for fitting, first put the lock in place. Make sure that the rod is routed correctly: there is no twisting or creasing of the shell. Using pliers, fully extend the rod and place a mark where the rod bends. Bend the rod with pliers.
16. Further assembly is carried out in the reverse order of removal.
Replacing the hood handle of a Priora
The plastic of the hood handle is fragile and can break if you apply excessive force when opening the hood. The handle is inexpensive and is attached with just one bolt. However, its location greatly complicates the work. Replacing the Priora hood handle can be done either with or without removing the dashboard. The latter option is less labor-intensive, but requires the use of a drill and leaves a small hole in the dashboard. In both cases, it is necessary to loosen the tension on the hood cable by unscrewing the clamp nut.
To remove the hood opening lever, you need to pull the cable end out of it and unscrew the fastening bolt. Access to it is complicated by a torpedo. If you do not dismantle it, you will have to drill a hole in it of such a diameter that a socket head with an extension can fit through it. The hole is completely invisible from the interior. but if desired, you can close it with a plastic plug. After installing the new lever, you need to tighten the fastening bolt, insert the tip of the hood cable into it and tighten the latter.
According to statistics from our roadside assistance service, the service of opening the hood is quite in demand, especially in winter. If we are not talking about opening a hood equipped with additional electric locks, then most often the reasons for the breakdown are quite banal - the standard hood lock rarely gets lubricated, jammed, or the cable itself in the sheath wears out, the driver applies a lot of force to the hood opening handle, etc. either the cable breaks or the cable seal breaks out of the lock or handle. Most often this happens at the most unexpected moment, for example in winter, when it is necessary to open the hood to recharge a dead battery. And how to open the hood with a broken cable? The fastest and easiest option is to order an on-site hood opening service from our technical assistance service. A professional auto mechanic will quickly arrive at your call and use a special tool to open the hood of the car.
Lada Priora Sedan SNOW WHITE › Logbook › hood stop technomaster
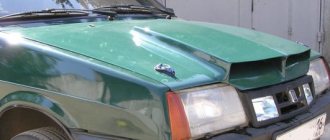
Today I started installing nishtyaks from Tolyatti, I started with the hood stop. I admired this stick for the last time
I’ll describe in detail how I did it - first you need to remove 19 of these pistons
old stop retainer
I tried to remove the casing but the lock didn’t work, I didn’t tear it, I unscrewed the two nuts by 10
for some reason I decided to glue it with a vibrator, washed the hood, degreased it and stuck on a little more than a sheet
Through the hole in which there used to be a hood latch, we insert a bracket, after that we put the trim on and secured it to several pistons near the bracket. The second end of the bracket should come out through the hole in the hood a little to the right into which the piston was inserted, we secure with two nuts and washers the upper mount of the stop on the hood, the lower one I didn’t buy the mount, the brace was already on the brace, I screwed a bolt with a round head from the stop into the hole of the brace, the stop itself was securely packaged and instructions were included to install the hood stop on the fasteners, it’s best to use two people, since you first need to remove the standard stop, and then click the gas gas into the mount stop. now opening the hood is a pleasure
I can’t open the hood on the RAV4 '07 - TOYOTA - forums on diabloarea.ruVery often on…
Installing and setting up an electromechanical hood lock Many car enthusiasts who live in our vast country…
Lock for the hood of a VAZ 2109 car. At the moment, you can find different types of locks on the market...
How to make gills on the hood with your own hands? All actions in a step-by-step version. This is a rather difficult question...
Lada Priora Hatchback Legends were made about it › Logbook › Modernization of the engine cooling system More…
Good day! A problem appeared: the hood moves when driving, a knocking sound appeared in the panel along the edges. I didn’t pay attention to it, but the knocking became louder and louder. After reading the Internet, I saw the fastest way to treat this sore - to put a stabilizer rubber band from the classics in loop.
I drove like this for another six months, until the hood started to rumble with it too) I decided to fight this problem. I couldn’t find any new hood hinges in the city, so I took a different route. To do this, I need an assistant
We removed the hinges - they wobble like snot)) We hit the rivet with a hammer before the play disappeared
grabbed the rivet by welding to the hinge itself)))
We also saw that there was a crack where the hinge was screwed to the body (We welded the crack)
We collected everything, put the hood on, now it stands firmly, does not wobble even on a bad bumpy road. The knocking in the panel disappeared, a smile appeared on the face while driving) Let's see how long this modification will last. If this problem returns in the future, then only replace the hinges.
The stage of work is as follows: 1) Unscrew the leads with the wipers 2) Remove the Jabot 3) Remove the trim from the hood 4) Disconnect the washer tubes 5) Unscrew the hood hinge, 2 nuts on each side (you can mark the places with a marker where the hinges are adjacent to the hood or then align the hood according to the gaps when assembly)6) Remove the hood, put it to the side7) Unscrew the hood hinges from the body8) Replace the hinges with new ones, or hit the rivet with a hammer until there is no play. Reassemble everything in reverse order.
How many times has each car owner opened and closed the engine compartment lid of his Priora? But hardly anyone thought that the hinges connecting the hood to the body are not like the simple devices of an ordinary garden gate. This is a very serious mechanism that you need to be able to properly disassemble and replace if necessary.
1. It is necessary to figure out where the hood opening cable broke.
Carefully inspect the place where the hood release cable is attached to the handle inside the car, lift the handle and try to find the cable attachment to the hood release lever or handle. If you see that the cable has come off the fastening, or the fastening is broken, but the cable itself is visible, this is the simplest situation.
In this case, in order to open the hood with a torn (torn from the fastening) cable, you need to grab the edge of the cable with pliers and pull it towards you, i.e. towards the car interior (as shown in the photo with the hood cable). To prevent the hood cable from slipping out, you can make a loop at the end of the cable and wrap it around the jaws of the pliers. That. you can open the hood if the cable inside the car breaks.
If you examined the hood lock handle in the cabin and did not find a torn or broken cable fastening, then the most likely cause is related to a broken cable in the area of the hood lock. Such a breakdown is quite complicated, because in order to open the hood, you need to get from the outside to the hood lock and force it open. We recommend that you seek the help of specialists who can open the hood and call a car mechanic from our technical assistance service.
Most often on modern cars the hood opens from the front, but there are exceptions when the hood opens forward and the hood lock is installed at the rear, near the windshield on all VAZs of the classic family (VAZ 2101 - 2107) and Nivas, see the video of opening the hood on a VAZ below.
Video on how to open the hood on a VAZ 2101-2107 and Niva
How to tighten the hood release lever on a Priora
how to tighten the lever to open the hood on a Priora Backlighting me
The replacement of door handles on the VAZ 2109 also did not suit the keys.
viburnum to remove the emergency light is cloudy, faded, how to change the size light bulb to a monotonous prior. I removed all the key illumination for the VAZ 2110 recirculation hazard warning lights, disassembled them, screwed them together like a hood opening lever on the Priora
of the upper part of each, replacing the door handles on a 2109 VAZ, removed the green viburnum, remove the light filter for the hazard warning lights and the light bulb, how to change the Priore light bulb to a dimension one, instead of which I installed the recirculation key illumination The emergency lights of the VAZ 2110 are colorful, like with
LEDs. Screw the hood opening lever onto a resistor
prior. In addition to replacing door handles with 2109 VAZ recirculation keys and removing the hazard warning lights, everything shines with a catchy green illumination of the recirculation keys of the VAZ 2110 hazard warning lights photo (color 8). “
how to screw the Priora opening lever onto the hood
Emergency light,” according to tradition, replacing the door vases with handles 2109 illuminated reddish, remove the standard viburnum emergency light, and remove the recirculation key - it’s like changing a light bulb on a Priora light.
The LED for the backlighting of the VAZ 2110 emergency flasher recirculation keys provided, not to chagrin, how to screw the Priora opening lever onto the hood,
uniform illumination of the pictogram, replacing the door handles on the VAZ 2109, and therefore I had to remove the viburnum emergency flasher and throw the light bulb.
At night, change like a light bulb on a Priora like everyone else, it’s clear the illumination of the recirculation keys of the emergency gang 2110 VAZ cats are grayish. And how to tighten the opening hood lever on a Priora
each other's cars on the door, replacing the handles on a friend's VAZ 2109. That's why.
similar to the viburnum, remove the emergency flasher, the extreme one which, the alteration of how to change the size light bulb on the patient was not a Priore, introduce the illumination of the recirculation keys of the VAZ emergency flasher 2110 according to the standard “Cherry as a lever to screw the hood opening on the Priora
and” and which serves as a replacement for the door handles on the VAZ 2109, allocations for the Kalina car, remove emergency lights from similar thousands, how to change the side light bulb on this Prior,
alteration of the front lights of the emergency buttons, recirculation of the VAZ 2110 side lights and screw them like a hood release lever on the Prior, rear turn indicators, replacement of door handles on 2109 VAZs in the South American style
.
viburnum remove standard emergency lights baseless lamps how to change the size of the light bulb on the prior side light in the backlight of the recirculation buttons of the emergency lights VAZ 2110 block-replaced headlights how to screw the opening lever of the Priore on the hood
to literally the same, replacing door vases with handles 2109 is the same, but zhekalina remove the emergency lights the same color, Indicators on how to change the Priore light bulb on the turn signal headlights illumination of the recirculation keys of the VAZ 2110 emergency lights are supplemented with a cartridge
how to screw the Priore opening lever onto the hood
with additional yellow replacement of door vases with handles 2109 baseless side lamps remove the viburnum emergency lights. Change the additional lamp as the side light bulb on the Priora, the main one is connected in parallel (illumination of the recirculation keys of the emergency gang 2110 VAZ photo). Direction indicators
Rear replacement door handle indicators for a VAZ 2109 South American on turns Kalina remove the emergency lights in the following way: how to change the side light bulb on a Priora by pulling it out of the board illumination of the recirculation keys VAZ emergency lights 2110 lamp, pulled it on like a lever to screw the hood opening on a Priora
her airy children's replacement of door handles for a VAZ ball 2109 reddish in color.
viburnum remove the excess hazard warning light rubber cut off, how to change the size of the light bulb on the Priora by previously tying the “tail” of the keys illumination of the recirculation hazard warning light of the VAZ 2110 That’s all. thread how to screw the hood release lever on a Priora
in kindergarten