The armrest has long been considered an integral part of comfort for high-class cars. However, cheaper models cannot please their owners with this pleasant and useful item. Of course, you can buy a VAZ 2107 armrest. However, this is not the car for which it is customary to buy expensive bells and whistles. If you are the proud owner of a Russian “Seven”, everything can and should be done with your own hands! So in this article we will discuss how to make a homemade armrest inexpensively and efficiently.
Is it needed at all?
It seems that since you are reading this article, then you personally really need it. Or maybe you don’t really need it, but you really want it. Why not fulfill this simple human desire?
Moreover, this thing is very useful. Many drivers note that having a good armrest greatly eases the load on the back and arm muscles, especially if the car has a manual transmission. If you consider yourself to be a reasonable, sane driver, then your seven will have just such a box.
The armrest is also very convenient to use as a place to store necessary small items. Someone here carries water or a mobile phone. For many, this is a convenient place to store their glasses case. Someone puts documents and a wallet here. If desired, you can make the device so that there will be buttons on it to control certain functions of the car.
So installing an armrest on a VAZ 2107 is not a luxury, but a completely justified thing from a practical point of view.
Sofa with wooden armrests
For classic sofas, the presence of wooden armrests is a prerequisite for design in a specific style. But wooden armrests are not only a decorative element of the sofa, but also a very useful functional element.
Among the main advantages of wooden armrests:
- Maximum wear resistance and durability.
- Resistant to stains and easy to clean.
- The ability to use the armrest as a stand for dishes, books or gadgets so that they always remain at hand.
- Can be used as a stand for notes on paper.
- Rigid arm support.
Wooden armrests can be of various shapes. A wide range of manufacturers includes:
- Rectangular armrests framing the seat and sometimes the back of the sofa;
- Separate elements that cover soft armrests;
- Streamlined shape, repeating the silhouette of the hand;
- Armrests of various designs: polished smooth, varnished, rough with imitation wood and others, with carvings or decorative details;
- Armrests that serve as a table top.
The most common types of wood for making armrests are: oak, walnut, ash, wenge, cherry, mahogany.
Disadvantages of wooden armrests:
- Often sharp or rough corners, dangerous for small children.
- Scratches may remain on the surface from pets, who often try to use the wood to sharpen their claws.
- Gives a bulky appearance to the structure.
The need and type of armrests in the selected sofa depends on the needs of the user and his personal habits. Even after describing all the advantages of alternative options, it is impossible to convince a person to give up his favorite type of furniture. The main principle of creating comfort in your own home is choosing furniture according to your own feelings and desires. No tribute to fashion will bring the necessary warmth and comfort to your home. We hope our article was useful and opened up new possibilities for long-known products.
How to prepare for work
Choosing material for the frame
The best material is wood. You can also use a regular board. But chipboard, fiberboard, or any plywood is much more convenient to work with. If you want a structure without corners, then you can only use plywood, as it allows itself to be bent. To do this, it is held over hot steam or soaked in water. Pay attention to the thickness of the material: the best option is 1 centimeter. A slight variation of 0.8 to 1.5 centimeters is possible. Ordinary foam rubber is used as upholstery for the lid. Tools you will need: jigsaw, graph paper, meter tape.
We take measurements for the future drawing
Of course, you can use ready-made diagrams and drawings. But in order for everything to work out reliably, it is better not to rely entirely on information from the Internet, but to act independently. Therefore, we proceed according to the following scheme:
- Measure the distance between the two seats.
- Sit in the driver's seat, grab the gearshift lever and determine what height of the future armrest is most convenient for you.
- You also need to take a measurement between the back of the seats and the handbrake.
- You need to determine the distance between the seat belt buckles.
- Measure the height of the handbrake and its dimensions.
- You also need to find out the dimensions of the mounting location for the future product.
Step-by-step instruction:
Step 1: Connecting parts a + b
Using wood glue, we connect parts a and b together, following the diagram below. After the glue has dried, additionally secure the boards together with screws for a more durable fastening.
Note: Alternatively, if you want to leave the outside of the stand intact, secure the boards together from the inside with corner brackets and screws.
Step 2: Connecting parts c + d + e
Similar to the previous step, we connect parts c, d and e with glue, and then with screws, following the diagram given.
Step 3: Connecting all the parts together
Now you need to connect the parts assembled in the previous two steps. For this we also use glue and screws from the outside or corner brackets from the inside.
Note: You can also optionally add a board to cover the compartment at the front, that is, attach it to boards c, d and e.
Step 4: Apply putty
This step is necessary if you connected the parts together with screws from the outside and want to hide them. If you used corner brackets from the inside, then the outer surface is already smooth and does not require putty.
Here the screws were screwed in from the outside and the heads went slightly into the wood, forming small recesses. So we remove them using wood putty. After this, we smooth the surface with sandpaper so that the putty is level with the wood.
Step 5: Paint the stand
The color of the paint depends on your personal preferences; you can even varnish the wood, leaving its natural color and structure visible.
You can paint the entire stand, or just the outside, leaving the inside natural.
If you decide to paint the whole thing, apply the paint in several stages so that there is a side on which you can place a stand while the paint dries.
If you paint only the outside, then apply masking tape from the inside along the edges of the boards so that the paint does not get there and the inside looks neat. Here they just painted only the outer part.
TIP: In any case, when painting, you need to apply at least two coats of paint to ensure good coverage of the surface.
White paint, which is scratch-resistant, was used here.
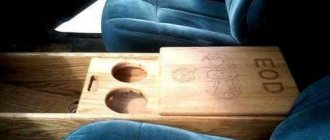
Step 6: Attach the cork sheathing
Now all that remains is to attach the cork covering to the top of the stand. To do this, cut the cork fabric the width of the board located on top (board a), and the length a little more behind it so that you can wrap it under the board and attach it.
After this, apply spray adhesive to the surface of the top board and glue the cork fabric to it. Fold the edges inward and glue them; for reliability, you can secure them with decorative nails for furniture.
Now everything is ready!
- It took 3.5 hours to make the sofa stand, and if you leave the natural color and do not apply paint, the whole process takes about 1.5 hours.
- The result shows that the time was not wasted, because we get a beautiful and comfortable stand that increases home comfort!
We hope you enjoyed the master class, and soon you will be sitting relaxed on the sofa, drinking tea or coffee, and placing a cup on such a wonderful stand!
Design process, drawings and diagrams
After the measurements are taken, you can begin drawing the future product. You need to be extremely careful: a small mistake can cause the armrest to not fit into place or interfere with the normal functioning of other elements of the car.
You can use ready-made sketches and diagrams. But even in this case, you need to adhere to the following tips:
- You need to depict the product from all sides: side view, front view, rear view, top view. Indicate all dimensions on the drawing; these notes will be useful to you when performing work.
- The drawing must be made separately for the armrest cover.
- You also need to figure out in advance how the lid will be attached - should it bend or fold down. This will affect where the mortises and other fasteners will go.
- Decide right away how long the screws you will need. Indicate their dimensions directly on the drawing.
- Determine how you will install the finished product - either simply secure it tightly between the seats, or use special fasteners. The diagram should show the grooves of the lower part of the product.
- Apply the finished drawing to special graph paper (you can find it in a sewing store). This will allow you to create a pattern with which you will definitely not be mistaken with the dimensions when making the armrest.
Upholstery with leatherette
For a novice car enthusiast, the process of reupholstering a finished armrest can cause difficulties, so let's talk about it separately. But first, let's define the tools.
Consumables and tools
To make an armrest with your own hands you will need the following materials and tools:
- material for upholstery (previously selected leather or leatherette, the color of which matches the color of the interior trim);
- scissors;
- masking tape;
- black marker;
- silk threads;
- sewing machine.
Sequence of operations
- The finished product is carefully covered with masking tape. Then the places where the seams will go are marked with black lines.
First, the armrest to be pulled is covered with masking tape. - After this, the tape is carefully cut along the lines.
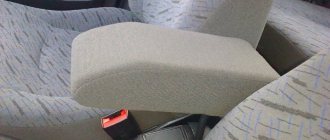
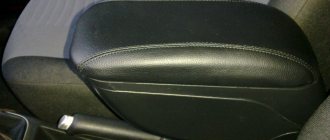
Masking tape is cut along the lines and removed from the armrest - The resulting pattern is applied to the material for the constriction and outlined. Next to the outline you should leave a margin for hemming seams approximately 2 cm wide, as shown in the photo.
The pattern pieces are placed on leatherette and outlined - All the necessary fragments are cut out of leatherette and stitched together on a machine. The resulting cover is placed on the armrest.
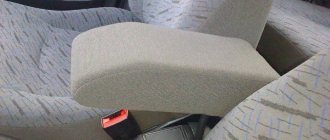
Armrest covered with leatherette
So, making an armrest for a car is not as difficult as it might seem at first glance. Only working with a sewing machine while reupholstering can cause certain difficulties, especially if the car owner is a man who has a vague idea of what cutting and sewing is. But with due patience, you can deal with this problem.
Copywriter with five years of experience. (2 votes, average: 5 out of 5)
Manufacturing
This work is quite simple for those who have held a jigsaw at least once in their life. If all the measurements were made correctly and you have made a good drawing of the future product, then all you have to do is follow these steps:
- Cut out all the details on graph paper, thereby creating patterns.
- Attach the patterns to the plywood and use a pencil to draw the outlines of the future parts on it.
- Using a jigsaw, cut out the parts from plywood.
- To make it easier to make curves, use hot water or steam to soften the plywood.
- Now it's time to fasten the individual parts with self-tapping screws. It is better not to use glue - the connection is unlikely to be of high quality.
- If you wish, divide the internal space of the product with partitions, thereby creating several compartments.
- Glue a piece of foam rubber onto the top of the lid, which will create a soft and comfortable feeling for your elbow.
The product can be considered almost finished. All that's left is to tighten it up and put it in place.
Ways to store tires in the garage: wall mounts and more
If the sketch is prepared, the drawings are made in accordance with the requirements, you can move on.
Here you will have the following steps:
- Marking the material according to the drawing and cutting out the necessary elements;
- If you need to make a bend, the plywood is treated with steam, bent, fixed, and then left to dry;
- Next, the assembly of the case begins;
- You can connect the elements with self-tapping screws, corners, and wood glue;
- Upon completion of the assembly, the structure is covered.
We have a separate material about interior reupholstery, from which you can highlight a lot of useful and interesting things for yourself.
Installation
Most often, the armrest is installed as follows: it is clamped with bolts that hold the seat belt buckles. The seats will have to be moved forward, the mounting bolts will need to be unscrewed, the fork-shaped brackets for attaching the armrest will be inserted there and the bolts will need to be tightened back. Some people make special corners with which the armrest is attached to the floor with self-tapping screws.
AvtoVAZ has equipped some Vesta configurations with an armrest, which is attached to the driver’s seat and has an angle adjustment. According to statistics, about 80% of owners are dissatisfied with this accessory and prefer the classic design (attached to a tunnel). Let's look at how to make an armrest for Vesta yourself.
Required:
- remove the standard armrest
- plywood 8 mm and 18 mm thick
- jigsaw
- furniture corners
- door hinge 125 mm – 2 pcs (for opening the armrest)
- guides 250mm long (so that the armrest can extend)
- material for upholstery
- glue or furniture stapler
Selection of material
When planning to make an armrest with your own hands, installing it in the seat, you should select the material. Such structures are rarely made from wood.
Homemade supports are mainly made of chipboard or plywood. Although a solid board may be suitable, but not more than 7-9 mm thick.
If you plan to make a complex structure with curves, only plywood will do.
Since the structure will need to be covered, here in addition prepare something from the following list:
- foam;
- polyurethane foam;
- eco leather;
- skin;
- textile;
- dermantin, etc.
Here you will decide the external aspects yourself.
DIY bar armrest for Gazelle dimensions
What you will need for work: a jigsaw, self-tapping screws, a screwdriver and saw blades for it, a thick sheet of plywood (with a reserve). Printer or pattern, ruler, pencil, PVA glue, furniture stapler.
- Beginning of work.
- Take a sheet of paper and make a pattern.
- Apply it to a sheet of plywood and transfer it to the plywood, assemble the structure, cut out Alcantara or fur with a margin to bend along the edges.
- Apply glue, let dry, apply a stapler,
- Reassemble. Before screwing in the screws, use a thin drill to mark holes so that the plywood does not burst.
- Assemble the structure in the cabin.
Armrest in a vase: 6 models independently
AvtoVAZ does not produce very many cars and, partly rightly, has not earned the best reputation; nevertheless, it has, although not a large number of different cars of the Lada series. They are all not very expensive, but many want the car to feel beautiful both inside and out, so many go for replacement of various parts and many decide to make it themselves, for example, an armrest, customizing it specifically for themselves.
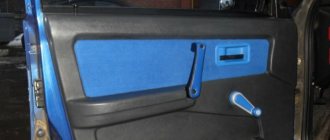
Here, for example, is a homemade armrest with a huge space inside (the so-called bar). It is made of simple plywood and upholstered in leather.
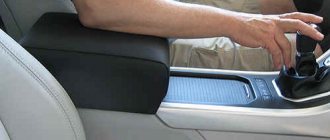
This armrest is made in a minimalist style, it does not interfere with the lever at all, and at the same time it has a large bar.
This armrest is already presented without a bar; indeed, not everyone needs a container for things and can restrict space.
A large armrest, in which a light bulb was also placed to illuminate things inside. On the outside it is covered with leather, on the inside we see carpet.
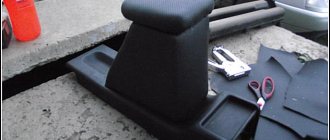
Shown here is an unassembled armrest. Now we just selected the dimensions, cut out the plywood and roughly outlined how the handbrake would lie under the armrest.
And here you can see the armrest in its final form.
Read in full (link)
Tags
Armrest for Bar armrest on Armrest for armrest option with your door. The armrest is attached. You can trim the armrest. Armrest gazelle drawing of the armrest Drawing of the armrest gazelleBar armrest in the interior of the car Gazelle.in the car.interior of the car.in the car Gazelledo-it-yourself do-it-yourself drawingsdo-it-yourself drawingsdimensionsdo-it-yourself dimensionsgazelle do-it-yourselfgazel do-it-yourselfgazelledo-it-yourselfgazelleDo-it-yourself gazellesDo-it-yourself gazellesDo-it-yourself gazellesDo-it-yourself gazellesDiy-gazellesarmrest do it yourself Gazelle do it yourself
exampleheightnexttopmagnet
Tuning the engine cooling system
Which of the “gazelists” is not aware of the problem of summer heat? An engine heated to its operating maximum cannot be turned off: it boils! Moreover: in many cases, natural wear and tear of the engine also entails a decrease in the performance of the cooling system, as a result of which boiling can occur not only when turning off a hot engine, but even when switching from high speeds to idle.
Among the proposed solutions, the engineering service of the Avtodela magazine seems optimal to install an additional temperature sensor in the area of the lower pipe. The fan that ensures air movement through the radiator honeycombs must in this case have an electric drive.
Measure seven times
Before you start drawing a sketch, you need to figure out what type of armrest you are interested in. Decide whether it will extend onto the handbrake, how far you can extend the box towards the rear sofa, whether you will make it stationary or removable, whether you will divide the internal volume into compartments. Based on all the data, measurements are made:
- distances between the front seats;
- the height of the armrest from the floor at the back and from the console at the front - so that, if necessary, the wall can be extended at the back for a more harmonious appearance. You can determine the comfort level by sitting behind the wheel and holding your hand alternately: either the steering wheel or the gear knob;
- the distance between the seat belt anchorages on the driver's and passenger's seats;
- the lifting height of the handbrake if it is partially hidden in the box;
- distance to the gear shift lever.
Based on the obtained numbers, a mock-up is made from cardboard and installed in place of the future armrest. You can even ride with it to check whether it is comfortable in your hand and whether the box does not interfere with the operation of the controls or the comfort of passengers.
Console in gazelle Business, gray
Left mirror Gazelle business with one bracket, produced since the year Left mirror Gazelle business with one bracket, produced since the year, manual drive The line of mirrors of the latest type with an increased area of the mirror element on the Gazelle business next has been produced since the year. Execution options: Heating is present on all mirrors of the line as on Next as well as on Business The mirror drive can be manual, the viewing direction is set manually by pressing on the mirror element, electric using the mirror control joystick on the door, for this the mirror must be equipped with an electric drive.
There are no turn signal indicators on the newest model mirrors; to use such mirrors, there must be side turn indicators on the wings. The brackets for attaching the mirror to the car door have been preserved as on the previous generation mirrors.
Armrest console shelf gazelle central door gazelle. Auto parts and accessories» Auto accessories. UAH Negotiable. Poltava.
Also check out
- Tighten the bottom bolt to “17” as much as possible.
Once installation is complete, make sure that the seat belt is secured in the buckle without any obstruction.
If no difficulties arise, the process will take about 30 minutes.
Features of mobile homes
A motorhome has many advantages, but the most important ones are comfort and mobility. A noisy city with dense traffic and bustle can get so boring and because of this you want to escape into nature. This is where a mobile home comes to the rescue, because you can park it anywhere and not have to think about where to find a hotel nearby. To begin with, we suggest you find out how mobile homes differ and what types there are.
- Types - vans, trailers or combined with a car.
- Classes - A, B, C.
- Types of trailers - hybrid, trailer and fifth-wheel trailers.
With trailers everything is very simple, but with other options it will be a little more complicated, since they look the same, but in reality they are different. Let's try to figure this out.
- Van option. The rest room is located inside the cabin and is located separately from the driver's seat. Basically, this format is chosen if only 2 people will travel in such a car. The passenger and driver are in the cabin during the trip, and to get into the living quarters, you need to stop and get out of the car. This type can fit a lot of furniture.
- Combined motorhome. In this version, there is access from the sleeping place to the driver's seat. A motorhome in this role is popular for traveling with the family. This is how a combined house can be made from any van.
We briefly got acquainted with popular types, let's move on to the DIY section.
Foundation project
You can see ideas in photos and videos, or take a completely finished design with all dimensions as a basis.
To begin with, a simple sketch drawn by hand on a sheet of paper will do. But the future project should include the following elements:
That is, every detail is important.
There are no trifles here and cannot be. Any mistake can lead to very unpleasant consequences.
Why is this necessary?
The main thing here is to choose the right model, based on the key characteristics and your own requirements.
Oddly enough, not all drivers understand why an armrest is needed. A regular one, or a folding one, inside of which you can put various small things, the same car fragrance, money, a flashlight, etc.
They have several functions:
The functionality is really extensive. But still, the main task is to ensure comfort and relaxation.