Hello, dear friends! I think many people are interested in an effective connection diagram for DRLs, that is, daytime running lights.
For several years now, there have been rules in the country according to which, when driving a car during the day, you should indicate your presence with the help of appropriate headlights. Fog lights, low beam headlights and the DRLs themselves are used as such lamps.
The use of fog lights and headlights has objective disadvantages. Therefore, it is best to connect the DRLs from the generator or battery yourself.
There are various ways and schemes for implementing the idea. Some do this without a relay, others combine DRLs with turn signals, others even control the daytime lights with a separate button, etc. To do everything right, you need to know some important points. And then automatic activation will be carried out without violating traffic rules.
Modification via DRL fuse
- 4-pin relay (article: 75.3777).
- Wires.
- Connector for installing an additional fuse (available in the Aliexpress catalog).
- Connectors that fit onto the fuse.
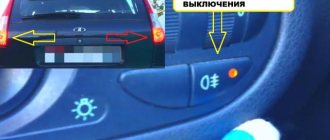
Connection diagram for DRL via handbrake
:
- Contact 85 is the “minus” from the handbrake (under the handbrake there is a breaker on “-”), we pull the wire from the breaker to the relay.
- Pin 86 is a constant +12 V (can be taken from the cigarette lighter).
- Pin 30 is +12 V from the DRL fuse.
- Pin 87 is the plus from the relay, which should be connected to the second socket of the DRL fuse.
That is, when connecting the relay, the DRL fuse is removed from the mounting block and installed in the circuit block.
Eventually
, when the handbrake is raised, the DRL will turn off. We release the car with the handbrake - the DRLs turn on.
The advantage of this connection diagram is that at any time (for example, during a visit to an official dealer), you can remove the wires from the connectors of the mounting block and insert a standard fuse in their place.
Write a comment
Comment:
Attention: HTML is not supported!
Publication date: September 29, 2016. Category: Automotive equipment.
Not so long ago, our authorities passed a law stating that, regardless of the time of day, fog lights or DRLs must work on cars. This decision was based on the experience of European specialists, who proved that thanks to working light elements on the vehicle, the percentage of road accidents can be significantly reduced. In this regard, since 2010, changes have been made to GOST and traffic rules, according to which non-working fog lights or missing DRLs can cause a rather “unpleasant” fine (1,500 rubles).
Modification via electronics control unit
It was discovered that sometimes after such a connection the body electronics unit goes into protection (the DRLs stop working, etc.), so for now the circuits are hidden:
On the Lada Vesta in the “Lux” configuration, the DRLs are controlled using an additional body electronics unit (EMM or comfort unit), which is located behind the glove compartment.
Scheme No. 1
: DRLs operate only in the left steering column switch mode - “AUTO”. To turn off the DRL, set the switch to the “0” position.
Scheme No. 2
: DRLs are disabled as long as there is ground on the additional channel of the car alarm or while the handbrake is raised (depending on the connection).
An additional car alarm channel should be programmed:
- The minus appears after the engine starts, and the car is armed.
- The minus disappears after releasing the handbrake.
Accordingly, after lowering the handbrake, the DRL begins to operate normally.
All connections are made on the EMM block:
- Points 1 and 2 (broken). Points 3 and 4 (broken).
- Broken wires: S1-C1 and S1-C2 in the diagram - power supply to the DRL lamps.
- Point 5 (contact S2 D15 in the diagram).
Eventually
The daytime running lights are connected to the vehicle’s on-board network via either a four-pin relay or a five-pin one. In this case, the “+” of the power circuit is taken from terminal D of the generator. In this state of affairs, the headlights are activated when the engine is turned on. The relay allows you to turn off the LED lights when the side lights are turned on. In particular, you can turn off the running lights when you turn on the low beam by taking the “+” from the positive contact of the low beam instead of the “dimensions”.
Daytime running lights (DRLs) in headlights, fog lights, turn signals, installed separately, and wherever they are not installed. Are there any rules at all that govern the installation of DRLs? Can I install DRLs myself? They also say that they consume several times less energy, and therefore you save on gasoline.
What are DRLs and what are they for?
“Daytime running lights” have nothing to do with side lights. This new concept appeared in the rules due to the fact that modern cars began to be equipped with them. This term refers to external lighting devices designed to improve the visibility of a moving vehicle from the front during daylight hours. On new European cars you can often find lights in the headlights that stand out structurally. Most DRLs are LED bulbs. When using daytime running lights, it is not necessary to turn on additional light signals (fog lights or low beams).
DRL installation rules
Requirements for daytime running lights APPROVED by Decree of the Government of the Russian Federation dated September 10, 2009 No. 720 Extract from the technical regulations ON THE SAFETY OF WHEEL VEHICLES
6.19 Daytime running lights
6.19.1 Installation Optional on vehicles. Prohibited on trailers. 6.19.2 Number Two. 6.19.3 Installation diagram There are no special requirements. 6.19.4 Placement of DRL placement rule (GOST) 6.19.4.1 Width - the point of the surface visible in the direction of the reference axis, furthest from the median longitudinal plane of the vehicle, must be located at a distance of no more than 400 mm from the edge of the overall width of the vehicle. The distance between the inner edges of two visible surfaces must be at least 600 mm. This distance may be reduced to 400 mm if the overall width of the vehicle is less than 1300 mm. 6.19.4.2 In height - at a distance from 250 to 1500 mm above ground level. 6.19.4.3 Lengthwise - on the front of the vehicle. This requirement is considered to be satisfied if the emitted light does not interfere with the driver directly or indirectly as a result of reflection from rear-view mirrors and/or other reflective surfaces of the vehicle. GOST placement of DRL 21106.19.5 Geometric visibility Horizontal angle beta = 20° outward and inward. Vertical angle alpha = 10° up and down from horizontal. 6.19.6 Direction Forward. 6.19.7 Functional electrical diagram If installed, daytime running lights must turn on automatically when the engine start/stop control is turned to the “on” position. It must be possible to activate and deactivate the automatic activation of daytime running lamps without the aid of a tool. Daytime running lights must turn off automatically when the headlights are turned on, except when the headlights are turned on for a short period of time to signal road users. 6.19.8 Pilot signal Optionally in closed loop form. 6.19.9 Other requirements None.
Requirements of UNECE Regulations No. 48 and No. 87: the area of luminous elements must be in the range from 250 to 2000 mm², luminous intensity - from 400 to 1200 cd (for Russia - up to 800 cd).
In the end, taking all this into account, I got it like this: - turn on automatically from the ignition - turn off when you turn on the low beam.
Types of connection
DRL Eagle eye, eagle eye
The connection diagram for running lights depends on the configuration and your budget. There are 3 types of configuration:
- the most inexpensive, only DRL;
- average in price, stabilizer included;
- expensive, with a control controller.
If you have the cheapest and worst ones, then the kit does not include a controller or control unit. Such a unit performs the function of a voltage stabilizer and on/off control.
The average configuration includes a 12V voltage stabilizer. There are voltage surges in the car network, and LEDs really don’t like this and fail. The stabilizer will significantly extend the life of the LEDs. But in this option, you will have to choose a place for connection so that they turn on only when the engine is running. There are many places for this, for example an oil pressure sensor or a generator.
Domestic model
The expensive version is equipped with a control unit that connects directly to the battery in the car. According to the principle of operation, they are of two types:
- determine the difference between the number of volts when the engine is off and on;
- cheaper, it turns on when the voltage rises above 13V.
The best option is the first one, regardless of the voltage on your battery, always turn it on and off correctly. The second option is budgetary and does not always work. With the engine off, the number of volts must drop below 13V for the controller to turn off the DRL. However, if your battery is new or well charged, then even after stopping the engine, it will have a voltage above 13V for up to several hours. That is, the daytime running lights will not turn off on their own until there is less than 13V. The only drawback will be its own power consumption when the controller is waiting for the engine to start. It will drain the battery along with the security alarm.
What are the rules for installing and connecting DRLs in Russia: is it possible to do this yourself?
The Ministry of Internal Affairs of the Russian Federation has such a document as the appendix of the Procedure for controlling changes to the design of a vehicle. It regulates a list of changes that do not require a conclusion, that is, they can be carried out without the permission of an authorized organization. It should be immediately noted that equipping the vehicle with running lights is not included in this list.
Thus, the rules for installing DRLs in Russia require installation of equipment only in standard locations. If there are none, then you will have to obtain permission for reconstruction. For example, the owner of a VAZ 2106 is advised to turn on the low beam, but if he installs daytime lights himself, he breaks the law. The situation is reminiscent of a violation of glass tinting standards and can lead to punishment, including deprivation of rights.
How to obtain permission for reconstruction?
In order not to break the law, you need to go to the traffic police, where a base has been created for installing daytime lighting on almost all car models. It is worth considering that when choosing lighting devices on your own, traffic police officers will measure the level of their luminous flux.
In the case where the DRL is supplied even in accordance with the standards, without permission this will be considered as unauthorized interference with the design of the car. In addition, the law combats such violations as underbody lighting, equalizer on the glass and other lighting equipment that imitates a special signal.
Operating mode
According to technical regulations for cars, DRL should automatically turn on when the engine starts. When you turn on the low beams, they should turn off automatically so as not to dazzle at night.
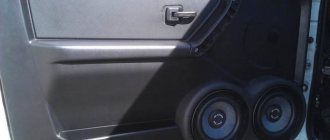
There are also combined models with installed turn signals on sale. The turn signal duplication section is connected separately in parallel to the standard turn signals. Having a stable diet is also a must.
DRL with turn signal
For models with additional control, there is a follow-up backlight function that operates for 10 minutes after the engine is turned off. It illuminates your path to your home or dugout, depending on where you live. Osram DRL has a mode in which they do not turn off, but dim by 50%. I just don’t know how legal it is and whether it will cause blindness.
The essence of modernization
The technology of connecting DRLs from a car generator did not arise by chance. After all, the main GOST requirements for the functioning of DRL are as follows:
- powerful light-emitting diodes must be turned off when the head light is activated, which is the “near”, “far” or luminous flux from the PTF;
- DRLs should automatically start when the body that controls the engine operating modes moves to the “on” position;
- it must be possible to turn off the running lights without the help of an external tool, i.e. button.
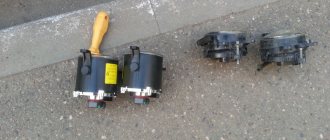
DRL controller
I prefer the DRL connection diagram using a control unit, the most reliable method, suitable for any car and does not require any knowledge. Many car enthusiasts buy a DRL control unit from AliExpress - it is inexpensive, and the reviews seem to be good. However, most reviews are left either upon receipt of the product or after several days of use. In fact, absolutely all DRL controllers from AliExpress are short-lived and have the following disadvantages:
- the operating principle does not comply with GOST;
- there is no stabilization (for the majority);
- low quality of materials and workmanship;
- the features of the vehicle’s on-board network are not taken into account;
- no guarantee;
- some do not have moisture protection.
Among the high-quality options, I can highlight the DayLight+ DRL control unit from a Russian manufacturer, which fully complies with GOST and is of good quality. The DayLight+ controller also has built-in stabilization, which will significantly increase the life of the running lights.
How to make it yourself
The option of making your own DRLs allows you to customize your car at low financial costs, and the main key to success in this case will be the ability to work with hand tools, the availability of free time and the desire to do this work with your own hands.
- How to turn on daytime running lights on a Kia Rio: illumination in detail
The following can be used as a light source when making DRLs yourself: LED strips, individual LEDs and an aluminum profile.
Option for placing daytime running lights on the VAZ-2110
Making DRLs using an LED strip
An LED line is a lighting product manufactured in a factory and consisting of an aluminum base on which LEDs are placed.
Manufacturers of LED products produce LED lines designed for different operating voltages. Therefore, when manufacturing DRLs, you should use models operating at a voltage of 12 Volts DC, corresponding to the voltage of the vehicle’s on-board network.
For manufacturing, you will need LED bars 150–200 mm long and fog lights (FTL), and you can use used ones. The length of the rulers used must correspond to the width of the PTF, and the number of rulers that can be placed in one headlight housing depends on its height.
Expert opinionAlexey BartoshSpecialist in repair and maintenance of electrical equipment and industrial electronics.Ask a question to an expertFor your information! The presence of an aluminum base in the design of the LED line allows for effective removal of heat generated during operation of the LEDs.
LED strips that can be used when performing work
Work on the manufacture of DRLs using PTF and an LED line is carried out as follows:
- When using several LED strips, they should be placed on a solid base that allows the strips to be secured in the same plane. To do this, you can use transparent plastic and adhesive sealant;
- the leads from the LED strips are connected in parallel to each other and soldered, and the output conductor is soldered to the common end;
- PTF is being sorted out. To do this, using a construction hair dryer, the junction of the protective glass and the headlight housing is heated, after which the sealant with which they were connected is removed;
- The standard socket intended for installing the light source is removed from the headlight, and a base with LED strips placed on it is installed in its internal space;
- the leads from the strips are brought out of the PTF body, and a diffuser (protective glass) is glued to the front side.
Important! In a similar way, you can make DRLs using an LED strip, but in this case it is necessary to further consider the issue of ensuring cooling of the LEDs.
Option for manufacturing DRLs from LED strip
After manufacturing the product, the reconstructed PTFs are installed in standard locations.
Manufacturing DRLs using an aluminum profile and individual LEDs
This manufacturing option is suitable for creative people, because in this case it is possible to make DRLs of an original shape. The main indicator limiting the author’s flight of imagination will be the regulated requirements for such light sources, which will be discussed a little later.
So, to manufacture DRLs of this type you will need:
- LEDs - from 5 to 7 pieces per DRL unit, power up to 3.0 W;
- lenses for LEDs;
- aluminum profile;
- connecting wires of the PV, PuGV, PVS brand or analogues.
DRLs made of aluminum profile and LEDs
A base is made from an aluminum profile on which the LEDs are placed using thermally conductive glue. Lenses are mounted on top of them, providing the required luminous angle of the light source.
Important! When connecting LEDs to each other using connecting wires, it is necessary not to confuse the polarity of the light sources.
DRLs made in this way can be placed on the car bumper, having previously cut holes in it corresponding to the dimensions of the manufactured product, or in the PTF, as in the previously discussed case.
Choosing a stabilizer
In this form, the first and second methods will be combined. Even if your daytime running lights do not have a stabilizer, I recommend purchasing one or making it yourself.
You can buy Chinese modules at prices ranging from 50 to 120 rubles, so as not to order on Aliexpress, take a look at Avito, you can find very reasonable prices. The most common modules are pulse LM2596 and linear LM317. They are of course outdated, but they will draw a current of 1 ampere, which will be a power of 12 watts.
The XL6009, XL4015 chips are considered modern for 2016. They have higher efficiency and heat up much less. They can withstand a current of 2 Amps without a chip cooling system, this is equivalent to a load of 24 watts.
Garage option
Now let’s look at a simplified version, often called the “collective farm” version. Before you start using the method, keep in mind that there is a risk of breaking the plastic body kits. If you are not sure of the accuracy of your actions, do not try this method. Before starting work, disconnect all connectors from the headlight. The procedure is as follows:
- Partially unscrew the radiator grille. Wring it out and unscrew one of the screws securing the “eyelashes”;
- Unscrew the top screws of the headlight;
- Twist the upper bumper mounts. They press it away from the body, so they gain access to the headlight screws and unscrew them;
- Remove the optics.
Connection via relay
Specialized relay Forget-me-not 3, price 450 rub.
On forums and websites you will find different ways to connect daytime running lights with your own hands; it will be different for each brand. Specialized relays are also sold, for example Forget-me-not, designed for any car.
The operating principle is simple. Power to the daytime running lights is supplied from the ignition switch wire. The positive wire from the far and near breaks the circuit when voltage appears on it. A 5-pin relay is sufficient for this. First, look for a solution on forums that specialize only in the make of your car. Perhaps you will find a simpler solution.
Connection diagram for running lights via relay
For example, in Duster you can connect the DRL to the cigarette lighter; voltage is supplied to it only when the ignition is turned on. This is better than looking for the ignition wire in the wiring. In any case, I recommend installing a fuse in case of a short circuit.
Many circuits use a gauge wire to disable the DRL. This is incorrect DRL should not go out when the headlights are turned on, only when low beam is on.
Another type of connection diagram for daytime running lights is the installation of a relay in the standard relay block of a car without any upgrades. It includes 30% or 50% distant, which will be enough to identify vehicles on the road. If the far one consumes 120W, then 30% equals approximately 36W, 50% equals 60W.
Nuances of using lights
There is a special GOST that defines and regulates installations, technical parameters and the connection itself of daytime running gears.
Thresholds on Niva: do-it-yourself installation options, photos, drawings Category: Tuning
The regulations state that the circuit should be used in such a way that the drive wheels turn on automatically when the key is turned in the ignition switch. That is, when starting the power plant. But DRLs are also required to turn off automatically as soon as the main beam headlights come on. Here, as you understand, we are talking about the headlight unit (low or high beam). There is also a rule indicating that the head light should turn on only when the headlights turn on. The exception is short-term signals to warn other drivers.
Based on the above, we can safely say that you should not output the DRL through the button. The same as through the handbrake. But you can install it in turn signals, but you will need to connect 2 additional wires from each turn signal.
All this is extremely important to take into account when connecting the movers. After all, you should be concerned not only with the fact that the light bulbs do not burn out. Although this is an extremely significant point.
Without a well-thought-out and competent scheme, you will definitely not be able to install DRLs yourself. After all, everything should work with a shutdown when the high or low beam is turned on.
There are a number of schemes according to which, in theory, you can install DRLs on your car if they are not included in the standard configuration of your vehicle. The only question is which scheme is better to use.
An important role is played by the voltage stabilizer, which is a subject of much debate when using diode running lights. The DRLs themselves are equipped with resistors that act as a current limiter. But during voltage surges, they are not able to maintain the voltage at a single level. Therefore, it is correct to assume that the use of a stabilizer in such a scheme will be mandatory and necessary. Otherwise, the service life of the DRL will be significantly reduced due to regular voltage drops. Although some still believe that the connection can be made without a stabilizer.
It is worth considering several schemes separately, drawing appropriate conclusions from them and making a final decision for yourself.
Other less popular methods
Many people are interested in how to connect DRLs without a relay on their own, but it depends on the electrical system of your car; look for a solution in online clubs dedicated to your car. The most important thing is that power is supplied to this place after the engine starts.
The basic diagram for connecting the DRLs is through a 4 or 5 contact relay, which turns off when the low one is turned on. Those who are not too lazy to rummage through the car’s wiring can connect it from the oil pressure sensor or generator. On any vehicle, when the engine starts, the oil pressure light on the dashboard lights up, the signal from this wire is used to supply power. The second way to connect running lights yourself is to connect to a generator. They will turn on automatically when voltage appears on the generator.
It couldn't be simpler
This is the simplest scheme, which involves connecting to a battery or generator as a power source.
The scheme provides that the DRLs will be activated simultaneously with the engine starting. The point is to connect the plus to the positive terminal from the ignition switch of your Renault Logan or the same Lada Largus, and fix the minus on the car body in any convenient place. Everything looks simple and extremely logical. But you should not rush to conclusions, nor should you make such a connection. After all, it has an obvious drawback.
If the system is assembled according to this scheme, the diodes from the DRLs will start working constantly while the key is in the ignition switch. There is no question of any coordination with other headlights here. Therefore, such a connection contradicts GOST and traffic regulations.
Heat
After a long warm-up, we check the temperature of the cooling system and LEDs. In daytime running lights mode it turned out to be only 106°. In this mode, the service life of the LEDs will be very long; according to the specification, heating up to 150° is allowed while maintaining the declared characteristics. The diodes can operate up to 100,000 hours if the driver does not fail. The radiator is made as efficient as possible; there are no decorative elements like Chinese lamps.
| — | DRL in turn signals | Radiator |
| Temperature | 106° | 68° |
Power
We warm up the DRLs in the 2 in 1 turn signals to operating temperature for 60 minutes. The results are almost as stated. Compared to the standard halogen P21W and PY21W, the energy consumption was reduced by 2-4 times.
| — | Stated | Measured | Halogen |
| DRL | 6w | 5.6w | 21w |
| Dimensions | 1.5w | 1w | 5w |
| Turn signal | 13w | 12.2w | 21w |
Color temperature, comparison with halogen
If you are concerned about the appearance of the car and how the headlights fit together, then you need to consider the color temperature. For these REFIT DRL daytime running lights, the result was 5300K (Kelvin). The 5300K indicator will be combined with 5000K xenon and 5000K-5500K LED low-beam headlights.
| REFIT DRL | Halogen | |
| Colorful temperature | 5300K | 3200K |
Traffic rules installation standards
The requirement for the presence of DRL is contained in the traffic regulations, and the technical parameters of the lights are regulated by two GOSTs - R 41.48-2004 and R 41.87-99. According to their requirements, there must be two lanterns, and the color of their glow is only white. Other characteristics should not go beyond:
- brightness 400..800 candelas;
- the distance between the lanterns is no more than 60 cm;
- distance from the edge of the car – within 40 cm;
- horizontal opening angle of the light beam – 20 degrees, vertical – 10 degrees;
- installation height – 25..150 cm.
Paragraph 6.19 of GOST R 41.48-2004 states that the DRLs should start shining when the ignition is turned on.
Mortise
“Eagle Eye” is especially popular. By design they are:
- in the form of a bolt with a diode cap;
- cylinder with snap fastening;
- tablet on double-sided tape for surface mounting.
The option using adhesive tape is not interesting due to the unreliable fastening. Although this is the easiest way to install a DRL with your own hands. What remains is the “eye of the eagle” with a mortise installation. To do this you will have to make holes with a diameter of 20-25mm. If you later decide to get rid of the “eagle eye”, there will be holes in the bumper that will have to be sealed and painted over. For this reason, holes are drilled in the fog lamp plugs, which are not painted, just black.
The actual power is about 1W, although stores indicate from 3W to 9W. To mark yourself on the road, you need to place 5-7 pieces on each side of the car. The installed lens ranges from 30° to 90°. 30° will be optimal; at a larger angle, the light intensity will decrease significantly. For example, at 60° the force will be 2 times less.
Fastening with tape
Threaded bolt
Eagle eye on latches
Fog light plugs
Plug for fog lights
Low beam or dimensions
You can also connect to the side lights or low beam headlights. In theory, everything here also looks quite simple, interesting and promising. The first of the schemes under consideration provides that you will use an electrical circuit that powers the size lamps. Here the plus from the DRL is connected directly to the battery as a power source. But the minus goes to the plus of the dimensions. At such a moment the latter will be electrically neutral. Thus, the current flows from the plus of the battery through the diodes to the dimensions, and then through the lamp to the housing, where the latter acts as a minus of the created electrical circuit.
Since the level of current consumption will be small, the diodes will start to work, but the size lamp will not turn on.
As soon as the driver switches to the dimensions, a voltage of 12V will appear on its positive side, the potentials will be equalized on the DRL wiring and the diodes will go out. The circuit will begin to operate in normal mode, supplying current to the dimensions.
Everything seems to be fine. But again, conclusions were drawn hastily.
The scheme is simple and working. It just has a few drawbacks:
- The drive trains will remain active when the engine is switched off. This directly contradicts current laws;
- If the dimensions are equipped with LED lamps, such a circuit will immediately become inoperative;
- Operation will not be correct when using powerful SMD diodes as part of DRLs;
- To provide additional safety, you will have to add a fuse to the circuit.
To avoid the first drawback, the circuit is slightly altered. The positive from the LED module is taken not from the positive of the battery, but through the positive of the ignition switch.
The second scheme involves activating the DRL using a low beam lamp. The point is that when the low beam is turned on, the walkers are turned off, and the rest of the time they work.
There are the same disadvantages here as for the previous scheme. That is, it contradicts GOST and traffic rules.
Driver
The power supply is made without a case; the board is covered with a thick heat-shrink tube, which is filled with transparent sealant inside. This reduces the cost of its production. This driver does not require a metal housing; due to its high efficiency, it does not heat up at all, that is, it does not require cooling.
Fine for driving a car or other vehicle without a license
To get rid of the disadvantages of previous schemes, a connection option via a 5-pin relay is used.
The relay is connected as follows:
- Contact 87 is not connected and is simply isolated;
- 87a goes to plus to the ignition switch;
- Pin 86 is needed to connect to the housing;
- 85 goes to the positive wire from the side lights;
- Pin 30 is output to the plus of the DRL LED module.
By turning the key in the lock, 12V begins to flow to the DRL, which allows the running lamps to light. When turning on the headlights or headlights, the relay opens contact 87a and closes contact 87. Thus, the running gears turn off and the other lights turn on. This scheme is good because it complies with GOST and traffic regulations. Plus you can use diode dimensions.
Here it is recommended to use a voltage stabilizer. The only drawback of the scheme is that when you turn the key without starting the engine, the DRLs will light up.
The main thing is to start
Gorbachev’s famous phrase helps with motivation to achieve a specific goal like nothing else. The beginning of our installation process is to purchase the required running lights from an auto parts store. There are many different manufacturers and even more models, so an inexperienced person can easily get confused. In this case, it is better to contact the seller or consultant. Most of the manufactured lights meet all GOST standards and are ready for subsequent installation.
When approaching the procedure, motorists must take into account certain requirements:
- brightness of LEDs and their rated power;
- technical characteristics and distinctive features of their vehicle model;
- size, shape and type of front bumper.
DRL installation kit The installation location will depend on the block (meaning its size and shape), but this does not create problems, since regardless of the shape (rectangular or oval), the dimensions of the block are small. When considering the main and “favorite” places to install emitters, one cannot fail to mention the air intake and bumper, where motorists most often install LEDs.
Example of benefit
When traveling short distances in winter, especially in severe frost, a large amount of battery energy is spent on starting the engine. Over time, the battery loses its capacity and holds its charge worse. Using DRLs instead of low beams will allow you to charge the battery faster while driving.
Let's do the math:
- low beam consumes about 100W, 2 lamps approximately 50W each;
- decent DRLs up to 15W;
- 100W – 15W = 85W less energy will be consumed.
For example, in my Duster there is a standard heating element that heats the interior until the engine warms up. Accordingly, the car will warm up faster.
Hello Sergey! I bought myself a DRL of this model with a DRL controller IN 2 IN 1 TURN SIGNALS 1156 BA15S LED base and a controller like you showed above, I need help connecting it, the diagram is there but not finalized in my opinion. I would have known before that you were on the site, so I consulted with you, but now I ask you to explain to me how to connect the controller to the DRL I searched for the video, but it shows a simple connection, which is already clear, but where to connect the controller, as I understand it, it acts as a voltage stabilizer, but then it turns out Should I clean it before the resistor or after? I can not understand. Thank you. Oleg.
The controller connects to the lamps and power, everything is simple. Ask where you bought it, they will know exactly the connection diagram.
Hello, the osram drl 401 DRL controller burned out, I had to look for an analogue, I found a similar one in China that does not dim the lights but turns them off completely when the headlights are turned on, I noticed a strange feature - an unpleasant flickering of the LED lamps and only at idle speed, the controller was not the cheapest for 700 rubles with a good wiring harness, and this evening after turning off the low LED lamps generally lit up at 10% of their brightness, is the second controller really dead, the car is a Honda CR-V 2008, I don’t know where to dig next, I’m asking for advice
To check the serviceability of the unit, test it separately so as not to damage the circuits in the car. Chinese DRL units have a lot of defects, my colleague tried to buy different ones, many burned out.
Hello Sergey. Together with a used Mitsubishi Outlander bumper, they came with homemade DRLs that looked very kosher (ARL 0200 13677 NCC/ML-018SAE PY2 06). There was a label hanging on the connection wire (Never connect light without driver to 12V.) I connected it through the KREN8 stabilizer, having previously checked the output - 12.08V, determined the polarity by checking and... they burned out, impudently flaring up at last. Please tell me what mistake I stepped on, maybe someone else will read it and not stumble. With respect, Nicholai.
There was a driver there that stabilized the current. And you connected the voltage source. The current turned out to be large, and the diodes burned out.
Everything is fine. Question: out of ignorance, I bought a FT-DRL-046 DRL, I connect it through the generator, but from the control unit there are 2 more white ones and 1 blue one, how to connect them. More precisely, which wire is for the near one. I have gas-31105, thank you.
It’s better to ask the store where you bought it, they will know for sure. or you can contact the manufacturer.