Lada Granta, Lada Kalina and Lada Priora are budget cars, so they do not have all the comfort options. For example, in the interior of these models there is no second lamp for rear passengers. However, you can install the ceiling lamp for the rear row with your own hands. Let's talk about all the features of this modification.
Required
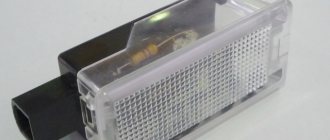
Lamp lighting, for example:
- from Lada Priora Luxe (catalog number: 21700-3714010-01) together with mounting frame (21700-3714014-01);
- from Sable or GAZelle (CA 453.0031);
- lamp from a foreign car (for example, with this number: 3b0947291);
- any other of your choice.
You will also need several meters of wires.
Where can I buy
: in our online store (category Interior lighting).
How to apply lighting to your feet
Making car interior lighting with your own hands is, in my opinion, the most popular and interesting topic of auto tuning. This time we will consider one of the elements of interior tuning, namely the lighting of the car interior feet.
Interior foot lighting will highlight the uniqueness of your car's interior, giving it any shade, from aggressive red to calm green.
To implement our idea, we will use LED strips with a long service life. And so, we need the same thing:
In addition, you can also purchase, but this is not necessary:
Well, let's start illuminating the legs of the car interior with our own hands.
We will connect the footlights to the ceiling lighting, so first we carefully remove the lampshade using a thin screwdriver and disconnect the terminals.
We connect “+” to the white wire, and strip the “-” to the red wire for better contact, after which we carefully insulate them with heat-shrinkable tubing. We insert the lampshade into place.
We run our wire under the ceiling trim, through the right pillar downwards (for ease of installation, the seal can be removed). The wire for the backlight runs past the glove compartment and exits at the passenger's feet.
We connect the wires to the LED strip; when connecting the wires, do not be afraid to confuse the “plus” with the “minus”; if you make a mistake, the LED strip will not light up at all.
Having made LED lighting at the passenger’s feet, we stretch the wires behind the center console to the driver’s seat. We carry out the same manipulations.
As a result, we get interior footwell lighting, which will light up when the door is open, illuminating the footwell for both driver and passenger.
The controller mentioned above is necessary in the case of backlighting the legs with a smooth fading effect.
Of course, connecting the footlights can be done in other ways, such as connecting to the terminals directly from the block under the driver’s feet.
In a word, don't be afraid to experiment.
In almost every car, the manufacturer has provided a backlight that turns on manually (when you turn a special toggle switch) or automatically (when you open one of the doors). But this is not enough. I would like not only to add functionality to the interior, but also to make it brighter and more unusual.
Thus, in recent years, the installation of LED lighting in the interior has become increasingly popular. Why not? On the one hand, the original tuning improves the interior lighting, and on the other hand, the car interior takes on a more solid and interesting look. At the same time, installing the LED strip will not cause you any difficulties. We will look at how to do this job correctly in this article.
Backlight installation: step by step
The main thing is not to be afraid of such alterations. You will see for yourself that there is nothing complicated here. Moreover, such tuning will bring great pleasure, because you are transforming your favorite car with your own hands. So, here we go:
Pay special attention to connecting the positive wire to the fuse output. There are two options here: the first is to pull out the already connected wire, wind it together with our wire from the button and return it to its place, and the second is to bite off the already connected wire a little lower from the clamp and connect it to the wire through the terminal.
That's all. Now, when you turn on the ignition and press the button, the lower part of the cabin will be illuminated with bright light. The whole job will take you no more than 1-2 hours.
Conclusion
Don't be afraid to make changes to your car and do your own tuning. Try it once and see how simple and interesting it is. Good luck.
The standard lighting in the interior of Lada Granta, Lada Kalina or Lada Priora cars is dim. Even if you modify it, you still can’t see anything in the cabin from behind in the evening. The problem can be solved by installing an additional lamp for rear passengers, but this time we will show you how to make high-quality additional floor lighting.
Installation
- We choose a place to mount the lampshade in the rear of the car. We find the stiffener by pressing on the ceiling trim. For convenience, you can make a fastening template from masking tape, which we paste onto the ceiling trim in the place where the lampshade will be placed.
- We make a hole in the ceiling trim according to the template using a utility knife.
- We make holes in the stiffener with a drill and secure the lamp frame with screws.
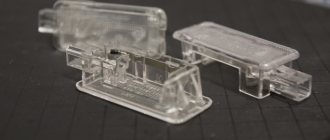
- Snap the lampshade into the frame.
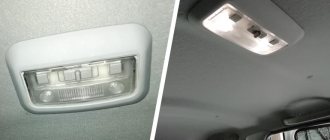
Instructions for replacing lamps
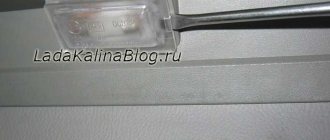
Replacing the light bulbs in Kalina's lampshade is easy. To do this, you will need two screwdrivers: one – flat, the second – Phillips. The procedure looks like this:
- Remove the lampshade glass. To do this, you need to insert a flat-head screwdriver into the grooves on the glass of the lampshade and carefully open the glass, which opens access to the interior lighting lamps.
- Replace light bulbs.
- If you need to remove the lighting unit with control buttons, insert a flat-head screwdriver into the groove of the unit on the driver's side and press the tool. The plastic cover will come off easily, so it is better to hold it with your free hand. This will give you access to the screws securing the unit to the roof sheathing.
- By unscrewing the two screws with a Phillips screwdriver, you can remove the lighting unit by pulling it towards you with a little force.
- To completely dismantle the device, you must disconnect the electrical connector.
Installation of the unit is carried out in accordance with the instructions provided, strictly in reverse order.
Connection
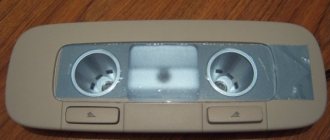
All the necessary contacts for connecting an additional lamp are in the front lamp. To install the wires, it is not at all necessary to remove the roof trim; just bend it slightly from the edge or move it slightly out of the door seal.
Lada Priora front lamp diagram:
- far left (red) - “mass”
- central (white) - +12V
- far right (black) - ground (door switches)
Diagram of the front lamp of Lada Granta (pre-style) and Lada Kalina:
- far left (black) - “mass”
- central (green) - ground (door switches)
- far right (red) - +12V
Diagram of the front lamp with ERA-GLONASS for Lada Granta FL:
- 11 and 14 - +12V appears after turning on the main relay (turning on the ignition, opening the doors). The power goes out 2-5 minutes after removing the ignition key.
- 15 - “mass”.
- 17 - “ground” (door limit switches), which appears for a while when the doors are opened.
The result of such a connection in the video:
Attention!
Wire colors may vary depending on vehicle equipment. Focus on the contact numbers and check the wiring with a multimeter.
Let's remember what we said earlier:
- how to make lighting in interior door handles
- how to install floor (foot) lighting in a car
Photo: Gold31
Keywords: interior lighting of Lada Granta | interior lighting for Lada Kalina | interior lighting for Lada Priora | roof of Lada Granta | roof of Lada Kalina | Lada Priora roof
0 0 0 0 1 0
Share on social networks:
Causes of breakdowns and methods for eliminating them
Despite the simplicity of the interior lighting circuit, sometimes malfunctions occur, leading to malfunctions or complete failure of the lighting devices. The most common problem is that the light in the Kalina’s cabin does not turn on. The reason may be burnt out light bulbs and fuses, replacing which is not difficult.
The lights do not light up when the doors are opened due to wear on the cam washers. Some car enthusiasts try to reduce the stroke of the locking mechanism by moving the pusher mounted on the car body in the door opening. Sometimes this helps eliminate the problem, but when the pusher moves, the tightness of the door to the seal worsens. This breaks the seal and allows dirt and water to get into the seal.
Types of lamps used in the Lada Kalina 1 car
Lada Kalina cars use a huge number of light sources. To make it easier to navigate, they are divided into categories: external and internal.
External lighting devices:
| Low beam | H7 |
| High beam | H1 |
| Front turn signal | PY21W |
| Rear turn signal | PY21W |
| Side turn signal | W5W |
| Side light | W5W |
| Rear marker lamp and PTF | P21/4W |
| Stop signal | P21W |
| Reverse | P21W |
| License plate light | W5W |
| Fog lights | H11 |
Internal lighting devices:
| Trunk lighting | C5W |
| Interior lamp | C10W |
| Instrument lighting | W1/2W |
| LCD indicator | W1/2W |
| Cigarette lighter | W1/2W |
| Glove compartment lighting | C5W |
| Individual lighting | T4W |
What causes lamps to burn out in Lada Kalina
There are three reasons why lamps in a car can burn out. And here is each of them:
- Life time. It is worth noting that any lamp is designed for certain operating hours. Once the operating time exceeds its limits, the light source begins to dim, and then the filament melts and the light source stops working. The operating time of the lamp may be affected by the voltage of the on-board network.
- All automotive light sources are designed for a voltage of 12 Volts, but not more than 14.7V. If this parameter is exceeded, the incandescent device begins to operate in overheating mode, which leads to its failure ahead of schedule. Overvoltage can occur due to a breakdown of the voltage regulator relay.
- Quality. A lot depends on the quality of the light source - from illumination to service life. To prevent the lamp from burning out prematurely, try to choose light sources recommended by the manufacturer.