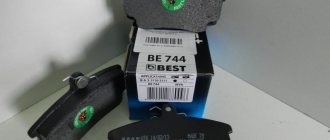
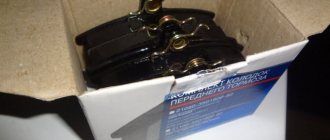
The reason for inspecting the condition of the rear brake pads on the Lada Granta editorial car was a grinding noise that appeared from the right wheel during braking.
It usually appeared after washing a car or driving through puddles. It feels like there is a drum full of sand. Interestingly, the grinding sound appeared only on the right, and was never observed on the left. It is quite obvious that dirt got there, but why then doesn’t dirt get into the brake drum of the left wheel? Today we will find out.
At the time of inspection of the rear brakes, Grant's mileage was 40 thousand km. By the way, the front pads were replaced at 23 thousand km, which by that time had been ground down almost to metal. Maybe the rear ones are already on their way? They say that the rear pads last on average 2-3 times longer than the front ones. Since the “mileage” of the rear pads has already approached two “resources” of the front ones, it’s time to take a look.
What to do if the brake drum does not fit on the new pads when replacing.
Sorry, friends, I probably annoyed everyone with my “nerdy” theme. I changed the pads and cleaned everything (photo) but here is the last stage - I ask for help - I can’t put the drum on. I tried both from below and from above. The brake pistons seem to be fully compressed. I understand the point is that the pads “float” and cannot form a “cylinder” shape along the outer contour; well, I don’t believe that the factories suffer so much. or I'm crooked. Maybe there is some trick.
There should be a wheel with teeth. It spins easily in one direction - it's pulled apart, but in the other direction it doesn't spin (you have to move the stopper to make it spin) - it's brought together.
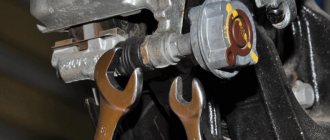
You can see in the photo - plus, in order to compress the pistons more tightly, sometimes you have to loosen the fitting and compress the pistons - a little brake fluid will of course spill out
+500 it is under the cylinder. There is a threaded strip between the pads
You put the piston into the cylinder.. then you will have fun with the wheels.
in the second photo, the right piston should be recessed in the same way as the left one.. as the pads wear out, they will continue to come out.. and now you need to push it in.. but carefully.. it is not necessary to release the slurry.. unless the slurry in the tank is under cover.
if right now there is a “wheel-bar, etc.” twist.. then the piston will be pushed out.. on basins there have been cases of critical wear of the piston spitting out of the cylinder.. loss of brakes at this moment is quite understandable.. i.e. Now we bring the piston into the cylinder, take a clamp from the dealer and twist it... and its rod recesses both pistons. here we need to do something similar.
Last edited by Antropoff; 01/04/2010 at 21:31.
Incorrect installation of components or poor quality parts
It is quite possible that excessive heating of the brakes is due to the fact that the equipment was assembled incorrectly at the service center. In this case, you will have to completely disassemble the system and check the quality of its assembly. And this must be done as soon as possible. In the best case, you will be able to reassemble everything correctly and just drive the car without any problems. In the worst situation, you will have to disassemble and reassemble the device several times to find the real problem.
Problems arise for the following reasons:
- an incorrectly assembled mechanism does not return the pads back, so that when the brake pedal is pressed, the pads remain in the spread position and continue to slow down for some time;
- a dropped or not put on spring for adjusting the brake pads gives a similar effect; the elements are brought together only if you sharply release the brake pedal, and the adjustment will be incomplete;
- purchased low-quality spare parts can cause such problems - the parts may be too large, a 1-2 mm misalignment in size is enough to cause constant friction;
- a thick lining can also cause strong heating, in this case you purchased defective pads, they should be replaced, and not modified or sawed off their parts;
- Perhaps one of the parts of the brake mechanism has failed, rusted or become very dirty; this may well cause the unpleasant moments described in the article.
You shouldn’t disassemble the brake drum yourself unless you have experience and sufficient confidence that you can put everything back in place efficiently. It should be borne in mind that the braking process must work very well, so subsequent disassembly and reassembly of the brakes should be entrusted to specialists at a proven station. If you don't have one, it's worth asking other drivers of cars like yours. Perhaps they will suggest you a good service station or even a garage mechanic with golden hands and a low price tag for the job.
Malfunctions: causes and symptoms
Since the participation of the rear wheels in braking is much less than that of the front wheels, the motorist does not immediately notice a decrease in the efficiency of their work. In this case, the process of reducing efficiency can last quite a long time.
Failures in the operation of drum brakes are felt when braking sharply - the car stops much more slowly. On many cars, failure of the drum braking system is especially noticeable when driving in reverse. The front brake system, which has become the rear, does not “want” to work effectively, stopping the car.
A leak of working fluid often leads to the shutdown of one or two circuits of the braking system - this provokes a decrease in its efficiency by up to 60%. Air in the hydraulics creates a soft pedal feel. In this case, the brake can only be applied at the end of the stroke.
If the pads are “skewed” or the spring/strut in the drum breaks, the motorist may hear grinding sounds . This leads to jamming and overheating of the drum. In addition, this leads to a decrease in vehicle acceleration and increased fuel consumption. Among the failures, “ovality” of the drum is often encountered.
How to replace rear brake pads
- Disconnect the upper spring from the rear block . It is best to pry off the spring with pliers. But a screwdriver will do.
- Disconnect the upper spring from the front block.
- Removing the lower spring.
If there is rust on the springs or signs of mechanical wear, the springs should be replaced with new ones. Springs can be obtained from a repair kit.
- We remove the clamps from the pads . To remove the lock, you need to press the spring and turn the rod 90˚.
- We dismantle the old pads . When disconnecting the rear shoe, you must additionally remove the parking brake cable end.
- We install new pads . It is highly advisable to wipe the working surfaces with an alcohol wipe.
- Installing a new drum . Its working surface, as in the pads, must be wiped with a clean alcohol wipe. In order for the drum to fit into its seat, it may be necessary to move the shoes together. The pads are adjusted using the adjuster wheel.
- Adjusting the pad clearance . The drum should fit without any extra effort, and there should not be a large gap between the pads and the drum. When the drum rotates, there should be no parasitic resistance from the pads. In this case, slight friction on the pads is allowed. The new pads will wear in quickly. The gap between the pads and the drum should be adjusted on the back side of the hub. The hole in the adjusting mechanism is covered with a rubber plug.
Procedure for replacing rear drum brake pads
1. Raise the car and remove the wheel, to do this:
- place the car on a flat surface
- put the car in gear
- put a wheel chock (or bricks) under the wheels to prevent the car from rolling
- tear off the nuts (or bolts) securing the wheel
- put a jack on and lift the car until the wheel rotates freely
- place a lifting support or log under the machine. Don't rely on the jack alone!
- unscrew the nuts (or bolts) and remove the wheel.
2. Removing the brake pads:
- unscrew the brake fluid reservoir cap
- remove the brake drum (if the drum does not give in, gently tap it with a hammer, on some models there are special holes in the drum into which 2 bolts are screwed in and thereby push the brake drum out)
- disconnect the upper and lower tension springs, and the expansion plate (on some models there is an automatic feed mechanism, which also needs to be dismantled)
- loosen the brake pad clamps, disconnect the parking brake drive and remove the old brake pads
- disconnect the parking brake lever from the block.
Perform a visual inspection of the brake system elements for damage and leaks. Replace unsuitable parts if necessary. Wipe the drum thoroughly and remove excess dirt.
3. Install new brake pads in reverse order:
- attach the parking brake drive lever to the new block, and then the drive itself
- we put the springs and the expansion plate in place (if there is one, then the auto-adjustment mechanism), and the brake pad displacement clamps
- put the brake drum and wheel in place, and lower the car (if the drum does not sit in place, you need to loosen the tension on the handbrake)
- If necessary, add brake fluid to the level.
After replacing the rear brake pads, you need to check the effectiveness of the braking system. It may take some time for the pads to break in and achieve maximum braking performance. The rear and parking brakes may also need to be bled and adjusted.
Tips for replacing brake pads
- Pads must be replaced on both wheels
- Do not unscrew the brake hose from the brake cylinder, otherwise air will enter the brake system
- You cannot change the pads between the left and right wheels.
Element device
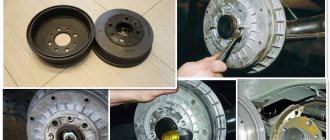
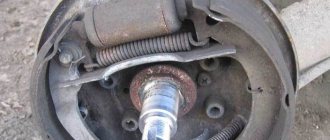
The rear brake drum consists of several parts :
- rotating drum;
- brake shoe;
- spring;
- brake cylinder (one or more).
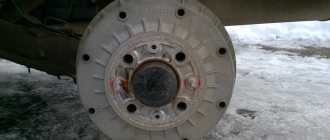
Removing the drum
When braking, the brake pad rubs against the surface of the hollow drum. To ensure the mobility of the pad, the mechanism contains springs, which, depending on the position of the gas pedal, will be compressed or decompressed. A special cylinder is responsible for the correct operation of the pad and its timely operation, pressing it to the surface of the rotating drum under the pressure of the brake fluid. The entire mechanism is mounted on a shield made by stamping.
But the rear brake drum in some cases has a different device. One of the key elements of the tape structure, as the name implies, is flexible tapes made of metal. During the braking process, the belts are stretched and squeeze the drum tightly. However, this design of the braking system has not been used in cars for a long time.
The right rear wheel pads are rubbing!
#1 DEADANARHIST
- Users
- 43 messages
- Registration 20-January 10
- Top
- Complaint
#2 ANGEL
- From: Kyiv
- Auto: 21053
two bolts are eccentric - something like this. you can let them down if it’s bothering you, as soon as they get used to it, adjust them again and separate them.
It’s better to adjust several times, otherwise the wear will be uneven.
- Top
- Complaint
#3 DEADANARHIST
- Top
- Complaint
#4 ANGEL
- From: Kyiv
- Auto: 21053
Do not remove the drum, they are behind it, from the inside. climb in and look, there is a protective casing behind the drum, on this casing they stand, from the outside. Turn them a little at a time with the key, turn the drum, listen, if you rub, turn them a little more, etc.
In general, the drum can be removed and seen, perhaps one of them is moved apart, the other is normal.
Right now, if I find a photo, I’ll post it.
Added after 7 minutes I can’t open the files or look at them. The computer is buggy. I'll take a look a little later.
- Top
- Complaint
#5 ANGEL
- From: Kyiv
- Auto: 21053
- Top
- Complaint
#6 riorom
DEADANARHIST, you remove the wheel under the shock absorber mount, put a block or some kind of stop, lower the car, remove the jack - in this position the handbrake cable will not be pulled, the handbrake is naturally released. You take it out of gear - the drum should turn easily by hand - if it rubs, there are two healthy nuts on the back side of the brake shield, rotating them in different directions, bring them in or spread the pads - then turn on the engine and stick in 1-2 gears, smoothly adjust them so that the pads are centered and adjust them again eccentrics until the drum rotates freely without catching the pads and will slow down at the slightest pressure on the brake
Replacing brake drums Lada Kalina
You will need : remove the rear wheel and prepare a high hex head “7”, a hammer, a wooden block, mounting blades.
To remove the Kalina brake drum :
- Unscrew the two wheel guide pins using a 7mm hex socket.
- Try to remove the drum with your own hands.
- If that doesn't work, try knocking it off with a hammer through a wooden spacer.
After removing the drum, do not press the brake pedal, otherwise the pistons may come out of the cylinder completely.
To install the brake drums, you must first recess the pistons into the working cylinder. To do this, we press on the pads with two mounting blades, leaning against the shoulder of the brake shield.
For Kalina's brakes to start functioning, with the car standing, press the brake pedal 2-3 times to bring the pads to the drum.
How to spot an upcoming problem
It is necessary to pay attention to any deviations that go beyond the normal operation of the brake mechanisms. It is necessary to immediately check the condition of the brakes if there are any of the following signs:
- whistling, squeaking or grinding of brakes when braking;
- skidding or pulling the car to the side when braking;
- braking of one wheel when the brake pedal is released (this can occur even with adjusted wheel alignment and the same pressure in all tires);
- insufficient braking efficiency;
- brake pedal travel is too long;
- hum or howl from the front or rear suspension.
By knowing the signs of a faulty brake system, you can prevent more serious damage and avoid costly repairs.
Another problem with the brakes can arise after replacing the pads. In this case, the driver feels that the car becomes more difficult to press the pedal. Sometimes she brakes jerkily. Some car enthusiasts believe that this problem occurs due to incorrect brake pads.
There's actually nothing wrong with them. It just takes time for the two elements of the wheel to get used to each other. This process usually requires 100-150 km of travel. The main condition is the correct operation of the installed parts during the first kilometers after repair.
About the advantages and disadvantages
Pros of drum brake
One of the main advantages of this mechanism is its reliable protection from external factors . This type of braking system is ideal for vehicles operating in difficult/extreme environmental conditions. Almost no dust penetrates into the brake pads; they are constantly in conditions of optimal humidity. And this significantly increases the working life of the entire mechanism. In addition, when braking in this design, a smaller amount of thermal energy is released, which allows the use of inexpensive fluids with a low boiling point.
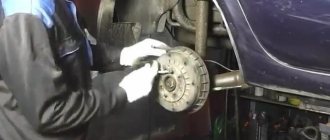
Removing the brake drum
Another advantage of the drum brake system design is the increased braking power due to the diameter or width of the drum. This becomes possible due to the increased contact patch, the contact patch between the drum surface and the block. This is what significantly improves braking performance. At the same time, the rear brake drum, thanks to its design features, is able to increase operating efficiency. When braking, the rotating drum tends to “carry away” the brake pad, turning it.
Disadvantages of a drum brake system
But, despite the obvious advantages , this type of braking system has certain disadvantages:
- lower startup speed compared to disk analogues;
- some difficulties in setting up;
- low stability;
- When the rear brake drum heats up, the pads “stick” and a significant deterioration in braking performance occurs.
In addition, experts do not recommend using the handbrake at subzero temperatures. Cases of pads freezing to the drums often occur. To avoid such situations on modern and expensive cars, this type of braking system is replaced with a disc version. Basically, a brake system with rear drums is found on budget cars and small cars, in which they are placed on the rear wheels. Trucks are also equipped with this braking system.
Removing the brake drum
Good luck on your journey.
I would really appreciate your use of these buttons.
- Improvement of Nexia. Install the gas stop of the trunk lid.
- Daewoo Nexia - spare parts catalog
- In cold weather, the car doors do not unlock.
- Cigarette lighter splitter. We install it correctly.
- Air conditioner radiator. We protect in winter on Daewoo Nexia.
: Do-it-yourself replacement of rear brake pads.
Something strange about your repair kit. I took one from the Opel Astra, one in the same with my family. But the worst problem is with the plates that fix the spring for pressing the pads to the shield; they are very flimsy. It's good that now you can buy them separately.
In this set the plates are just solid, but the lower spring is not so great, I left the old one.
I also changed the pads today... the result is that the handbrake is gone. What did I miss?
The handbrake is adjusted in two places: 1. Under the car, adjust the cable tension (located under the thermal shield of the resonator, unscrew 4 nuts, remove the shield and there is a 13 key nut there), tighten and release the rocker arm on which the cables are attached. 2. A mechanism for automatically adjusting the gaps between the pads and the drum (after assembling the brake mechanisms, you need to press the brake pedal several times, clicks should be heard until they stop) this is done by turning the adjusting nuts on the sliding spacer bars. The arm of the parking brake release lever rests on these same bars.
If the travel of the parking brake lever is normal (no more than 5 clicks), then the tightening of the cables is normal; if more needs to be tightened, but the parking brake still does not hold, then you should remove the drums and look at the adjusting nuts of the spacer bars. If the nuts remain fully tightened, then the automatic clearance adjustment mechanism did not work. (Re-read the article above and check the correct assembly). You can adjust it manually, rotate the nuts by the teeth with a screwdriver, periodically trying on the brake drum (so that it fits onto the pads with minimal clearance). There may also be a problem with the parking brake cables; it happens that in some places the shell is destroyed and, due to internal corrosion, the cable stops moving in it and, accordingly, tightens the release lever.
Troubleshooting methods
Before we talk about ways to remove the rear brake drum if it is stuck, you need to name the reasons why this can happen:
- Heating the brake pad causes the metal that makes up the drum to expand, causing the cover to stick to the body.
- Dirt accumulated between the cover and body.
- Rapid heating of the element during braking, and then sudden cooling (for example, in a puddle of water).
All this leads to sticking of the brake drum. Note that dismantling it is quite difficult. Therefore, experts do not recommend resorting to sharp braking in rainy weather, which is quite difficult to dismantle when replacing the pads. Now let’s talk about the most acceptable ways to remove a stuck drum.
If car service technicians cope with this task almost effortlessly, having sufficient experience and the necessary tools, then an ordinary motorist who decides to do such work on his own needs to stock up on a certain tool. Moreover, for each specific case this tool may be different.
But you will always need WD40, which is used when repairing various vehicles.
Brake drum lubrication
Sledgehammer to help you
Using this method requires reliable fixation of the car. It is better to perform all actions on a lift (a car jack is not able to provide maximum stability to a raised car). In addition, a metal goat designed to support the machine, or an ordinary stump from a large tree, may be suitable for this. Let's move on directly to the sequence of actions when dismantling the brake drum. You will need:
- Remove the wheel.
- Using a wire brush, clean the cavity from any accumulated dirt.
- Spray the surface generously with WD40.
- Gently tap the drum collar at the bottom until it becomes movable. There is no need to strike too hard - this can lead to damage to car parts.
But it is advisable to warn that this method has one significant drawback - not everyone has a sledgehammer and not everyone knows how to handle it. Therefore, it is advisable to consider other options for solving this problem.
Brake drum removed
Extreme way
This method involves absolute fixation of the machine . Before starting work, you should check everything carefully, because if the car comes off, the risk of serious injury increases by almost 100%. Having chosen this option for removing a stuck drum, you will need to perform the following steps:
- Get behind the wheel.
- Turn on the ignition.
- Engage 2nd (3rd) gear and release the clutch.
- Rotate the engine to medium speed.
- Shut down the power unit and remove the drum.
The meaning of this method is to spin the moving part of the axis, and therefore the drum itself, using centrifugal force. In this embodiment, the drum will simply be descaled.
Removing the brake drum
Radical measure
If suddenly the methods described above did not lead to the required result , in addition, the brake system cylinder is jammed, then it is advisable to take radical measures. To complete the work you will need a drill with a drill (diameter size 2-3mm), a medical syringe, and a sledgehammer. Here's what to do if all else fails:
- Make several holes at the junction of the axle shaft and the drum.
- Use a syringe to pour brake fluid into the holes and at the same time gently hit the drum with a sledgehammer.
To simplify operations, use a special removable key (you can buy it or make it yourself). After performing these steps, the stuck drum should come off. But, if you still can’t do this, then you need to visit a car service center. Here the craftsmen will certainly be able to handle the removal of the brake drum. Of course, you will need to pay for the service, but it will be cheaper than buying a new hub or steering knuckle if it breaks.
How to remove a drum on some cars
So, we found out that the drum element must be replaced in case of wear, deformation and sticking . The general procedure for performing actions when removing this element was described. And now we want to tell you how to remove the drum on VAZ models.
Brake drum removal wrench
VAZ (2101-07)
Replacement of the rear drum element is carried out with the car suspended and the handbrake released. First, remove the wheel on which the element is to be removed. Then, using a wrench/spanner, remove the guide fasteners (pins) that hold the drum and secure the wheels to the hub. After completing these steps, pull out the element body. It should come off fairly easily.
If this does not happen, which happens often, then take a couple of bolts (M8) and screw their holes into which they can easily be screwed. They must be screwed in evenly. As a result, the drum will give in.
Lada (2108-21099)
To remove the rear brake drum elements on these VAZ models, first gear is engaged and stops are installed under the front wheels of the car. The handbrake must be released. Then the wheels are removed, and the brake mechanisms are cleaned of dirt.
After this, the mounting pins are turned out, WD40 is applied to the hub and any traces of dirt/corrosion are removed. Applying light blows with a rubber/polymer hammer, the drum is pulled off the hub. If the element does not give in, then the drums are pressed together using fasteners (M8 pins/bolts).
Types of breakdowns
Among the most common reasons that involve removing the rear brake drum and replacing it due to loss of efficiency is not only wear on the pads, but also high wear on the drum itself. On its inner working surface the circumference increases. If the pads and working surface wear out immediately, there is a risk of pistons being squeezed out of the cylinder, wheels jamming, or brake fluid leaking.
Brake drum failure
On cars with high mileage, due to corrosion, the spring “sticks”, weakens or breaks . The pressure force may decrease significantly due to the fact that the handbrake cable has become loose. Not often, but it still happens that the friction linings peel off from the pads, then it is necessary to replace the brake pads on the rear drums.