The sound of a failed front hub bearing 2121 is often practically indistinguishable from road noise, especially in winter when driving in studded tires on asphalt. However, as the unit wears out, it begins to intensify and accompanies the driver continuously.
An additional benefit is the heating of the wheel away from the center without the characteristic smell of brake pads.
At the first suspicion of a specific malfunction, you need to start looking for it and then change the part, otherwise not only acoustic comfort will be affected.
There is a possibility of complete destruction of the bearing, the appearance of wear on the hub with its subsequent replacement, and in the most advanced situation - misalignment and wedge of the wheel, which will make it easy to “make ears” with the help of a short wheelbase and the unique suspension settings of the Niva 21213 and 21214.
Repairing the Niva-21213 hub
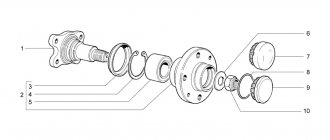
My old Niva has a disease. The wheel bearings on the right don't last long. Once every year or two I change them, and together with the hub, because, according to the instructions, with a slight movement of the hand towards you, the hub does not come out of the steering knuckle and you have to knock it out along with the bearings, and then, having examined and noticed the “grooves” on the seat of the internal bearing and the collar, sadly I’m going to buy a new one... Moreover, on the left I only changed the hub once or didn’t change it at all - I don’t remember now. I try not to take it apart unnecessarily. Today I started assembling hubs after repairing the front suspension and noticed differences in two new hubs purchased at different times and in different places, as well as differences in their operation. The difference is strange and I cannot explain it. It consists in the presence or absence of a ring at the point of contact of the hub with the end of the steering knuckle bushing. Previously, I neglected this difference, because... I disassembled the hubs at different times and it was not possible to compare defects on different designs.
Hub type 1.
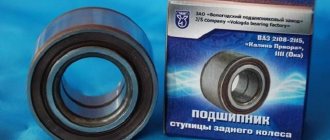
Manufacturer: VAZ JSC. Price 707 rubles in a store selling factory (?) spare parts. Rosstandart stamp. Pay attention to how the place that comes into contact with the steering knuckle is designed. Here we see grooves of varying depths
Hub type 2.
Bought at the car market for 550 rubles.
Manufacturer unknown. I purchased a hub of a similar design in Pskov several more times, since the loss of the original one. The difference is a slightly rougher surface treatment and the presence of an unfortunate yellowish ring at the point of contact with the end of the steering knuckle, where the factory hub has just a groove. Photographed after assembly with the brake disc. Look - a hollow (U-shaped in cross-section) ring in the place where there should be a notch.
When I first bought such a hub, I asked what the hell it was. I was told that this was a “better” hub, so I continued to use this type of hub until today without paying attention to the ring and without being puzzled by its absence or presence. So today, after turning two different types of new hubs in my hands, I decided to see what the old ones looked like. They looked different. On the left is the left one, factory type 1, without ring. On the right is the right one with a ring - type 2. Hub Type 1. Without a ring, factory (?) Used for at least 4 years. The inner bearing has been removed. The outer one came out of place tightly, but its inner ring moves freely along the seat of the inner bearing and even spins merrily on it. The knurled collar prevents it from being completely removed. The oxidation layer (?) at the site of the outer bearing is preserved, but absent at the site of the internal one. Hub Type 2. Used for a little over a year. The ring is heavily dented during use and shows signs of rotation and friction. The oil seal has not been removed, there are nicks on the seat from the chisel used to knock down the bearing. The seat for the inner bearing is worn, but less than that of the left hub, there is a fillet along the edge. It is because of this that the inner ring of the outer bearing cannot be removed, and in general the hub cannot be removed from the steering knuckle as required by the instructions. Let's take a look at the steering knuckles. The left steering knuckle that worked with the factory hub. The condition of the contacting surfaces is almost perfect. The o-ring (?) is in place and in good condition. The right steering knuckle that worked with the hub with the ring. The condition is not very good. The sealing ring is crushed “to a cone” and has traces of friction during rotation precisely against the ring on the hub. The oil seal is not pressed in completely, I realized this later, it is still recessed by 3 millimeters. Now the actual questions. 1. How to achieve correct mating of the steering knuckle with the hub and ring (Type 2). Remove the ring from the hub or the knuckle? If both rings remain intact, they rub against each other and become deformed. Moreover, as I understand it, the correct (completely) seating of the bearings is not ensured. 2. How far should the oil seal be driven in in the photo above. Enough or all the way? 3. Why do hubs fail so quickly and, first of all, the seats for internal bearings wear out with the formation of a shoulder. The bearings, apparently, would still be working if it had not been necessary to disassemble the hub with a sledgehammer. 4. How necessary is it to install spacer rings between the bearing and the oil seal? I only have one left, but I can’t buy it. And how is it installed correctly? Cone to the bearing or oil seal. I had a cone facing the oil seal, but I’m not sure which is correct. 5. Is it necessary to stuff lithol into the seals? Indications vary.
Well, as an epilogue, the machine is in progress. New steering rods made by Trek were installed, a front beam with a new pressed-in bushing, which turned out to be 1.8 mm shorter than the original one and also with chamfers removed from the inside, as a result of which the area of the pressing surface to the washers decreased by about 1.5 times . There is a risk that the washers will, if not rotate, then be pressed inward.
And now for those who read to the end the answers to some questions. The hub with the ring is the hub for the Niva-2121 - it has a slightly different design of the hub assembly. It turns into a Niva-21213 hub by picking out a copper alloy ring. On the Niva 2121, mud rings were not put on the steering knuckle (I incorrectly put this ring as an “o-ring”). On Niva-21213 they are provided by the design of the steering knuckle. It is absolutely not correct to put two rings on the Niva 21213 hub. It is necessary to install (requiredly) only a dirt deflector that fits on the steering knuckle. I used to do everything correctly, but then I lost this secret knowledge and when I wrote the post I decided that I had always installed it with a copper ring, especially since due to some misunderstanding the last time I had an old hub with a hub ring assembled at a service center without dismantling it. What this led to can be seen in the photo. By the way, I never changed the left hub, but the right one still works after this repair.
Installing a new part
Manufacturers do not lubricate their bearings and rings very generously, so you will have to add the missing amount of grease yourself. Litol-24 in an amount of 40 g is suitable; apply lubricant to the separator and rollers before replacing the Niva front hub. Don't forget to adjust the gap. If there is no hydraulic press or puller, we will replace it using a hammer and a mandrel (or using an old ring):
- The outer race is inserted into the hub socket and driven without distortion through a wooden spacer.
- For its final landing, you can take a pipe of a suitable diameter or a mandrel.
- Then a separator is placed inside, and the assembly is assembled using the reverse algorithm.
How to diagnose a broken hub
Surely every driver has at least once encountered a situation when, while driving, a so-called crackling noise is heard. The sound can appear at speeds of 40 km/h and above. Using a car with such a sign is fraught not only with danger to the life of the driver and passengers, but also with serious consequences for the car itself. Most likely, you will notice a hum in a loaded car when turning.
Finding out which wheel bearing is worn out is quite simple: if there is noise from the wheel when turning to the right, the left bearing should be replaced. Similarly, if a hum occurs when turning left, pay attention to the right bearing.
There are several stages of wheel bearing wear:
- hum when turning;
- hum during normal driving with a loaded car;
- hum when driving an empty car;
- constant hum that increases during turns;
- a strong hum, accompanied by crunching, grinding and unregulated movements of the car from side to side.
The period of time between the first and fifth stages with moderate driving can be up to 5 years. It is recommended to replace the part as soon as possible so as not to put the car and the driver’s life at risk.
What could have caused the Niva Chevrolet bearing to fail:
- in 70% of cases, breakdown occurs due to unsuitable lubricant: its quality, excess or shortage may well damage the part;
- it happens that various contaminants and moisture penetrate deep into the bearing;
- this is the cause of failure in 18% of cases;
- There is also a possibility of incorrect assembly of parts, which entails excessive load and overheating.
What are the risks of driving a car with a damaged wheel bearing? There is a considerable possibility of the wheel jamming, which can end in disaster when driving at high speed. It is quite possible to lose control of the car due to the wheel “moving to the side”. Spreading brake pads is also a possible consequence.
Symptoms of a problem
Bearing wear manifests itself as the following symptoms:
- Vibration of the front wheels, which can be reflected in the steering wheel or felt in the cabin.
- Knocking or crackling sounds in the front of the car when driving;
- Heating of the front wheels in the axle area.
If such manifestations occur, you need to check the condition of the wheel bearings. To do this, jack up the car and rock the wheel in different directions. Play and knocking in the bearing area indicates the need for replacement and adjustment. The malfunction may also manifest itself in the form of noise when the wheel rotates.
1. The hubs get hot. It is important to understand that when braking, the kinetic energy of the car is converted into thermal energy. As a result, the brake discs and the hubs on which they are attached become very hot. Heating of the part during movement, and not during braking, indicates wear of the bearing or its incorrect adjustment.
The second option is typical for adjustable hubs. The adjusting nut must be tightened with a force of 2 kgf*m. If you tighten it further, the tapered bearings will be too tight.
Their rotation will be difficult. Prolonged operation of the machine in this condition leads to bearing failure and wheel jamming.
2. The adjusting nut is unscrewed while moving. Sometimes this happens literally after 20-50 kilometers. The phenomenon is observed in three cases: the master forgot to tighten the nut, there was a misalignment between the bearing races, or play appeared in the coupling of the CV joint with the hub.
Replacing the front wheel bearing on a Niva Chevrolet
It is recommended to entrust installation to professionals. However, if you have a set of tools and free time, it is quite possible to perform the replacement yourself. Before starting repairs, you need to visit a car wash and wash the front suspension especially thoroughly. The second important step is the correct dismantling of the part. To do this, you need to block the wheel and remove the bolts that secure the wheels. Further:
- first, use a jack to suspend and secure the front part of the car;
- then remove the wheel along with the brake pads;
- unscrew the piston pin of the swing arm;
- we take out the bolts that secure the ball joints;
- screw the hub together with the hinges.
The fact that the wheels on a Chevrolet Niva rotate smoothly is determined by the presence of bearings in the hubs. They can stand on both the front and rear wheels. Bearings are designed to reduce friction.
If such bearings fail, the wheel warps and the rubber begins to wear unevenly and quickly. If the bearing is damaged while the car is moving, the wheel will simply lock and stop rotating. For this reason, it is important to pay timely attention to bearings, especially on the Chevrolet Niva, since the car is an SUV and therefore experiences heavy loads on the chassis.
Also interesting: Niva car steering gear
At this point, the process of replacing the wheel bearings on a Chevrolet Niva can be considered complete. After assembly, you should check the ease of rotation of the wheel.
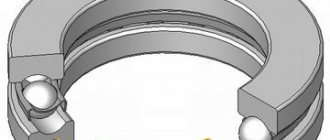
Design Features
The product is a complex-shaped part that rotates on a pair of tapered roller bearings. Their outer diameter is pressed into the steering knuckle. The standard equipment of the Chevrolet Niva includes adjustable hubs. In it, the bearing clearance depends on the position of the adjusting nut.
Also interesting: Chevrolet Niva owner reviews: Excellent cross-country ability for little money! —
The latter is equipped with a fixation belt that prevents spontaneous loosening or tightening of the threaded connection. This mechanism requires adjustment during maintenance. An incorrectly adjusted unit wears out quickly:
- Excessive tightening torque makes it difficult for the wheel to rotate, leading to overheating and destruction of the bearings.
- A loose nut causes play and knocking noise in the bearings. Impact loads accelerate wear of the roller metal.
The drive axle shaft transmits torque to the hub due to the presence of splines on the inside of the central hole.
There are 22 of them in the standard design, and 24 in the reinforced design. The second, more durable type of design is equipped with double-row bearings from IVECO trucks. Reinforced hubs are used on VAZ 2121, 2123, 2131, 21213 and 21214.
Some owners re-equip their cars by equipping them with hub units themselves. This avoids damage in the form of broken splines. However, this modification is fraught with drawbacks. The strength of the standard hub is lower than that of the transfer mechanism parts. Therefore, it serves as a kind of “fuse” against overload.
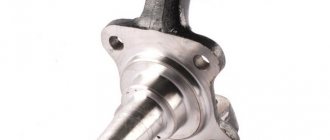
The mounting design for the rear wheels of the Chevrolet Niva is radically different from the front. No hubs are used here. The wheel is attached to the flange of the axle shaft, which rotates in a special bearing.
Torque is transmitted from the rear axle gearbox to the wheels through a spline connection. However, in this case, the splines are cut not in the hub, but in the gears of the gearbox.
How to change a wheel bearing yourself
(as well as the rear) Chevrolet Niva has exactly the same design as old cars, and their repair and replacement are carried out according to the same scheme. Initially, you should go to any car wash, where you should thoroughly wash the entire front suspension under high pressure. For crossovers, this advice is especially important.
- The front of the car is raised using a jack;
- The corresponding wheels, brake pads and calipers are dismantled;
- The hinge pin is untwisted and pressed out using a special tool;
- The bolts from the hinges and nuts are removed.
- After this, you have the opportunity to examine the part for damage and make appropriate repairs. Regardless of whether you plan to replace the bearings, you should change the seals.
After removal, the inner race along with the rollers must be thoroughly washed with kerosene. After this, you will be able to visually assess the bearing damage. It is worth remembering that these parts are replaced only in pairs.
- There is no possibility of adjusting the backlash using a nut (tightening does not help);
- The rollers and clips are heavily scratched;
- Overheating is detected and a hum is observed.
If you observe one of these signs, you need to get new bearings for your Chevrolet Niva. Otherwise, only the lubricant and oil seal need to be changed.
Pressing occurs using special nozzles. Do not throw away the old clip, as you will need it to install the new part.
If difficulties arise, you can always find one of the many videos on the Internet that demonstrate this process.
Let's sum it up
The standard Niva hub unit is a headache for owners of a domestic SUV. For the safe use of a vehicle in conditions of increased impassability, it is important to strengthen the Niva’s hub assembly. If you know how to work with tools and have previously done car repairs, then this kind of modernization is definitely up to you.
Which way to choose to strengthen the hub assembly of an SUV is up to you to decide. It all depends on what financial costs you are willing to incur. Any of the proposed options will please you with an impeccable result.
Hub repair: popular mistakes and misconceptions
Connoisseurs of tuned cars are often able to make radical changes to their cars. And few restrictions exist for them. Owners of Niva Chevrolet are no exception. Tuning fans also took a look at the design of the front hub assembly.
Often on online forums in discussions you can find advice (and even corresponding training videos) about replacing the bearing using a hub mechanism that has a steering knuckle from a VAZ 2121 car, since it is believed that this design is better in terms of reliability.
However, this is a misconception.
Yes, tightening will occur without any difficulties, but this will make it impossible to adjust the camber of the front wheel of the car. The fact is that each fist has distinct differences in size and axial angles. But much more stupid are the tips that require turning the hub and shaft on a lathe.
Repairs such as replacing a wheel bearing in a field can be done independently without much difficulty. Wheel bearings on the VAZ 2121 and Chevrolet Niva have a very short resource due to the suspension design, compared to other all-wheel drive vehicles, therefore, these parts need to be given increased attention in order to identify the fault in time.
Replacing a wheel bearing in the field does not involve anything complicated if you follow the instructions strictly. Anyone, even a novice car owner, can cope with such repairs. Not all vases have wheel bearings changed the same way. The design of the Niva car hub differs from the design of other VAZ models, so the process of replacing the bearing will also have its differences.
Symptoms and identification of a worn wheel bearing
When the life of the hub bearing is running out, a hum is clearly audible when driving, this is the main sign. If you listen, you can understand which direction this hum is coming from. When driving at low speeds, it is not too noticeable, and it can easily be confused with noise from rubber, but as speed increases, the hum increases, which is reminiscent of flying in an airplane. You can’t drive with a humming bearing, because soon it may simply break into pieces, and this implies a lot of other problems.
If there is an assumption that the bearing has exhausted its service life, then you can check this with the car parked. To do this, you need to jack up the wheel whose bearing is suspected and pull the wheel vertically with your hands. If there is play, then the bearing is most likely to blame.
Necessary tools for work
- Jack and supports. To replace the front bearing, you need to lift both wheels, otherwise the stabilizer will interfere, pinching the suspension elements;
- Wrench for unscrewing wheel nuts;
- Flathead screwdriver. To remove the protective cap;
- Head 27;
- Locksmith's beard. To straighten the collar of the hub nut;
- Hammer;
- Wrenches for 10, 17, 19 and 22;
- Chisel and wooden spacer. To avoid damaging other parts when knocking out;
- Vise;
- A piece of pipe for pressing in bearing retaining rings.
Bearing replacement process
- Loosen the nuts on the wheel where replacement is planned and jack up both wheels of the axle. Remove the desired wheel;
- We dismantle the caliper and guide. To avoid damaging the brake hose, we tie the caliper to the upper arm with wire;
- Having removed the protective cap, use a 27mm head to unscrew the hub bearing nut and remove the conical bushing;
- Using a chisel, unbend the locking plate of the front and rear lever mounting nuts. Using a 19mm wrench, unscrew the front and rear nuts securing the lever. After this, remove the locking plate;
- When the lever is released, it must be moved away from the steering knuckle, freeing the brake hose;
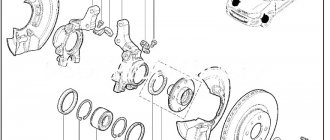
- Disconnect the ball joints (upper and lower) from the lever;
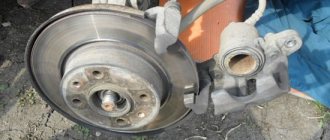
- Now you can remove the entire steering knuckle assembly, along with the ball joints and the brake disc, by removing it from the CV joint splines;
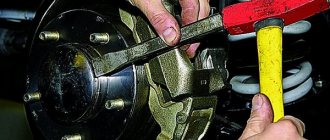
- Separate the steering knuckle from the hub with the brake disc. If the parts do not separate freely, then we clamp the fist in a vice and, using a soft metal drift or chisel, through a spacer from wood, knock out the hub with the brake disc;
- Next, pull out the bolts securing the lever and knock down the protective ring with a chisel;
- Using a 10mm wrench, unscrew the bolt that secures the casing and remove the casing itself;
- We hold the fist in a vice and, using a flat-head screwdriver, pry up and remove the wheel bearing seal. There is a metal ring behind the oil seal, we also remove it;
- The next step is to remove the inner ring of the outer bearing assembly from the well. Next, we also remove the oil seal, metal ring and inner bearing ring assembly;
- Using a punch and a hammer, we knock out the metal rings of the outer and inner bearings. At this point, dismantling is considered complete.
After cleaning the well from old grease, you can proceed to installing a new bearing. Replacing a wheel bearing in a field occurs in the reverse order; it is only important not to forget to fill it with fresh Litol 24 grease and, after installing the steering knuckle on the car, adjust the clearance in the bearings.
Adjustment
Having restored the structure until the calipers with pads are returned to their place, a dial indicator clamp is placed on the steering knuckle. The indicator is positioned so that its leg rests against the adjusting nut.
Having built a lever on studs, the mechanism smoothly rotates around its axis.
If the permissible gap exceeds 0.15 mm , the adjusting nut is replaced with a new one. By successively changing the degree of twisting, the clearance in the bearings is measured. At the end of the work, the nut is locked.
Replacing the NIVA wheel bearing
We will show you how to replace a wheel bearing in a NIVA car. To work, we will need new wheel bearings, two wheel seals, and a standard set of car enthusiast tools. The entire repair process is shown from start to finish, with detailed comments from the author along the way.
Owners of this car very often encounter the problem of a humming wheel bearing. It is recommended to remake the bearing for 108, after that there is no need for any adjustments or tightening it once a month. If for some reason you do not want to change the wheel bearing, then you must change the hub seals during disassembly.
Checking the hub and wheel bearing
If, while driving, you hear a sound whose frequency gradually decreases or increases depending on the speed. To diagnose the problem, you can use this method. We hang the wheel, place a stump under the lower arm and lower the car onto it. Next, we grab the bottom and top of the wheel with our hands and start pumping. If you feel any play, you can simply tighten the bearing. If this does not help you, there is still play, then most likely the hub has become unusable and needs to be replaced. If there is no play, there is a high probability that the bearings have failed.
The sound of a faulty wheel bearing is dull; it can be clearly heard at an average speed of 60-80 km if the car is rolling in neutral gear.
Case from practice
The owner of Niva came to the car service center with a complaint about bad brakes. When the brake pedal was pressed, it sank to the floor and only when pressed again did it work as it should. Everything indicated that there was air in the brake system, but bleeding did nothing. In the end, it turned out that the fault was with failed wheel bearings and the hub itself. The inner race of the bearing rotated on the hub.
Arrows indicate production and pitting. For comparison, this is what the new hub looks like.
But what happened to the bearing.
Diagnostics
In the absence of a special stand, it is possible to identify the problem. To do this, with precautions, hang up the supposedly faulty wheel. And then grab the extreme points in the horizontal and vertical planes and make swinging movements.
A serviceable bearing has no play or it is insignificant, requiring replacement, on the contrary. In addition, when turning, you can hear rolling or cracking sounds. What then? It is necessary to change the wheel bearing yourself, because there is no talk of adjustment.