The front wheel bearing or rear wheel bearing is the main element that allows the wheel to rotate. In this case, the wheel bearings experience heavy loads. Also, moisture and dirt can damage the wheel bearing.
If problems arise with the hub bearings, they are replaced. On a Lada Kalina, you can replace the wheel bearing separately (replacing the entire hub assembly is not necessary). To replace the wheel bearing you must:
- remove the hub;
- press out the old bearing;
- Press in the new wheel bearing.
During the replacement process, you also need to take into account certain nuances in order to correctly install the new bearing. Read more in our article.
Front wheel bearing Kalina: signs of malfunction
As a rule, on the vast majority of cars, the front wheel bearing is the first to fail. This is due to the fact that the front wheels turn, impacts on the wheel can occur at different angles, etc.
In this case, a malfunction of the front wheel bearing on a Lada Kalina can be determined by a number of characteristic signs:
- when driving, a hum or howl appears (the intensity of the sound changes at different speeds);
- a crunching sound is heard when the wheel rotates;
- If you hang the wheel and swing it in different planes, you can feel some play; when rocking and unwinding, you can hear a tapping sound inside the hub.
Often the first sign of bearing problems is the humming noise that Kalina's hub makes, and the noise becomes noticeably louder when cornering. This is due to the fact that the weight of the car is redistributed; in a left or right turn, the noise can come more strongly from the left or right wheel.
Please note that if an increase in extraneous sound is noted when turning right, this indicates wear on the left wheel bearing. The opposite signs will indicate wear on the right wheel bearing. You can also hear extraneous noise from the wheel bearings when driving in a straight line, while driving over uneven surfaces, etc.
To more accurately check the bearings, it is necessary to hang the wheels to identify wheel play. The appearance of play will indicate that the clearance in the bearing has increased. To do this, the wheel is rocked, determining the play.
Chemical
Now we will consider methods for those who do not rely on the help of physics, but want to solve the problem with the help of chemistry. Your laboratory should have: kerosene, white spirit, acidified sulfuric acid, zinc, plasticine, hammer, water, sandpaper, wrench, chisel.
Attributes of the chemical method for unscrewing the nut
We moisten the nut and bolt with kerosene (experienced people recommend making a mixture of White Spirit and kerosene), applying a swab to them, it doesn’t matter whether it’s cotton or gauze. After some time - from an hour to a day, and with repeated attempts, you may find that the hub nut can be easily unscrewed. But even here you cannot do without force: at a minimum, you will probably have to work with sandpaper to clean the parts from rust. If even after this things don’t work, you should help with a hammer: tap it on the edges of the hub nut.
How to check the Kalina wheel bearing
If necessary, check the Kalina front wheel bearing, you must:
- raise the front of the car, tighten the handbrake;
- start the engine and engage 5th gear;
- Next you need to spin the suspended wheels to a speed of about 120 km/h;
- then you need to determine which wheel is making the noise;
- if the noise is weak, additionally listen to each wheel with a stethoscope.
This method allows you to quickly identify the problem bearing only if the wear of the latter is sufficiently severe. If the wear is insignificant and the play is weak, the lack of load on the wheels and the noise of the running motor and transmission can drown out minor bearing noise.
Moreover, after installing the wheels on the road and returning to the standard load, the driving noise increases. For this reason, it is best to check the wheel bearings for play. To check the front wheel bearing of Kalina, you must:
- hang up the front wheels;
- grab the top of the wheel with your hand, as well as the bottom;
- the wheel needs to be rocked, revealing any play;
- you can also spin the wheel by hand, assessing the smoothness and ease of rotation;
Taking into account the fact that the load on the bearing with this method of checking is also not high, it is recommended to additionally invite an assistant, who should lightly press the brake while rotating the wheel. If the noise disappears when the brake is pressed slightly, this may also indicate a faulty wheel bearing.
Let us add that if the Kalina front wheel bearing is faulty, there is no need to delay replacement. The fact is that the noise will gradually increase (deterioration in comfort), and at some point the bearing may jam. In turn, jamming of the wheel bearing can lead to loss of controllability, increasing the risk of getting into an accident, etc.
How to unscrew a hub nut - the delicate way
- Tubular socket wrench - “wrench”. The tool must be made of high-strength steel.
- Powerful screwdriver.
- Iron pipe.
- WD-40.
- Wire brush.
- Clean the threads from dirt using a brush with metal bristles. Now you should soak the hub nut with penetrating lubricant. For example, WD-40.
- We impregnate the hub with the penetrating mixture. You can rest for 10-15 minutes, and then you should put the wrench head on the nut and hit it with a hammer several times, gradually increasing the force of the blow. Just don’t overdo it: the point of this action is to slightly deform the nut, which will make it easier to remove. And immediately after the impacts, you should try to unscrew the hub nut on a VAZ or a car of another brand.
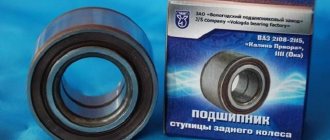
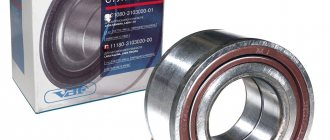
Which wheel bearing is better to choose?
Often the best option is an original wheel bearing for Kalina. You can also search for the front bearing among available analogues, which are widely presented in auto parts catalogs.
Among the various manufacturers, we can highlight wheel bearings from SKF, FAG, Moog, Optimal, Ruville, ABS, SCT, Febest, Profit, etc. The main thing is to purchase a branded and high-quality part. If installed correctly, the new bearing will last at least 60-80 thousand km.
What thread is on the hub nut?
1200 rub. for the photo report
We pay for photo reports on car repairs. Earnings from 10,000 rubles/month.
Many will agree that unscrewing the hub nut is an activity that can be punished in court; it is too inconvenient and difficult even for a physically strong person with all the necessary tools. However, since it is not always possible to choose the easiest one (option One, also known as the Main one!) - sending the car to a service station, where they will not only unscrew it but also carry out subsequent repairs. Then you will have to figure out the task yourself, using the easiest and most effective method possible.
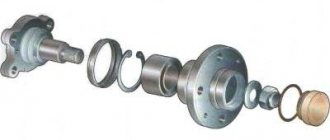
Replacing the front wheel bearing
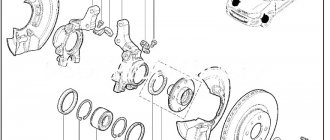
To replace the wheel bearing of a Lada Kalina, the car must be driven into a pit or raised on a lift. It is also necessary to prepare a special wheel bearing puller in advance.
To understand how to change the front bearing, you need to study the following:
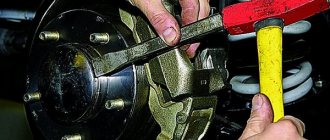
- first remove the hub cap;
- then, using a narrow chisel, the flange of the hub bearing nut is straightened in two places;
- putting the car on the handbrake, the gear is engaged, wheel chocks are placed under the wheels;
- now, using a 30mm socket, you need to loosen the hub bearing nut (the nut is tightened tightly, you need to apply a lot of force);
- then the wheel mounting bolts are loosened, after which you can hang the front part of the car;
- both wheels need to be lifted, since jacking only one side does not allow you to “relax” the anti-roll bar, which clamps the suspension and does not allow you to remove the hub;
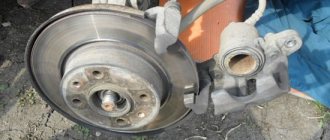
- Now you can remove the wheel, as well as the brake pad guide and caliper;
- then the brake disc together with the caliper must be tied with a clamp or wire so that these elements do not hang on the brake hose (to prevent damage to the hose);
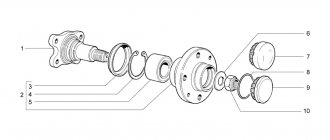
- Having secured the disc with the caliper, the bearing nut can be completely unscrewed and the washer removed;
- now through two opposite holes in the brake disc you need to pass bolts (length 130 mm, bolt thread M12x1.25 mm);
- the specified bolts are screwed into the holes of the hub to a depth that corresponds to the thickness of the hub;
- using sharp blows on the heads of the bolts (you can hit them with a brake disc), the hub is pressed out;
- now you need to unscrew the fastening of the ball joint to the steering knuckle, after which the CV joint is removed from the bearing hole;
- Another way to remove the hub is to disconnect the ball, and only then remove the CV joint from the hub;
- using a soft steel drift and gradually turning the hub, it is necessary to knock it out of the steering knuckle;
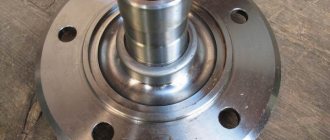
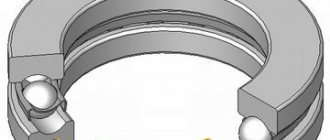
We also recommend reading the article on how to replace the wheel bearing on a Chevrolet Niva with your own hands. From this article you will learn about the features of replacing a wheel bearing on a Niva Chevrolet. - then the retaining ring is removed, then using a puller the bearing is pressed into the cup, which is located outside the steering knuckle (it must be taken into account that the bolt puts pressure on the inner ring of the bearing through the washer inside the steering knuckle);
- As a rule, when pressing out the hub, the bearing ring remains on the hub (the ring is fixed tightly, which complicates removal);
It is optimal to have a puller, the legs of which will go into a pair of grooves on the hub (if the puller does not fit, remove the dirt ring with a screwdriver, after which the bearing ring is moved using a chisel). - Having removed the ring, use a file to clean out the nicks on the hub, and install a dirt ring that needs to be sealed on the hub. You also need to clean off dirt and lubricate the inner surface of the steering knuckle;
- then, using a puller, the new bearing should be pressed into the steering knuckle;
- It is important to consider that the large puller washer must rest on the steering knuckle from the inside so that the mud rings are not damaged;
- in parallel, during pressing, the new bearing should be pressed through the old bearing, which will transmit force exclusively through the outer ring;
- The final stage is installation of the retaining ring, pressing in with a hub puller, and reassembly of all previously removed elements.
Please note that the bearing nut must be tightened with the required torque, and do not forget to lock it by jamming the collar.
Unscrewing the hub nut on a VAZ: “burn, hit and twist!”
Now let’s look at the methods that may be the only effective ones in your case, but that doesn’t make them any less radical, even barbaric.
Strong hammer blows
If you hit the hub, you hit the bearing! If you are going to make a replacement, then go ahead! If you value the bearing, avoid this method.
Warming up the hub nut with a burner. Not recommended!
Using the burner
The law of physics is guaranteed to work, and the body (read: hub nut) will expand. And this will make it much easier to remove the stubborn part. There is one “but”: not only this one part heats up, but also everything else in the area of the burner. For example, a bearing. And it’s better not to allow this. As a more gentle option, we can suggest using a soldering iron and... patience. You'll need it.
Jumping on a lever
A chisel will help you remove the hub nut.
The “method” is fraught with the danger of unexpectedly breaking off the edges of the nut, breaking the key, and so on. Just don't do it.
Take a chisel and make notches on the edges
An increase in diameter, of course, makes the hub nut unsuitable for further use, but it will be easy to unscrew it.
Recommendations
If necessary, replace the Kalina front wheel bearing; all connections should be cleaned during reassembly. Removing dirt allows you to increase the service life and improve the quality of fit of parts and elements;
We also recommend reading the article on how and with what to lubricate a wheel bearing. In this article you will learn why you need to lubricate your wheel bearings, as well as how to lubricate your wheel bearing.
During the process of reassembling the connections, it is also important to fill them with lubricant. Graphite lubricant (graphite) is well suited for these purposes. Additional lubrication also increases the service life of parts, and also greatly simplifies subsequent disassembly.
Further sequence of actions
So, the hub nut was successfully unscrewed. What to do next?
- First of all, an external inspection is carried out to determine the integrity of the threaded elements. Using fine sandpaper, improvised materials, kerosene or solvent, the entire surface of the thread on the stud is thoroughly cleaned to bare metal. Order factory hub nuts in advance.
- The tightening is carried out under load control. We use a torque wrench.
- To prevent this part and contact from sticking again, we use a special deep penetration lubricant WD-40 or thick graphite lubricant.
- Don't forget to lock or install a cotter pin.
Security measures
To safely unscrew the hub nut, the following requirements must be met:
- Use proper tools and accessories;
- Firmly fix the body in its original position (handbrake, heel);
- Use special anti-slip gloves;
- If excessive force is used, do not place body parts under the car body if the wheel is jacked up;
- First we try to unscrew it using more gentle methods, trying to preserve the original locknut;
- The sequence of actions is defined in the operational map. It must be followed.
Useful videos and links:
What to do if the nut is stuck or rusted
We recommend watching:
Mudguard amplifier for VAZ 2109. Where does the name come from?
Chemical
Now we will consider methods for those who do not rely on the help of physics, but want to solve the problem with the help of chemistry. Your laboratory should have: kerosene, white spirit, acidified sulfuric acid, zinc, plasticine, hammer, water, sandpaper, wrench, chisel.
We moisten the nut and bolt with kerosene (experienced people recommend making a mixture of White Spirit and kerosene), applying a swab to them, it doesn’t matter whether it’s cotton or gauze. After some time - from an hour to a day, and with repeated attempts, you may find that the hub nut can be easily unscrewed. But even here you cannot do without force: at a minimum, you will probably have to work with sandpaper to clean the parts from rust. If even after this things don’t work, you should help with a hammer: tap it on the edges of the hub nut.
If in this case you are not successful, make a small container out of plasticine, secure the hub nut on top, pour water with sulfuric acid into it, and put zinc in the container. A chemical reaction begins that does a very good job of removing rust. Usually a day is enough for even advanced corrosion to go away from a part. Finish the job with a wrench. But this method is valid only in the case when the reason is that the nut is tightly stuck and/or rusted, and if it was simply tightened, neglecting the required tightening torque (to “be sure”), then you just need to tighten it.
Unscrewing the hub nut on a VAZ: “burn, hit and twist!”
Now let’s look at the methods that may be the only effective ones in your case, but that doesn’t make them any less radical, even barbaric.
Strong hammer blows
If you hit the hub, you hit the bearing! If you are going to make a replacement, then go ahead! If you value the bearing, avoid this method.
Warming up the hub nut with a burner. Not recommended!
Using the burner
The law of physics is guaranteed to work, and the body (read: hub nut) will expand. And this will make it much easier to remove the stubborn part. There is one “but”: not only this one part heats up, but also everything else in the area of the burner. For example, a bearing. And it’s better not to allow this. As a more gentle option, we can suggest using a soldering iron and... patience. You'll need it.
Jumping on a lever
A chisel will help you remove the hub nut.
The “method” is fraught with the danger of unexpectedly breaking off the edges of the nut, breaking the key, and so on. Just don't do it.
Take a chisel and make notches on the edges
An increase in diameter, of course, makes the hub nut unsuitable for further use, but it will be easy to unscrew it.
Advice for motorists
- Purchase spare parts only from trusted, reliable retail outlets, ask for quality certificates for products.
- If there are no mandrels for pressing, use rings from old bearings.
- Remember, when pressing, apply all your force only to the outer ring.
- The replacement process is not so simple, but at the same time you save money on service station services and still, you can do it yourself faster than getting the car back from the service station.
To make it easier to study the repair process, watch the video on the topic “Replacing the Kalina front wheel bearing - VAZ 1118”:
MrPodshipnik
Bearing replacement, repair
Enter the marking or size (for example: 8*22*7) of the product and the country of sale
New instructions
- How to make your own repairs and replace the bearing on the steering column in a ZOOM bicycle 10/09/2019
- How to independently, at home, replace a bearing in an electric motor of a Philips food processor 10/05/2019
- We repair a DAB heating circulation pump and change the bearing ourselves 10/04/2019
- How to repair a Shimano fishing reel yourself and replace a faulty bearing 10/03/2019
- We replace the bearing and repair the SBR_ 132_A concrete mixer ourselves 10/02/2019
How to replace the front wheel bearing on a Lada Kalina
Owners of a Lada Kalina car should know that the operational mileage of the front hub bearing is no more than 50,000 km.
Although adjusted for our roads, this mileage is significantly less. If your bearing has failed, then you have come to the right site! I will give you complete step-by-step instructions for replacing the bearing on the front hub of the Lada Kalina, with my own hands.
Reasons why you should start unscrewing the VAZ 2110 hub nut
The main reason is a malfunction of the car's chassis, and delays are not welcome. The problems that arise are caused by problems with the hub nut. If it is damaged, the car will move from side to side while driving, and the wheel will seem to hold weakly and become loose.
Imagine that suddenly a situation arose: on the road, without special conditions, you had to change a tire, everything was done in a hurry, so mistakes were made. What could this lead to? Threads are broken and bolts are loosened, that is, the fastenings become unusable, which means you need to think about how to tighten the VAZ 2110 hub nut and whether it’s worth buying a new one.