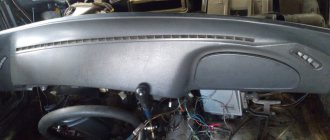
Hello, dear readers of the blog Kak-kupit-auto.ru . Replacing the stove on Kalina is not an easy task, but that is exactly what we will talk about in this article. Kalina's stove is one of its main advantages. It heats well, and even in severe frost the interior warms up quite quickly. While Kalina is new, everything is going great, but soon Kalina may disappoint its owner. If the heater radiator starts to leak, then puddles of antifreeze will appear on the floor mats, and in the worst case, antifreeze can even flood the electronic engine control unit.
Features and nuances of the heater design
Note that problems during replacement are caused not by dismantling, but by installing a new radiator. There are two main nuances that make it difficult to fit the heat exchanger into the heater housing. The first one is the installation side. The radiator is pulled out towards the pedal block, and the pedals themselves prevent the radiator from “coming out”. But this does not cause problems during dismantling, since the leaking heat exchanger can be sawed and removed. But it’s impossible to install a new radiator because of the pedals.
The second nuance is the design of the radiator itself. The heat exchanger fittings for connecting the cooling system pipelines are long and pass through the engine shield. Thanks to this, the connection of the pipes with the radiator is carried out in the engine compartment and if the fastening clamps are loosened, the antifreeze flowing through the leak does not enter the passenger compartment. But due to the long fittings, you can only pull out the heater radiator by moving the heater housing toward the passenger compartment, and this is only possible with the front panel removed.
The replacement methods that car enthusiasts have come up with involve some modifications to the heater elements, allowing the installation of a heater radiator. In the future, these modifications make it possible to replace the heat exchanger without problems and in a short time.
Location and principle of operation of the stove
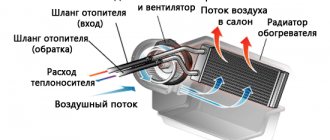
With the onset of cold weather, many motorists are faced with the problem of heating their car. This is a very common breakdown in which heat does not flow into the car interior, which makes being in it insufficiently comfortable. Let's first figure out how our stove works. The operating principle of the heater is as follows:
- Through the air filter, air from the street first enters the air intake. Then, using electric fans, it is driven inside the air ducts.
- The intake air is heated using a heater (heater radiator), which is located under the protective panel.
- While the engine is running, heated coolant circulates through the radiator, thereby heating the air flowing through it.
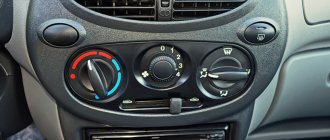
- Adjustment of the air supply speed, as well as temperature adjustment and damper control is carried out using a control unit located in the central part of the dashboard.
The process of replacing the Lada Kalina stove consists of several stages
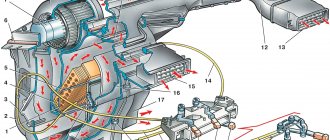
The location of the stove on Kalina is convenient; it is located in the central part of the torpedo. The control of the switching mechanisms is quite simple, carried out by four regulators. Repair of the Lada Kalina stove can be divided into several stages: diagnostics and troubleshooting, disassembly and assembly of the necessary mechanisms and repair (replacement) of failed parts.
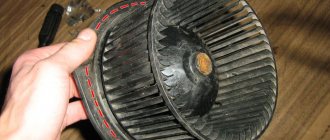
Heater fan (stove)
| When the door windows are closed, air is supplied to the cabin by an electric fan. The intensity of the air supply is regulated by the rotation speed of the electric fan impeller. The fan electric motor has four speed modes (lower speeds are provided by an additional resistor with two windings). |
How to choose the right heater radiator
When choosing a suitable radiator from a fairly extensive range, you should remember a few simple rules.
First of all, you need to pay attention to the metal from which the heating system element is made. Cheap options are made of aluminum. If it cracks, the owner has only one choice - throw it away and buy a new one.
Meanwhile, the brass-copper model, although more expensive, can be easily repaired - cracks in it can be easily sealed.
It is also important that the swirlers of the new radiator are made of durable plastic. As practice shows, such models last for many years and rarely become clogged.
Preparatory process with preliminary disassembly
To ensure the ability to carry out repair work to replace the radiator, you will need to acquire the following tools:
- locksmith set, which includes a wide range of standard keys;
- a hacksaw for metal with the ability to extend the blade;
- a container paired with a hose to drain antifreeze;
- silicone sealant or other means for gluing plastic;
- with a rag.
During the procedure for replacing the heater in the LADA Kalina model, we also recommend replacing its power supply and return pipes. On old hoses there is a high probability of cracks appearing, which can manifest themselves unexpectedly and negatively. This approach will eliminate the need to repeat the labor-intensive disassembly procedure in order to replace the pipes
We advise you to pay attention to silicone products
How to choose the right heater radiator
Before choosing a stove radiator, you should know that they can be either aluminum or copper-brass. It is difficult to clearly prioritize the choice of one material, but each one has specific features of its work. These features are dictated by the properties of the material. Copper has a slightly lower thermal conductivity than aluminum, and therefore warms up more slowly. This cannot be said to be bad, since the thermal inertia of such a radiator is quite large. This means that it may not cool down for a long time.
We recommend: What kind of TSI engine?
An aluminum radiator is the opposite. It warms up quickly, but cools down just as quickly. It has a few more disadvantages. Firstly, the aluminum radiator cannot be repaired. Once it drips, you can throw it away. Copper is soldered quite simply and as many times as necessary. You just need to choose it correctly, because when selling, especially in the car market, you may come across a repaired copy with the partitions removed. It won't leak, but it won't provide heat either. Antifreeze will simply pass through such a radiator as if through a pipe.
It is also worth paying attention to the presence of plastic liquid swirlers. You can see them if you look into the pipe. These are spiral-shaped plastic plates that increase the efficiency of the radiator by 25%. The price of a heater radiator for Kalina can range from 900 rubles for the original, and little-known companies can offer their radiators for 600-800 rubles. Naturally, it is better to overpay and buy an original new one. Copper or aluminum - at the discretion of the owner.
An important step is removing the knot
The cooling radiator and related components are unscrewed using the following tools:
- socket wrench 10;
- pliers with cylindrical thin ends;
- Phillips screwdriver;
- when carrying out work on Kalina with air conditioning, use a set of TOPEX internal socket wrenches (star-shaped).
To dismantle the radiator, you must first remove the engine cooling fan, having first disconnected the power connector from it. The fan is attached to the radiator with 4 bolts. The bolts are unscrewed with a 10 mm socket wrench, after which the fan is removed through the top.
The next step is to remove the rubber pipes from the radiator: upper, lower and coming from the expansion tank. The pipe clamps are loosened using pliers or a screwdriver. Next, use the same key to unscrew the 2 nuts securing the unit. The cooler can now be tilted towards the engine and pulled out.
When working with an air conditioned Kalina, you will have to deal with an additional cooling device attached to the main radiator. To separate them, you need to unscrew 4 bolts with a star key.
When removing the radiator, pay attention to the lower support pads; they can be removed along with the unit or remain in the body holes. It is better to remove the pillows to examine them for functionality.
The same applies to rubber-metal bushings installed on the cooler body. If necessary, these parts must also be replaced.
A radiator malfunction can be localized by plugging its large pipes, immersing it in a container of water and supplying air at a pressure of no higher than 1 bar through a small fitting. If there are many places where air breaks through, then the unit is replaced with a new one.
If you have 1-2 small fistulas, try to negotiate a repair at a service station; you should not undertake this yourself. The design of the aluminum radiator is such that careless movements can easily cause even more damage.
The new cooler is installed together with the cushions in place and screwed with nuts
Further assembly is carried out in the reverse order, and attention should be paid to the condition of the rubber pipes and clamps. It might be better to replace them too
How to carry out work according to the manual (classic method)
- According to the factory instructions, dismantling the heater takes from three to six hours, including the preparatory stage.
The main stage of dismantling the heater is briefly discussed below. You need to start by disconnecting the negative terminal of the battery. It is necessary to disconnect the negative terminal of the battery before dismantling the heater - Second step: remove the windshield frame trim.
Remove the battery and air filter housing along with the air duct. According to the instructions, you need to remove the windshield frame trim - Remove the battery from the engine compartment.
- The next step is to disconnect the heater radiator hoses, which will require draining the coolant and crawling under the car.
Pre-drain the coolant, disconnect the heater hoses - Next, you need to unscrew the bolt securing the heater to the partition of the engine compartment.
Disconnecting the heater mount - The last step: remove the heater radiator cap and the heat exchanger itself. The radiator is located under the dashboard in a plastic casing, so in this case the console and front seats must be removed from the interior. Also, the main stage of work, in addition to removing the dashboard, is preceded by the dismantling of the steering column, power steering and central tunnel.
Replacing the stove on Kalina using the radiator reverse method
So, let's begin. We park the car so that on the left you can open the driver's door and carry out work in the area of the pedal assembly. Open the hood, remove the air filter and air duct .
It is recommended to plug the holes in the air filter and in the throttle with a clean cloth so that during operation dust, dirt and foreign objects that could further damage the engine do not get inside.
We remove the battery and the platform under it (keys 10, 13, ratchet wrench with a head 13).
To completely remove the platform, unscrew the hard-to-reach nut with a 10mm head, which secures two pipelines to the platform. These hoses have to be unscrewed every time you remove the platform under the battery, so I connected them together and don’t screw them to the platform anymore, because they won’t go anywhere anyway
Next we need to drain the antifreeze , but this can be done in at least two ways .
Selection of spare parts
The choice of a stove radiator should be approached carefully, since changing it is quite inconvenient. The majority of motorists choose an original part that is available for sale. But few people know that there are several analogues.
Let's consider the heater radiator options for Kalina, their catalog numbers:
- 1118-8101060 – this is the article number of the original catalog number of the heater radiator for Kalina. It fits perfectly and does not require any modifications. The average cost in the Russian Federation is 1500-1700 rubles.
Original heater radiator and hoses
- There are several analogues that are in no way inferior to the original in terms of quality. Thus, spare parts from the following manufacturers are suitable for Kalina: Pekar (1118-8101060), Fenox (RO0001O7), Luzar (LRH 0118) . The average cost of an analogue is 1200-1500 rubles.
Kraft stove radiator
Reasons for failure
There are not many reasons for the failure of a stove radiator, but you need to know them. Let's consider the main ones:
- Radiator clogged, which led to pressure, resulting in a breakdown of the inner tube.
Antifreeze flows into the cabin due to a breakdown in the heater radiator
- An air lock can also cause a radiator leak.
- Wear . Frequent use of the stove leads to wear on the inner walls of the tubes.
We recommend: Valve knocking on a hot engine: causes, repairs, consequences
Perhaps these are the main reasons, but others may arise due to the operation of the car.
Without removing the windshield
In this case, the windshield and the cabin filter remain in place. Roughly speaking, fewer preparatory operations are performed. But the algorithm for the main stage of work is fundamentally different from the traditional one. It looks like this:
- Disconnect the gas pedal cable.
- We remove the pedal.
- We dismantle the sensor for turning on the rear side lights.
- We disconnect the brake pedal from its drive by disconnecting the locking bracket and the metal pin.
- Remove the steering column.
- Remove the trim on the left side of the dashboard.
Removal algorithm
As for removing the element, with all three replacement methods without removing the panel, dismantling is performed in the same way. The algorithm for removing the heater radiator is as follows:
- Drain the antifreeze from the cooling system.
- We dismantle the engine air filter along with the air duct.
- Disconnect the battery terminals and remove the battery from the car.
- Remove the battery mounting plate.
- Under the steering rack we find two pipes through which coolant is supplied to the heater radiator, loosen their clamps and pull the tubes off the fittings.
- Near the fittings we find a nut that secures a mounting plate with a rubber seal through which the heat exchanger fittings pass to the engine shield. unscrew this nut.
- Let's go to the salon. On the driver's side, remove the decorative side trim of the center console.
- Unscrew the gas pedal and move it to the side.
- We remove the brake light sensor located near the brake pedal.
- Since it will not be possible to remove the brake pedal without dismantling the steering column and mechanism, we do this. We remove the bracket for fixing the pin that connects the brake pedal to the vacuum booster, remove the pin and bend the stop plate of the brake light sensor. After this, we lift the pedal up and it does not interfere with removing the radiator.
- Unscrew the three screws securing the radiator to the body.
- Since the radiator outlet is blocked by fittings, they need to be sawed off or broken off.
- After sawing off the fittings, the radiator will “come out” of the seat.
But dismantling the heat exchanger is only half the battle; you still need to install a new element, but the fittings prevent this from being done.
Installing an inverted stove radiator on Kalina
So, let's look at how to install the radiator upside down - with the pipes facing the driver rather than the engine:
If the fittings are not cut, then there is very little space left to fit the hoses. Theoretically, you can first put on the hoses and install the radiator already assembled with the hoses, but I took a different route. I had two tubular angles , I connected them to the hoses, then installed the radiator and finally connected the angles to the radiator. I cut the fittings on the radiator to a minimum, leaving 30 and 50 mm .
The length of 30 mm was chosen based on the fact that it will allow, if necessary, to install a second clamp on the upper fitting . By adding another 20 mm (hose diameter), I got the length of the lower fitting - 50 mm .
Now I checked - the antifreeze is not leaking, so the second clamp on each fitting is not needed. To install one clamp, you can reduce the length of the fittings by another 15 mm , therefore, I recommend that you, dear readers, in order to save space, limit the length of the fittings to 15 and 35 mm .
After installing the corners on the radiator, I ended up with something like this design.
Having installed the heater radiator into the mounting socket, I realized that along the length these corners fit end to end. Therefore, I once again recommend that you make the fittings 10-15 mm shorter.
I then left the clamps in place and the corners to make installation easier. Remembering the unsuccessful experience of installing a gazelle radiator, I decided to properly seal the radiator and covered it with foam rubber according to the following scheme.
The entire far wall is sealed with foam rubber , plus two 15x15 square strips are glued to the side of the fittings, top and bottom. Thanks to these two strips, there is no blowing from under the radiator at all, neither from above (cold air) nor from below (warm). Therefore, I recommend that you, dear readers, do the same, because thanks to the correct sealing, the flow from the fan will pass through the heater radiator , which means it will heat up better.
I did not glue thick foam rubber on the right and left so that it would not peel off during installation. It seemed to me that there would be enough foam rubber 5 mm thick, and I must say that the radiator fit into its niche quite tightly.
When the radiator is covered with foam rubber, we leave it to dry , and at this time we will install the hoses in their places . I had to modify the metal plate . Initially it looked like this:
The protruding wall had to be broken off, since it did not allow installing the radiator and hoses at the same time. After modification, the part acquired the following appearance:
Next we insert the hoses into the rubber seal . Hoses, especially those with a diameter of 20 mm, will sit quite tightly in the rubber band, so they should be inserted into the rubber band before the plate with the rubber band is installed on the body.
We install the metal plate and seal in their place. It should be emphasized that the presence of a standard seal has a positive effect on the tightness of the interior and sound insulation , so it is advisable to keep it.
Using a 10mm deep socket , not forgetting to install the washer, we pull the plate to the engine shield:
When rubber plate the hoses from the passenger compartment into the engine compartment and put them on the engine fittings. You shouldn't have any problems with this, because... you will use a hose with a diameter of 20 mm, but I had to make adapters from the 18th hose to the 20th using improvised materials.
I made some of the adapters on the engine side from a standard pipe from the Kalina stove, 20 mm in diameter, which I planned to use and therefore bought in the store, along with the radiator:
As adapters , I used tubes with a diameter of 18-20 mm, which I bought a long time ago at a GAZ auto parts store.
Now that the hoses were mounted in place, I installed the heater radiator in the niche, complete with seals:
After this, we insert the corners into the hoses, tighten the clamps, and remove the excess part of the hoses upward, behind the ventilation duct.
And the last step is to connect the corners to the radiator . I don't know if this makes any difference, but I connected the lower hose from the engine to the lower radiator fitting, and the upper hose to the upper one.
Then I put everything together, and I got this wonderful picture.
It would be nice to also fasten the radiator to the ventilation duct with three screws that are intended for this, but I have not done this yet, because... The radiator already sits very tightly, there is no blowing from under it anywhere, and there is no particular desire to tinker with the fastening while it’s winter)).
On the right there are traces of the installation of the gazelle stove - holes made with a soldering iron. The foam rubber sealed them tightly, but in the summer I plan to seal them with epoxy resin, so the seal will be fully restored. Now I know for sure that I wasted my time with the Gazelle stove in vain. You need to install a standard heater radiator from Kalina , period!
Now let's list in reverse order everything that needs to be returned to its place.
Main causes of malfunction
If, with the onset of cold weather, no heat is supplied to the interior when the heater is on, then you need to figure out what is causing this. The main causes of failure may be:
- Thermostat malfunction;
- Heater radiator leaking;
- Air in the cooling system.
The main cause of the malfunction is a leak in the heater radiator
The most dangerous breakdown is a leak, which can occur in several places simultaneously. It is detected by visual inspection of the system, as well as the connection points. A copper radiator can be repaired by soldering the leaking areas, but an aluminum radiator will have to be replaced.
How to drain antifreeze on Kalina?
To avoid burns, work with coolant only when the engine is cool.
There are two ways to drain antifreeze:
- 1) You can unscrew the drain plug on the lower right side of the engine radiator and open the expansion tank cap. If you drain using the classic method, I recommend that you replace the standard radiator cap with this tuning version, which is sold in the store for 15 rubles. The slots for the screwdriver on the standard plug (pictured on the left) quickly break, you have to look for it by touch - it does not protrude from the radiator, and the tuning plug (pictured on the right) is clearly visible and can be easily unscrewed by hand. I recommend all potassium growers to install such a plug!
- 2) The second method of draining antifreeze is to drain only that part of the antifreeze that is in the heater radiator (1-2 liters). In this case, all the drained coolant will be collected in a canister and not a drop will be spilled, and the rest of the liquid will remain in its place in the system.
The technique is as follows: remove the hose from the heating of the throttle assembly:
Coolant will be drained from this hose, so it must be extended with another hose , and the free end placed in a canister where the drained antifreeze will be collected. As an adapter , I use a high 10 head, fortunately it has a through hole, and, in fact, it is a tube.
Next, we clamp our finger on the heating fitting of the throttle assembly (from which the hose is removed) and blow into the expansion tank . The pressure in the system increases and antifreeze rushes through the hose directly into the canister. When air comes out of the hose, it means that most of the antifreeze has already left the stove.
Blowing into the expansion tank is not an amateur activity, so some would prefer to drain the coolant through the radiator cap, but I made a simple device that allows me to pump air into the system using a compressor. Having disassembled the old cap from the expansion tank, I drilled a hole in it and inserted a nipple from the car inner tube from the inside:
Now we pump the reservoir with a pump or compressor and the coolant drains itself.
Causes of breakdowns
For inexperienced car owners, it will be useful to find out why the heater radiator becomes unusable. It is possible that this information will allow you to avoid improper operation and extend the service life of the heater and all its components.
The heating system most often stops working properly due to:
- accumulation of scale and slag in the radiator;
- clogging of the stove itself with dirt and dust;
- loss of integrity of radiator tubes.
In the first case, wear is accelerated (and significantly) by low-quality coolant, in the production of which not distilled water is often used, but ordinary tap water.
The cabin filter will reliably protect the stove from foreign contamination. This measure will be even more useful for cars equipped with air conditioning. The main thing is to remember to clean it regularly, and everything will be fine.
As a rule, the radiator pipes located inside crack – if a coolant leak is detected, this is where the problem should first be looked for.
Replacing the radiator without removing the front panel
The classic method of replacing a Kalina heater radiator, a video of which we presented on the page, involves complete dismantling of the interior. It’s doubly disappointing that you have to lose a whole day if you change the radiator yourself, or five thousand and also a whole day if you use the services of a service station.
However, there is a method that allows you to replace the radiator with less labor and faster. An alternative replacement method is to use a hacksaw saw to cut out a segment with pipes from it before removing the old radiator, or simply cut off the pipes. If the radiator is aluminum, then in this case the pipes will be plastic and removing them will take at most 15 minutes. There are some other nuances to consider when replacing.
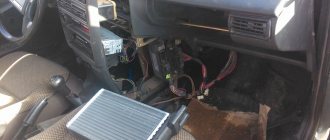
After removing the pipes, so as not to weaken the front panel, you can also make cuts in the places shown in the photo on the heater casing. In this case, you no longer have to completely dismantle the panel when replacing the radiator. Simply drain the antifreeze, remove the gas pedal (you can also remove the brake pedal mounting block, although many do without it), shorten the standard guide pin by 10 mm (with large wire cutters, pliers), remove the old radiator and put the new one in place.
This way you can simply solve the issue of replacing the heater radiator on Kalina, saving time and money. Use the right antifreeze and have a good winter road trip everyone!
We recommend: ZIC oil: description and reviews
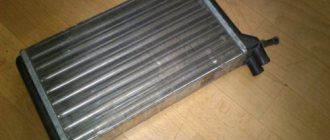
Dimensions of the standard radiator of the Lada Kalina stove
At one time, I was never able to find either the dimensions or a clear image of the radiator of the Kalina stove ; one might say, I had to select the radiator blindly, agreeing to return it if it didn’t fit. Therefore, I hasten to share this information with you, dear readers. I hope it will be useful, for example, if you decide to install a heater radiator from another car.
So, the dimensions of the Kalina stove radiator : 240 x 195 x 50 mm
You may also find the dimensions of the niche in which the Kalina heater radiator is installed useful: 54x198 mm. However, if you are planning to install a heater radiator from another car, keep in mind that the edges of this niche are strongly rounded:
Two common replacement methods
There are two ways to replace a stove radiator. The first method does not require removing the panel. The second method is described in the Lada Kalina operating manual. It involves complete dismantling of the torpedo (the author of the video is Gaz0014).
First method (without removing the panel)
When using the method without dismantling the panel, you must perform the following steps:
- First of all, the car is de-energized by removing the negative terminal from the battery.
- After unscrewing the 4 bolts, remove the cover from the steering wheel.
- Remove the pedal covers.
- After pressing the accelerator pedal all the way, you need to unscrew the brake pedal mounts.
- Now you need to remove the radiator pipes.
- Next, use a hacksaw to saw off the bottom of the panel.
- Now you can dismantle the radiator.
- Before installation, the pipes should be shortened by 1.5 - 2 cm to make it easier to install the new device.
- Next, the hoses are put on.
- Assembly is carried out in reverse order. The sawn-off part of the panel is returned to its place.
This is an easier way to replace the heater core.
Second way
The method of completely dismantling the torpedo is more complex and time-consuming.
To perform the work, you should prepare the following tools and materials:
- set of wrenches;
- screwdrivers;
- knife;
- new radiator.
New product for Lada Kalina
Replacing the heater radiator on Kalina using the second method consists of the following steps:
- Before removing the dashboard, it is necessary to dismantle the decorative trim.
- Next, unscrew the screws on both sides of the torpedo.
- Then the trim from the instrument panel under the windshield is removed.
- At the next stage, the air duct grilles are dismantled.
- Next, you need to dismantle the trim, which contains the organs that control the air conditioner and stove.
- When the trim is removed, you can unscrew the two screws that secure the instrument panel and remove it.
- To avoid damage, the electronic control unit must be moved to the side.
- The torpedo is removed after unscrewing the 9 nuts securing it to the body of the Lada Kalina.
- After dismantling the torpedo, the heating radiator is accessible.
- At the next step, the screws securing the stove casing are unscrewed and the pipes are disconnected.
- Now you can remove the old one and install a new heating device.
- After installing a new radiator, assembly is performed in the reverse order.
Lada Kalina without a torpedo
The most difficult part is dismantling the dashboard, since you have to remove a lot of parts and touch the wiring. Having returned all the parts to their place, you need to start the engine, let it warm up and check the operation of the stove.
Option two: replacement with complete disassembly of the dashboard
Following the instructions given on how to remove the old radiator, you must repeat the first four steps of the work described above (with the exception of dismantling the gas pedal and steering column). Next we perform the following steps:
- We completely remove the decorative trims of the instrument panel, remove the radio and climate control control unit from the center console.
- We dismantle all the air ducts and the trim in front of the windshield, which will provide access to the nine bolts that secure the dashboard. Unscrew the bolts and dismantle the panel.
- We remove the entire stove casing by unscrewing its fasteners (from the side stiffeners of the body). We remove the old stove and install a new one.
- We return all the removed elements to their place (in reverse order).
New Lada: Generator on Granta in Balashikha, p. 2
Differences between the algorithm on a car with air conditioning
“Kalina” with air conditioning has two heater radiators and a temperature controller in the cabin that is different from models without climate control. There are two radiators, since air conditioning freon passes through one of them, and antifreeze passes through the other, as in a car without an air conditioner. Accordingly, the temperature regulator allows air to pass through one of the radiators, depending on its position. It will be more difficult to dismantle such a structure and replace the necessary elements yourself.
It is not immediately possible to understand that the stove has become unusable, since the leaking liquid quickly evaporates and reminds of itself only by a specific smell. When replacing a radiator, you must carefully place the parts being removed, do not deviate from the instructions and follow safety precautions.
Kalina engine cooling system
Kalina, like other cars of the VAZ family, is equipped with a similar cooling system to other cars. Since the system is not perfect, but it works very well when the car is new, over time its performance deteriorates and components are subject to breakdowns.
Main elements of ODS:
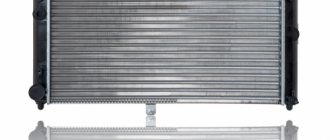
- Cooling radiator;
- Heater radiator;
- Water pump;
- Expansion tank;
- Cooling jacket;
- Thermostat;
- Expansion tank cap;
- Pipes.
Each of the elements seriously affects the operation of the car and its stove.