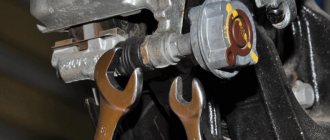
Good afternoon everyone. On April 4, I changed seasonal tires at the nearest tire shop, the sun is shining, it’s warm, it’s spring, the forecast is without frost - I changed it. I called at lunchtime - come, there is no one to replace me. And the day before I noticed that the rear brakes began to squeak. Logically speaking, if the front ones were replaced, then the rear ones are on the way. I looked at this issue on our website and found an entry in the logbook from user phantom102 “replacing rear brake pads” about replacing squeaking pads and for some reason only half worn ones. And when I was changing the tires, I asked about the cost of replacing the rear pads - 1,100 rubles with all the handbrake tightening - quite acceptable. And since I don’t have a pit, and the garage is only wide in one direction))), the best solution for me would be to delegate the replacement and the hated i.e. very uncomfortable, weakening - pulling up the handbrake. But the manager, in response to my question - “if you have rear brake pads for grants with ABS?”, pointed to a display case with pads without a hole for the abc sensor, like “of course they will fit”))) Any insincerity is repulsive, and the same for I'm no exception, I left. And already in another store I checked, I bought normal pads. And today, after reading the above post, I decided to simply check the rear brakes. I jacked it up, put wheel chocks under the wheels, unscrewed the wheel bolts, using a wrench and a pipe. I carry the pipe with me just in case, without an additional lever, which is the pipe, it can be very difficult to unscrew the wheel nuts without jumping on the wrench)) an ordinary gas-welded pipe, length 35 cm, through hole 16 mm. The brake drum on the right side of the car refused my entreaties to dismantle it. I snorted a little WD on the axle, screwed the unscrewed drum mounting bolts into the threaded niches, very carefully, with a slight tightness, screwing it in and using this effect as a puller, rotated the drum and knocked it on the back side using a wooden mallet. By the way, when unscrewing the drum mounting bolts, I used a 7mm socket from this one I recently bought Set of heads
, and it turns out that it was not in vain that I bought it, I didn’t have a 7 mm head before, I have a 7 mm horn head, but it’s not serious). After my brief manipulations, the drum finally decided to change its place of residence.
Service life of the rear pads of the Lada Granta
The specificity of the braking system is that the main load during braking falls on the front brakes, so the linings on the rear brake pads last quite a long time. Even the model’s designers cannot name the exact mileage that the rear pads can withstand. The rate of wear depends on several factors:
- driving style (during aggressive driving with constant acceleration and braking, the pads wear out more intensively);
- quality of the material of the linings on the rear pads;
- condition of brake drums;
- the presence of extraneous factors (for example, chemicals that are sprinkled on roads in winter destroy the material of friction linings).
Under favorable conditions, the rear pads of the Lada Grant can travel up to 60 thousand kilometers. But they should be changed depending on the condition of the lining, and not the mileage of the car. If the thickness of the lining is 1.5 mm or less, if it begins to peel off from the metal or has chips and cracks, it is necessary to replace the rear pads of the Lada Granta. If the pad linings are thinner, the pistons may extend too far out of the brake cylinders, causing brake fluid to leak and causing the brake system to become ineffective.
Typical causes of wear on brake system components
- Long-term operation without intermediate prevention;
- Mechanical damage to the caliper or steering knuckle, resulting in deformation of the lining;
- Deformation, and as a result, creaking of brake pads on Grant;
- Purchase and subsequent installation of low quality parts;
- Violation of installation technology;
- Aggressive driving style of a vehicle;
- Insufficient amount of fluid in the expansion tank of the master cylinder;
- Damage to the supply line DOT – 4;
- Working cylinder jammed.
How to change rear pads on a Lada Granta
An anti-lock braking system can be installed on the Lada Granta. Replacing Grant rear pads with and without ABS is practically no different. The only difference is the presence of a sensor, which must be disconnected when changing the ABS pads.
Attention: rear pads should only be replaced as a set. It is unacceptable to change the pads on only one side;
Before replacing the rear pads of the Lada Granta, you should check the brake fluid level. If it is close to the maximum, you need to use a rubber bulb to take some liquid into the prepared container.
The pads are changed in stages: first on one side, then on the other.
Replacing the Grant rear pads is done as follows:
- fully lower the handbrake lever;
- loosen the tension on the handbrake adjusting bolt;
- unscrew the guide pins holding the brake drum;
- clean the brake drum seat located on the wheel hub from dirt;
- treat the seat with WD-40;
- tap the drum with a rubber-faced hammer to facilitate subsequent dismantling;
- screw the bolts into the threaded holes on the drum and compress the drum, tightening the bolts evenly;
Attention: if you press the brake pedal with the brake drum removed, the pistons may fall out of the brake wheel cylinder, so this is not permitted!
- carry out a visual inspection of the brake drum (there should be no cracks, chips, deep marks);
- using a pair of mounting blades, bring together the rear pads of the Grant;
- Using pliers or a slotted screwdriver, remove the end of the upper spring that tightens the pads;
- disconnect the upper spring;
- lower the front pad and remove it together with the lower spring that tightens the pads;
- remove the upper tension spring;
- remove the spacer bar;
- remove the hook of the brake spacer lever from engagement with the parking brake cable;
- remove the second (rear) block;
- Unscrew the axial pin of the spacer lever using pliers;
- remove the washer from the block;
- disconnect the spacer lever and axial pin;
- clean the mechanism parts from corrosion and dirt;
- make sure there is no leakage of brake fluid from the working cylinder (if the cylinder is leaking, it must be replaced);
- attach the axial pin, spacer lever and spring to the new block;
- install the block;
- Use pliers to install the cotter pin on the axial pin;
- hook the end of the handbrake cable to the spacer lever;
- install a spacer bar;
- put the second block in place, having first put the lower spring on the blocks;
- Use pliers or a slotted screwdriver to tighten and install the upper tension spring;
- install the brake drum;
- tighten the two guide pins;
- press the brake pedal several times until the pads are in the working position;
- install the wheels, tighten the fastening bolts;
- remove the car from the jack;
- replace the pads on the second wheel.
Video - Changing the pads - lubricate the caliper
According to the regulations, brake parts must be inspected every 15 thousand km. The replacement interval for the Granta car is not regulated. But if the pads are damaged, they need to be replaced. And when performing a replacement, they first carry out preparations: they lower the DOT fluid level, release the handbrake, and the car itself must be secured. Let's look at each step in more detail.
Removal
You will need : new rear brake pads, a set of keys and remove the car from the handbrake.
Check the brake fluid level, if it is around 0, then pump out some of the fluid. Jack up the car and remove the wheel. Further:
- Unscrew the guide pins.
- remove the drum from the hub, knocking it with a hammer through a wooden spacer.
Next in order:
- disengage with the spring block.
- and remove the upper spring first.
- then the bottom one.
- disengage the pressure spring from the block.
- remove the front pad.
- remove the spacer bar.
- Having disconnected the pressure spring from the rear block, lower the block.
- remove the rear shoe lever from the hole in the handbrake cable end.
- pull the cotter pin out of the hole.
- remove the washer.
- pull out your finger.
Checking the parking brake
A common situation: the pads have been replaced, but the handbrake adjustment has also changed. So, all that remains is to configure:
- First we release the handbrake;
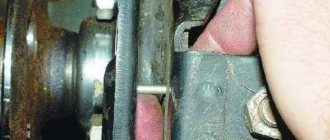
- Then, using a 10mm wrench, unscrew the four nuts (Fig. 1). You also need to remove the cushion securing the brackets;
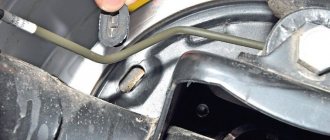
Removing the screen
- The part called “screen” needs to be moved forward (in the direction of travel);
- The adjustment mechanism consists of two nuts (Fig. 2). The “wide nut” must be held in order to unscrew the lock nut.
Two nuts, adjusting and locking
Note that a “13” wrench is suitable for each of the nuts. Don't forget to tighten the locknut in the last step!
Turning the nuts to the right corresponds to tightening the cable, and vice versa. The standard full travel of the handbrake should be 2-4 “clicks”.
Installation
Before installing new brake pads, remove dirt and wipe the rear brake parts. Assembly is carried out in reverse order. To install the pressure spring with the block, use the lower tension spring, hooking its end to the hook of the pressure spring. We tighten the spring with a screwdriver and insert the hook of the spring into the hole in the block.
Move the pistons to the center of the cylinder, bringing the pads together with two mounting blades. After completing the work, press the brake pedal 2-3 times to bring the pads to the drum. For clarity, the entire process is also shown in the video:
Let us remind you that periodically monitor the serviceability of the brake system and change the front brake discs on time.
General issues
Let's figure out when you need to change the pads and what to choose from components.
When to change rear pads
The rear pads on the Grant are changed at the following indicators :
- the wheels make noise - rattle - vibrate when braking;
- 1.5 mm (or less) left on the pads;
- the pads have delaminated, causing the wheels to periodically jam;
- stopped holding the handbrake;
- You recently changed the front pads, but haven’t touched the rear ones yet.
As always, the obvious point: we change the pads as a set along the axes! You cannot replace only the right or left wheel and leave the other with the old brakes.
Even with severe wear on the pads, the car can slow down, but this is dangerous and unacceptable.
Selection of components for Grants
We have compiled a table of article numbers for spare parts for replacing brakes. Here it is (can be used to search and order online):
List of article numbers for all spare parts that may be required for work.
There are never too many options.
ABS allows you to shorten braking distances and maintain maneuverability when braking.
Selection of components
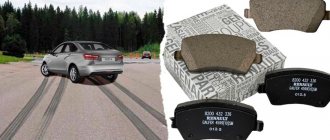
On VAZ cars with and without ABS, the rear pads are different. In the first case, the part is designated as follows: 11180-3502090-10. Well, in the second we are talking about pads 21080-3502090-01. Both types of pads are produced by .
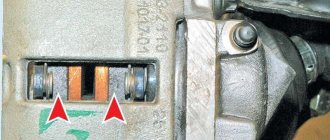
There is a slot - that means it is compatible with ABS
The interesting thing here is that the different parts differ in shape only in the slot (see figure).
For VAZ 21080-3502090-01 pads you can find an analogue:
- Pilenga BS-T 1002, 1002 N or 1002 LN;
- Trialli GF231;
- BOSCH 0 986 487 219;
- BOSCH 0 986 487 813;
- 21080-3502090-04 VIS Auto.
For each of all manufacturers, all suitable options are listed here. Although, the list can be supplemented with new brands.
We are looking for analogues for VAZ 11180-3502090-10 parts:
- Allied Nippon ABS 1703;
- Trialli GF239;
- Pillenga BS-P 1005 N;
- Ween 152-2470;
- Finwhale VR317.
Probably no questions will arise here. By the way, the rotor disk number in the VAZ catalog looks like this: 11180-3538400-00.
Brake pads need to be replaced in sets of 4 pieces. “Old” pads can be rearranged in a crisscross pattern. Other options are excluded in principle! Be aware of this.
Rear wheel axle assembly with hub - removal and installation, disassembly and assembly
Removal
1. Place the car on a two-post lift and turn off the ignition (electrohydraulic lift type P-3.2G with a lifting capacity of 3.2 tons).
2. Remove the rear wheel.
3. Remove the hub cap, unscrew the nut 6 securing the hub and remove the washer (replaceable head 30, knob).
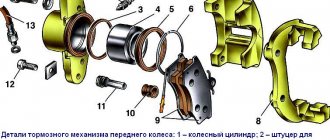
Removing the rear wheel axle and hub assembly:
- rear suspension arm;
- rear wheel axle mounting bolts;
- rear brake shield;
- rear brake wheel cylinder;
- rear wheel hub;
- hub fastening nut;
- rear wheel axle
: Hub nuts must be replaced and nuts must not be reused.
4. Raise the car to a height convenient for performing work.
5. Loosen the tension of the parking brake drive cables.
6. Remove the brake drum and rear wheel rotor (if equipped), rear brake parts.
7. Disconnect the brake pipe from the working cylinder.
8. Disconnect the rear brake speed sensor from the bracket (if equipped) and remove it.
9. Unscrew the four bolts 2 securing the rear wheel axle to the flange of the rear suspension arm 1 and remove the spring washers (internal hex socket 8, ratchet wrench).
10. Remove axle 7 assembled with hub 5 and rear brake shield 3 assembled with wheel cylinder 4.
11. Replace the rear wheel hub bearing.
Installation
1. Install the axle assembly with the hub and rear brake shield assembled with the wheel cylinder onto the flange of the rear suspension arm, install spring washers and tighten the four fastening bolts. The tightening torque of the bolts is 35...43 N m (3.5...4.3 kgf m) (internal hexagon socket 8, ratchet wrench, torque wrench).
2. Install a washer on the hub axle, screw in and lock the new rear wheel hub fastening nut, deforming the nut’s locking collar into the grooves of the hub axle shank.
3. Install the hub cap. The nut tightening torque is 190…225 Nm (19.0…22.5 kgfm) (replaceable head 30, wrench, torque wrench, center punch, hammer).
4. Install the rear brake parts on the brake shield, connect the manual brake cable, connect the brake pipe to the working cylinder, install the rear wheel speed sensor, rear wheel rotor and brake drum.
5. Bleed the brake system.
6. Adjust the manual brake drive.
7. Install the rear wheel.
8. Check the effectiveness of the service brake.
To do this, you need to find the book you are interested in and click on the “Buy” button. The price of the book is indicated on the button.
For residents of Ukraine in hryvnias, and for all other countries - dollars.
After clicking on the “BUY” button, a payment window will open where you can select a payment system with which you can pay for the selected book using any bank card (Visa, MasterCard, MIR, etc.)
When you click on the “Pay by bank card” button, the Portmone payment system will open, which is the easiest way to make a payment.
- Yandex (payment from any bank cards, Yandex Money account, QIWI Wallet, terminals, etc.);
- Portmone (payment from any bank cards, Portmone account);
- PayPal (payment from any bank cards, PayPal account);
- WebMoney (payment from any bank cards, payment from WebMoney wallets).
Difficulties in selecting parts
Before you begin replacement, you must select a suitable set of pads. There are many options for the Lada Priora on the market. Conventionally, they can be divided into two categories - parts equipped with ABS and those without this system. It is not difficult to understand what type your Lada Priora is - the diagram of cars with an anti-lock braking system includes an ABS sensor and a wire connected to it.
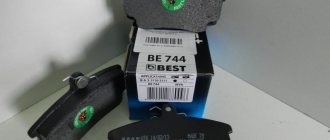
The basic principles of selection are common to the two categories. The product must be well packaged, have protective holograms and quality certificates. When purchasing a whole set with release springs, it is advisable to check them. We often came across sets from China where the spring brackets were turned in the wrong direction.
There is no need to look for how much the cheapest kit for a VAZ will cost. It is better to give preference to original parts or famous analogues. Even at a higher cost, the pads will provide excellent service life and excellent braking dynamics.
Selection for cars with ABS
Below is a list of pad sets with the best price-quality ratio.
| Part name and number | Minimum price, rub. |
| AT 2090-118BP | 400 |
| AutoReal AV18-350-2090 | 450 |
| Pilenga BSP1005N | 600 |
Selection for cars without ABS
If your Lada Priora is not equipped with an anti-lock braking system, then you should purchase special pads. The most popular sets are the following.
| Parts brand | Initial cost, rub. |
| Fortech FB-2102 | 500 |
| Pilenga BST1002N | 550 |
| Bosch 0986487219 | 800 |
Three preparatory steps
The standard equipment is equipped with: front disc brakes, and at the rear, a drum mechanism familiar to domestic car enthusiasts.
DOT fluid reservoir It must match o. Excess liquid is drawn out of the tank using a syringe or bulb. First, of course, you need to unscrew the cap (see figure below).
The marks on the tank are on the side
After replacing the pads, the fluid must be added back.
The body can be secured using a jack and a safety net. All actions are similar to changing a wheel. The jack is installed in front of the arch, and then, having shifted the body to a sufficient height, a safety part is placed under it. The wheel itself needs to be removed too.
Procedure:
- Loosen the fastening screws on the disk;
- Carry out actions with a jack;
- Remove the wheel.
The last step is to release the handbrake. Don't forget this.
For vehicles with ABS
Before replacing, disconnect the ABS system sensor. It is installed behind the hub on the outside of the shield.
Find the connector Remove the sensor
All the steps look simple: disconnect the connector and use a TORX E-8 wrench to unscrew the fastening screw. The sensor housing can then be brought out.
Reminder
Let's summarize the key points :
- Granta with ABS has special pads, an ABS control disc and sensors that must be disconnected before disassembling the brake drum;
- When the drum does not come off well, you can remove it in another way: screw the pins 7 into the holes next to which they were screwed in (for more details, see the section How to remove a brake drum);
- Do not press the brake pedal after removing the drum;
- If you do not pump out excess brake fluid before starting work, it may be squeezed out after replacing the pads.
For repair enthusiasts, we have prepared an article: how to change the front brake pads on a Grant.
Have something to add to the article? Write everything in the comments!
Consumables such as the rear brake pads of the Lada Granta are extremely important for the safe operation of the car. Failure of brake system elements can lead to the most dire consequences. Therefore, the pads not only require periodic timely replacement, but also constant condition monitoring. These operations can be entrusted to professionals or, if you have a tool and certain repair skills, you can do it yourself.
Content
All replacement steps
When replacing the pads, it is necessary to remove four springs: 5, 13 and 7 (2 pcs.). An ordinary screwdriver will help - just pry the spring by the ear.
The block itself is part “4”
When there are no springs, both pads move forward. However, part 12 (lever) is attached to one of them. The lever has an eye connected to the handbrake rod. This link cannot be removed until the block itself is removed.
Need to get rid of unnecessary details
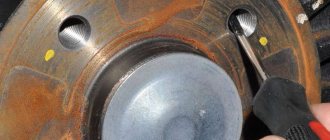
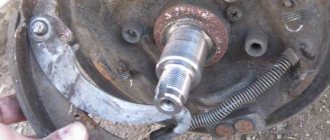
First of all, you need to remove the drum body: use a 7-socket wrench to unscrew the two pins.
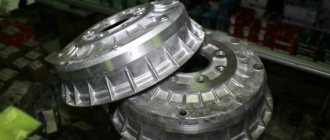
There are only two fasteners
The drum needs to be moved forward. By the way, if necessary, a mallet is used here. The entire hub is rotated around its axis, lightly hitting the body.
The mallet should help!
In cars with ABS, there is a rotor (a disc with slots) under the drum. Don't damage it!
The installation of the rotor can be done using the holes into which the pins were inserted.
In the second step, remove all springs: top, bottom, two side ones. There is a bar under the top spring (see Fig. 2). It also needs to be removed.
First step for dismantling Don't forget to remove the spacer
Pull out the pads
The four springs and spacer must be missing. And then the block installed in front can be removed immediately (Fig. 1).
The simplest action is Removing the rear pad
The second block is also pushed forward: the handbrake cable has been released, and there is no tension!
The very last step is to remove the lever. The wire key can be easily pulled out with pliers.
Getting rid of unnecessary details
Installation of the unit is carried out in the reverse order. But we need to take into account some subtleties.
What you need to know
The mounting parts of the lever connected to the block should always be lubricated with Tsiatim. Machine oil will not be enough here. After installing the pads in place, secure them with side springs (see figure).
Homemade wire rod
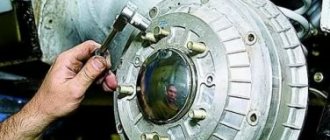
To pull the spring forward, use a wire rod.
Let's say all that remains is to put on the drum. There will be one subtlety here: both pads must be pressed from the sides and held with a flat wrench or a screwdriver.
How to hold the pads
If the DOT fluid had not been drained, the level would have risen to the reservoir cap.
After tightening the pins on the drum, perform two steps: press and release the brake pedal, check the handbrake adjustment. She might get lost. If the brake pedal begins to beat after adjustment, then pay attention to this material.