Print this article Font size 16
On a car, fender liners play a protective role. In general, the fender liners on the VAZ 2114 and on any other cars are a plastic element that bends under the body and covers the upper part of the car’s wings.
The protection lies in the fact that the fender liners do not allow dirt, dust, snow, salt, which is sprinkled on icy and snow-covered roads, to negatively affect the body elements. Therefore, we are talking about a body protection component.
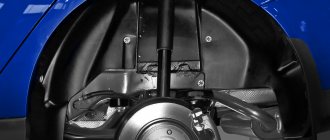
Original protective fender liner for VAZ 2114
Over time, they can wear out, lose their effectiveness, and crack. One way or another, the elements need to be replaced. How to do it? This is exactly what we will talk to you about in our material today.
Methods
For most drivers, mud flaps are rubber flaps that are installed behind the wheels near the bottom of the front fender and rear bumper.
If we are talking about a car body, then a mudguard is usually called a metal casing that connects the spar, the engine shield and the wings in the nose (the shock-absorbing strut cup is part of the mudguard). In the rear part there is a mudguard - the wheel well of the body. The protection of these body elements will be discussed. The car owner has only 2 ways to protect wheel arches:
- installation of fender liners. The plastic casing is attached to the wings and the internal cavity of the mudguards;
- liquid protection. The arch is treated with a special anti-gravel material based on bitumen and anti-corrosion components. For application, use a special gun that sprays a liquid mass, or a brush. After drying, a dense, damping surface is formed on the body, which has noise and vibration insulation properties.
Sound insulation deserves special attention. Due to vibrations from driving over uneven surfaces and the rolling noise of tires, the cavities of the mudguards are quite vibration- and noise-laden areas. Water, dirt and large stones flying from under the wheels, hitting the metal part of the body, resonate, which leads to the transfer of noise into the car interior. Good noise insulation protection of the wheel arches significantly increases the level of comfort.
Which is better
If we consider plastic fender liners and liquid protection separately, it is difficult to choose the best method. If there are factory places for attaching protection, as well as corresponding plastic products, it is better to give preference to fender liners. They are more durable in use. To install rubber mud flaps, you will not need to drill into the body, which is a huge advantage.
If there are no standard places for fastening in the wings, and the owner does not want to bother installing lockers without screws, then it is better to choose liquid sound insulation. In terms of the level of transmitted noise, these methods of protection are approximately the same, but the disadvantage of liquid fender liners is their fragility. Constant impacts of stones, dirt, moisture, temperature changes and vibrations of the body lead to delamination of the material. As practice shows, even high-quality processing must be repeated every 2-3 years.
Selection of lockers, mastic, sound insulation
Guidelines when choosing fender liners:
- thickness. Products that are too thin are damaged faster and are more susceptible to deformation in the hot season;
- elasticity. Lockers are made of ABS or PP plastic. The latter option is more elastic and therefore often more durable. But even with the same labeling, you can feel the difference between manufacturers. You should not buy products that are too hard, as the material will become completely hard in the cold, which can cause cracking;
- presence of stiffeners;
- holes for standard fasteners, if provided.
Preparation for wing replacement and necessary tools
First you need to prepare the car itself. To do this, he should drive the VAZ 2114 into a technical pit or overpass. If this is not possible, then it will be enough to simply lift it with a jack on the side from which the wing will be replaced and securely fix it in this position. Next, you need to remove the wheel and remove all interfering parts. These include:
- front bumper;
- facing linings;
- thresholds;
- wheel arch liners
Before removing the bumper, you need to disconnect the contacts of the fog lights. To do this, simply remove the terminal with “minus” polarity from the battery. Such a simple procedure will significantly reduce the risk of damage to all vehicle electronics, saving the owner from unnecessary financial costs.
To perform the removal and replacement procedure you will need:
- screwdriver;
- pliers;
- set of spanners;
- set of wrenches;
- anti-corrosion compound (may not be useful).
Nuances of choice
The fender liners are attached to the car's wings using self-tapping screws. Depending on the kit, either standard holes will fit, or you will have to make new ones
Front left locker for Lada Vesta (Lada Vesta), sedan, from 2022 to 2022, article number nll.52.33.001
Therefore, it is important to check whether you will have to drill the body, or you will get by with a little blood. Versatility. Let’s say right away that there are no universal fender liners, so you should look specifically for fender liners for the VAZ 2114
Moreover, any other VAZ fender liners will not fit your specific model. Well, unless you are going to cut something there, file it, and so on. Arched structures are made of high quality polyethylene. This is due to the fact that this material is practically unaffected by aggressive environments and chemical components. Plus, polyethylene is plastic, durable, and does not crack under low temperatures. If you choose the right and high-quality fender liners, you definitely won’t have any problems installing them. Installation does not require the use of any special tools. And the procedure itself takes a little time. It is not at all necessary to be a professional in the field of car repair.
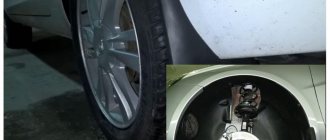
Fixed fender liner
Features of the material
One of the main materials from which fender linings for VAZ cars are made is ABS plastic. It is used due to its optimal characteristics:
- Plastic. A product made of ABS plastic can change its shape when heated without changing its performance properties. For example, if the expander does not fit tightly to the wing due to some kind of defect (convexity, concavity), then it is enough to heat it with a hair dryer so that it takes the desired shape.
- Flexibility. A fender made of ABS plastic or polystyrene can be bent without fear of it breaking. The universal trim is easy to install on wheel arches of any diameter.
- Softness. In many cases, when installing the lining, it is necessary to adjust the length, i.e., cut it. This can be easily done with a simple knife or hacksaw. To make the cut area look neat, just wipe it with a piece of waffle towel soaked in acetone.
Metal extensions on VAZs are used quite rarely; they are made to order for a specific model and are not produced as standard.
Sources
- neauto.ru/kak-pravilno-podobrat-nakladki-na-krylja-na-vaz/
- remont2114.club/kak-snyat-i-ustanovit-nakladku-perednego-kryla-na-vaz-2114/
- infokuzov.ru/tuning/vaz-nakladki-na-krylya
- zen.yandex.ru/media/id/5af8214d77d0e67253a8095d/chem-skryt-rjavchinu-na-arkah-vaz-2113-2114-2115-5afc23f31410c328647ca46b
- drive2.ru/l/476117947836793148/
Replacement procedure
So, the need to replace the wheel arch liners on your car has been determined. You also managed to correctly select a set of new arched elements. You can start replacing.
You will need to purchase:
- Set of fender liners for front and rear wheels;
- Body 90 type product. This is a bituminous material with anti-gravel and anti-corrosion properties. It is applied with a simple brush or spray;
- Degreaser;
- Brushes;
- Self-tapping screws.
We replace the fender liner:
Try to wash the car thoroughly, paying special attention to the fender liners. It is better to start dismantling work from the rear arches. Loosen the wheel bolts, jack up the desired wheel, and remove it. There is no need to remove the spring, brake disc or boot. But wrapping them in protective film or simple bags is a completely unnecessary undertaking. Now use a brush and water to wash away any remaining dirt that you could not get rid of during the car wash process. Let the car dry thoroughly. Now soak a rag in degreaser and treat the arches
There is no point in sparing the remedy. Again, wait until the product dries. Apply a coat of Body 910. You may have to change brushes as one is unlikely to be enough for you. The bitumen-based product must dry. Now attach the fender liner, press it as tightly as possible to the wheel arch. This must be done in order to mark the screws. Having made the markings, you can proceed directly to installing new arched protective elements. Use a screwdriver if possible. Working with a simple screwdriver is quite difficult, but possible. Apply a little more bitumen-based product to the resulting seams. Now you can remove the bags and films from the units, put the wheel in place, lower the jack and proceed to the next one. Using a similar method, the wheel arch liners of each of the four wheels are changed. It is better to enlist the support of a friend, since some steps are extremely difficult to complete on your own. First of all, this concerns applying markings to the fender liners. There you will have to carefully, evenly and tightly press the fender liner, plus at the same time work with a marker. Two hands are clearly not enough here.
Lockers for Lada Granta
The procedure for replacing fender liners is not complicated, but it requires a fairly large amount of free time.
It is worth adding that the factory front fender liners do not completely cover the wheel arches, but they cover the area under the front bumper better than their analogues.
Therefore, it is better to give preference to the originals. Although some analogues from other manufacturers have their advantages
Here, take into account your own judgments on this matter.
Domestic VAZ cars have always been distinguished by reliable and durable bodies. The designers, knowing the specifics of operating conditions, tried to prepare as much as possible all components of the car for long-term and uninterrupted operation. With the development of technology, new materials have appeared that have made cars lighter. But such innovations had a negative impact on the strength of body parts.
One of the VAZ 2114 spare parts that most often suffers from various types of mechanical damage is the front wing of the car. Problems may arise as a result of:
- traffic accident;
- unsuccessful parking;
- simple wear of the part itself.
Therefore, it will be useful for owners of such car models to know how to remove and replace the front fender of their vehicle.
Fastening elements
Reliability of fixation will depend on the quality of the fender liners and fasteners
What are liquid fender liners? selection criteria and installation features
It is important that they are not afraid of deformation
Clips
Clips can be used to attach not only the fender liners, but also the trim. The photo shows a Renault Logan mounting clip. A plastic body part may also be called a spring clip. The fender liner mounting clips are fixed by expanding the cut part during installation.
Latches
When installing fender liners without self-tapping screws, elements for rigid types of fender liners are used - S-shaped brackets or “clothespins”. They provide a less “traumatic” fastening for the body and do not require drilling. This technique is used by foreign manufacturers. The installation method is not rigid, so the product may wobble a little. For this reason, it is recommended to cover the arches with anti-corrosion mastic.
Self-tapping screws
It is recommended to use galvanized self-tapping screws. They will last longer because they can resist corrosion. A hole is drilled in the metal. The screws are installed on the sealant.
Pistons
The piston is a universal fastener. It is securely attached in the cap area and in the hole. Even when the piston does not reach the end, it still remains firmly fixed. The pistons for fasteners have dimensions of 19.9 × 13.3 × 6.8 mm.
Bolt nut
This type of fastener belongs to threaded fasteners and has good strength properties. The bolt + nut will directly interact with the metal surface. It is recommended to treat it with Movil or a similar fatty composition. The principle of fixation is similar to a regular nut that is screwed onto a screw.
Advice from experienced drivers
- To eliminate the relief discrepancy, during installation, individual sections of the plastic are deformed by heating them with a high-temperature hair dryer. If the fastening is done correctly, the tire should not touch the wheel arch protection even at maximum wheel inversion.
- If the area of the wheel arches is already rusty, then after cleaning it needs to be primed with anti-corrosion agents, for example “ML”, “Movil”. The composition protects exposed metal in holes from the corrosion process. For the same purpose, during installation, screws should be screwed in, having previously treated them with sealant.
Most products have point protrusions - this greatly simplifies installation, which can be done without distortions. If the fasteners are not performed correctly, some areas of the body will remain unprotected. According to reviews from consumers and sellers, the warranty on fender liners corresponds to their shelf life - 5-8 years.
Hi all.
Denis and I decided to install fender liners from the 14 for me. I couldn’t find any information about the installation on the Internet. I decided to share my personal experience with you, maybe it will be useful to someone.
Today Denis and I completed the installation of fender liners on my car.
We installed standard wheel arch liners from 14 in 2109. There seemed to be no difficulties with the installation. The installation took three evenings for two hours. First evening.
I went to the car wash, washed the whole car, special emphasis was placed on washing under the wings. After washing, I went to put the car in the garage. That same evening I removed the front wings. To wash off any remaining dirt, dry everything. Apply a little mastic in the right places if required.
We make preparations
It is most convenient to install the fender liners when the car is on a lift and there is full access to the wheel arches. But it is not always possible to use such equipment, so a regular jack will do just fine. The sequence of preparatory work is as follows:
- The wheels are removed;
- Wheel arches are cleaned of dust using brushes. If possible, it is worth treating the surface with compressed air to remove even the smallest contaminants;
- If pockets of corrosion are found on the metal, they must be thoroughly cleaned and coated with Movil;
- The fender liners are being tried on - the plastic elements must fit perfectly into the wheel arches;
- If the “trying on” showed some discrepancies in shape, then they can be corrected by heating the polyethylene with a hair dryer;
If all of the above points are met, then the plastic fender liners will take their place perfectly and the wheels will not touch them even in the sharpest turns.
We mount the fender liners
In most cases, to attach fender liners, it is enough to use 5-8 self-tapping screws with press washers around the perimeter of the element and 2-3 in the wheel well itself. But it is difficult to give advice on the number of fastening points without knowing the car model and the condition of the metal of the arches, so each car owner himself can determine in which places to make fasteners. It is better to do the work together - this will not only save time, but will also make it possible to do the work better.
When installing the fender liner, it is necessary to install it in the correct position, which it occupied during fitting, and use a screwdriver to fasten it with galvanized self-tapping screws. It is best to fasten self-tapping screws with sealant - this will protect the holes drilled in the metal from rust. After the work is completed, you need to make sure that the wheel arch liners are installed without distortions and do not interfere with the movement of the wheels when turning.
We described the installation of polyethylene fender liners - which are elastic enough to use self-tapping screws with a press washer for their installation. It is better to install elements made of ABC plastic or fiberglass using special brackets. Such products can burst at the points of attachment to the body and they must be given the opportunity to “play” during operation.
If the work is done correctly and the fender liners are securely fastened, then they will serve your car faithfully for 5-7 years, although given the state of our roads, even the coolest car service center is unlikely to provide a guarantee for this work.
High-quality preparation of a car for operation involves the use of fender liners - special plastic devices to protect the body space around the wheels. Today, various manufacturers offer car fender liners that are ideal for your model, specially designed to take into account all the shapes and features of the wheel arches. It should be noted that this particular protection option is the most important and necessary to preserve the body from corrosion. The paint under the wheels is quickly scratched off due to constant attack by small stones, sand and water, so rust in these places forms within a matter of weeks of using the car. It is necessary to install fender liners immediately after purchasing the car and protect the body from further destruction. If rust has already begun to spread, it is better to treat these areas.
You can find various options for fender liners that are attached with clips, screws, or other mounting options. The best choice is clips or latches, which do not use fastenings that require drilling into the body. Rust will form where the self-tapping screw is used; the car can quickly respond to such actions by the appearance of weak points. Therefore, it is much better to choose solutions with clips, which are much easier to install and do not present any problems in operation. If there are no options for fender liners with clips for your model, it is worth considering options for attaching this protection so as not to damage the body and minimally touch metal parts directly. But before installing the fender liner, you can also think about soundproofing the wheel arches.
Sequencing
We will assume that all preparatory work (wheel removal, washing, anti-corrosion treatment) has been completed. The plastic fender liner purchased in the store needs to be modified - you need to cut off the horizontal side edge, which is located near the outer side of the arch, leaving a side 7 mm wide. This side, that is, the remaining part of the protruding edge, is “recessed” into the profile slot. The lower rear part of the fender liner is tucked under the bumper. So, from this part of the part the edge is cut off completely (a 7 mm wide edge is not needed here).
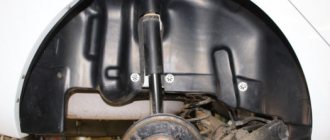
Rear plastic fender liners after installation
You can install the rear fender liners by following these steps:
- The plastic shield that protects the bumper from dirt is dismantled, and the screws that secure the bumper to the arch are also unscrewed;
- The rubber profile is placed on the fender liner along its entire length, starting from the lower front corner;
- The fender liner is installed in its rightful place, tucking the metal side of the arch into the slot, and the rear part of the fender liner goes into the gap between the bumper and the surface of the arch;
- At the installation points of the self-tapping screws that secured the bumper, the fender liner needs to be drilled with an awl;
- The bumper mount is restored;
- The shield is being installed.
At the final stage, it is recommended to push the plastic inside the arch with your hands, drill a hole near the corner of the fender liner and screw a self-tapping screw into it. And to protect the metal from rust, you can use silicone sealant.
We insulate the wheel arches to reduce noise in the cabin
There are literally dozens of options for soundproofing wheel arches. Many use traditional methods with the installation of insulation of various shapes and options, others prefer more modern solutions. In any case, you should remember about the effectiveness and durability of the chosen sound insulation method. You can choose to spray special chemical compounds on the fender liner, which will be done for you in a specialized center. You can also use the ideas of liquid sound insulation in the form of various resinous compounds applied to the metal in a thick layer. However, the most popular solution is this method of soundproofing car arches:
- in a car store or on the market, a search is made for the optimal materials for sound insulation specifically for your car or universal ones;
- the material in this case is a foil and fairly thin seal that should cover all metal surfaces above the wheel;
- the material is mounted on mastic, as well as on special glue or other fasteners, which also reduces the possibility of corrosion;
- sound insulation can be single-layer or multi-layer; often the effectiveness of all work performed depends on the number of layers of material;
- the sound insulator is mounted with the foil side to the wheel, this helps to reflect sound and reduces unpleasant noise effects in the car interior;
- A plastic fender is mounted on top of the insulation layer - this is a prerequisite for maintaining the durability of the insulation layer and the efficiency of its operation.
The process of installing sound insulation on fender liners is quite simple, so you can complete all the tasks yourself. Many sellers offer ready-made plastic fender liners with a layer of sound insulation and insulation applied. This is a completely adequate solution, but its effectiveness is somewhat lower than when carrying out high-quality insulation using special materials. You can use a variety of solutions to get the desired result. The main task is to ensure reliable protection of the body from the spread of corrosion. This is one of the first tasks when performing any work related to the installation of additional materials or devices. Therefore, it is recommended that work be carried out by specialists.
Manufacturers
The wing trim for VAZ 2114, 2110, 2111, 2112 remains a frequent consumable; on average, the part is replaced every 10-15,000 km. In addition, every year more and more drivers seek to protect or decorate their car with the help of fenders. There are more than 30 companies and small firms on the market, not all of them produce high-quality spare parts. We list the most popular and reliable of them:
- "Russian Artel" (RA). The material used is ABS plastic (acrylonitrile butadiene styrene), it is suitable for making fenders. The arches have a smooth surface and are intended for painting only. The complete kit includes products for all wheels, fasteners, primer, and in some kits a bottle of anti-gravel. The cost of a set of 4 extenders starts from 700 rubles, the part can be attached either with bolts or with auto glue.
- "A hundred times." Along with other parts for cars, it also produces universal wheel arch covers for VAZ models. The main material is high-quality black rubber. In addition to the linings themselves, the kit includes self-tapping screws and mounting plates. The price of the set is 100 rubles.
- Lapter. It produces power wheel arch extensions for SUVs, including for the VAZ 2121. The manufacturing material is high-density polyethylene with special additives, the composition of which was developed by specialists of this company and is kept secret.
Selection and installation of fender liners on the front and rear wheel arches
The front wheel arches are somewhat easier to install plastic wheel arches. The fact is that there are many possibilities for conveniently securing the protection without screws. Firstly, the fender liner is inserted into the grooves and, provided the quality of protection is normal, may not be fixed at all by additional fasteners. Secondly, there is often a fairly large plane of the front bumper, which allows you to tighten the screws without the risk of corrosion. You can also mount the fender liner to the mudguard and tighten two self-tapping screws in the area of the pillar inside the wheel arch - the metal is well protected there and is rarely attacked by corrosion. Rear fender liners are much more difficult to install:
first you need to try on the fender liners themselves in order to cut out unnecessary parts, if any, in the plastic protection; then you should prepare the surface, thoroughly clean the metal under the arch and examine it for the presence of corrosion; all problems should be eliminated immediately and preserved in mastic and other anti-corrosion materials; Next comes the direct installation of the fender liner, which is an important part of the process for preserving the metal parts of the arch; you should screw the screw into the plastic bumper, but refrain from screwing into the metal parts of the body; if there are special clips for mounting fender liners, you can use them, otherwise, installation should be carried out using a minimum number of fasteners; a good and correctly installed fender liner will not fall off during operation, even when installed with a small number of screws.
During operation, you should look at the caps so that no gaps appear between them and the metal parts. This can cause a serious increase in the risk of corrosion that you cannot see with the naked eye. Therefore, work on installing the fender liner should be carried out comprehensively and efficiently. If you are not sure that you will be able to organize high-quality work on your own, it is better to turn to specialists. For service station technicians, this task looks like a simple job that won’t cost too much. But the quality of the installation will be the highest.
Alternative options
It is up to the owner to decide whether to install fender liners or not, and why it is needed in this or that case. The plastic arch protection installed on some foreign cars sometimes looks more impressive than the option we reviewed. In particular, an external edging (plastic strip) can be used, under which the edge of the fender liner extends. It is usually not possible to ensure a hermetically sealed contact between the outer overlay and the surface of the paintwork, and you can see what the consequences of all this are.
Some owners decide not to complicate their lives by installing additional plastic parts, instead treating the bottom and arches with an anti-corrosion compound. Of course, in order to protect metal from rust for at least several years, the coating must be strong enough. This is why bitumen-based mixtures are usually used to treat metal surfaces. Perhaps, from a reliability point of view, this option looks even better than using lockers. At the same time, the wheel arch liners can be removed at any time, but the same cannot be said about bitumen-based coatings.
We deliberately do not provide a list of companies producing plastic body kits for Kalina and Kalina-2. Different brands are popular in different regions. The rear plastic fender liners designed for Kalina-1 are suitable for our purposes. Happy tuning!
How to replace fender liners and how to install new ones on all VAZ cars?
Note! Before you start, remember a few important things that you should know when working with this protective material, namely, before installing a new fender liner, be sure to lubricate the upper part of the wing with some anti-corrosion material to protect it from moisture, but before you start lubricating, water or Whatever else you do (it’s most convenient to use a Karcher) clean the entire inside of the wing from any dirt stuck to it and only after cleaning proceed to lubricating this part of the wing!
Sometimes it happens that installing fender liners is simply not convenient, this mainly happens because they simply do not fit, in this case the car can be raised a little higher with the help of a jack, or you can simply remove the wheel from it and install a new fender liner as well ! (How to properly remove a wheel, see the article entitled: “Replacing a wheel on a VAZ” in this article the title will be written about cars of the tenth and Samara families, but since the wheel is replaced on all cars almost identically, then carefully read that article on which the link is given even if you have another car that does not belong to the tenth and Samara family)
Removal: 1) At the very beginning of the operation, in order to remove the fender liners, you will need to unscrew all the screws that secure them, and after these screws are unscrewed, then you can easily remove this protective material from your car.
Installation: In order to install them, you need to figure out what exactly you need, that is, if you have just removed the old fender liners, then install the new ones in the reverse order, tightening all the screws that secure them, and if you are installing this protective material for the first time, then follow the instructions below:
1) First, before you start, check whether there are holes on the wings or near them for installing fender liners, perhaps the previous owner (This is only if you are not the first owner of your car) has already installed fender liners on the car, but Only then did I remove them and leave the fastenings.
2) After inspection, if no holes are found, then first try simply using a screwdriver and a screw (Self-tapping screw) to screw in the fender liners, namely, attach the fender liner you need to the wing and then simply take a regular self-tapping screw and screwdriver and screw it on With some force applied, on some cars the self-tapping screw fits in even without drilling.
Note! If nothing works out for you, then give up and pick up a drill and a drill and use them to drill holes for installing new fender liners in the wing, and after that just screw them in with self-tapping screws so that they hold on! (For more information on how to install fender liners, see the video clip located at the very end of the article)
Important! 1. If your car has holes for installing fender liners, then before purchasing, try to purchase fender liners on which the mounting holes match the holes on your car in order to easily attach the fender liners! 2
On some cars, the fender liners also come with locking plates, for example on some VAZ 2110s this is the case, so if you find a special locking plate on the fender liners, then look for a stud on the wheel arches into which this plate will fit, for example, see the photo below:
2. On some cars, the fender liners also come with locking plates, for example, on some VAZ 2110 this is the case, so if you find a special locking plate on the fender liners, then look for a pin on the wheel arches into which this plate will fit, for example, see the photo a little below:
Additional video clip: You can see more details about how to properly install new fender liners on a car in an interesting video clip located just below:
Do-it-yourself installation of wheel arch liners on a VAZ
Installing a locker (fender liner), the simplest manipulation for budget cars, if you’re not too lazy to get your hands dirty
The installation of fender liners can be done even on the street; the tools you will need are:
- Jack.
- Balloon key.
- A powerful Phillips screwdriver or better yet a screwdriver.
- Drill - 3mm.
- Zinc self-tapping screws with a drill (or without a drill) with a press washer - 4.2x14 or 4.2x16.
The figure shows approximately where the fender liner will be screwed on (look, there should be marks).
What you need
So, you have decided to do this simple task and are thinking about how to take on this task, that is, how to install the fender liners? But everything is simple. In order to do this job we will need 4 fender liners, anti-corrosion agent, brush, degreaser, rag, self-tapping screws and a screwdriver. First you need to wash the arches with water under pressure. It would be better to do this at a car wash. Then you go to the garage or other place where no one will bother you for the next couple of hours.
First of all, we remove all the wheels one by one, and put the car on trestles or bricks. Now pour degreaser onto a rag and thoroughly wash the wheel arch so that the anti-corrosive agent adheres to the surface of the arch as best as possible. It’s better to do it this way: wash one arch with a degreaser and move on to the other. After the last arch is washed, the first one will already dry.
Now we apply anticorrosive. It is better to use a brush for this rather than a spray bottle.
Note! If you paint with a brush, then do not skimp on the anticorrosive agent. The thicker the layer, the longer it will last and the longer the guarantee that the arches of your car will not be eaten away by corrosion. If you have time and resources, it would be better to paint in two layers. The application scheme is the same. We painted one arch and moved on to another. By the time you paint the last one, the first one will already be dry.
Now we move on to installing the fender liners. To do this, it is better to use the services of an assistant. It is necessary that one person presses the fender liner to the arch so that it does not move or slide to the side, and the other at this time, using a screwdriver, screws them to the arch with self-tapping screws. Screw in the screws carefully; don’t just make a sieve out of the arches of your car. And choose shorter self-tapping screws. Centimeter ones with a large cap will be enough.
There are special plastic clips on sale that secure the fender liner to the arch without screws or extra slots. But, unfortunately, they do not fit all cars, so you can ask about them in the store, but if you are the owner of a domestic car, don’t have high hopes.
Note! Do not leave gaps between the fender liner and the arch. Subsequently, dirt and moisture will get clogged there, which means that rust will form even faster than without wheel arch liners and anti-corrosion. If such gaps remain, then there is a simple way to seal them. Take a simple syringe and fill it with anticorrosive, bitumen or anti-gravel and pour it into the cracks. After this, the car needs to sit for at least a day. This is necessary for complete drying of the poured substance.
So, it’s not so difficult to properly coat the wheel arches with anticorrosive and close them with lockers. All you need is a little free time and a lot of desire. After installing the lockers, you can be sure that the arches of your car will remain intact for the next three to five years.
If you find an error, please select a piece of text and press Ctrl+Enter.
Welcome! Car fender liners - they act as a kind of protection, namely, they protect the car body from moisture and large stones that can easily damage it, but sometimes it turns out that the body remains intact, but the fender liners become unusable, for example, they become deformed and after that some people are starting to wonder how to change them and what they are supported in general, we will talk about this in today’s article.
Note! In order to replace the fender liners or install new ones for the first time, you will need to take with you: A screwdriver, as well as some kind of anti-corrosion material, for example mastic or Movil, which is mainly sold in cans, but can also be sold separately in 25 liter bottles , but there is one But! If you are going to install new fender liners on your car for the first time (that is, there are no special holes for them), then in addition to everything said above, you will also need to stock up on a drill and a drill!
Summary:
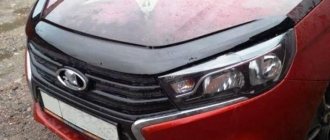
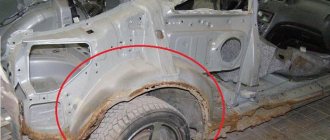
Where are the fender liners located? Basically, as was said earlier, they are located in the fenders of the car; unfortunately, this protective material was not installed on cars from the factory, so people generally have to install them on their own, but they have very useful qualities - firstly, they prevent the passage of moisture, and also thanks to them, the upper part of the wing becomes protected from various pebbles that can easily deform the wing, but still let’s return closer to the topic of where this protective material is located, see the photo below for more details :
Why change fender liners?
There are several reasons that may prompt you to replace the wheel arch liners on your VAZ 2114.
- Old car wheel arch liners have lost their effectiveness and burst. They simply fell into disrepair, so new arched elements are simply necessary.
- These are products that perform the role of protecting the body from corrosion and premature rust formation.
- The fender liners additionally protect the underbody, or rather the wheel arches. This is perhaps the weakest point of the car's underbody.
- The so-called sandblasting effect is reduced. Sand is an integral part of any road. There is a certain amount of it almost everywhere. This sand, falling under the car, increases the speed of its wheels. As a result, sand literally hits the car from below, destroying all protective redoubts over time.
- Reagent protection. As you know, in winter the roads are covered with snow and ice. To prevent multiple accidents and accidents, roads need to be cleared. Ordinary shovels and tractors are not enough here, since a layer of snow still remains. Special reagents or even ordinary salt dissolve snow and ice, making roads safe and non-slippery. Unfortunately, these reagents have a negative effect on car bodies, leading to corrosion and rust formation. The fender liners protect the car from them quite effectively.
Installing rear lockers on a VAZ 2114
Post by SWINDLERr » 11 Nov 2011, 21:54
Messages: 656 Registered: June 08, 2009, 00:00 From: Tyumen Experience: 2009 Car: BMW 523i e39
| Rating: 816 |
| Reputation: +1 |
Thanked: 1 time
Posted by Mustang650 » Nov 11, 2011, 10:01 pm
Messages: 495 Registered: Jan 31, 2011, 00:00 From: Tyumen Experience: 2009
| Rating: 835 |
| Reputation: 0 |
Post by Nikolay89 » 11 Nov 2011, 22:02
Messages: 4145 Registered: June 05, 2011, 00:00 From: Tyumen Experience: 08/03/2011 Car: Pajero II
| Rating: 6,495 |
| Reputation: +16 |
Thanked: 9 times Thanked: 15 times
Post by Waldopwnz » 11 Nov 2011, 22:02
Messages: 242 Registered: June 21, 2011, 00:00 From: Tyumen Experience: 2002 Car: FF2
| Rating: 252 |
| Reputation: 0 |
Post by Diesel85 » 11 Nov 2011, 22:55
Messages: 124 Registered: Jul 13, 2011, 00:00
| Rating: 436 |
| Reputation: +1 |
Thanked: 1 time Thanked: 4 times
Post by egs » 11 Nov 2011, 22:59
Messages: 1414 Registered: August 13, 2009, 00:00 From: from there —> Experience: since 1997
Awards:
| Rating: 4 124 |
| Reputation: 0 |
Thanked: 12 times Thanked: 54 times
Post by SOPAP » 11 Nov 2011, 23:20
+ one and a half. The way they install it here (by screwing in screws without treating it with anything), it’s better not to install it at all!
And when drilling holes, processing them and inserting clips like normal machines, you need to be very careful.
Messages: 98 Registered: July 14, 2011, 00:00 From: Tyumen Experience: 2006 Car: Toyota Mark 2
| Rating: 104 |
| Reputation: 0 |
Post by MARK2IR-V » November 12, 2011, 00:44
Messages: 46 Joined: Oct 11, 2007 00:00
| Rating: 139 |
| Reputation: 0 |
Post by SoBoR » November 12, 2011, 00:46
Messages: 1833 Registered: Oct 08, 2011, 00:00 Experience: 1993 Car: toyota
| Rating: 4,639 |
| Reputation: +3 |
Thanked: 83 times Thanked: 50 times
Post by diman_333 » 12 Nov 2011, 00:59
Messages: 890 Registered: Sep 20, 2007, 00:00 Experience: 2004
Awards:
| Rating: 1,705 |
| Reputation: +1 |
Thanked: 11 times Thanked: 5 times
Post by Kaster » 12 Nov 2011, 02:14
make anti-gravel, a compound like rubber and fender liners are not needed
Added after 1 minute 5 seconds:
make anti-gravel, a compound like rubber and fender liners are not needed
Preparation, sound insulation
Protecting the arches begins with washing the inside of the mudguard and thoroughly drying it. Then the entire surface is degreased. Option for good sound insulation of wheel arches:
- A vibration-absorbing layer is glued onto the entire surface of the mudguard, covered by the locker you purchased (for example, Shumoff L3 or M3. It needs to be heated before pasting). The sheets are rolled tightly with a metal roller. In this case, the standard anti-gravel coating does not need to be removed;
- Mastic is applied on top with a brush or spray. If desired, you can put it in 2-3 layers, but at the same time, allow 10-15 minutes of drying between layers. at a temperature of +20ºС;
- plastic lockers are covered with noise-absorbing material (for example, Shumoff Germeton A15). Also at this stage, soundproofing sheets based on foam rubber can be used (as an option - Shumoff Comfort 6).
Noise insulation of wheel arches
Installing wheel arch liners without screws on a vase
How to install fender liners
Wheel arch liners, also called lockers, are a plastic casing on the inside of a car's wheel arch. At the manufacturing plant, cars are rarely equipped with fender liners, completely shifting the responsibility for this to the future owner. Our domestic manufacturer usually does this. It happens that fender liners are installed, but only on the front arches. And their size is negligible, so they do not protect even one third of the arch.
What are they needed for
If the owner is responsible or wants to drive the car for a long time without thinking about rust in the arches and on the edges of the wings, then he will definitely install the wheel arch liners himself or at a car service center. In general, they are installed to protect against stones flying from under the wheels. The fact is that stones fly out at great speed and when they hit the wheel arch they spoil the paintwork, which in this place is very weak due to mechanical influences and reagents that are so generously sprayed on our roads. Additionally, an owner who loves his car will definitely cover the arches with anticorrosive. This, among other things, will make sound insulation better, because most extraneous sounds enter the car from the wheel arches.
Manufacturers
The wing trim for VAZ 2114, 2110, 2111, 2112 remains a frequent consumable; on average, the part is replaced every 10-15,000 km. In addition, every year more and more drivers seek to protect or decorate their car with the help of fenders. There are more than 30 companies and small firms on the market, not all of them produce high-quality spare parts. We list the most popular and reliable of them:
- "Russian Artel" (RA). The material used is ABS plastic (acrylonitrile butadiene styrene), it is suitable for making fenders. The arches have a smooth surface and are intended for painting only. The complete kit includes products for all wheels, fasteners, primer, and in some kits a bottle of anti-gravel. The cost of a set of 4 extenders starts from 700 rubles, the part can be attached either with bolts or with auto glue.
- "A hundred times." Along with other parts for cars, it also produces universal wheel arch covers for VAZ models. The main material is high-quality black rubber. In addition to the linings themselves, the kit includes self-tapping screws and mounting plates. The price of the set is 100 rubles.
- Lapter. It produces power wheel arch extensions for SUVs, including for the VAZ 2121. The manufacturing material is high-density polyethylene with special additives, the composition of which was developed by specialists of this company and is kept secret.