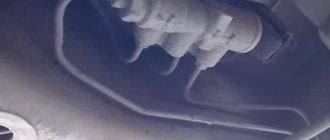
One of the most mysterious, but no less important parts of the car is the brake force regulator (sorcerer VAZ 2114).
The importance of this part is that it regulates the behavior of the car under different braking conditions. When the regulator operates correctly, the braking distance is reduced and skidding and skidding are prevented.
What is a sorcerer on a VAZ 2114
As just said, every machine has such an important element as a sorcerer. Its correct name sounds like a rear brake pressure regulator. The sorcerer of the VAZ 2114 is responsible for reducing the braking distance and for the absence of skidding during emergency braking, which is extremely important both for the safety of the car and for the safety of its passengers.
This element should be adjusted after any intervention in the car that entailed replacing springs or other suspension elements (which, in turn, could lead to a change in ground clearance). In some cases, it may be necessary not only to make adjustments, but also to completely replace the sorcerer with a VAZ 2114.
You can determine that this part has become unusable by three signs:
- The cuffs have worn out, resulting in a leak of brake fluid.
- In case of sudden braking, the car began to skid strongly.
- The piston of the device has soured.
The first two signs are quite easy to identify, but to identify the last one, you should invite an assistant and conduct a small experiment. One of its participants must press the brake pedal, and the second must monitor the sorcerer's rod.
If it is working properly, the rod should periodically extend (at the moment of pressing) and press on the spring plate, pressing it against the drive lever. If this does not happen, it means the piston is rusty and the sorcerer will have to be replaced.
You should absolutely not ignore the malfunction of the sorcerer, as well as completely dismantle it (as other motorists sometimes advise), since without it the car will lose control when braking and will often skid.
Possible malfunctions of the regulator
In general, there are few malfunctions that can occur in the sorcerer. These include:
- Valve jamming;
- Misalignment of position;
- Brake fluid leaks.
A deregulated sorcerer can be adjusted. You can determine the need for adjustment by the behavior of the car when you press the brake. If the regulator is set incorrectly, the car starts to toss to the side.
If the valve jams or fluid leaks, the mechanism must be replaced. Theoretically, it can be repaired. However, the process of such repairs is complex and expensive, which makes it unprofitable.
How to change the sorcerer
In order to replace a damaged sorcerer, you will first need to purchase a new one. One of the best of this kind is considered to be the brake regulator from. In addition to this, you will also need to purchase a canister of brake fluid, since during the repair process a significant leakage from the system may occur.
To perform the replacement you will need an appropriate set of tools, which includes:
- wrenches “10” (it is highly recommended to use special ones designed for unscrewing brake pipe fittings);
- wrenches “13” (socket and socket);
- a screwdriver with a large blade or a steel spatula;
- feeler gauge (a drill or a 2 mm thick steel plate will also work).
The replacement and adjustment of the VAZ 2114 sorcerer itself should be carried out in the following order:
- Place the vehicle on an overpass or inspection hole.
- Clean the pipe fittings and other threaded connections with a wire brush, then fill them with kerosene or WD-40 and leave it like that for a while.
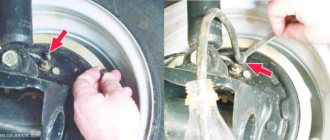
- Using a screwdriver or a spatula, use a screwdriver or a spatula to pry the clamp-retainer of the regulator drive lever and remove it.
- Disconnect and dismantle the sorcerer lever.
- Unscrew the fittings using a special “10” wrench and immediately plug them with rubber plugs (if you are unable to move the fittings out of place, you should once again flush the threads with “Vedeshka” or kerosene and wait some more time, then try again).
- Unscrew the two sorcerer fastening nuts from the body using a “13” wrench.
- Remove the sorcerer along with its bracket.
- Disconnect the brake pressure regulator from the bracket.
- Attach the new sorcerer to the bracket (there is no need to tighten the bolts all the way).
- Place the bracket with the regulator in its original place, connect the tubes to it and tighten the fittings.
- Connect the lever from the rear beam to the sorcerer and secure it with a clamping bracket (it is important to ensure that the bracket securely grips the lever).
At this point, the installation of the sorcerer can be considered complete, all that remains is to bleed the brake system.
When dismantling the brake pipes when replacing the sorcerer, it is recommended to immediately mark them so as not to confuse them during reassembly.
"LADA-Kalina"
We set the regulator so that the rear is slightly late in locking the wheels. With this setting and partial load, the car needed only 27 m to stop. Fully loaded - 29.5 m. There are slight difficulties in preventing the front wheels from skidding. We reduce the gap in the regulator to zero - the half-empty Kalina stops after 31.8 m. The braking distance increases by 4.8 m, accompanied by a sharp blocking of the front wheels. The loaded one slows down after 35.2 m, the deterioration is even greater - 5.7 m! The pedal effort is increased and the brakes become noticeably hot.
Now we move the adjuster so that the rear brakes work as efficiently as possible. At partial load, the rear wheels suddenly lock and the car drifts off course—you have to release the pedal. On the verge of blocking it is very difficult to brake. The result is 30 m, which is 3 m worse than the “norm”. Full load gave a result of 26.9 m, which is 2.6 m better than the base (29.5 m). There are no comments regarding deceleration control. At the basic position of the regulator, the braking distance increases with increasing load. At partial load the spread of results is 4.8 m, so the base position is most effective. When you deviate from it in any direction, the braking distance increases.
On a fully loaded vehicle, depending on the position of the regulator, the spread of the braking distance is 8.3 m.
The best results, as on the Niva, are with increasing pressure in the rear brakes.
READ Front struts on Priora which are better
However, on a slippery road, even in smooth turns, early locking of the rear wheels is possible, leading to a skid.
And at partial load, with the regulator position different from the base one, the braking distance only increases.
Adjusting the sorcerer
After the regulator has been replaced, all that remains is to figure out how to adjust the sorcerer on the VAZ 2114.
This should be done as follows:
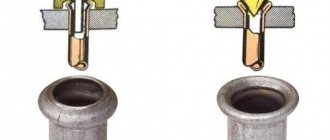
- Rock the car from side to side several times.
- Use a screwdriver to press the sorcerer pin with such force that the gap between it and the spring is 2 mm (you can check this using a feeler gauge or, more conveniently, the shank of a drill of the appropriate diameter).
- Tighten the first adjusting bolt.
- Check the size of the gap again.
- If it remains unchanged, then tighten the second adjusting bolt.
At this point, the configuration of the sorcerer can also be considered complete.
As you can see, replacing and adjusting the sorcerer will not be difficult for a motorist even with little experience. The only thing worth remembering once again when finishing this article is that you should check the condition of the brake pressure regulator periodically, and if obvious signs of malfunction appear, replace it immediately.
"Chevrolet-Niva"
By the way, before testing tires on cars without ABS, each time we slightly adjust the regulator taking into account the road condition (snow, ice, asphalt), ensuring that the rear wheels lock a little later than the front ones. Let's not break tradition. Our Shniva found the gap between the cheeks of the regulator to be 16 mm, which was adjusted using a stop screw.
Several brakings, and the braking distance from 80 km/h for a car with a partial load is determined: 34.4 m. With a full load... 33.6! Almost a meter shorter! At the same time, the driver noted a heavier pedal and rapid heating of the brakes, which required cooling before each measurement. Let’s remember these parameters and make adjustments to the “sorcerer” adjustment. First, let's reduce the gap to 8 mm. Now the regulator significantly limits the pressure in the rear brakes, transferring almost all the hard work to the front ones.
Braking has become more difficult, keeping the front wheels from skidding is not so easy - they lock very sharply and the car, naturally, loses control. However, the result, to our surprise, is the same as in the basic version: 34.4 m. At full load, you have to press the pedal much harder, the front brakes begin to overheat. The result is 37.8 m. This is 4.2 m more than with the basic adjustment (33.6 m).
What is a sorcerer for? Is it worth cleaning it up!?
Since ancient times, a brake pressure regulator has been installed on Soviet cars; in colloquial language it is called a sorcerer. This small invention serves to distribute the braking force of the wheels, although it is not for nothing that it was nicknamed the sorcerer because of its unpredictability. If the sorcerer is not working properly, when braking, the car may skid to the side or the brakes may not be effective. Incorrect braking can also be caused by incorrect settings of the sorcerer. The front wheels always start braking, and then the rear ones, but the transition delay time depends on the sorcerer.
To properly configure the sorcerer, load the rear of the car halfway, that is, as much as you usually carry, including passengers, divide in half. We climb into the inspection hole and, using any object two millimeters thick, create a gap between the plate and the sorcerer.
The sorcerer may be faulty due to souring of the rod or internal blockage; it is better not to delay repairs, because faulty brakes are dangerous!!!
When replacing the sorcerer, only the rear brake cylinders need to be bled. To bleed the brakes, unscrew the nipple (not completely) from the inside of the wheel, ask an assistant to press the brake pedal, and bleed air from the system. We press the brake pedal with three long presses and on the fourth press we press the pedal, at this time we loosen the nipple and then tighten it again.
You can remove the sorcerer at your own risk, but at the same time you will have an even distribution of braking force on all four wheels, which will need to be taken into account when braking. The sorcerer can be replaced with a tee (2101-3506091), or bypassed using two brake hoses from a VAZ 2108.
Pinout of the sorcerer tubes:
1. Highway
2. Right wheel
3. Left wheel
4. Highway
When hooking up brake hoses from a VAZ 2108, you just need to connect 1 and 2, 3 and 4. Using a tee, we combine 4 and 1 and hook up 2.3 into the tee.
Personally, I do not recommend removing the sorcerer, and if it is not working properly, then it is better to simply replace it with a new one.
Examination
VAZ 2109 rear brake adjustment
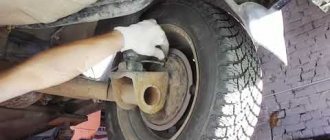
- Raise the rear axle of the car with a jack.
- Remove the wheel rims.
- Remove the brake drums.
- Inspect the brake cylinders for leaks.
- Also check their operation, the cylinders should extend to the required distance for braking.
- After releasing the pedals, they should not jam. If this flaw is detected, the cylinders must be replaced.
- Check the condition of the springs; they should not have any spiral bends. They must also have a flat surface.
- Inspect the quality of the pads themselves. There should be no delamination on them, the thickness should be at least 2/3 of the standard.
- Also inspect the spacer bar; it should not have any defects, since a damaged bar can interfere with the operation of the pads.
- Check the brake drums. There should be no burrs or large grooves on them from the operation of the pads.
Attention. It is necessary to check both sides of the vehicle. After the inspection, replace worn or failed parts if necessary.
VAZ 2109 brake adjustment
To carry out regulation it is necessary:
- plate 3 mm thick;
- a set of keys;
- portable lamp with a protective glass cover, with a protective steel mesh.
The process of adjusting the free play of the brake pedal is carried out to ensure the normal functionality of the entire system. If the stroke is reduced, then the rear pads do not fully return to their position. This causes them and the drums to heat up. Uneven acceleration also occurs at the beginning of movement. With increased free play, pressing the pedal causes the brake pads to incompletely expand.
When to change
The main reason for changing brake fluid is moisture getting into the system. This leads to unpleasant consequences. For example, it can simply freeze in winter (this cannot happen with a clean one), and this can cause not only brake failure, but also damage to pipes and other elements of the car. And replacing brake hoses on a VAZ2114 is not a pleasant matter. However, this process is quite long, and takes about 2-3 years, in the absence of breakdowns in the system, after which it is necessary to replace the brake fluid of the VAZ 2114.
In summer this problem is also relevant. Moisture, as you know, tends to boil. So, prolonged braking can lead to exactly this, as a result of which the car simply stops braking.
Mileage and intensity of brake use also affects fluid performance. For the VAZ 2114, it is recommended to change the fluid in the entire system after 30,000 kilometers. Detailed operating rules are listed in the vehicle documentation.
Why did it happen so?
Perhaps the automatic requests do not belong to you, but to another user accessing the network from the same IP address as you. You need to enter the characters into the form once, after which we will remember you and be able to distinguish you from other users exiting from this IP. In this case, the page with the captcha will not bother you for quite a long time.
You may have add-ons installed in your browser that can make automatic search requests. In this case, we recommend that you disable them.
It is also possible that your computer is infected with a virus program that is using it to collect information. Maybe you should check your system for viruses.
If you have any problems or would like our support team, please use the feedback form.
So, in this article we will look in detail at how to replace the rear brake pressure regulator on VAZ-2170 Priora, VAZ-1118 Kalina, VAZ-2108, VAZ-2109, VAZ-21099, VAZ-2110, VAZ-2115.
The feasibility of installing a vacuum brake booster
The vacuum booster dramatically improves the driving comfort of the VAZ 2108. It reduces the pedal effort required to stop the car. All modern cars are equipped with a vacuum booster. Domestic and imported. Nowadays, it is impossible to imagine a car without a vacuum brake booster.
The amplifier is aggregated with the master brake cylinder and is mounted on a shield separating the engine compartment from the interior of the VAZ 2108. It is connected to the engine crankcase with a flexible hose to supply rarefied air necessary for the operation of the amplifier. A malfunction of the amplifier is clearly indicated by a noticeable increase in the force on the brake pedal. Braking acceleration decreases.
Continuing your trip with a broken amplifier is very risky.
You can drive to the nearest car service center with caution. A cracked hose can be wrapped with several layers of electrical tape.
If replacing the cracked hose and check valve does not produce results, the unit must be replaced.
Work on removing the amplifier is carried out in this order.
- Disconnect the negative battery terminal. De-energize the electrical system.
- Disconnect the wiring block from the hydraulic reservoir cap located on the brake master cylinder body.
- From the passenger compartment, remove the amplifier pusher pin using pliers. Disconnect the pusher.
- Disconnect the hose going to the engine crankcase.
- Unscrew the two nuts securing the brake master cylinder.
- Move the cylinder away from the amplifier housing. Leave it hanging from the metal hydraulic pipes.
- Unscrew the four nuts securing the amplifier bracket to the engine shield and carefully remove the amplifier.
- Unscrew the two nuts securing the amplifier to the bracket. Disconnect the bracket and amplifier.
Install the new VAZ 2108 vacuum booster in the reverse order.
Replacement process
Before starting work, you need to stock up on the following tools:
- Hose 10-15 centimeters long and 6 mm in diameter;
- Wrenches for 8 and 10;
- Plastic bottle;
- Gloves (work clothes and safety glasses are also a good idea);
- Hydraulic fluid (there are a lot of manufacturers, each with its own characteristics).
Having collected all the tools, you can start working. The procedure is not complicated and does not require any professional skills. Most motorists do the replacement themselves.
It is extremely difficult to do this kind of work alone, so I recommend taking a friend with you who will undoubtedly help in the process. This will not only save time, but will also greatly simplify the procedure.
We are changing bunker - 4 in the VAZ 2114 in stages:
- We park the car on a pit or overpass;
- Remove the cap from the brake reservoir;
- We go into the pit. Here we need a fitting located on the rear right wheel;
- It is closed with a cap, which we remove;
- Take a bottle and pour some DOT-4 into it;
- We put the hose on the fitting and lower the other end into the bottle (do not forget to lower it to the bottom);
- Now you need someone to press the brake pedal. Smoothly 7-8 times in a row, and the last press all the way and hold;
- Unscrew the fitting a couple of turns;
- We observe how the waste product comes out;
- When 1-1.5 centimeters remain in the tank (it is important not to be late, otherwise air will enter the system), tighten the fitting and release the pedal;
- Add the missing DOT-4 to the tank (up to the Maximum mark);
- Then we repeat the procedures with the fitting and pressing the pedal until clean pillbox flows into the bottle;
- We tighten the fitting and move on to the next wheel.
There is a specific order in which the replacement must be performed. After the left rear wheel, we need the right front, then the left rear and finally the right front. If you started doing everything according to the instructions, then this is the sequence in which the bunker runs.
rav />Neoline CUBEX V50 DVR review – reviews and features
Neoline CUBEX V50 is a fairly expensive DVR that boasts good characteristics and positive user reviews. First of all, you need to pay attention to the type of mounting - the bracket is designed in such a way that it is very easy for the driver to rotate the camera in the vertical and horizontal plane. If you need to quickly remove the camera and capture what is happening on the street, this can be achieved by simply turning the DVR to the side.
A 3-megapixel camera in combination with a powerful Ambarella processor provides good picture quality with a viewing angle of 130 degrees diagonally, that is, not only the roadway, but also the side of the road is captured in the frame. Video recording is cyclic, carried out in small fragments from two to five minutes, even if the power is turned off, the last file will be recorded to the end. In order not to press the buttons on the device body again, you can set the Autostop mode, and the recording will stop as soon as the motor is stopped.
To ensure that all moments are displayed on the video, and the most important recordings are not erased after the memory card is full, there is a G-sensor that can be turned on or off at your discretion. However, a common problem with DVRs on CIS roads is that the shock sensor is too sensitive; it even perceives collisions with bumps or holes as a danger and saves these files in a separate folder, which can only be cleared after removing the memory card.
It’s nice to have a GPS module and the ability to receive GLONASS signals, thanks to which the video displays not only the video sequence itself, but also a map of the route, the speed on a particular section of the route, stamps of the license plates of the cars that were included in the frame, the time and date of recording. In addition, there is still access to the X-COP police radar database. This database includes all stationary installations on the roads of Russia and Belarus; updates occur every two weeks and can be downloaded for free on the manufacturer’s website – Neoline.
“>