Replacing the engine sump gasket for VAZ 2108, 2109, 21099
The pan gasket on the engines of VAZ 2108, 2109, 21099 cars and their modifications has to be changed in case of damage (oil leakage under the gasket), during engine repairs (replacing pistons, rings, etc.).
Necessary tools, accessories and spare parts Wrench “10” (socket or head with wrench)
New engine pan gasket
Solvent (gasoline, diesel fuel, etc.), rags
We install the car on a viewing hole, overpass or lift
Removing the engine compartment protection sheet
Removing engine mudguards
Removing the lower clutch housing cover
Drain the engine oil from the sump
Features of replacing the engine pan gasket VAZ 2108, 2109, 21099
Unscrew the pallet mounting bolts
We use the key to “10”. There are 16 bolts in total.
Removing the engine sump
We move it forward a little to free it from engagement with the oil pump intake and remove it down.
Removing the old pan gasket
Cleaning the tray from dirt
We clean the pallet itself and its mating surface under the gasket with a rag soaked in solvent.
Clean the mating surface of the block for the gasket
We use rags and solvent. The main condition for installing a new pan gasket is that the parts in contact with it are clean and dry.
Installing a new gasket
Place a new gasket on the mating surface of the pallet.
Installing the sump on the engine
Carefully press the pan against the engine so as not to displace the gasket. First, we engage it with the oil intake, moving it slightly forward. Place several bolts along the edges of the pallet. Screw in the remaining bolts. Lightly tighten them first. We make the final tightening of the bolts in several passes from the middle to the edges of the pallet so that the gasket lies evenly. The final tightening torque is within 10 N.m.
Notes and additions
For installation, it is better to use a silicone gasket rather than a cork gasket, as it is more reliable and has a longer service life.
Special pressure shaped washers are installed under the heads of the pallet bolts.
More articles on engines of VAZ 2108, 2109, 21099 cars
Important points
There are a couple of nuances that you definitely need to remember when changing the oil pump:
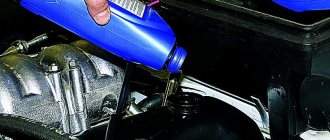
- Before installing a new oil pump, you need to remove the plastic oil seal from it and generously lubricate its inner edge with engine oil. This will make it much easier to install the pump on the crankshaft;
The inner edge of the oil pump oil seal must be lubricated with oil.
The VAZ 2114 oil pump oil seal should be filled with a pointed stick or pencil
Replacing the oil pump on VAZ 2114 and VAZ 2115 cars is a task that seems impossible only at first glance. Upon closer examination, it turns out that you can cope with it on your own, saving a significant amount on the services of a qualified auto mechanic.
Instructions for removing, cleaning and replacing the engine sump on Lanos and Chance 1.5
Before starting work on removing the oil pan on Lanos, you will need to first purchase a sealing gasket, oil, filter and sealant. Which oil to choose and how to replace it on Lanos is described in detail in this material. The article number of the sealing gasket for Lanos and Chance 1.5 cars is 90409693
. However, do not rush to buy it, since the likelihood that you will be able to install the pallet in place with it is very low. We use sealant as a gasket.
Let's proceed to directly removing the crankcase cover Lanos and Chance 1.5:
- First, the car must be installed on an inspection hole or overpass, which greatly simplifies further actions.
- Remove the engine protection, if equipped.
- Drain the oil and wait for the engine to cool. This is necessary in order to avoid getting burned when unscrewing the exhaust pipe.
- Let's get to work and unscrew the nut of the clamp securing the exhaust pipe using a "17" wrench (if such a fastening is available).
- Using a "14" wrench, unscrew the three nuts securing the exhaust pipe to the exhaust manifold. These nuts tend to stick, so it may be difficult to unscrew them. To simplify the process, we first clean them with a wire brush and treat them with WD-40.
- Using the “17” key, unscrew the bolts securing the metal plate to which the clamp for securing the exhaust pipe (if present) is fixed.
- The exhaust pipe is lowered, thereby freeing access to the Lanos engine sump. There is no need to remove it completely.
- Using a “10” wrench, unscrew the bolts securing the plastic cover of the timing mechanism.
- We proceed to unscrewing the 15 bolts securing the Lanos oil pan, using a “10” wrench.
- All 13 bolts are located in plain sight and are easily accessible. Two bolts on the flywheel side are hidden under plastic plugs (if present).
- It is with unscrewing these two bolts that owners of Lanos and Chance 1.5 cars have difficulty. The bolts are located in the channel (for clarity, a photo is shown below).
- The main difficulty is that it is impossible to reach them using a standard ½ inch socket. To do this you will need a 3/8 inch tool.
- Unscrew the 4 bolts securing the pan to the gearbox. One bolt is located on the side of the box. Shown in the photo below.
- Two bolts are on one side.
- And another one is located on the other.
- After this, you can remove the pan. To do this, we use a knife and go around the perimeter of the part. The cover fits tightly to the engine, so there is no need to try to tear it off or knock it off, as it can be damaged.
- The removed pan is subject to comprehensive cleaning and rinsing.
- To carry out cleaning work, you need to unscrew the 8 x 10 bolts that secure the plate. Clean the deposits and rinse the part to the condition as shown in the photo below.
- Don’t forget to remove any remaining old sealant around the perimeter of the pan and on the engine block.
Regardless of what caused the removal of the Lanos and Chance 1.5 crankcase cover, in any case it is necessary to clean its internal part, as well as dismantle the oil receiver and clean the metal mesh. If the oil pan needs repair, then after eliminating the defects using welding equipment, we proceed to assembly. If the part cannot be repaired, then you will need to buy a new pan, the cost of which for Lanos and Chance cars is about 3,000 rubles. Video instructions for removing the Daewoo Lanos 1.5 device.
Replacement
Having discovered the first signs of a leak in the pan, you should immediately replace the gasket. But the problem can also be caused by a breakdown of the “bathtub” itself. In this case, we carefully inspect the surface of the pan for mechanical damage - cracks, etc. If any, the crankcase should be replaced or repaired (depending on the extent of the damage).
To replace a part such as the engine pan gasket, we need to drive the car into a viewing hole or hang its front part with a jack (at least on one side). Since the element is located at the bottom, it is important to provide high-quality lighting using a portable lamp. An important point is that if the replacement is made in cold weather, the oil should first be warmed up. Let the engine idle for a few minutes.
Depending on the design features, it is necessary to remove the metal crankcase protection.
It is installed non-standard - usually the car comes from the factory with plastic engine mudguards.
Since the crankcase is a kind of reservoir for oil, when dismantling it, you need to drain all the lubricating fluid. To do this, unscrew the drain and filler plug (the last one - so that a vacuum does not form in the system, so that the oil quickly drains out). You should first place a container next to the tray. Typically, passenger cars use up to 4-5 liters of oil. In the absence of an inspection hole, it will be difficult for us to place a bucket here - we need a flat container. To do this, take an old canister and cut off the “sidewall” from it. We unscrew the plug and wait until all the liquid drains out.
The next step is to thoroughly wash the outer part of the pan. Usually a lot of dust accumulates on its surface (since it is the lowest part of the car). And if the gasket is broken, then there will also be oil streaks on the pan. It is extremely difficult to remove them. You need to use a spray degreaser.
Using a 10mm wrench, unscrew the crankcase mounting bolts. Also, do not forget about the bolts that are located above the beam and near the resonator manifold. Next, carefully remove the pan, prying the joints with a negative screwdriver.
Sequence of actions for replacing the gasket
Place the car over a hole or on an overpass so that it is convenient to get to the oil pan, otherwise removing it will turn into a “quest”. Having correctly placed the car over a hole or on an overpass and secured it securely (at least with a handbrake), you can begin the main process.
Going under the car, we see the oil pan protection, which we have to remove to get to the gasket.
The protection is attached to 4 bolts, which can be easily unscrewed with a socket wrench or a socket wrench. Having removed the protection and thoroughly wiped everything with a rag (and you will need a lot of it, because there is more than enough dirt), we see the oil drain plug.
The next step is to remove the engine protection, which prevents us from removing the pan. After this, unscrew the plug with a special key (hexagon) and drain the oil to remove the empty oil pan. Sometimes the drain plug can be tightened too tightly or become soured if it has not been unscrewed for a long time. In this case, we put a tube on the hex key; it will serve as an excellent lever.
Before draining the old oil, warm up the car engine, this will ensure more complete drainage (hot oil drains much better and faster). And it’s worth preparing a container for old oil in advance; the neck of the container should be as wide as possible, otherwise there is a danger of burning your hands with hot motor oil.
After this, unscrew the 19 bolts, which are evenly spaced around the perimeter of the pallet.
After unscrewing the bolts, we try to remove the pan. It is unlikely to succeed the first time; it rests on the oil pump. Exit - you need to raise the engine by unscrewing the engine mounts with a 17 key. The engine mount is attached on both sides, top and bottom, in both cases the same key is used, 17.
To remove the pan, you need to lift the car engine by at least 10 cm, otherwise all your efforts will go to waste. If everything is done correctly, we will see such a picture.
After removing the pan, carefully wipe it from the inside from oil and dirt, wipe the oil receiver, and remove the remnants of the old gasket.
Now we install a new gasket and carry out the assembly process. This is done in reverse order. The final touch will be to fill in new engine oil (don’t forget to change the oil filter).
Something else useful for you:
Here, in brief, is the entire process of replacing the cylinder block gasket; there is nothing overly complicated about it. The process (with associated work) takes on average no more than 5 hours, although experienced car mechanics do it much faster. But, as they say, experience comes with time.
3.24. Replacing the oil pan
Remove the engine splash guard. Drain the oil from the crankcase. Drain the liquid from the engine cooling system (see Replacing the coolant). Disconnect the upper radiator hose (see Replacing the engine radiator) and the lower radiator hose (see Replacing the thermostat).
We unscrew the four nuts securing the exhaust pipe to the exhaust manifold (see Replacing exhaust system parts) and use a 13mm wrench to unscrew the bolt securing it to the gearbox bracket.
Remove the exhaust pipe from the manifold studs and lower it.
We unscrew the two upper nuts securing the engine mounts (see Replacing the engine mount mount).
Using a wooden block, we rest the jack against the clutch housing (the engine can be lifted with a hoist).
We lift the engine, “helping” the pillow studs with a screwdriver to come out of the holes in the brackets.
Using a 10mm socket, unscrew the nineteen bolts securing the oil pan.
Reinstall the removed parts in reverse order. We recommend replacing the oil pan gasket with a new one, preferably one with cork chips in the rubber. We tighten the pan mounting bolts gradually, just as we did when replacing the cylinder head gasket. We lower the engine, using a screwdriver to adjust the studs of the pillows into the holes of the engine brackets. Fill the engine with fresh engine oil.
How to remove the pan on a VAZ 2114
Most car enthusiasts have heard about the existence of such a part in a car as an oil pan. But if you ask a beginner what it is needed for, what functions it performs and what it consists of, it will be quite difficult to get an intelligible answer. At the same time, everyone knows that the crankcase must be protected from mechanical shocks (there is even special protection for this).
Purpose of the oil pan and design features
The oil pan is shaped like a small bath of unusual dimensions. Depending on the make and model (and, accordingly, engine design), it may have a different configuration. Everything is done in order to prevent possible contact with the elements of the transmission located underneath or, for example, the front axle gearbox.
Some cars have a so-called “dry” sump. It has one interesting feature. The oil is not in the pan (as is usually the case), but in a special tank.
On most cars (including domestic cars), the task of the pan is to collect and store oil that circulates through the engine system. It is in the oil pan that all unnecessary debris settles, which can appear during the friction of various metal parts.
In addition, oil is collected in a special container, which at a certain point in time is not involved in the lubrication process. Subsequently, the composition is captured using an oil intake and sent to the main engine components. At the same time, the installation of such an oil “sucker” is well thought out. It captures oil not from the very bottom (where there is a lot of dirt and sediment), but a little higher. Moreover, in some models special magnets are installed at the bottom of the tray. Their task is to hold metal “chips” and prevent them from returning back to the engine.
On the inside of the crankcase there are special anti-drip bulkheads. Their task is to prevent oil from splashing during movement. In addition, the hole for draining oil from the engine is also located in the oil pan. Everyone (even beginners) knows how to check the oil level in the crankcase - this is done using a special oil dipstick.
The oil pan is a removable mechanism. It is fixed to the main unit using several bolts. In this case, a special gasket made of rubber or cork material is installed between the pan and the crankcase. Its task is to eliminate oil leaks at the junction of two elements. If the gasket is damaged, it should be replaced as soon as possible. If the malfunction is not noticed in time, the lion's share of the oil may leave the engine. The consequences for the most expensive component of a car can be very tragic.
Changing the oil pan gasket on a VAZ-2114
So, when the first symptoms of an engine oil leak appear, the first thing to do is inspect the engine. Damage to the gasket can be seen immediately by the appearance of a characteristic leak at the junction of the crankcase and the pan. The reasons may be different - natural aging of the material, poor quality of the gasket and its wear. In addition, problems with the gasket may appear after installing an initially defective product or insufficient (or, conversely, too strong) tightening of the bolts.
As for the gasket replacement process, it will take you no more than 20-30 minutes.
The algorithm of actions should be as follows:
- Carry out the work in a viewing hole in the garage or use a lift. If this is not possible, then you can jack up the front of the car and install wooden trim.
- Place special shoes to securely secure the car, apply the handbrake and engage first gear.
- If your car has a metal crankcase protection, unscrew the mounting bolts and move the structure to the side (it will not be needed yet).
- Start the engine and bring it to operating temperature. This is necessary in order to warm up the oil a little and reduce its thickness.
Common unit breakdowns
- operational wear of the components of the unit: the pump housing or gears fail: during the operating cycle, the gap between the driven and driving gears increases. In normal condition it does not exceed 0.25 mm. Wear leads to the fact that the distance between the parts increases to 0.5 mm: the gears no longer mesh. The described breakdown makes the oil pump unsuitable for routine repairs - it is easier to buy a new part than to install new gears and adjust them;
- leakage: oil begins to leak from under the pump. The reason for this is a leaky oil pump gasket. Replacing the gasket solves the problem;
- Oil receiver clogged: The oil receiver becomes clogged due to a clogged crankcase. In this case, you need to dismantle the oil pan and clean the mechanism.
In most cases, it is necessary to purchase a new oil pump. The price of a new part in online stores is in the range of 1700 - 2500 rubles. The devices are compatible with the first generation Samara.
Signs and causes of oil pump malfunction Lada 2114
There are several markers, the appearance of which will allow you to suspect defects in the pump:
- The corresponding light on the dashboard lights up;
- Oil puddles regularly form under the car;
- Smoke is generated during engine operation.
Causes of unit malfunctions:
- use of motor oil that does not comply with the car manufacturer’s recommendations;
- oil filter clogged;
- permanently low level of lubricating fluid in the crankcase;
- non-working condition of oil level monitoring devices;
- failure of the engine lubrication system valve;
- impurities entering the engine oil (most often coolant is mixed with it).
All the described breakdowns are accompanied by activation of the control lamp, so do not delay repairs; begin service operations after activating the control indicator.
Lada Largus. Replacing the 1.6 (8V) engine oil pan gasket
We replace the oil pan gasket when an oil leak occurs at the junction of the pan with the cylinder block, as well as each time the pan is removed during engine repair.
We carry out the work on an inspection ditch or overpass.
We show the operations on a car with ABS and air conditioning.
We remove the protection of the power unit.
Drain the oil from the engine.
Disconnect the exhaust pipe from the exhaust manifold. Remove the rear support of the power unit. Unscrew the three screws securing the front bumper to the subframe (see “Removing the front bumper”).
Unscrew the rear subframe mounting bolts 3–4 turns (see “Removing the subframe”).
Having unscrewed the bolts securing the two subframe brackets to the body (see “Removing the lever”) and the bolts of the front fastening of the subframe to the body (see “Removing the subframe”), lower the front part of the subframe on the adjustable stand.
Using a 13mm socket, unscrew the nut of the bolt securing the power steering tube bracket to the cylinder block, holding the bolt from turning with a wrench of the same size.
Using a 13mm socket, unscrew the bolt securing the power steering tube bracket to the cylinder block bracket.
Using a 13mm socket, unscrew the bolt securing the oil pan to the cylinder block bracket.
On the left side of the subframe, use a 10mm wrench to unscrew the bolt securing the power steering tube bracket to the subframe.
We remove the power steering pipe from the subframe.
Using a 13mm socket, unscrew the four bolts securing the oil pan to the gearbox.
Using a 10mm socket, unscrew the 20 bolts securing the oil pan to the cylinder block.
Pulling the subframe down, remove the oil pan and remove it from behind the subframe.
We remove the sealing gasket from the grooves of the oil pan. We clean the mating surfaces of the cylinder block and oil pan from residual sealant and oil.
We wash the inner surface of the oil pan with kerosene.
Installing a new gasket...
...into the grooves of the oil pan. Before installing the oil pan, apply a thin layer of sealant...
...in the area of the cylinder block cover (for clarity, shown on a removed engine)...
...and in the area of the 1st main bearing cover. Install the oil pan and tighten its mounting bolts.
Tighten the oil pan mounting bolts to the prescribed torque (see.
Video on the topic “Lada Largus. Replacing the oil pan gasket for 1.6 (8V) engine"
Oil pan gasket for Renault K7J, K7M, K4M replacement. Oil pump inspection. | Video lecture #2
https://youtube.com/watch?v=nqxOvhKIkqg
How to change the engine sump - training video
Renault Sandero/Logan: Crankcase pierced, part 1
Pallet characteristics
This element is the lower part of a car engine (that is, the bottom of the cylinder block). What functions does this part perform? The element serves as a protective block. Oil is also stored in the pan. It cools down further when moving. Externally, the tray looks like a small bathtub.
The element is also a collection point for all impurities and particles that were formed during the operation of the piston group. The engine sump contains small metal particles and shavings - this is waste from the elements of the crank mechanism. Often a magnet is installed at the bottom of the pan, which absorbs all these impurities. The reader can see what it looks like in the photo below.
This is the transmission pan. There is also a pan gasket here. Automatic transmissions are required to be equipped with these magnets. Thanks to them, all metal shavings are attracted and retained in one place. This way it does not circulate throughout the system, working as an abrasive.
The pallet is mounted using mounting bolts. Just like at the junction of the block with the head, a gasket is used here. It is made of cork or rubber.
On older cars, the oil pan gasket was an ordinary sealant that was used to coat the joints and edges.
Installation of seal
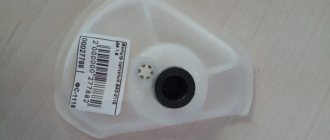
Before installing a new gasket, all traces of leaks must be removed. Experienced motorists advise not only to wipe the pan, but also to degrease it. The same actions are recommended for the surface of the block. It is advisable to remove, wash and blow out (at least with a regular tire pump) the so-called “gander”. When installing it back, you can lubricate the rubber ring of the “gander” with sealant for better fixation.
At a distance of 3 mm
A layer of the same sealant is applied from the inner perimeter. The sealant is laid out on its bed as evenly and quickly as possible, and a similar layer is applied on top. Bolts are baited; If the instructions supplied with the car do not indicate the exact order of tightening them, screw in the fasteners diagonally, crosswise, so as not to unevenly pinch any of the sides.
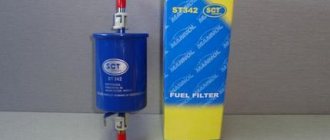
Hello, in this article you will learn how you can independently replace the oil pan gasket on a VAZ 2108, 2109, 21099. This gasket is replaced when oil begins to squeeze out from under it. It is better not to delay replacing the pan gasket, as every day it can begin to leak more and more. As a temporary measure, you can try tightening the pallet mounting bolts, but even if this is enough, it won’t last long. To replace the pan gasket, you will need a 10 socket and a 17 wrench. The cost of a pan gasket on a VAZ 2108, 2109, 21099 averages 100-200 rubles. First you need to drain the oil from the engine. After this, you need to unscrew the bolts securing the protective cover of the clutch housing and remove it
What is protection
Structurally, engine protection 2114 is a metal casing that protects the engine crankcase (essentially a container with oil) from damage when hitting protruding solid objects (for example, large stones).
The absence of this protection, as well as its being in an unsatisfactory condition, can lead not only to oil leakage (which is the most favorable option), but also to the complete destruction of the engine due to its sudden wear.
For this reason, you should always check the condition of the engine protection after hitting obstacles when you return home, and if oil leaks appear on the ground after the collision, then immediately after the accident. If it turns out that the protection is severely deformed, you should stop driving and call a tow truck.
The protective casing is located at the lowest point of the engine compartment (which is why all manipulations with it should be done from the pit for greater convenience), directly under the engine. Externally, as mentioned, it is a steel casing that covers the bottom of the crankcase, and therefore it will not be difficult to find it.
How to remove the oil pan (engine oil pan) without removing the engine
The oil pan is a reservoir located under the engine and is designed to collect unused oil that circulates throughout the system. This element resembles a metal bathtub, has a simple structure, and is therefore not susceptible to breakdowns. However, there are times when the container breaks through during off-road travel, or simply rusts. To remove the oil pan, you need to know not only its location, but also its design features.
- Where is the oil pan located and what does it look like?
- Crankcase Removal Tools
- How to remove the oil pan on a domestic car
- How to remove the oil pan on a foreign car
- Possible problems when removing the engine sump
Basic requirements for installing crankcase protection
Please note that all efforts to select protection may be nullified if the device is installed incorrectly. To ensure maximum efficiency and reliability of the product, consider a few tips:
— firstly, despite the visual simplicity of installation, trust this work only to an authorized dealer. On the one hand, you receive a guarantee for the work performed, and on the other hand, you can be confident in the quality of the installation.
Of course, you can install the crankcase protection yourself if you have the necessary tools and, as they say, your hands grow from where you need them.
- secondly, the casing should be fastened only to the fasteners provided for this (as a rule, these are special holes on the subframe).
To absorb excess noise, special rubber seals must be used. Such simple devices can remove unnecessary squeaks and vibrations;
— thirdly, the installation of protection should be carried out as strictly as possible. Any occurrence of sag or play may reduce the effectiveness of the protection to a minimum. Over time, the protection may completely unscrew;
- fourthly, the product must have “windows”. They are useful not only for cooling the engine, but also for its maintenance (replacing the oil filter, draining the mass, and so on).
How to remove and install the oil pan yourself
This is not a complicated procedure, and most car enthusiasts can do it, although it does require some repair skills and tools. Depending on the brand of the car, nuances are possible. For example, in VAZ cars of the classic family, with a longitudinal engine, you need to lift the engine. Therefore, before you start disassembling it yourself, read the repair manual for your car.
Procedure for removing the oil pan:
- Prepare a clean container - it can be a canister with a wide neck or a cut one. Its volume must correspond to the amount of oil in the engine of your car;
- Drive onto an inspection hole or overpass; it will be more convenient for you if it is deep enough so that you can stand under the car at full height;
- Warm up the engine to a temperature of 50-60 degrees, the engine oil will become thinner and more fluid;
- If the engine compartment protection is installed, remove it; it is usually secured with 3-4 bolts;
- Carefully unscrew the drain plug, placing a previously prepared container under it, be careful - the oil will definitely flow onto your hands and possibly somewhere else;
- Unscrew the oil filler plug. After unscrewing the filler plug, the flow of escaping oil will increase sharply, make sure that it flows into the canister and losses are minimal;
- Wait until all the oil has drained and begin unscrewing the fastening bolts/nuts;
- If all the bolts are unscrewed and the oil pan cannot be removed by hand, this means that the parts have been glued together. You need to tap it with a rubber hammer, carefully pry it with a screwdriver or other flat object, but so as not to damage the joints. Scratches may cause leaks in the future.
Now that the pan has been removed, you can carry out repairs and also see the crankcase structure.
Deformation, extrusion
Spontaneous deformation of the gasket often occurs. You need to understand that this sealing element is subject to high loads, pressure and temperature changes. And if on the street side the air temperature can be +15 degrees, then inside the pan the oil is heated to 110 degrees Celsius.
Also, the pan gasket is subject to deformation due to high pressure in the oil system. What could cause this phenomenon? Often, oil seals and gaskets are squeezed out due to dirty The element must allow a mixture of oil vapors and condensate to pass into the inlet pipe. If the valve does not work, the high pressure in the engine squeezes out all the sealing elements. This does not happen right away. However, replacing these parts will cost a pretty penny. Moreover, not only the parts themselves are expensive, but also the work to replace them (for example, the rear crankshaft oil seal). To prevent this from happening, periodically check the crankcase ventilation system.
What oil is better to pour?
Choosing a car oil is the most crucial moment, requiring care and a particularly thorough approach. The lifespan of your engine will depend on the type of engine oil you use. It is better to fill the engine with high-quality lubricant to extend the life of the engine.
Please note the requirements of the API standard. The choice is also made taking into account the viscosity of the material
Here it is necessary to take into account the seasonal factor. Correctly selected viscosity indicators will ensure normal engine operation in any weather.
Mineral motor oil does not last as long as synthetics or semi-synthetics, moreover, it is not effective at low and high temperatures, however, it is gentle on engine parts. Any of the three types is suitable for the LADA Samara car engine. It's up to you to decide which product is best to use. There are a great many manufacturers producing motor oils; you can choose a high-quality product, but when choosing, you should take into account all the characteristics.
Symptoms of a problem
If the replacement is carried out incorrectly, the rupture may occur again, foreign particles will get inside the crankcase, sealing will be insufficient, which will lead to failure of the engine or its individual components.
It would seem like a simple gasket, but what a burden of responsibility lies on it.
To determine the need to replace the gasket, you should pay attention to the characteristic signs of such a problem:
- Oil is leaking.
- There is a decrease in pressure in the oil system.
- The oil level drops more rapidly than usual.
How to replace the oil pan and its gasket on a VAZ 2101-VAZ 2107?
Note! This method is not always suitable for people to remove the pan from a car, because not everyone has items that facilitate this, so at the very end of the article there is a video that shows the procedure for removing and replacing the pan and gasket without the use of special tools!
Removal: 1) Before starting work, drive your car into the inspection hole.
2) Then remove the crankcase protection from the vehicle. (How to remove the protection, see the article: “Replacing the crankcase protection”)
3) Then completely drain the engine oil from the car engine. (How to drain the oil, see the article: “Changing engine oil”)
4) Next, unscrew the two nuts on both extreme sides that secure the right and left engine mount to the cross member.
5) Next, install the “Travece” on top of the engine compartment, it is indicated by the number “1” in the photo, and then begin to tighten the nut under the number “2” and thereby lift the engine from the car.
Note! You need to lift the engine until the ends of both studs, numbered “1”, coincide with the flat part of the engine mount brackets, which are indicated under the number “2”!
6) Now, using a wrench or an extension with a hinge and cap, unscrew the “19” bolts that secure the pan to the engine.
Note! There are washers under each bolt, so be careful not to lose them!
7) And finally, use a screwdriver to carefully separate the oil pan from the cylinder block and, as a result, remove it along with the gasket.
Note! If the gasket is stuck to the block, then use a sharp object to remove it and clean the entire plane of the block from pieces of the gasket!
Installation: 1) First, use a clean cloth to wipe the mating surface of the block, and then the oil pan.
Note! There is no need to degrease the surfaces of the block and tray using products such as White Spirit, etc. Because in the future, this will make it easy to disassemble the connection!
2) Next, lubricate both sides of the gasket with a thin layer of silicone sealant to ensure that engine oil does not leak through the gasket in the future.
3) Finally, install all the removed parts in their place, in the reverse order of removal.
Note! Replace all deformed parts with new ones, and tighten the “19” bolts that secure the oil pan during installation crosswise. When tightening the bolts, do not use much force because this may damage the crankcase flange and the gasket may be deformed!
Additional video: For more detailed instructions on removing and replacing the gasket and pan, see the video below:
Preparing for work
Preparation plays a big role in successfully replacing the oil pan gasket. Actually, this event will not be very difficult.
- Drive the car into the pit or lift it using a lift;
- Provide high-quality light so that you can carefully inspect the condition of the pallet;
- Remove the crankcase protection if you previously installed it on your VAZ 2110;
- The oil pan must be cleaned because a large amount of dirt and oil accumulates on it. It is also recommended to clean the areas adjacent to the oil pan;
- The easiest way to detect a leak is when the engine is warm, but only at idle speed. This will increase the pressure in the oil system and will show how serious the problem is with oil leaking through the oil pan gasket.
Repair
Removing the oil pan is a fairly simple procedure, which is performed after first hanging the car on a lift. During its implementation, the specialist inspects the condition of the pallet and its internal part, after which a decision is made on the advisability of replacing it. It goes without saying that if the source of the oil leak is the gasket, the pan will not need to be replaced. The entire removal and installation procedure takes about an hour.
At the same time, installing the oil pan in place is a more labor-intensive operation, since it requires careful adjustment and careful tightening of the bolts. It should be noted that during the procedure, regardless of its tasks, it is necessary to replace the gasket, as well as the oil in the vehicle’s power unit. In addition, it would be useful to install engine protection on the car in order to protect the sump from possible damage.
- Sign up for repairs
- or by phone:
- +7
How often should cleaning be performed?
If the ventilation system is clogged and its filter is unable to clean the mixture passing through it, then not only unburned gases, but also oil particles and other pollutants will enter the engine. All this will ultimately have a negative impact on both the operation of the engine and its remaining service life.
The frequency with which the crankcase ventilation of the VAZ 2114 should be cleaned directly depends on the condition of the engine. So, if the car just recently came off the assembly line, and its engine has not clocked up 50,000 km, you shouldn’t even think about cleaning it, since the piston rings are still new, and there is practically no leakage of gases through them.
The first cleaning (as recommended by AvtoVAZ itself) should be performed after the car has covered 60,000 km. And all subsequent cleanings should also be performed after every 60,000 km.
Many owners of domestic cars with extensive experience say that 60,000 km is too much, and cleaning should be done at least every 30,000 km - this will help avoid many problems with the engine and extend its life. In this case, the first cleaning should be carried out after the first 60,000 km.
Possible problems when removing the engine sump
Usually it is not possible to remove a part if the bolts are rusty. They need to be unscrewed carefully so that the pins do not break off. It is necessary to preheat the mounting location, and then slowly unscrew the bolt. In domestic cars, the bridge often gets in the way after unscrewing the fasteners. In this case, you should not try to cut off the interfering strips. The problem is solved by removing the oil pump.
It is important to raise the engine to a sufficient height. Otherwise it will be impossible to get to the pallet
The engine is raised until it reaches the nuts securing the mounts. It is convenient to use a diamond-shaped jack for this operation. It needs to be installed under the box; when lifted, the engine will move. Procedure:
- Disconnect the receiving pipe from the manifold, pull out the rods coming from the radiator and heater.
- Disconnect the gas draft loop located on the right, unscrew the casing from the stove.
- Pull out the oil dipstick. Disconnect the tube in which it is placed.
- Remove the clutch box, and then the shield located below the radiator.
- Disconnect the rear support post from the crossbar. Raise the box with a jack, then the handbrake drum will begin to rest against the body. The rear pillar will have to be supported.
- Place a jack under the crankcase and disconnect the cushions. Raise the engine until it stops.
- Place several planks between the motor feet and the cushions. Remove the jack and carefully secure the engine.
- Unscrew the fasteners that hold the crankcase in place. To do this you will need a key with a universal joint. To remove the tray, you need to pull it back.
If there is no jack, a traverse made of timber will do. The beam must be positioned parallel to the radiator. Next, the pin is attached to the engine and threaded through the yoke. Then you need to carefully tighten the nut on the stud. The motor will begin to rise slowly.
It happens that when you try to pry the pan with a screwdriver, it does not budge. In this case, the part gets stuck somewhere inside. First you need to check that all the bolts are unscrewed. In most engines, the cover is held on by 15 bolts, less often by 14. If everything is unscrewed, this means that the oil intake tube is stuck. To solve the problem, you will have to unscrew the tube from the pump.
Tips and tricks
It is possible to dismantle the part only if the preparatory work is carried out correctly. First, the car is placed above the inspection hole; if this is not possible, the body is raised with a jack. After this, it will be possible to get to the crankcase and adjacent parts.
To carry out manipulations, good lighting is required. Without illumination, it is difficult to remove a spare part from a hard-to-reach area. If you have a powerful lamp, it will be possible to inspect the pallet and make sure that there are no dents or holes on it. You will also have to check the condition of the gasket.
If a hole has formed in the housing, repairs can be made using argon welding. Minor cracks are repaired by cold welding, but before doing so, the oil is drained and the surfaces are degreased. Leaks at the junction of the engine block and the sump indicate the need to replace the crankshaft oil seal. Slight sweating around the drain plug is not considered a deviation from the norm.
Welded engine sump
The pan can be accidentally punctured when driving off-road, even with high ground clearance. Many car owners install protection that covers the pan from impacts and complicates access to it. The protection is dismantled in advance; it is usually held on by several bolts and can be unscrewed without any problems.
Before dismantling, it is advisable to wipe the tray and surrounding elements with a rag. This makes it more convenient to carry out work, and it is easier to see damage to the body. If oil spills out, the location of the leak is determined visually. To check the integrity, you need to turn on the engine at idle speed. In this mode, oil will quickly begin to flow out through the hole. If after removal you find damage to the gasket, do not throw it away. It is better to take the old seal with you when going to the store. Then it will be easier for the seller to select a similar spare part.
Crankcase protection
Over the weekend I hardly left the garage; a lot of work was done. So, I’ll start in order: on Saturday morning I went to the car market and bought various parts for my white car: crankcase protection, interior carpets, rear arch linings for the VAZ 2108-09-099, a tray in the trunk, a mechanical steering wheel lock, an alarm system and also chrome bolts in quantity 12 pieces.
Speaking of these bolts, they are for alloy wheels since there are no bolts for chrome stamps, what does this mean? This means that they have a different cone and a longer thread, so if we tighten them, we will not be able to turn the wheel since the bolts will rest against the calipers and brake cylinders with pads. Even before the purchase, we understood that we would have to tinker, and when we came to the seller of alloy wheels, the dialogue was something like this: (me) - Hello (p) - Good morning (me) - We need chrome bolts, how much do they cost? (n) -What kind of wheels? bolts fifty dollars apiece (I) - Stamps (p) - They won’t fit, the cone is different and the thread is long (I) - I know we will shorten (after these words the seller’s eye almost twitched and he wondered how it was and why he handed me the bolts) . Weakling! I thought, took a handful of bolts and went further along the rows. It all arrived at the garage and work began.
First of all, I glued the STP ceiling in the front part, that is, above the driver’s head, and went over the final layer of splen.
Then I pressed it again in all places so that everything would stick together more tightly, and completely installed the ceiling trim along with all the handles, lamps and clips. The ceiling was assembled and the appearance pleased me.
Then we moved on to the technical aspect, I would say, and the car was unscrewed and the fenders were removed, cleared of factory mastic at the junction with the body and prepared for processing. I’ll tell you why I take off the wings at all, because many may wonder. Let me start with the fact that this will be a low pelvis, and therefore the issue of processing arches and wings must be approached with special trepidation this time.
Two, I know that under the mastic at the junctions of the wings with the body there is completely clean, unprimed metal, as it was on my father’s 15, so I have a 14 here, and it was in these places that the metal was exposed to 8, so gentlemen, do not be lazy and pay attention. The removed wings were processed a thick layer of red lead was literally poured into the fold of the wing so that all the cavities were treated.
Let's move on, many have noticed that on old chisels the corner under the windshield just above the fender gets stuck, the metal first swells with bubbles and then completely falls through to holes - a terrible sight for me. The reason for all this is very simple: this place is a cavity into which condensation falls, but there is nowhere for it to go since there is no drain from this cavity, so water stands there both in winter and in summer, which creates an excellent environment for rust.
This is how this issue was resolved: a limiter was put on a 12 mm drill (a silicone hose or something suitable for the diameter of the drill) so that the drilling depth did not exceed 10 mm. This must be done, otherwise without a stopper you can drill through the hole, then you will cry and clutch your head. After all these tricks we get the following two holes on each side (with a knife I visually point out the drainage holes made)
Now the cavity is breathing; moreover, the mixture under pressure will be blown into it by nozzles. After drilling work, the arches inside were also treated with the first layer.
The bottom also took on the first layer.
There is another intimate place on these machines - the plane under the muffler, since during winter there is a greater amount of condensation due to the heating of the muffler cooling plus exhaust gases. On older cars you can easily see rot under the muffler. Therefore, I took off the ten-thousandth muffler and treated this appendicitis
pay attention to this place in your cars.
I reached into the cellar for potatoes just before leaving and was stopped by the sight of the engine, I thought that if the bolts from the crabs were easily unscrewed, then I would use my last strength to install protection. I took the cylinder cross wrench and surprisingly the bolts went easily, well, back and forth and the protection is in its rightful place.
The calipers are painted.
The door cards have been removed in the cabin and we are preparing for alarm installation and processing.
Removing and installing the oil pan and oil intake of the Nissan Patrol oil pump
Removing and installing the oil pan and oil pump oil intake
Removal
| To perform the procedures described below, you will need a tool to cut the sealant pads. |
| Execution order |
|
Installation
Installation is in the reverse order.
| Execution order |
|
Replacing the oil pan and its gasket on a VAZ 2101-VAZ 2107
Today, many people already know such a thing as an oil pan, but not everyone knows what it really is, when it needs to be changed and how to properly replace it on cars of the “classic” family - we will look at these questions today.
To replace the pan and its gasket, you will need to prepare a few things in advance: First, be sure to stock up on wrenches, or you can use an extension, universal joints and sockets instead!
Where is the oil pan and its gasket located?
The pan is located at the very bottom of the car engine; unfortunately, in order to fully see the pan it is necessary to remove the crankcase protection, which is done in the figure below:
The blue arrow indicates the gasket that is located between the cylinder block and the crankcase pan!
When do you need to replace the oil pan and its gasket?
The pan must be replaced if it is deformed, due to which the engine oil that was located in it begins to flow out of the pan itself.
The pan gasket must be replaced if it is strongly compressed and if it is torn, how do you understand this, you ask? Usually, when the gasket is deformed, engine oil begins to flow through it, but the leak can also be treated by simply tightening the bolts that secure the oil pan, but if tightening the bolts does not produce any results and the leak does not stop, then replace the gasket with a new one.
How to replace the oil pan and its gasket on a VAZ 2101-VAZ 2107?
This method is not always suitable for people to remove the pan from a car, because not everyone has items that facilitate this, so at the very end of the article there is a video that shows the procedure for removing and replacing the pan and gasket without the use of special tools!
- Before you start work, drive your car into the inspection pit.
- Then remove the crankcase protection from the vehicle. (How to remove the protection, see the article: “Replacing the crankcase protection”)
- Then completely drain the engine oil from the car engine. (How to drain the oil, see the article: “Changing engine oil”)
- Next, unscrew the two nuts on both extreme sides that secure the right and left engine mount to the cross member.
Next, install the “Travece” on top of the engine compartment, it is indicated by the number “1” in the photo, and then begin to tighten the nut under the number “2” and thereby raise the engine from the car.
Where is it located?
If you open the hood of your car, you will have a hard time seeing the protection. To do this, direct your gaze to the lowest point of the engine compartment.
Location
In order not to torment yourself and your eyesight, approach the car from the other side, that is, from below. It is under the bottom that you have to work with the crankcase protection.