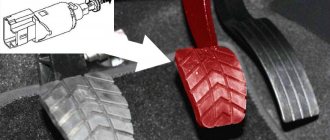
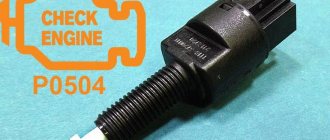
During operation of a modern car, defects in engine operation may appear: failures, short-term lack of response of the gas pedal, etc. At the same time, the “Check Engine” icon lights up on the instrument cluster panel, which translated from English sounds like “check the engine.” The car owner goes for diagnostics, where a computer connected to the car detects error P0504. The brake pedal position sensor (frog) is responsible for this failure in the system. Next, we will tell you where the sensor is installed, how to check, repair and replace it.
Causes and symptoms of malfunction
Most often, error P0504 worries owners of Lada: Grant, Priora, Kalina and other VAZ cars with an ECU. Often a defect appears on GAZ cars, for example, GAZelle NEXT. But owners of foreign cars are less likely to contact the service to eliminate error p0504 and replace the sensor (frog). Most likely, the quality of foreign spare parts is much better. What symptoms indicate that the brake pedal sensor is faulty:
- The engine begins to work unnaturally: it feels like it either stalls while driving, then immediately starts.
- The traction disappears at around 40 km/h, but after applying the gas, the former agility is restored. Then the defect appears again.
- The brake lights do not light up, or on the contrary they work constantly.
The cause of incorrect operation of the “frog” can be: mechanical damage, oxidation of contacts or wire breakage. Sometimes a failure occurs due to the burnout of both brake light bulbs. Due to the listed defects, an error appears in the system under code p0504. It can be removed, but it will appear again soon.
Plant technological instructions
P0504 - Brake pedal A/B switches, signal mismatch
Using the Lada Vesta as an example:
Code P0504 is entered if:
- the brake pedal limit switch signals “3-4/1-2” are mismatched for more than 200 seconds with the engine running in idle mode;
- or the number of presses on the brake pedal, determined by the signals of two limit switches “3-4/1-2”, differs by the value of the diagnostic threshold on a moving vehicle.
The malfunction indicator lights up on the 3rd trip after a permanent malfunction occurs.
Description of checks
The sequence corresponds to the numbers on the card.
- It checks whether code P0504 is active at the time of the request.
- Electrical circuits are being checked.
- Check the installation of the brake pedal switch.
Diagnostic information
The scan tool in Signal Monitor mode displays the pin status bit 3-4 (Brake Pedal Switch 1 parameter) and the pin status bit 1-2 (Brake Pedal Switch 2 parameter) of the brake pedal switch. The status of contacts “1-2” can also be monitored using the brake light lamps.
If a mismatch in the signals from the “1-4/2-3” switches is detected, the engine control system will operate in emergency mode until the end of the current trip.
After repair, start the engine, reset the codes and make sure there is no malfunction.
Using the Lada Granta/Kalina as an example:
Code P0504 is entered if:
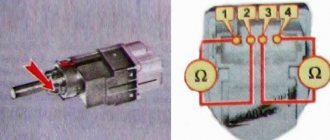
- the brake pedal limit switch signals “1-4/2-3” are mismatched for more than 200 seconds with the engine running in idle mode;
- or the number of presses on the brake pedal, determined by the signals of two limit switches “1-4/2-3”, differs by the value of the diagnostic threshold on a moving vehicle.
The malfunction indicator lights up on the 3rd trip after a permanent malfunction occurs.
Description of checks
The sequence corresponds to the numbers on the card.
- It checks whether code P0504 is active at the time of the request.
- Electrical circuits are being checked.
- Adjust the brake pedal switch clearance.
Diagnostic information
The diagnostic device is in mode “1 - Parameters; 1 - General View” shows the status bit B_BREMS of contacts “2-3” of the brake pedal switch.
Monitor the state of contacts “1-4” using the brake light lamps.
If a mismatch in the signals from the “1-4/2-3” switches is detected, the engine control system will operate in emergency mode until the end of the current trip.
After repair, start the engine, reset the codes and make sure there is no malfunction.
By the way, the brake pedal position sensor can be repaired.
Keywords: lada xray sensors | Lada Vesta sensors | Lada Largus sensors | Lada Granta sensors | Lada Priora sensors | Lada Kalina sensors | 4x4 sensors | pedals lada xray | fret vesta pedals | fret largus pedals | fret pedals granta | Lada Priora pedals | fret Kalina pedals | 4x4 pedals | ECM Lada Vesta | ECM Lada XRAY | ECM Lada Largus | ECM Lada Granta | ECM Lada Kalina | ECM Lada Priora | ECM 4x4 | Niva sensors | Niva pedals | esud niva | AvtoVAZ order | universal article
1 0 0 0 0 1
Share on social networks:
How to change
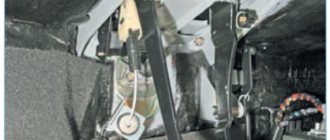
The sensor is located slightly above the brake pedal lever. To find it, you need to look under the torpedo. On Lada Priora, Grant and Kalina, a 19 mm open-end wrench will be required for dismantling. The replacement process looks like this:
- Remove the negative terminal from the battery
- Disconnect the 2 plugs from the sensor.
- Loosen the locknut with a 19 mm wrench (remember its approximate location).
- Unscrew the sensor counterclockwise.
- Install a new one and secure it with the adjusting nut.
- Connect the battery.
- Turn on the diagnostic equipment and clear the old error P0504.
The old sensor is quite repairable. In most cases, the cause of the malfunction is a broken spring. If you disassemble the body and install a new spring, the “frog” will work again.
Car owner's comment: On my Lada Grant, a spring broke in the sensor and began to close the contacts of the limit switches. When I left the car overnight, the ignition did not seem to turn off, which is why the battery ran out completely several times. I bought a new battery, but the problem did not go away until I made diagnostics and replaced the sensor. At the same time, the Check Engine did not light up.
Crankshaft position sensor (CPS)
The Niva DPKV is installed in a special hole in the oil pump drive cover. This sensor is responsible for setting the ignition timing. The sensor takes readings from the crankshaft pulley, which has teeth and in one of the places there is “caries”, that is, several pulley teeth are missing. It is “caries” that the DPKV understands in what position the crankshaft is. The sensor itself resembles an inductive coil, which generates impulses when the crankshaft rotates and transmits them to the computer.
If the sensors fail, the car will not start.
Signs of DPKV malfunction:
- The car does not start;
- The car stalls spontaneously;
- Uneven operation of the internal combustion engine;
Which one to buy
Experts and service workshop specialists recommend purchasing an original brake sensor. It is of better quality and lasts longer.
Table 1. Price of brake pedal position sensor
| Manufacturer | Code | Cost, rub. |
| AvtoVAZ | 11183720010 | 170 |
| Avar | 2113720 | 180 |
| AMY | 11183720010 | 95 |
Source: autopiter.ru
Before changing the “frog”, you can “ring” it with a tester to make sure the part is working.
Electronic engine control unit (ECU)
An ECU is a kind of computer in a car; it is in this device that the entire operation of the internal combustion engine is corrected. All sensors that are installed in the car transmit readings specifically to this unit, and based on the readings, it makes changes to the operation of the engine, which affects both the engine speed and its consumption.
Symptoms of ECU malfunction:
There can be a huge number of signs of malfunction of this unit, because signs of failure of one sensor may even indicate failure of the unit.
Lada Priora Hatchback Strict SE Logbook Error P0504 Brake pedal sensor and its solution
Good evening everyone, nothing interesting happened to the car, and then bam, today it means I’m not touching anyone’s food, I didn’t pay attention to how often I pressed the brake, but suddenly the car begins to slow down to such an extent that it seems that it stalls while driving and then but after 1.5 seconds it starts, I couldn’t believe my eyes, at first I thought the gear was knocked out, when I press the gas at 40 km/h it just doesn’t go, so + besides, there are no revolutions at all! In a panic, I went and refueled (it was 5L at that time), I thought it was petrol, I refueled, I gave it a ***, I accelerated, like normal, I parked the car near the house, I started it an hour later, an error pops up, fortunately I have a friend Lyo with a cable and a program in next door, I rush to him. We do the diagnostics, and here’s the most interesting part:
Having read on the Internet that either the sensor is faulty ****, or the stoppers may burn out and because of this it is tripping, but the stoppers are all burning, the previous ones are intact. Someone also wrote that the sensor may be poorly adjusted, and it works too often when the brake is pressed. They cleared the error, now I’m driving and looking, so far everything is fine, so far there is no desire to change the sensor.
Today I went and bought a sensor, it costs 232 rubles, a little expensive IMHO) I installed it, it’s very easy to install, I unscrewed the nut and unscrewed the sensor itself, before of course disconnecting it from the power supply (which, by the way, only enters the sensor on one side, that is, by mistake you won't be able to connect it).
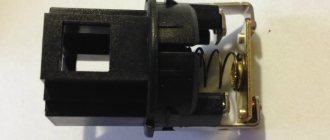
Old on the left, new on the right
The last photo shows that the spring of the old sensor has apparently stretched, because the limit switch no longer snaps off properly, but only moves halfway. I reassembled everything in the reverse order, adjusted it by eye
Then I cleared the error, and now everything is quiet, thank you all for your attention) And for those who will ever do this for the first time, there is no need to remove anything, I moved the seat all the way back, raised the steering wheel as high as possible, pulled out the rug (so as not to get dirty), took off the cover that covers the fuses (to let in more light) and lay right under the steering wheel, and everything is clearly visible there. I used the key for 19. The replacement took 10 minutes maximum
It became interesting, I disassembled the old sensor, everything is visible as is) The upper spring simply broke
Checking brake pad wear
We check the degree of wear of the brake pads of the front brake mechanisms in the following sequence.
1. Place the car on the inspection ditch.
2. Remove the front wheels.
3. When checking the pads of the left brake mechanism, turn the steering wheel completely to the left, and when checking the pads of the right brake mechanism, turn it to the right.
4. Through the inspection hole in the movable caliper bracket, we visually determine the thickness of the brake pads.
If the thickness of the lining of at least one pad is less than 1.5 mm, we change all the brake pads of the brake mechanisms of the right and left wheels.
Ignition module (IZ)
The ignition module is installed on the left side of the engine on a bracket. This sensor is involved in the formation of ignition. It is this that produces the high-voltage voltage necessary to create a spark in the combustion chamber of the internal combustion engine. The module has two coils, they are also autotransformers, which produce a spark in pairs, each coil for two cylinders. If one of the coils fails, two cylinders fail at once.
Signs of malfunction of the MH:
- Troubles the engine;
- Increased fuel consumption;
- Increased engine vibrations;
- Loss of traction and dynamics;
Oxygen sensor (DC, lambda probe)
An oxygen sensor, also known as a lambda probe, is installed in the exhaust system of a car. In some versions of cars, two sensors are installed before the catalyst and after the catalyst. Two sensors are installed in Niva with EURO-4 standards. The sensor captures exhaust gases and transmits readings to the ECU. If there is a large amount of unburned gasoline in the exhaust gases or, on the contrary, a small amount, then the DC makes changes to adjust the fuel mixture.
Signs of DC malfunction:
- Increased fuel consumption;
- Loss of vehicle dynamics;
- Poor engine starting;
Performance diagnostics
Checking the functionality consists of: 1. Testing the product with a multimeter. 2. Disassembly and visual inspection of the internal components of the part. 3. Replacement sensor is not known to be good.
The first method involves alternately measuring the contacts of the dismantled sensor. The point is to check each contact individually and in pairs (second and third contact). This is quite convenient to do, since at the place where the contact chip is connected, all connectors are numbered.
The second method is used to identify faulty or deformed internal elements of the product (in most cases, damaged springs). Remove all internal elements and pay attention to their integrity and performance. In addition to the condition of the springs, pay attention to the metal contact plate. There should be no traces of oxidation or contamination. If there are any, clean them out.
The third method is quite simple and trivial. Install a new part to replace the one whose serviceability you doubt. Test the operation of the car by driving in various modes, when switching up and down gears. When the system is restored to normal operation, the malfunction indicator (check engine) should go out (if it does not disappear within 15 minutes, the error should be reset manually).
Knock sensor(DD)
The knock sensor is installed on the right side of the vehicle's cylinder block. A DD is needed to catch detonations in the engine and adjust the fuel mixture. The sensor itself is made on the principle of a piezoelectric element and, in the presence of vibrations in the engine, transmits impulses to the ECU, which in turn adjusts the fuel mixture.
Signs of DD malfunction:
- Increased fuel consumption;
- Uneven operation at idle (increased vibrations);
- Jerks when the car moves;
