08 September 2015 Lada.Online 178 859 29
APS-6 is a standard anti-theft device for Lada Priora/Kalina/Granta/Niva cars. On Luxe trim levels the standard immobilizer is activated from the factory, but on simpler versions you have to do it yourself. The article provides instructions for learning the key and activating the immobilizer.
The delivery set includes 3 keys: 2 black “working” keys (hereinafter referred to as RK ) and a red “master key” (hereinafter referred to as MK ) for training the system. The indicator lamp (hereinafter referred to as CL ) signals the programming state. Its rapid flashing (5 times per second) indicates that the learning procedure is being performed correctly. Stopping fast flashing means:
- wrong action;
- exceeding the time provided for completing the training procedure;
- malfunction;
- This RK has already been trained by another immobilizer (does not fit the ECU).
How it works and what blocks it
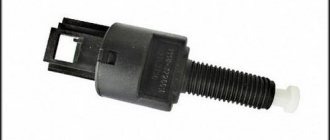
The immobilizer on Priora is designed to prevent theft of a vehicle by intruders. It consists of the following parts:
- APS unit, structurally combined with electrical package.
- A sensor, the presence of a key with a “native” chip in the form of a pumping loop wound around the ignition switch.
- Connecting wires for signal transmission.
- Keys with transponder.
When purchasing a car, the owner is given a special key with a red insert, which contains a chip that allows you to train working keys, and 2 working keys with programmable chips. The training key must be kept at home, because it gives access to setting up keys that the APS will consider “native”.
After activating the immobilizer and learning the working keys, the car can be started. But, only if the anti-theft unit “sees” the key with the transponder and a code is written in the chip that matches the information stored in the non-volatile memory of the APS.
In Priora, the immobilizer works as follows:
- When the working key is turned in the ignition switch cell, a voltage pulse is applied to an inductive coil wound around the lock, which excites electromagnetic oscillations in space.
- The switch contains an inductance in which the current strength changes, which allows it to receive a pulse from the pump loop.
- The capacitance is charged, supplying power to the chip with the code.
- The chip generates a return pulse, which is emitted into space and received by the pump loop.
- The signal enters the APS, where the codes stored in the block’s memory and the received codes are compared.
- If the data matches, the anti-theft device does not interfere with the operation of the engine ECU. If the codes do not match, the APS goes into protective mode, transmitting a signal to the ECU, which blocks power to the fuel pump, starter and ignition of the car.
Reliable protection against car theft
One of the most effective means against car theft is an immobilizer. This is an electronic device that blocks fuel injection in case of unauthorized access to the car. If the immobilizer is activated, then the Priora will not budge without a special permission signal.
As a rule, this signal can only be given by a special key that the owner of the car must have. If attackers decide to break the immobilizer, the car’s electronic systems will be blocked and the car will not go anywhere. So such a device is a very effective method of resisting car theft.
The presence of an immobilizer may be provided by the car manufacturer. This device is called a standard immobilizer. Although some car factories still prefer simple standard alarms, which do not prevent theft, but only notify the owner about it and scare thieves. All configurations of the Lada Priora contain an immobilizer, but it must be activated for it to work.
Problem Resolution
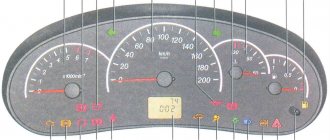
What to do if the immobilizer blocked the engine from starting? First of all, make sure that it itself is functioning normally - the indicator on the dashboard (if there is one) indicates that the chip code is not recognized. If the indicator “shows no signs of life” when you turn on the ignition, then you should probably start by checking the electrical system - perhaps the fuse has blown in the section of the circuit where the immobilizer unit is powered.
Re-register a key that is not recognized by the system - this solves the problem. However, there are two ways to program the immobilizer. In the first case, which is used on most foreign cars, programming of key codes is carried out by a dealer diagnostic scanner, via an internal network (the request goes to the manufacturer’s servers). The entire set of keys is registered at one time, since at the beginning of the training procedure, data on previously registered keys is erased from memory. So the owner himself cannot do anything with the immobilizer: he turns to the official dealer of his brand or to a company specializing in such work. As a matter of fact, the existence of universal devices for training immobilizers “plays into the hands” of car thieves. And you should approach the choice of a company offering immobilizer training services more carefully - the car owner will not control how many keys are actually registered, and there may be an “extra” one for the future.
The second method of training the immobilizer involves the presence of a master key in the kit, which is used to program the others. This allows the owner to perform immobilizer training himself, but only if the master key itself is recognized. For example, the APS-6 unit, which is very familiar to VAZ owners starting with Kalina, has a similar learning mechanism.
You will also be interested in:
To program “working” keys using a training key on the APS-6 unit, you need to:
- After closing the doors, turn on the ignition with the learning key.
- Wait at least 6 seconds, then turn off the ignition. The immobilizer indicator will blink rapidly, indicating the start of the learning procedure.
- Insert the registered key into the lock and turn on the ignition. Do this before the immobilizer light goes off. The buzzer will beep three times, indicating that the chip in the key has been recognized and read. If the indicator goes off and there are no beeps, this means either that the ignition is turned on too late (repeat step 1 onwards) or that the immobilizer is faulty.
- Wait until two more beeps sound. This confirms that the key code is stored in the controller's memory.
- Repeat steps 3 and 4 for the remaining keys.
- After turning off the ignition with the last key you registered, with a pause of no more than 6 seconds, you need to reinsert the training key into the lock and turn on the ignition. First, three beeps will sound, then two more.
- Turn off the ignition, but do not remove the key from the lock until you hear a single signal. The blinking frequency of the immobilizer indicator increases. If not, go back to step 1 and try again. A secondary error will clearly indicate that training with this master key is impossible. Therefore, contact the service.
- When a single signal is heard, you need to quickly turn on the ignition. The buzzer will sound three times and the immobilizer indicator will go off. After 2-3 seconds, turn off the ignition. The car will respond by flashing the hazard lights and beeping.
- Remove the learning key. Before checking the operation of the registered key, wait at least 10 seconds.
The procedure looks complicated, but it ensures that the user cannot accidentally trigger relearning by simply using the master key to turn on the ignition.
In some systems without a master key, the manufacturer provides emergency PIN codes for key programming. On old Renaults, the PIN code is calculated through the Trantir program using the code printed inside the key body; on Kia/Hyundais up to 2007, it is determined by the last digits of the VIN, even without special programs (online services), and so on. The code entry itself is performed both by standard means of the car (Renault has an interior door lock button) and through the diagnostic connector. In this case, you will have to buy an adapter for old cars with inexpensive devices like VAG K-Line from Aliexpress. You can find the necessary software on the Internet. The already mentioned Kia/Hyundai uses the Cascade program, in which the immobilizer learning process is interactive and placed in the corresponding menu item.
Let's sum it up
Upon completion of the entire list of manipulations, this chip key can be considered trained. Sometimes the first attempt, when the key is trained, may not bring the expected result. You should not despair, because if you repeat the procedure, the situation is guaranteed to improve. And now you know how to register the key correctly.
Welcome! Immobilizer - This is a device thanks to which the car breaks the chain in the system (which chain the car chooses to break), thanks to this the car will either not start, or it will start but after a very short time it will stall, but over time such moments happen that the immobilizer you have to train, this happens for various reasons, for example, you need to change the password for the immobilizer (This is very useful when strangers find out the password for the immobilizer), or if you lose the working keys (the working key is the one that starts the car), the immobilizer also has to be retrained, otherwise the car just won't work.
Resynchronization of remote control codes
The ECU transmits data to the Lada Priora remote control via a radio channel and a transponder channel. Problems arise with the radio channel: if you press buttons (send a car signal) outside its coverage area, then after 1000 presses the code is resynchronized: while sending a command in the radio signal area, the electrical package will not perceive the remote control code.
Also, a code error may occur if the battery is discharged: in this case, the ECU will briefly generate a random code that will erase the codes of all remote control chips. In these cases, you will have to enter the remote control data into the electronic control unit again.
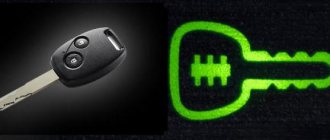
A flip key for Lada Priora is, first of all, beautiful. It is pleasant to the touch; all remote control buttons are located on the body. Its undeniable advantage is that it will not damage the fabric during storage, because its blade will be hidden. The blade is attached to it more securely, and it will not loosen the remote control chip.
Regular and flip key for Priora
The flip key for the Priora does not come from the factory - so you take a standard microcircuit and screw it into a new case: here you have a flip key.
Such cases are usually sold on Aliexpress. You don't even need to re-program! If the key is lost, then: it turns out that you can train any key for a Lada Priora car so that it is “recognized” by the immobilizer. Learning is as simple as pressing a couple of buttons.
When you buy a car, you are given keys to a Lada Priora with a diagram and three buttons and a regular mechanical one.
Making changes to your car for comfort is like an integral part of owning a car. The Lada Priora offers real scope for creativity, and many owners strive to make their “swallow” different from other cars. One of these conveniences - which, as a rule, does not come from the factory - is a flip key for the Lada Priora.
The standard ignition key is “learned” from the dealer or car service center, and the car owner most likely does not do this on his own. Because of this, learning the flip key for the Lada Priora can be difficult. With the necessary amount of patience, dexterity and dexterity, this procedure will become extremely clear, you just need to follow the instructions as clearly as possible.
What is an immobilizer for?
In addition to protecting the car from theft, the immobilizer performs a number of additional functions:
- the ability to control the delay for turning off the interior lighting;
- control of the rear fog lamp;
- checking the presence of the key in the ignition when opening the doors and giving a warning signal to the driver (one buzzer flashes in the instrument cluster);
- signaling that the external lighting is not turned off when the ignition is turned off (double buzzer signal).
Positive sides
The positive characteristics of using a standard immobilizer include:
- inability to start the car engine by turning the ignition lock cylinder or using a key without a chip;
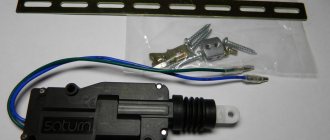
- the ability to control the central locking using the standard key;
- when using a standard alarm system, it works in conjunction with the immobilizer, which provides additional protection;
- implementation of additional comfort functions;
- possibility of diagnosing the unit using a scanner.
The principle of operation of the immobilizer in Priora
The anti-theft immobilizer allows you to start the engine only after recognizing the key installed in the ignition switch.
The operating principle of such a device looks like this:
- There is a special identification chip in the head of the key.
- The signal from this chip is sensed by a ring antenna made of many turns of thin copper wire.
- The antenna is located around the ignition switch cylinder.
- The read signal is transmitted to the control unit, which compares it with the reference one and activates or prohibits starting the engine.
- The immobilizer unit is connected via the K-Line bus to the fuel pump control unit, engine ECU and ignition system.
- If the key is not recognized, these systems are blocked. In this case, the crankshaft may be cranked by the starter, and the immobilizer system warning icon will light up on the instrument cluster.
Key programming instructions for Lada Kalina, Priora, Granta, etc.
- Close all doors. Turn on the ignition with the training key and wait in the on state for at least 6 seconds.
- Turn off the ignition. The indicator light in the warning lamp unit should flash quickly (at a frequency of 5 times per second) while the learning procedure is being carried out correctly. If the lamp stops flashing quickly, it indicates an incorrect operation, an out-of-time interval, or a malfunction. Remove the training key from the ignition switch.
- While the warning lamp is flashing (about 6 seconds), insert the remote control and turn on the ignition. The immobilizer buzzer should emit three beeps. If the buzzer does not sound and the indicator has stopped flashing, this means: - the time interval of 6 seconds has been exceeded and it is necessary to repeat the learning procedure, starting from step 1; -immobilizer is faulty
- Wait 6 seconds for the buzzer to emit two more beeps and turn off the ignition.
- If it is necessary to train the second remote control, then you should perform steps 3...4 again, using the second learning remote control to turn on the ignition. If not, continue from step 6.
- After turning off the ignition for no more than 6 seconds, while the indicator is flashing, remove the remote control, insert the learning key and turn on the ignition. The buzzer should beep three times. Wait 6 seconds until the buzzer beeps two more times.
- Turn off the ignition without removing the training key, wait 6 seconds until the buzzer sounds a single sound signal. The indicator should flash twice as fast. If the sound signal does not sound and the flashing indicator stops, you should return to step 1 and repeat the learning procedure. If a repeated failure occurs when performing step 7, this means that the ECM was previously trained with a different key, in which case the controller should be replaced.
- After the buzzer gives a single sound signal, no later than 3 seconds, turn on the ignition for 2...3 seconds and then turn it off (after turning on the ignition, the buzzer will sound three times and the indicator will stop flashing). The hazard warning lights should flash and the car horn should beep.
- Remove the learning key. Wait with the ignition off for at least 10 seconds. Insert the working key and turn on the ignition. Wait 6 seconds, if the indicator does not flash, test start the engine, the engine should start. If the indicator flashes, turn off the ignition and wait at least 10 seconds. Turn on the ignition. The warning light should not flash and the engine should start. If, after turning on the ignition, after 6 seconds the indicator lights up with a constant light, then the learning procedure must be repeated, starting from step 1.
What is it and why do you need to train keys?
Before you start preparing the system, it’s worth briefly getting to know the immobilizer device on the Lada Priora. The design of the security system includes:
- Control block;
- indicator light on the dashboard;
- electromagnetic frame in the ignition switch;
- working key with remote control;
- a training key with a red mark, which after training is better to hide out of sight so as not to lose, but to start using the working key.
The immobilizer works in tandem with an electronic engine control unit and this pair can either be in a trained state or not.
In the first case, the immobilization function is activated, in the second, both electronic devices have no connection with each other. During the key learning process, both devices receive a unique password , with which the security system unlocks the engine.
It is important to know that the Priora immobilizer can only work with two working keys and one training key, with a red mark. At the same time, only new keys and only new, never programmed electronic control units can be trained.
We teach the key with our own hands
This is the normal key that we will be teaching.
After training the key, we will get a bunch of useful functions - of course, we will activate the immobilizer, completely change the password (it will be automatically programmed into the training key), write the codes of working keys, and in addition, we will completely delete the codes of all keys known to it from the ECU memory. Now let's move on to training, which is carried out according to a strict scheme:
- We close all the doors in the car and completely exclude the presence of extraneous sounds (buzzers). To do this, it’s a good idea to have 10-15 liters of gasoline in the tank to prevent the warning system from triggering when the tank is empty.
- Turn on the ignition with the key with the red mark and wait for at least six seconds.
- Turn off the ignition, and the indicator light on the instrument panel should blink at a frequency of five times per second. The lamp will flash during the entire process. If the lamp stops flashing during training, this indicates a failure in the procedure or a breakdown.
- We take out the red key from the lock.
- Quickly, in six seconds, insert a simple key into the lock and turn on the ignition. The system will sound a buzzer three times, which means that the process is proceeding correctly.
- Within six seconds, the system will beep twice; if this does not happen, you will have to start the process all over again. After the double buzzer, the ignition can be turned off.
- We quickly remove the working key and insert the red one, turn on the ignition, 3 buzzer signals should sound when the key is turned, and then, within six seconds, two more.
- Turn off the ignition, but leave the key with the red mark in the lock. One beep will sound for six seconds and the panel light will blink twice as fast.
- While the lamp is flashing quickly, turn on the ignition with the same key for exactly three seconds. No later than five seconds after turning off the ignition, the system will sound three beeps, after which the ignition cannot be turned on for 10-15 seconds.
Video on how to register a new key
Instructions for activating the standard immobilizer
- Close the doors.
- Turn on the ignition with the RED key and wait at least 6 seconds.
- Pull out the key. The machine should blink at a frequency of 5 times per second.
- Quickly (within 5-6 seconds) turn on the ignition BLACK.
- 3 squeaks + 2 squeaks.
- Turn off the ignition and remove the key.
- Quickly (within 5-6 seconds) while the car is blinking, turn on the RED ignition
- 3 squeaks + 2 squeaks.
- Turn off the ignition RED KEY IN THE LOCK.
- 1 squeak.
- Quickly (within 5-6 seconds) turn on the ignition for 2-3 SECONDS!
- Turn off the ignition. KEY IN THE LOCK
- 3 beeps + machine goes out. We do not remove the key. (When working with some controllers, the light stops blinking and the buzzer emits 3 sound signals when you turn on the ignition. In this case, you should still turn off the ignition and wait at least 10 seconds)
- wait at least 10 seconds.
- Remove the key.
- Checking immo activation. We turn on the ignition with any key, if when you turn on the ignition the car on the dashboard does not light up, then the immo is activated.
The learning process is also shown in the video:
Crib:
- Close the doors.
- Red - ignition for 6 seconds - remove
- Black - ignition 3 beeps + 2 beeps - remove
- Red - 3 beeps + 2 beeps - ignition off - 1 beep
- Ignition on 2-3 sec - ignition off
- Do not turn on the ignition for another 10 seconds.
To resynchronize the codes, turn on the ignition of the vehicle. Wait 6 seconds. If the CL starts flashing once per second (error), turn off the ignition and wait at least 10 seconds. Then turn the ignition back on. The CL should not blink, but the engine should start.
If 3 seconds after turning on the ignition the key light remains on continuously, it means that the anti-theft function is not activated and the key learning procedure should be repeated again.
Worried about your car? Install the alarm yourself.
Keywords: safety of Lada Granta | safety of Lada Kalina | safety of Lada Priora | ignition system for Lada Granta | ignition system for Lada Kalina | Lada Priora ignition system
13
3
Found an error? Select it and press Ctrl+Enter..
Russian Post will receive more than 1000 Lada Largus cars
Steering Lada Vesta (device, reviews)
If the air flow switching knob on a Lada XRAY does not turn
How to disable DRL on LADA without interfering with the wiring
Learning immobilizer keys for Lada Priora
Immobilizer key training
Lada Priora immobilizer control, anti-theft system keys. Diagnostics of electrical circuits of the VAZ 2170. Repair instructions for the generator, starter 2171. Operation of the anti-theft system, battery, light alarm of the VAZ 2172. Car diagram.
- To activate the anti-theft function, carry out the immobilizer training procedure. After completing the entire training procedure:
- – the anti-theft function will be activated in the ECU of the Lada Priora engine management system, if it has not already been activated;
- – the system will change its password to a new one chosen at random;
- – the new system password will be written into the training key;
- – information about all previously trained working keys will be erased from memory;
- – the codes of those working keys that were trained in this training procedure will be stored in memory.
- The immobilizer training procedure is used in the following cases:
- – to activate the anti-theft function in the ECU (for example, on a new Lada Priora car or when replacing a faulty ECU);
- – in case of loss of working keys to erase information about old working keys and to learn new ones;
- – to change the system password if the owner suspects that the password may have been read (for example, when sold by one owner to another);
- – when replacing a faulty VAZ 2170 immobilizer with a new one to train working keys.
The system provides for training only two working keys. Only new working keys can be trained (i.e.
those that have not been trained by another immobilizer) or those that have previously been trained with the training key used in this training procedure.
Working keys can only be trained together with an ECU in which the anti-theft function is not activated, or with an ECU that was trained together with the training key used in this training procedure.
- To learn the immobilizer key, you must do the following.
- 1. Close all doors. Turn on the ignition with the training key and wait at least 6 seconds.
- 2. Turn off the ignition. The indicator lamp should begin to flash at an increased frequency (5 times per second) as long as the learning procedure is carried out correctly. If the lamp stops flashing quickly, it indicates an incorrect operation, exceeding the time allowed for the learning procedure, or a malfunction. Remove the training key from the ignition.
- 3. While the warning light is flashing (about 6 s), insert the working key into the lock and turn on the ignition of the VAZ 2172. If everything is done correctly, the buzzer will sound three times when the ignition is turned on.
- 4. Wait with the ignition on (about 6 s) until the buzzer sounds two more beeps. If after 6 seconds there are no beeps and the rapid flashing of the warning light stops, turn off the ignition and start the procedure again. If you fail to complete the learning procedure again, it means that a malfunction has occurred or this working key has already been trained by another immobilizer.
- 5. Turn off the ignition.
- If it is necessary to learn a second working key, perform steps 3–5 again, turning on the ignition with the second learning working key. If there is no such need, continue the training procedure.
- 6. While the warning light is flashing (about 6 s), remove the trained working key from the ignition switch, reinsert the training key into the lock and turn on the ignition. If everything is done correctly, the buzzer will sound three times when the ignition is turned on.
- 7. Wait with the ignition on (about 6 s) for the buzzer to sound two more beeps.
- 8. Turn off the ignition, but do not remove the training key from the ignition switch of the Lada Priora. Approximately 6 seconds after turning off the ignition, the buzzer should emit one sound signal from the Lada Priora, and the warning lamp should start flashing at double frequency.
- If the buzzer does not sound and the rapid flashing of the lamp stops, you must turn off the ignition and start the learning procedure again. If you cannot complete the learning procedure again, it means that a malfunction has occurred or this learning key does not fit this ECU.
- 9. No later than 6 seconds after the sound signal (while the lamp is flashing quickly), turn on the ignition with the same training key. After waiting 2-3 seconds, turn off the ignition. No later than 5 seconds after turning off the ignition, the buzzer should sound three times, and the rapid flashing of the warning lamp should stop. Do not turn on the ignition for at least another 10 seconds.
- When working with some controllers, the lamp stops flashing and the buzzer gives three signals when the ignition is turned on. In this case, you should still turn off the ignition and wait at least 10 seconds.
- At the end of the training procedure, it may be necessary to resynchronize the immobilizer and ECU codes, since after completing the training procedure, the ECU may not allow you to start the engine when you first turn on the ignition of the VAZ 2171. To resynchronize the codes, turn on the ignition with any trained key (preferably a working one). Pause for 6 seconds. If the immobilizer warning lamp begins to indicate an erroneous system state (flashing once per second), turn off the ignition and wait at least 10 s. After this, turn on the ignition again. The light should not flash and the engine should start running.
If, 3 seconds after turning on the ignition, the warning lamp is constantly on, it means that the anti-theft function of the computer is not activated and the VAZ 2171 key learning procedure should be repeated again.
Source: https://vazclub.com/lada/priora/remont/elektrooborudovanie/protivougonnie-sistemi/obuchenie-klyuchei-immobilizatora.html
Purpose:
The remote control is designed for remote control of locking and unlocking of car doors, turning on and off super-locking doors, turning on and off the alarm system, raising the windows, controlling the locking of the tailgate (trunk lid), and also as a coded electronic key for the APS-6 immobilizer
The remote control is mounted on the blade of the ignition switch key type 1118-3704010 and is designed to operate:
- with electrical package control unit 1118-6512010
- with driver's door module 1118-3763080, 2170-3763080-00/10
2) via transponder channel:
- with immobilizer control unit APS-6 2123-3840010-ХХ;
- with immobilizer control unit APS-6.1 1118-3840010-ХХ;
- with electrical package controller-2170-3763040.
Regular key with buttons
The standard device that is sold with the car is the usual, “basic”, simple version. Inside the case there is a board that includes a control panel for some vehicle systems. In Priora, the key is not just a tool for manually opening doors, it is a pocket device that simplifies the operation of the car.
The remote control control board is attached to the key blade, which is inserted into the ignition switch. The design of this tool is a little flimsy, so due to the swing of the blade, the remote control board suffers and does not respond to button presses the first time.
A standard unit, like any other, operates via a radio channel and a transponder channel. The first sends commands to the driver's door module and the electrical package control module, which is located behind the center console. The second channel transmits signals with the immobilizer control unit APS-4 or APS-6.
How to activate the immobilizer?
The process of turning on the blocking device is usually carried out at the factory when the car is released. If the immobilizer has been replaced, the consumer will need to independently activate the system.
Step-by-step instruction
The activation procedure is performed as follows:
- All car doors are locked. The ignition is activated using the key used for learning. After this, you must wait at least six seconds.
- Then the ignition in the car is turned off. The indicator on the control panel should begin to blink quickly, at least five times in one second. This is normal and blinking occurs throughout the learning process. Once it stops, it will report incorrect actions taken during the task. Perhaps the consumer has exceeded the time interval or there is a problem with the blocking device.
- The key is removed from the ignition switch.
- Within six seconds, while the indicator is blinking, you must install the working element in the lock. The ignition is activated. If the actions are performed correctly, the beeper will emit three sound pulses.
- With the ignition activated, you need to wait about six more seconds. During this time, the beeper should produce two signals. If this does not happen, and the indicator on the control panel stops blinking, then the ignition is turned off and the procedure is carried out again. If the situation repeats, you need to diagnose the device; there may be problems with it. The reason may be that the key being used was trained with a different engine lock.
- The ignition is deactivated.
- If it is necessary to learn a second key, the procedure is repeated. Only the new element is used for activation. If this is not necessary, then while the indicator blinks for six seconds, the old key is removed from the lock and a new one is installed in it. The ignition is activated. If the actions are performed correctly, the beeper will emit three sound pulses.
- Then two more beeps will sound, this should happen within six seconds.
- The ignition is turned off and the key cannot be removed from the lock. Approximately six seconds after the system is turned off, another beep will sound, after which the indicator light will blink at high speed. If there is no audible warning and the light does not blink, the ignition system is turned off and the procedure is repeated. If the problem recurs, this indicates a malfunction of the engine lock or that the key does not fit the immobilizer.
- During the next six seconds, while the indicator is blinking quickly, you must activate the ignition using the key. After 2-3 seconds it turns off.
- Then, within five seconds of deactivation, the beeper will emit three warnings and the indicator light will stop blinking. In this case, the ignition cannot be turned off for 10 seconds. Depending on the model of the locking device, sound signals may sound immediately when the ignition is activated. Then the system still needs to be turned off. The successful completion of the task will be indicated by the activation of a light alarm.
What to do if the immobilizer stops working?
If the device does not work, the lamp on the dashboard flashes and the ECU does not see the blocker, the cause of the malfunction may be oxidation of the contacts on the connector.
The problem is solved like this:
- The bolts installed under the steering column in the car's interior are loosening.
- Using flat pullers, the column protective casing is divided into two parts.
- Next, the plug should be disconnected from the immobilizer, but first you need to remove the connector from the guides. To do this, you need to apply a little pressure on the block. Then the car owner presses the opened latch and disconnects the connector. The second part of it will remain under the plastic lining of the panel.
- Using a screwdriver with a thin tip or a sewing coal with a large eye, clean the oxidized contact elements.
- To avoid such problems, the plug is treated with copper grease. Moreover, both pads are cleaned. Copper grease ensures high-quality conductivity and high anti-corrosion characteristics. The substance is applied using a screwdriver or needle.
- The two parts of the connector are then connected to each other. The correct operation of the immo is diagnosed. If the device is functioning, all components are assembled.
If cleaning does not help, then the immo problem may lie in the operation of the chip resistor.
To replace a part with your own hands, do the following:
- The locking device is being removed from the vehicle. To carry out the task, the side covers on the console inside the car are removed. The controller clamps are unscrewed, as well as the terminal clamps that are screwed to the microprocessor module.
- The control devices are disassembled for soldering a working resistor chip. To carry out the task, a PC is connected to the microprocessor module via a special cable. The program for reading the software is launched, the firmware file is saved into the computer memory. In particular, we are talking about FLASH and EEPROM. The chip resistor itself is soldered from the main board of the device.
- New firmware is installed in the control unit.
- A new resistor chip is soldered. Before connecting the power unit blocking control module, the immo is disabled. This will prevent its possible activation during installation. The module contacts are used to disconnect. First of all, the 12-output plug is disconnected.
- Conductors numbered 9 and 18 are disconnected from the block and shorted with each other. After this, the blocks are connected to the control unit, then the device is mounted in the installation location.
The Immobox channel talked about self-diagnosis of anti-theft locking devices in Priors and other cars.
How to change the battery in the Lada Vesta ignition key
Buttons consume energy, so you need to remember the battery charge and change it in time. The first sign of low battery will be a slow response when pressed. The Lada Vesta flip key is synchronized with a standard battery. To change it you need a screwdriver. The remote control opens with the blade extended, otherwise the case and microcircuits can be damaged. The tool is inserted into the hole in the center line of the case and with a simple movement separates the remote control into two halves. After changing the battery, you need to use a light snapping motion to assemble the product.
Read also: Duster lift for off-road
How to change the battery in the key
Purpose:
The remote control is designed for remote control of locking and unlocking of car doors, turning on and off super-locking doors, turning on and off the alarm system, raising the windows, controlling the locking of the tailgate (trunk lid), and also as a coded electronic key for the APS-6 immobilizer
The remote control is mounted on the blade of the ignition switch key type 1118-3704010 and is designed to operate:
- with electrical package control unit 1118-6512010
- with driver's door module 1118-3763080, 2170-3763080-00/10
2) via transponder channel:
- with immobilizer control unit APS-6 2123-3840010-ХХ;
- with immobilizer control unit APS-6.1 1118-3840010-ХХ;
- with electrical package controller-2170-3763040.
Purpose - why to teach
Each car comes with two keys from the factory: one training key and one regular key without schematics. The device containing the microcircuit is trained to recognize the car and is installed as an immobilizer driver. After which an anti-theft alarm is installed. After this tricky procedure, they are both able to:
- Control door locks and trunk lid from a distance;
- Manage alarms;
- Manipulate power windows;
- “Contact” the immobilizer and unlock the engine control.
And this can be taught to a new key! But the “memory” of the control unit can simultaneously record two devices, so when programming a new tool on the Lada Priora, you will have to delete the old ones from the ECU memory.
An important detail: even if the original Lada Priora key from the dealer has long been lost, the ECU can still be taught a new one if there is a training tool.
Even if it could not be found, you will have to replace the electronic control unit, the APS unit, and the ignition switch (including the cylinders). It is highly not recommended to carry a training copy with you: even if it saves you if the working key malfunctions, its loss will cause a lot of money.
Unlock methods
To unlock the immobilizer controller, use the following methods:
- reflashing the immobilizer controller;
- shunting of actuators;
- complete disabling of the immobilizer;
- installation of an immobilizer bypass;
- call to the dispatcher.
Flashing
To flash the immobilizer, remove it from the car, connect it to a computer or laptop using an adapter, and then use a special application (it is supplied with the immobilizer) to change the firmware of its memory. To perform this work you will need not only a computer, but also the ability to use a special application.
Otherwise, attempting to flash the firmware will result in damage to the device. In addition, you need to have a good understanding of the structure of the car and know where the IM (immobilizer controller) is installed. Therefore, this method is most often used by car service workers, because the average car enthusiast has neither the equipment nor the qualifications for such work.
In serious alarm systems (Starline, Pandora and others), the immobilizer is part of the security system. Therefore, it is impossible to independently reflash this unit without deteriorating the alarm system. However, on cheap alarm systems, as well as those installed from the factory, this method works successfully.
This method is suitable for those who are well versed in electronics, the structure of the car and know how to repair car wiring with their own hands. It is necessary to short-circuit the wires corresponding to the relay contacts, making sure that this manipulation does not disrupt the operation of the engine electronic control unit (ECU).
This method will also not work if the relays are tripped. In this case, shorting the contacts will only result in a blocking voltage being supplied to the corresponding terminal of the ECU.
This method is used if other methods are ineffective. To perform this operation yourself, you need to unscrew the CI fastenings, remove it and disconnect all contacts. Then you will have to adjust the operation of the ECU, perhaps change its firmware. After all, the operation of the ECU depends on CI commands, so simply removing the controller will not restore the operation of the motor.
The exception is simple models and a standard CI installed from the factory, which close certain contacts of the ECU or supply voltage to some terminals. If a more complex device is installed on the machine, you will have to make changes to the wiring and firmware of the ECU. It is better to entrust such an operation to a specialist, unless you are well versed in electronics, the structure of a car and similar devices.
The crawler allows you to deceive the ECU by applying voltage to the corresponding terminals or closing the necessary contacts. This device can be made in various versions:
- simple switch;
- secret button;
- electronic unit with GSM module.
Installing a crawler reduces the overall effectiveness of anti-theft protection, because an attacker can use it to drive away with your car. Crawlers with a GSM module are the most effective, because they respond to SMS containing a specific code and sent to the correct number. If you have installed a reliable security system (Starline, Pandora, Alligator and the like) connected to the dispatch service, then only specialists who have received the approval of this dispatcher should install the immobilizer bypass. After installation, you must inform the dispatcher about connecting a new unit.
Call to the dispatcher
Modern cars are equipped with sophisticated electronics that control engine operation. Therefore, any intervention in the electrical wiring of the machine may result in serious damage to the ECU, which will require its replacement. If you are an automotive electrical specialist or an experienced radio amateur, you will be able to understand the immobilizer connection diagram and disable it without damaging the car.
How to disable the immobilizer
If the immobilizer breaks down or malfunctions, the car owner is faced with a choice: replace the control unit or disable the system. A more rational solution, from a security point of view, would be to purchase a new control unit and keys, but there is no guarantee that this unit will last long. Another solution would be to deactivate the system. To disable the immobilizer unit, several methods are used that will require the performer to have knowledge in electronics. If you do not have such skills, then it is wiser to take the car to a service center, where the unit will be turned off by qualified specialists.
Using a crawler
A bypass device is often used when installing alarm systems with auto start. The operating principle of such a device is based on the use of a separate unit with a standard key or chip installed inside. The unit is located in the car interior under the plastic trim of the pillars or in the instrument panel.
The signal from the key or chip is read by the unit's antenna and transmitted to the ignition switch. The crawler is controlled using a separate relay. If necessary, the crawler can be set to permanently exclude the immobilizer from the circuit. The car can be started with a key without a chip, but data will be supplied to the immobilizer from the bypass device control unit.
One of the classic devices is the Starline crawler model BP-03, which can work in conjunction with any security alarms. Device connection options are shown in the photo below.
In addition to the key crawler, you can use keyless devices that emulate the signal from the chip. The operating principle of the devices is the same. The main disadvantage of this scheme is the retention of a standard immobilizer on board, so this option can only be recommended if security systems with auto start are installed.
Without a lineman
If the car owner does not want to install the crawler himself, then he can remove the immobilizer only by reprogramming the ECM system units.
On some blocks you will have to change the layout of the elements, but on others - not. Such products include the ECM model M73 manufactured by Avtel.
Before starting work, you must remove the unit from the car and connect a standard K-Line type adapter according to the diagram below. You will have to make the transition wiring harness from the unit to the adapter yourself.
Connecting the M73 block
After this you need to proceed as follows:
- Install the OpenBox software on your computer, run it and read the stock EEPROM firmware.
- Save the factory EEPROM data for rollback to its original state (if necessary) and modification.
- Download and install the HxD file editor and open the downloaded firmware.
- Add a line consisting of two FF characters at the beginning of the text and save the change.
- Load the corrected file into the block memory. You can use ready-made versions of untrained firmware that are publicly available.
- Disconnect the unit and install it back on the car.
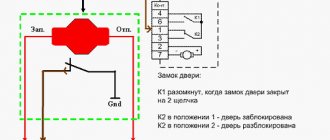
To disable the immobilizer in the January 7.2 block, it is necessary to assemble the following circuit (based on the K-Line adapter), where there is a positive wire switch that acts as an ignition switch.
ECM connection diagram January 7.2 to disable the immobilizer
Then follow the steps:
- Install ChipLoader version 1.97.7 or newer on your computer or laptop.
- Launch the program and select the desired block type.
- Connect to the unit using the “establish connection” function.
- Read EEPROM chip data.
- Click the “delete IMMO” button, after which the program will automatically correct the data in the file.
- Close the program window, disconnect the unit from the wiring and return it to the car.
On M74 type blocks the following must be done:
- Disconnect the battery from the car.
- Remove the connectors from the block.
- Install a homemade harness on the block (according to the diagram below). The circuit should use a double switch, which will allow voltage to be supplied in stages.
- Connect the circuit via the VAG-COM cord.
- Connect the circuit to the battery.
- Turn on the first key of the switch, through which the programming permission signal will be sent.
- Run the WinFlashECU program on your computer, in the settings window of which you select the block type and data transfer speed (the speed should be set to the minimum).
- Turn on the second key, after which a notification about the start of communication with the block will appear in the program window.
- Save the standard firmware of the unit and EEPROM and replace them with new ones. The flashing time may take several minutes.
- After finishing the firmware, turn off the program, power and wiring.
- After connecting the unit to the vehicle's on-board network, it may be necessary to adapt the zero throttle position. To do this, perform engine braking several times from 4 thousand revolutions to a thousand in second gear.
M74 block connection diagram
It should be noted that all flashing methods require the owner to have knowledge in electronics and software. If you doubt your own abilities, it is better to seek help from a service center.
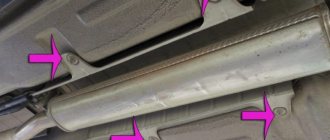
Find immobilizer
To manipulate the immobilizer, you need to know where it is located. The standard location of the device is the vehicle's lock tab. The anti-theft device is secured with one screw, so removing it is not difficult. The antenna connector is located deep in the car panel, right behind the rubberized steering column curtain.
How to get a new key without having the old one as a sample?
Here again, different options are possible.
- You go to the official dealer with all the documents for the car, if, of course, the car was bought new, and ask him just one question: I lost the car keys, what to do. In response, he will most likely offer you to make a new key based on the parameters of your car and/or its serial number.
- You change all the lock cylinders, including the ignition switch.
Pros: Thieves will not be able to use your lost keys to steal your car.
Disadvantages - it is expensive, difficult and time-consuming.
- You call all the reliable companies involved in the production of keys, check whether they can produce a duplicate without the original, if they can, determine for yourself the most optimal price-quality ratio of them, remove the ignition switch and deliver it to the desired address, again along with the documents to the car. There they will make a cast of the lock and use it to make a duplicate; the only reason when this action will be denied to you is when the key is not a simple one, but a chipped one.
Repair of the ignition switch Lada Priora
The process of replacing the rear shock absorber on a Lada Priora VAZ-2170.
For about a week, my lock began to jam in the second position (starter), the key turned in 2-3 attempts. Just yesterday, the second position disappeared completely, i.e. the key turned only to position I (ignition), then the key seemed to rest against something. I read all the tips on the lock, looked at the repair link and, having bought a new lock just in case, decided to remove and look at my own.
First of all, remove the casing. We see four bolts securing the ignition switch.
Since the bolts have break-away heads, to remove the lock they need to be drilled out or loosened using a small chisel. I used the second option. For convenience, remove the steering column switch.
By lightly tapping in a counterclockwise direction, we tear off the bolts, and then unscrew them with needle-nose pliers.
The markings on the lock are Kalinovskaya.
Next, we disassemble the lock by unscrewing three screws. We see that there is enough lubrication there!
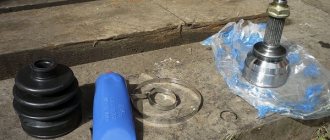
We release the cylinder of the steering wheel locking mechanism by lifting the lock cylinder upward. The most important thing is not to lose the ball that falls out of the end of the larva, and the small springs, but they, however, hold on normally and do not fall out.
On the cylinder there are visible traces of wear on the cylinder rod of the locking mechanism - grease in yellow brass dust.
On the cylinder itself there were burrs on top and a sort of rim had formed, which, in general, is the reason for the jamming and jamming of the 2nd position of the ignition switch. The cylinder in the photo has already been cleaned and smoothed with a file and sandpaper. I forgot to take a photo of the scratches.
The instructions for repairing the lock, offered to me, did not say anything about the brass rod of the cylinder, but I decided to turn its end with the working inside the cylinder towards the spring, so that the working end was intact.
By the way, if you are forced to replace the entire lock, you can leave the old cylinder if it is in good condition, so as not to change the cylinders on the remaining doors or not to carry two keys for the doors and for the new lock on a keychain.
We assemble the lock in the reverse order, check its functionality and install it in place. I again used breakaway bolts, 10 rubles apiece.
Old bolts and heads from new ones.
https://drive2.ru/l/6543921/
next article:
Training procedure:
Carrying out the training procedure leads to the following consequences:
- the engine control controller activates the anti-theft function if it has not been activated;
- the system changes its password to a new one chosen at random;
- a new system password is written into the training key;
- all remote controls that were previously trained are erased from memory;
- The codes of those remote control units that were trained in this training procedure are stored in memory.
The training procedure is applied in the following cases:
- activating the anti-theft function in the controller (for example, in a new car or replacing a faulty controller);
- erasing old and training new remote controls if lost;
- changing the system password if the owner admits that his system password may have been read (for example, when selling a car from one owner to another)
- remote control training when replacing a faulty immobilizer with a new one.
Only new remote control units or those that were previously trained using the training key used in this training procedure can be trained. It is impossible to learn a remote control key from another car into your car.
Please note: Due to the importance of the training key, it is not recommended to use it for everyday use and should be kept in a safe place. Before starting the training procedure, fill the car with at least 10 liters of gasoline, so as not to get confused by squeaks
Before starting the training procedure, fill the car with at least 10 liters of gasoline so as not to get confused by the squeaks.
Purpose and features of the learning process
What preferences does key training provide to the owner of Lada Kalina? As a result of this procedure, the following options are achieved:
- the anti-theft function is activated;
- the password is changed;
- the previously existing list of remote controls is erased;
- updated codes are entered.
In most situations, remote controls of new modifications can be reprogrammed. It is not possible to perform a given manipulation using a non-native key.
An important point arises here. The ignition key, which has undergone all reprogramming steps, cannot be used permanently. It must be removed from sight and use.
Before directly performing the process, it is recommended to replenish the fuel tank in a volume of at least 10 liters. This allows you to perform all manipulations correctly and eliminate confusion in the signals sent by the car.
We perform actions according to a specific algorithm. It is relevant not only for the Lada Kalina, but will also suit the owner of a Priora or Granta. In general, the programming method for these models does not have any global differences.
Resynchronization of remote control codes
The ECU transmits data to the Lada Priora remote control via a radio channel and a transponder channel. Problems arise with the radio channel: if you press buttons (send a car signal) outside its coverage area, then after 1000 presses the code is resynchronized: while sending a command in the radio signal area, the electrical package will not perceive the remote control code.
Also, a code error may occur if the battery is discharged: in this case, the ECU will briefly generate a random code that will erase the codes of all remote control chips. In these cases, you will have to enter the remote control data into the electronic control unit again.
A flip key for Lada Priora is, first of all, beautiful. It is pleasant to the touch; all remote control buttons are located on the body. Its undeniable advantage is that it will not damage the fabric during storage, because its blade will be hidden. The blade is attached to it more securely, and it will not loosen the remote control chip.
In case of loss of keys on cars with an immobilization system integrated into the key, it is necessary first (of course, after opening the car in all possible ways), to dismantle the “brains” or the engine control unit and deliver it to a service station that has a service for disabling the immobilizer.
After this work is done, you can begin to restore the functionality of all elements of the anti-theft and security systems. It is necessary to either cut a new ignition key (if you still have the factory tag with the key number, it always comes with the keys when purchasing a new car. Or purchase a new ignition switch.
Do-it-yourself Lada Priora switch key step-by-step video instructions
Previously produced switchgear models were modified by craftsmen to match the elements of control panels that are equipped with domestic cars at the factory.
The board was adjusted to their size, and the electronic components were resoldered. Nowadays, the market widely offers various flip-out (folding) ignition keys that do not require such modifications. With their design, they resemble key rings from famous world automakers; they are made in the style of Audi, Volkswagen and many other brands. When choosing the model you like, pay attention not only to the appearance. Cheap options quickly fail: the buttons swell and stop working, the release mechanism becomes loose, the body wears out
Some types of keys are equipped with a full-fledged transponder chip or immobilizer chip for a specific car. Empty cases that do not have electronic filling are also sold. Their cost is much lower than chip ones, but you will have to replace the electronic board with the standard ignition key.
When choosing a model, pay attention to the ease of changing the remote control battery, the operation of all four channels, the tightness of the parts, the smoothness and force of pressing the buttons, the material of the case, its strength
Learning a new key
After the purchase, you need to order a blank of the blade of a standard ignition key from a copying shop to make a new one. After this, you can begin training him. This is done using the master key that comes with your car. It has a red mark (insert) on the end. According to the operating instructions for the Lada Priora, the procedure for learning a new key must be performed at authorized VAZ centers or at service stations certified by it in the presence of the car owner and at his expense. However, the car owner himself can perform such an operation; a description of how to do this is easy to find on the Internet.
If the car's immobilizer is disabled or there are operational problems, you will have to reset the EEPROM of the electrical package and the ECU.
In this case, the learning process will need to be carried out again for all the keys to the car. This can be done either through the car’s ignition switch or programmatically using Scanmatic.
On a Lada Priora car, training and simultaneous operation of up to four remote controls is possible.
Some disadvantages
According to reviews from owners of such flip keys, one of the main disadvantages is the small range of action (as, indeed, that of a standard one) of the control panel. Ways have been found to solve this problem: changing the location of the antenna or extending it with a piece of wire.
The operating mode of some remote control buttons also changes slightly. For example, when you press the door open button once, only the driver's door opens, twice - the other doors. You can reprogram the button action algorithm using Scanmatic.
The popularity of flip (folding) car ignition keys is due to their ease of use and beautiful case design. They are more compact, and their parts, due to the rigidity of the structure, do not hit the dashboard and do not distract the driver from driving the car. You can also put it in your pocket without fear of damaging your clothes with sharp metal.
https://youtube.com/watch?v=5Ni7hUaXn7w
Replacing the battery of the Lada Priora remote control
The moment when the battery in the remote control needs to be replaced is determined by the fact that when you press any button (for example, when turning an alarm on/off), the indicator on the remote control flashes twice; If it doesn’t even blink, it means the battery has become unusable. During normal operation, the indicator should light up once.
The control panel in the flip key fob contains a lithium battery (CR2032), voltage – 3 V
To pull it out, you need to open the case (the cover is secured with one screw) and carefully remove the board. Place a new battery taking into account the polarity; install the board back and reassemble the case
The electrical package will work in the same mode, the key fob code does not change.
Replacing the remote control battery
The remote control is equipped with a CR2032 lithium battery, the initial supply voltage of which is 3 V. If the remote control supply voltage is within normal limits, then each time you press any button on the remote control, the indicator lights up with a short flash. If, when you press any button on the remote control, the indicator lights up with two short flashes or does not light up at all, then you should replace the battery with a new one.
To do this, you need to unscrew the screw from the side of the case opposite the control buttons, separate the halves of the case, remove the board from the case, replace the battery with a new one, observing the polarity; insert the board into the case; snap the housing halves together and tighten the screw.