Signs of a faulty ball joint VAZ 2114, 2109.
If, while driving over bumps or small irregularities, you hear a knocking sound in the front suspension of a VAZ 2109, 2114, then this is a reason to start looking for a fault! There are two ways to check the ball joint of a VAZ 2109 - 2114 for a malfunction.
The first method does not require an inspection hole, but a jack is required. We hang the front wheel on a jack and sharply pull it toward and away from us. If the ball joint is faulty, it will make a sound and the wheel will have play.
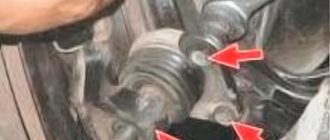
If you have a garage with an inspection hole or overpass, then inspect the ball joint boots for damage. If the boot is torn, this is a sign of wear on the ball joint of the VAZ 2114 and it is better to replace such a ball joint even if it does not knock yet. Place a crowbar or pry bar between the ball and lever. Place one end on the lever and the other on the bolt or ball housing and try to move them apart. For convenience, you can turn the steering wheel towards the wheel being tested. If there is play, the ball must be replaced.
Many people wonder: can a ball joint fly out on a VAZ 2109? Answer: Yes! Maybe! Therefore, if there are signs of a malfunction of this part, do not delay repairs. Moreover, it is not difficult. Next, I will tell you how to replace the VAZ 2109 - 2114 ball joint with your own hands.
Replacement procedure
So, your ball joint can no longer perform its direct duties, so it needs to be replaced. Now let's talk about how exactly such repairs are carried out.
To get started, arm yourself with a set of tools and materials, which includes:
- Shoes;
- Dry rags;
- Set of heads;
- Set of spanners;
- Jack;
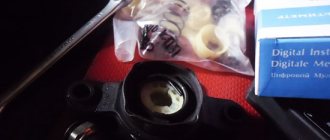
- Litol lubricant (can be replaced with graphite lubricant);
- New ball joints;
- Carrying with a light (required if the garage is dark or repairs last until the evening).
Now you can proceed directly to the repair
Here it is important to follow a certain sequence of your actions. It will allow you to avoid common mistakes, as well as correctly assemble the unit back after replacing the old supports.
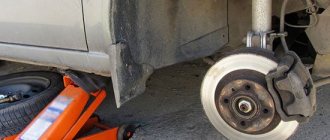
- Drive into the inspection hole or lift the car using a lift. Since we are talking about do-it-yourself repairs, it is unlikely that you will have your own lift. Therefore, a simple inspection hole will do.
- Stop the engine, set the handbrake all the way and block the wheels using the wheel chocks.
- Get under the car and use spanner wrenches to unscrew the fixing bolt of the support pin located on the hub.
- Use a pry bar to very carefully remove the support from its installation location.
- Using a 17 mm spanner, unscrew the two bolts from the bracket. They mark the fastening of the lower part of the support to the found bracket.
- Essentially, the ball joint from your car can now fall to the floor. This is quite normal, but just take care of your feet.
- Remember that ball joints are exclusively disposable elements of the car. This indicates the impossibility of repairing it under any circumstances. Any advice on this matter will be a waste of your time. Just buy new supports and that's it.
- Get rid of the old support.
- At the same time, it would be a good idea to check the brake pads and their current condition. If you find signs of a malfunction, be sure to simultaneously replace the pads.
- Inspect the bracket. If it is intact and has no signs of wear, then leave it in place. If the condition is suspicious, it is better to replace it. This also applies to silent blocks. They can also wear out and produce a characteristic knocking noise when the car is moving. Therefore, it would not be superfluous to replace this element, since you have already disassembled the unit.
- Treat the tip seat of your hub with lubricant, which will make it much easier to remove the element during the repair process in the future.
- Place the new ball joint in place of the old ball joint.
- Reassemble the unit in reverse order and check the car in action.
- If the car behaves quietly when driving over uneven surfaces, you have correctly identified the cause of the noise, and also managed to correctly replace the ball joint.
How to replace a ball joint on a VAZ 2109, 2114.
To replace the ball joint of a VAZ 2109, 2114, place the car on a jack and remove the wheel. Now unscrew one nut securing the ball joint to the lever and two bolts securing the ball joint to the hub.
If you have a ball joint remover.
If you have a puller, place it as shown in the photo and remove the ball.
How to remove a ball joint without a puller on a VAZ 2109 - 2114.
If there is no puller, you will have to remove the lever completely. To do this, unscrew the bolt securing the stabilizer bar (egg), the nut securing the “saber” to the lever and the bolt securing the lever to the body. We remove the lever, take a heavier hammer and knock out the ball.
There are situations when the bolts stick to the silent blocks or you are simply too lazy to remove the lever. In such cases, you can use a backup option, but it may not always work.
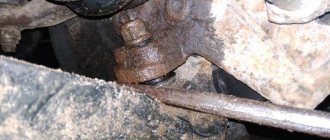
In this option, the ball should not be unscrewed from the hub. Unscrew only the nut securing the ball to the lever. Use a gas torch to heat the lever where the ball pin fits into it. It should be heated for about 3 minutes. Next, just as in the method of checking the ball for malfunction, insert a crowbar between the ball and the lever and press on the crowbar. The longer the crowbar, the easier it is to remove the ball in this way - this is important.
You learned how to change ball joints on a VAZ 2109 - 2114. If you have any questions, write them in the comments and I will definitely answer you!
Source
Execution of work
How to change the ball joint? Before removing the ball joint, you should thoroughly clean it and all adjacent elements from dirt. The removal process includes the following steps.
- Placing the car on a viewing hole with the wheel hanging with a jack or hanging the entire car using a lift.
- Removing the wheel from which the support will be replaced.
- If necessary, treat connections with rust removers.
- Unscrewing the nut securing the pin to the suspension arm.
- Pressing the finger out of the lever using a special puller. If it is not there, you can try to knock out the finger by striking the lever. In this case, the pin nut is not completely unscrewed.
- Pulling the lever down using a pry bar and releasing the finger.
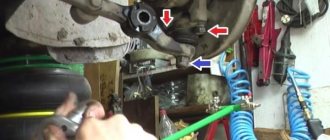
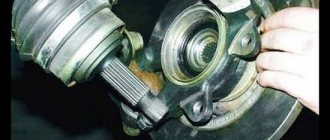
- Unscrewing the bolts securing the ball to the steering knuckle.
- Removing the support.
As you can see, figuring out how to change the ball joint is not at all difficult. Installation of the new support is carried out in the reverse order of removal, starting with securing it to the steering knuckle. The process of installing a finger into the eye of the suspension arm can be somewhat difficult - this operation is more convenient to perform with two people. When the pin is in place, all that remains is to screw in the nut and install the wheel.
A specific suspension maintenance operation is the installation of a ball joint spacer. This is required when the tuning process reduces the ground clearance, or, more simply, the car is lowered. The spacers are designed to improve handling, primarily when cornering. Structurally, they are a solid metal element about 20 mm thick, repeating the shape of the landing part of the support, and are installed between it and the steering knuckle. If spacers are used, the “original” ball mounting bolts will have to be replaced with bolts 40–45 mm long.
The lifespan of a new mount largely depends on your driving style. Be careful and careful.
1. To replace the ball joint on a VAZ 2108, VAZ 2109, VAZ 21099 car, lift and place the front part of the car on supports. Remove the wheel.
WARNING Apply the parking brake and place wheel chocks under the rear wheels.
HELPFUL HINT Loosen and tighten wheel bolts only with the vehicle on the ground. Bolt tightening torque (65-95 Nm) (6.5-9.5 kgf-m).
2. Unscrew the nut securing the ball joint.
3. Press the ball joint pin out of the front suspension arm using a puller.
This is what a puller for removing a ball joint from a front suspension arm looks like.
4. If there is no puller, do not unscrew the ball stud nut all the way. Press the front suspension arm with a pry bar and use a hammer to press the ball joint pin out of the arm using a hammer along the axis of the arm. After this, finally unscrew the nut.
5. Remove the two bolts securing the ball joint to the steering knuckle.
6. Push the lever down and remove the ball joint.
7. Rock the ball pin into the ball joint. The ball pin should not move due to hand effort (a play of no more than 0.7 mm is allowed).
8. If the ball pin moves in the ball joint with little force, the ball joint requires replacement.
9. If the protective cover is torn, remove the top dirty layer of lubricant (if it is noticeable that dirt has gotten inside the ball joint, replace the ball joint) and apply new grease.
10. Install the spacer sleeve onto the ball joint until it stops.
11. Place half of its volume in the new protective cover of the ball joint with grease.
12. Install the ball joint on a VAZ 2108, VAZ 2109, VAZ 21099 car in the reverse order of removal. Before installing the dirt cover, it is recommended to apply sealant to the surface of the support.
WARNING When installing, be careful not to damage the protective boot on the ball joint. Be sure to replace the damaged ball joint cover. Having lowered the VAZ 2108, VAZ 2109, VAZ 21099 car to the ground, shake it strongly several times. Tighten the nut securing the ball joint to the lever to a torque of 80-96 Nm (8.0-9.6 kgf-m), the nut securing the ball joint to the steering knuckle -50-63 Nm (5.0-6.3 kgf-m). After driving 100 km, tighten these threaded connections again to the required torque.
Spent ball joints on cars VAZ-2108, VAZ-2109, VAZ-21099, VAZ-2110, VAZ-2112, VAZ-2115, VAZ-1118, VAZ-1119, of course, will not cause as many problems as ball joints on the legendary classics . They don’t fly out (it takes a lot of effort to tear out a ball joint on a MacPherson strut suspension), but they can knock and squeak, quite loudly. This means that they still have to be changed. But the question immediately arises - How to determine whether it is time to change the ball joint or not? . Chassis diagnostics will help answer this question. It’s quite possible to do it yourself. But having a friend who isn't afraid to get their hands dirty will be very helpful. There are two options... There are no three options for diagnosing ball joints . First, we lift the wheel and, holding the top and bottom with our hands, shake it, checking for play. The second, more accurate method is to take a pry bar or crowbar in your hands and climb under the car. We insert the pry bar between the lower arm and the edge of the support, and press it up. In this option, the backlash will be more noticeable. And the third diagnostic method...
The surest way! Quickly, take and remove the support from the car. And now we check it “manually”. Holding the support in a vice, we check the ball pin for radial and axial play. If you manage to move the ball joint pin without much effort, the ball joint should be replaced. But in order to quickly remove the ball joint from a VAZ-2108, VAZ-2109, VAZ-21099, VAZ-2110, VAZ-2112, VAZ-2115, VAZ-1118, VAZ-1119 car you will need: a ball joint remover , a wrench socket 17-19, jack, wheel wrench, pry bar (crowbar, metal pipe) and a faithful friend (to whom you will hand the pry bar). And with this arsenal, you can “diagnose” and replace the ball joint in 15-20 minutes . And one more thing... The new support must be lubricated before installation. To do this, remove the boot and apply a small amount of lithol to your finger, put the boot on.
We change the ball joint on cars VAZ-2108, VAZ-2109, VAZ-21099, VAZ-2110, VAZ-2112, VAZ-2115, VAZ-1118, VAZ-1119 . Let's mark the time!
Loosen the wheel bolts and jack up the car. We remove the wheel. Unscrew the ball pin nut (photo 1) and the bolts securing the support to the steering knuckle (photo 2). We insert the puller and press out the finger (photo 3).
We ask a friend to press the lower lever with a pry bar and remove the old support. We screw the new support to the steering knuckle and after that (photo 4), ask the assistant to slowly release the lever, pointing his finger at the eye. Tighten the ball stud nut.
Replacing the ball joint on a VAZ-2109 car can be easily done with your own hands, without taking the car to a car service center, and without spending extra money. This work is the most common repair on the chassis of the VAZ-2109 and similar vehicles. The safety of the driver and passengers when driving depends on the serviceability of this element. Therefore, the replacement of the VAZ-2109 ball must be carried out in a timely manner. Don't skimp on this, because the consequences can be much more expensive.
Signs of a bad ball joint
Don't know how to determine whether a ball joint is faulty? The answer to this question can be the following situations and their symptoms, presented in the table:
| Symptoms of a bad ball joint | Description of the symptom and cause |
| Knocking from the wheel while driving, especially when driving through potholes and various irregularities. | Clanking and knocking can occur at any speed. It is heard especially well when a loaded vehicle hits a hole, sharply enters a turn with body roll, or sharp braking. It can be either one-time or recurring in nature, during peak load on the ball joint. An exception is the case when the lubricant in the CV joint freezes in the cold season, but after warming up and driving for a short time, it warms up and the knocking stops. |
| Changes in wheel alignment characteristics. | Usually, the wheel on whose side the ball joint is worn out more “suffers” more. Such changes in wheel alignment will not be visible to the eye, so to identify the breakdown, it is recommended to use the services of car services, where they perform wheel alignment measurements and restoration. An indirect sign of a breakdown in this case will be “eating” of the rubber on the edge of the wheel. |
| The car "wobbles" along the road. | This behavior is caused by the appearance of play in the ball joint. Because of it, the wheel wobbles when driving and the car is not able to keep the road straight. Moreover, this yaw will increase as the speed increases. However, at the initial stage, this sign is quite difficult to catch, especially if the car mainly drives on bad (rough, broken) roads. |
| Creak when turning. | In this case, we mean the squeaking noise coming from the front wheels. Since creaking sounds can also come from the power steering or steering rack. Therefore, in this case, it is better to do an additional inspection using a ball assembly. |
| Uneven wear on front tires. | When, as a result of damage to the ball joint, the steering wheel is not strictly vertical, but at an angle to the road surface, then along its inner edge (the one closer to the engine) the tread wears out more than on the rest of the wheel surface. You can simply check this visually by inspecting the corresponding surface of the tire on the side where the knocking occurs while driving. This can also be caused by wheel wobble when driving. |
| During braking, the trajectory of the car changes. | When driving straight and braking, the car may turn slightly to the side. Moreover, the one on the side of which there is a damaged ball joint. This is caused by the fact that one of the wheels is slightly tilted, which creates force for movement. Typically, characteristic clicks are heard coming from the area where the ball joint is installed. As braking increases, the clicking sound may also increase. |
Signs of breakdown
If the ball joint is very worn, the car itself will let you know about it.
You just need to pay attention to the characteristic symptoms.
- When hitting bumps, a distinct thud begins to be heard. It can only come from the front of the left or right side of the car if the problem is in the ball joint.
- When the ball joints wear out, the force applied to the steering wheel for turning increases noticeably. At the same time, the ball begins to creak.
- Moving on a flat road, the car begins to behave unstably, it is pulled in one direction or another.
- When the ball joints on one of the wheels wear out, it is positioned incorrectly and has a certain tilt to the side. This can be easily seen by comparing the position of both wheels. If you often drive your VAZ 2109, you will notice how one wheel wears out faster than the other.
If signs of wear are detected, it is recommended to check their actual current condition and then replace it.
Causes of ball failure
There are a number of typical reasons why a ball joint becomes unusable. Among them:
Remember that the causes of ball joint failures do not appear overnight. The only exception may be an initially defective part (for example, with a crack in the body), but the likelihood of this is quite low. Therefore, it is necessary to diagnose the ball at the initial stage of failure. And when buying, it’s also better not to skimp and pay a little more, because the more expensive the part, the more wear-resistant it will be (in most cases). Their main difference is the quality of the material, the type and amount of lubricant used, as well as tensile strength.
How to determine whether a ball joint is faulty
It is believed that the optimal method of checking the ball joint is to visit a car service center where there is a lift and an appropriate stand. There, specialists will be able to identify faults not only with the ball joint, but also with other elements of the vehicle’s suspension.
However, if the task is only to check the ball, then this can be done in garage conditions using just installation. Well, perhaps it would be desirable for the car to be parked on a pit or overpass. A faulty ball joint can be identified by the main symptom - knocking and free movement of the ball pin when a mount force is applied to it.
Quick check
First of all, you need to “listen” to the ball joint. However, for this it is better to take an assistant, preferably one who knows what sound a broken support makes and generally has some understanding of the elements of a car’s suspension. The verification algorithm is simple - one person rocks the car from side to side (in the direction perpendicular to the movement), and the second listens to the sounds coming from the suspension elements, in particular, from the ball joint.
If such rocking does not produce results, it is worth jacking up the car on the side where you want to check the support. Then, holding down the brake pedal (this is done to eliminate possible bearing play), try to swing the wheel in a direction perpendicular to the movement (that is, away from you and towards you). If there is play and/or “unhealthy” clanging sounds, then there are problems with the ball.
The play of the broken ball will be checked using a pry bar. So, the car needs to be jacked up, and the flat end of the mount placed between the lever and the steering axle. Then, while one person slowly turns the steering wheel, the second person presses on the pry bar. If there is play, it will be clearly felt and even visible to the eye. A similar procedure can also be performed without rotating the steering wheel, especially if the ball joint is already significantly worn.
Is it possible to drive with a broken ball joint?
Many car enthusiasts who are faced with a similar problem for the first time are interested in the question: if the ball joint is knocking, is it possible to drive with such a breakdown? The answer depends on the degree of wear and damage of the specified unit. If the knocking noise from the ball joint while driving has just appeared and the car is not yet “driving” on the road, it does not knock when turning, that is, there are only early signs, then you can still drive such a car. However, make sure that the driving speed is not high, and also try to avoid potholes and uneven surfaces. And, of course, you still need to think about the upcoming renovation. After all, the sooner it is done, the cheaper it will be, firstly, and secondly, the car can be operated safely!
If the breakdown of the ball joint has already reached such an extent that the car “fidgets” on the road and the knock of the ball joint while driving is clearly audible, then it is better to refuse to operate such a car until repairs are carried out. As a last resort, you can drive it at low speed and following the rules of safe driving to a car service center or garage, where you will have to replace it (usually the ball joint cannot be repaired and is only replaced with a new one).
Source
Also check out
- To avoid turning your finger, you need to clamp the lever with a mounting tool.
- Remove the ball joint fasteners to the upper arm.
- Remove the ball.
- Clean the place where the ball joint sits on the lever (there should be no damage or cracks on it).
- Remove the sealing washer from the old ball joint and install it on the new one.
- Before installing the ball joint, you need to lubricate it with ShRB-4 or Litol-24.
- Install the boot and washer.
- Screw the ball onto the lever. Place it in your fist and tighten the nut.
- Unscrew the nut from the lower ball joint. Usually this causes the finger to start scrolling. To avoid this, it is necessary to create a lateral tension at the connection between the fist and the finger, for which a mounting is inserted in the gap between the brake shield and the fist. If there is no result in the gap between the fist and the lower arm, you should install an adjustable pin, and then use it to fix the pin.
How to check a ball joint
The question of how to check a ball joint can be of concern both when symptoms of its malfunction appear, and even when purchasing a new one. There are three main methods for checking serviceability - without hanging the wheels, with jacking up the car and using a lift on which the car is lifted (usually used in a car service center). The check also depends on the type of ball joint - single-link (another name for MacPherson strut suspension) and multi-link. In addition, there are lower and upper supports. Despite the diversity, the testing methods are largely similar and are available to almost any car owner who has basic skills in performing car repair work.
Ball joint testing methods
There are 3 main methods that allow the car owner to check the condition of the car's ball joint. The first and simplest is without removing the wheels or even jacking up the car. The second is using a jack (you need to hang the wheels one at a time). The third is using a lift. This method is only available in a service station, but this diagnostic method gives the most accurate answer to the question about the condition of the car’s ball joint. Also, testing methods differ depending on what type the ball is - single-lever or multi-lever. So let’s look in more detail at the serviceability of a ball without a lift, focusing only on the knock, play and degree of wear by the way the ball dangles in the body.
Types of ball joints
The choice of testing method depends on the type of ball joints used in the vehicle. As stated above, they are of two types, namely:
How to check a ball joint without a lift
Next, we will consider in order the algorithm for searching for wear of ball joints of various types, although often the methods for checking them are largely similar, accordingly, they can be used for different types of ball joints.
How to check the upper ball joint on a car
To check the serviceability of the upper multi-link ball joint, you must follow the following algorithm (it will make it possible to check the play):
Checking the upper ball
If there is play in the upper hinge on the support, then during the described check it will be clearly felt. You may also hear clicks or squeaks coming from the ball joint. However, often such a check is only suitable in case of significant wear; at the initial stage, such an algorithm may not produce results.
Therefore, it is better to use a jack to check. The algorithm will be the same, but the difference will be that you need to swing not only the upper part of the wheel, but also the lower and side ones. Specifically, you can grab the top of the wheel with one hand and the bottom with the other. Next, swing the wheel in a vertical plane . A similar check can be performed by grasping the left side of the wheel with one hand and the right side with the other. In this case, the wheel must be rocked in a horizontal plane . If there is play and “unhealthy” creaking sounds, then it is necessary to replace the support with a new one. These simple steps will help you check the ball joints without removing them and without a lift.
How to check the serviceability of the lower ball joint
You can check the lower balls in the same way as in the case of the upper ones, but the result will be much more effective if you use a pry bar and install the machine on an overpass or lift. It is necessary to insert the assembly between the trunnion and the lever to unload the ball joint and check the possibility of its movement. The following test methods are suitable for testing a single lever system.
Checking lower ball joints on a lift
Checking the ball video instructions
So, to check the lower ball in a single-link suspension system, you need to use a jack and a pry bar. It is advisable to drive the car onto an overpass (inspection hole) or onto a lift so that it is more convenient to carry out diagnostics. The verification algorithm in this case will be as follows:
Checking the lower ball joint on a machine without a lift
The method of checking a ball joint without a lift can be carried out using an additional support, like a stump, capable of supporting the weight of a car or a similar structure.
So, first you need to jack up the wheel under test, then place a stop under the ball joint in such a way as to load the ball joint. If it is in relative order, then the car wheel will remain suspended and will rotate freely, without making any extraneous knocking sounds. If you feel a beating and knocking noise when the wheel rotates , it means that the ball joint has failed and must be replaced.
The design of the suspension of some cars also provides for the presence of a diagnostic hole, specially made to measure the distance from the surface of the ball joint to the base of the pin. However, it is necessary to know the permissible values of the corresponding distances. They can be found in the technical documentation. The distance is checked with measuring instruments. The presence of this hole greatly simplifies the process of diagnosing the ball joint for wear with your own hands without any tools.
Required tools and materials for DIY replacement
Repairing a ball joint yourself is impossible without the tools listed below.
Table - Tools and materials required to replace the ball joint.
| Name | Note |
| Puller | It is not necessary to replace the ball, but it significantly simplifies the dismantling process |
| Spanner | "at 17", "at 19" |
| Socket wrench | "at 17", "at 19" |
| Heads | "at 17", "at 19" |
| Heavy hammer | Required if there is no puller |
| Grease | ShRB-4, Litol-24 or graphite |
| Balloon wrench | For wheel removal and installation |
| Installation | Can be replaced with any strong rod, piece of pipe or crowbar |
| Metal brush and rags | For cleaning work surfaces |
| Penetrating lubricant | To facilitate the separation of rusted and stuck joints |
Checking the ball joint boot
When checking the condition of the ball joint, you must pay attention to its boot. It is made of rubber and its task is to prevent moisture, dust and various debris from the road from entering the joint during operation of the machine. The boot, by and large, is a consumable item and must be periodically replaced. As a result of temperature changes (including in winter), mechanical influences, damage and simply the aging process, first small and then increasingly enlarged cracks may appear on its rubber body, through which dust, sand and other small debris will get inside the ball joint . This mixture will act as an abrasive, gradually breaking down metal surfaces and washing away lubricant.
Therefore, when performing an inspection, you should always pay attention to the condition of the boot, the presence of debris and lubricant in it. If it is damaged, it must be replaced with a new one, since the use of a torn boot leads to a sharp decrease in the overall service life of the ball. And when replacing the boot with a new one, you need to remember to fill it with lubricant (Litolom, ShRB-4 or their analogues).
There is another non-standard method of checking the ball, in particular due to damage to the boot. In particular, the method is suitable for testing on machines in which the ball is positioned vertically with its finger up, that is, if water gets inside, it remains inside like in a vessel, and it enters from above through the oil seal. So, on machines where it is difficult to dismantle and generally get to the support, you can take a regular medical syringe with a needle and pour a little liquid oil into it (2...3 cubes). Next, you need to pierce the boot at the top with a syringe needle and pour the existing oil inside. After this, compare the nature of the old knock and the knock after adding oil. If a difference appears, it means that the ball has failed and it is advisable to replace it. As for the hole from the needle, water will not get inside through it, so the car owner can be calm about this.
The fastening bolt broke off
I'll tell you with my own example. When I installed the new support, I decided to tighten the mounting bolts more tightly. But, unfortunately, I overdid it too much and the head of one of the bolts broke off. As they say, I broke his neck. After that I suffered quite a bit.
These bolts are made of strong steel. I decided to drill it out with a drill, but it wasn’t the right size to be able to get under for drilling. I had to lift the car even higher. When I started drilling, the drills quickly became dull, and one of them broke off and a piece of it remained inside the bolt. Now it was no longer possible even to do anything with a drill.
I imagined that I had to go to work the next day, but I didn’t want to walk, and neither did my wife. Then I decided to drill a hole a little away from the main thread. Its size in the main hole is M10, the pitch is small. I first drilled a hole with a diameter of 6 mm, then drilled it out to 7 mm. After that, I found an M8 tap with a large pitch and cut the thread. Only after that I finally installed the ball joint on the car.
Although the hole was drilled slightly to the side of the main one, still, during installation, an M8 threaded bolt fit into this place. The diameter is slightly smaller than M10, and the bolt in the larger hole has moved slightly and hit the correct hole.
Checking the new ball joint
Many new car parts, even from the factory, are not as high quality as the car enthusiast would like. This is especially true for budget spare parts from little-known Chinese and other brands. This is also true for new ball joints. Therefore, before purchasing a spare part, it makes sense to check its condition by visual inspection. By the way, a similar check can be performed if for some reason the car owner dismantled the problematic ball joint. As for repairs, modern ball joints are non-repairable, but old parts for Moskvich or VAZ classics were often made with the ability to replace the polymer liner, that is, with the possibility of restoration.
The simplest method for checking a removed or new ball joint is to turn the ball pin down. If in this case the upper (when turning over, respectively, the lower) end of the pin sank down under its own weight (and even more so if it simply fell out of the seat), then such a ball is obviously faulty and must be replaced. Even if there is no big play in it yet, it is only a matter of time. Likewise, it makes sense to jerk the ball pin from side to side in its seat. Not only should there be no play, but the movement itself should be with little effort!
Another sign of low-quality (mainly Chinese) ball joints is the presence of a grease trap or a place for it. Original high-quality supports should not have grease fittings (roughly speaking, it is believed that grease fittings are a thing of the past). For reference, a grease fitting is the old name for a grease fitting. The name comes from the word grease, as lubricating oils were previously called. Accordingly, a grease gun is a device for supplying lubricant.
Also, on a new ball joint, it is necessary to inspect the integrity of the boot. Not only should it not be damaged (even small cracks), but there should also be plenty of lubricant underneath it. Otherwise, it is better for the car owner to fill the boot with lubricant himself before installing it on the car.
Conclusion
It is best to check the functionality of the ball joint on a lift, but you can easily do it yourself using a jack and a pry bar. Also don't forget to check the boot. The main thing is to carry out the check in a timely manner in order to replace the ball joint at a stage when it does not yet threaten the safety of the driver and passengers when the car is moving!
Source
Support design
The nine ball joint is simple and unprepossessing, and the suspension design no longer allows the support to collapse as quickly as in classic Zhiguli cars. However, its design is the same - it is a ball pin molded with metal cups. As a rule, a plastic (maybe polyurethane) liner is installed between the finger and the cups, which reduces the coefficient of friction and increases the support life.
For old Zhiguli models, dismountable ball joints were sold, in which the liner was simply replaced. How economically feasible this is is unclear, since the support pin remained old, it could wear out the new liner in about five thousand km. Then - replacement again. If you install a non-removable high-quality support, then its service life can reach one hundred thousand or more, if you do not overload the suspension on bad roads.
Choice
When choosing a new ball joint (BJ) for replacement, focus on several basic criteria.
Selection criterion
Peculiarities
Today there are a lot of manufacturers of ball joints. But not all of them produce truly high-quality parts. That’s why car owners have identified certain companies for themselves. For owners of the VAZ 2109, it is worth paying attention to the manufacturing company Trek.
A loud, well-known name of the ball joint manufacturer is not a guarantee of quality. There are a lot of fakes on the market now. To find the original, visit the official websites of trusted companies, learn about the features of the original packaging, the nuances of protection that allow you to distinguish fakes
There should be no signs of damage, wear or defects on the ball body. High-quality SHOs are always welded from two elements
If you notice that the ball joint pin is painted black, there is nothing good about it. A high-quality finger is also black, but it gets this color as a result of hardening the metal under high temperature. Also try rotating your finger. If you managed to do this without a knob, this is a low quality product.
Responsible manufacturers, in addition to the SHO itself, complete the parts with nuts, bolts and boot
Make sure there is no damage, signs of wear, or other defects.
The mounting bolts must be hardened. If the bolt is yellow, its quality will most likely be terrible.
Must have a Teflon insert or cotter pin. Plus look into your finger - there should be a through hole
Often the inside of the ball joint is lubricated at the factory, but practice shows that this amount of lubricant is not enough, so when replacing you must have a little more lubricant on hand
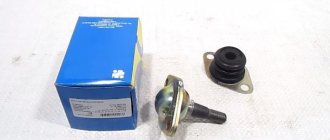
Brand new set
Before replacement
Repairing ball joints on a VAZ 2109 is impractical - people have long considered them consumables. Therefore, if a malfunction is detected, a new part will need to be selected. What should you consider when choosing a part?
Before purchasing and installing, you should pay attention to such factors.
| What aspects to check | What should be |
| Manufacturer's reputation and type of packaging. | Availability and safety of protective packaging elements. |
| Condition of the case. | It is free of scratches, chips, cavities and other defects. |
| Finger color. | It should be black, but not painted, but darkened as a result of hardening. |
| Finger mobility. | It must be impossible or very difficult to turn the element manually. |
| Equipment. | Typically, the supports are supplied with a pin nut, mounting bolts and a boot. |
Immediately after purchasing the parts, check and, if necessary, increase the amount of lubricant in the support.
Checking status
Before changing the ball joint, make sure that this element has actually failed and is the cause of the car's inappropriate behavior.
There are two ways to check - simple and more complex.
First way
To check you will need to do the following:
Verification procedure
Second way
The second testing method is more accurate, but will require a pit and additional equipment.
Adviсe
The next day, my wife and I were driving to work by car. The conclusion from this is simple - when replacing a VAZ-2109 ball, you do not need to tighten the fastening bolts with excessive force; it is better to do this with a torque wrench.
Alas, VAZs often have problems with the quality of cheap spare parts, and ball parts are one of those. If you want to save money on a service station and have some free time, or you just like to tinker with your car, you can easily change the ball joints yourself!
Brake the car with the parking brake and install wheel chocks (“chocks”) under the rear wheels.
Loosen and tighten wheel bolts only with the vehicle on the ground. The tightening torque of the bolts is 65-95 N m (6.5-9.5 kgf m).
Work order
1. Raise and place the front of the vehicle on supports. Remove the wheel.
2. Unscrew the nut securing the ball joint.
3. Press the ball joint pin out of the lever using a puller.
Note
Puller for ball joint of suspension arm.
4. If there is no puller, do not unscrew the nut completely. Press the lever with a pry bar and use a hammer to press the hinge pin out of the lever using a hammer along the axis of the lever. After this, finally unscrew the nut.
5. Remove the two bolts securing the ball joint to the steering knuckle.
6. Push the lever down and remove the ball joint.
7. Before installation, lubricate the hinge and the internal cavity of the cover with grease.
8. Install the ball joint in the reverse order of removal. After lowering the car to the ground, rock it vigorously several times. Tighten with appropriate torques: nut securing the ball joint to the lever - 80-96 Nm (8.0-9.6 kgf m), nut securing the ball joint to the steering knuckle - 50-63 Nm (5.0-6 .3 kgf m). After driving 100 km, tighten these threaded connections again to the required torque.
When installing, be careful not to damage the ball joint protective boot. Be sure to replace the damaged cover.
Before replacing the ball bearing on a VAZ 2109, you must select a new element, check the current state of the unit and make changes based on the results obtained.
The choice of the last ball joint (BJ) for replacement is guided by several basic criteria.
Aspect of Choice
Characteristics
Nowadays there are a lot of ball bearing manufacturers. But not all of them actually make quality parts. Therefore, car enthusiasts set up several offices for themselves. VAZ 2109 owners should pay attention to the products of the Track company.
The famous name of the ball bearing manufacturer is not a guarantee of ownership. There are a lot of fakes on the market at the moment. To find the original, visit the official websites of trusted companies, learn about the unique packaging features, safety aspects that distinguish a fake
The ball body must show no signs of damage, wear or defects. SHO quality is always welded in 2 parts
If you see that the ball joint is black, then there is nothing wrong with it. A quality finger is also dark, only this color is the result of the metal curing at the highest temperature. Also try rotating your finger. If you manage to do this without a collar, you will have a defective product
Responsible manufacturers, in addition to SHO, complete parts with nuts, bolts and saw
Make sure there is no damage, wear or other defects.
The mounting bolts must be hot. If the bolt is yellow, its quality will probably be terrible
Must have a Teflon insert or pin. Plus look at your finger. there should be a through hole
Replacing the ball bearing on a VAZ 2115 (2113, 2114)
Often the inside of the ball joint is lubricated at the factory, but practice shows that lubrication is not enough, so when replacing it is necessary to have even a little lubricant on hand.
If the ball joint is badly worn, the car will let you know. All you have to do is pay attention to the relevant symptoms.
- As he runs through the punches, he begins to hear the precise impact. It can only go in front of the left or right side of the car if it is a ball joint.
- When the ball bearings wear out, the force acting on the steering wheel increases significantly. Immediately after this, the bullet begins to creak.
- Moving along a straight road, the car begins to behave erratically, pulling in one direction or another.
- When the ball bearings are put on one of the wheels, it sits incorrectly and has a certain tilt to the side. You can simply see this by comparing the position of both wheels. If you often drive your VAZ 2109, you will notice that one wheel wears out faster than the other.
If any signs of wear are found, it is recommended to check their actual current condition and then change them.
Before changing the layer with the ball, make sure that this element has failed and is a prerequisite for inappropriate behavior of the car.
There are two ways to check. ordinary and more complex.
To check you need to do the following:
- While driving, listen for knocks coming from the front of the car. The malfunction of the ball joint is especially noticeable when the wheel enters the hole;
- If during a collision with a hole there is a dead impact from the front wheels, the ball must be replaced;
- There is another way. place your foot on the front wheel, then start pushing towards the other front wheel. If you hear a knock during manipulation, it is better to check the condition of the ball using the second method in more detail.
Replacing ball vases 2108 2109 2110 viburnum priora 2115
The second test method is more understandable, but requires a pit and additional equipment.
- You will need an inspection hole or lift to operate. But if they don't exist, you can make a worldly nest.
- Remove the wheel with the spherical bearing mismatch.
- Thoroughly clean all items of accumulated dirt, treat fasteners with WD40 to prevent rust from forming on them and you can easily remove it.
- Use a 19 mm wrench to loosen the nut that secures the ball joint to the VAZ 2109 suspension handle.
- Armed with a puller, remove the SHO finger from the suspension.
- With the absence of equipment, a car service is not required. There is another method. For you, do not completely unscrew the ball joint nut. Tension is created by fastening and several targeted, heavy blows on the hammer arm. In 99% of cases, the finger comes out without problems.
- Do not remove the hitch too far as it should now lower the suspension slightly, freeing the ball joint pin from the arm.
- Raising your head to 17, you need to remove a couple of bolts that are responsible for connecting the sho with the fist.
- Remove worn ball layer.
- Check the condition of the dust container. In some cases, it is enough to change the download. But if the ball joint is worn and showing signs of failure, install the last ball and reassemble the assembly in reverse order.
- Make sure there is a pad on the finger. If removed, be sure to return the item to its original location. In the unlikely event, the new support may not work as expected.
- Be sure to lubricate the rubber boot with grease before installing the reverse. Also, lubricant is applied to the place in the support where the barrel is installed.