Drive diagnostics
But a crunch can also appear when other suspension elements - balls, rod ends, bearings - are destroyed. Therefore, before replacing the CV joint on a VAZ-2109 with your own hands, do a complete diagnosis of the suspension and chassis. It is quite possible that it is not only grenades that will need to be repaired. In general, the diagnosis looks like this:
- Place the car on a viewing hole, overpass, or lift. It needs to be secured securely so that it does not roll off.
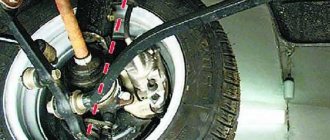
- Using a mounting spatula, check the drive play - if it is large, you can hear the balls knocking when moving, you will need to change the element.
- At the same time, check the condition of the ball joint - their reliability is not very high, and the roads leave much to be desired.
- Visually inspect the condition of the anthers on all grenades - they determine how long the drives will last.
If there are no signs of damage to the grenade, but there are small cuts to the boot, you can disassemble and wash the element. Also, be sure to replace the CV joint boot and lubricant. If necessary, install new clamps.
Repair tool
To independently remove CV joints on a nine or any other car, you need to have the following tool on hand:
- A socket wrench for “30” or a socket with a strong wrench.
- Hammer and chisel.
- Balloon wrench.
- Set of spanners and sockets.
- Penetrating lubricant such as WD-40.
- Capacity of at least 5 liters.
- Marker or metal scriber.
- Jack, support and wheel chocks.
You may also need a grinder, drill, drill bits, and other attributes. The work can be complicated if the drives have never been removed - the threaded connections become dirty, which complicates disassembly.
Preparatory work
Before replacing the CV joint boot or the grenade itself, you need to perform several preparatory steps. Without this, withdrawal is impossible. Please note that you cannot remove both inner joints at the same time - this will lead to destruction of the differential mechanism.
If the bevel gears fall off, you will have to remove the gearbox and completely disassemble it. Preparation includes the following steps:
- Complete or partial drainage of oil from the gearbox. When removing the internal CV joints, oil will spill out; to prevent this from happening, it is necessary to drain at least 2/3 of the total volume.
- Unlocking the front wheel hub nut (or both, if two drives need to be repaired).
- Loosening the hub nut and wheel bolts. The hub must be unscrewed using a 30mm wrench with a large lever.
- Removing the wheel after installing the side to be repaired on the jack and support.
Do-it-yourself removal and replacement of VAZ 2108, 2109, 21099 drives
If you hear a crackling or crunching sound when cornering, then you will probably need to remove the drives and replace the CV joints of the VAZ 2108, 2109, 21099 yourself. This usually occurs on cars with high mileage, but it also happens on relatively new cars due to use on our roads. It's all about the wear of the bearings, they need to be changed.
You will need: left and right drive shaft assemblies, hub wrench, pliers, flathead screwdriver, socket and wrench set, lifter.
It is important to know! Before starting work, drain the gearbox oil. If the hub nut comes off, the car must stand on its wheels with chocks under them.
Unlock the hub nut.
Use a hub wrench to remove the hub nut. Loosen the wheel nuts.
Raise the car and remove the front wheel. We completely unscrew the hub nut and use a screwdriver to pull out the washer.
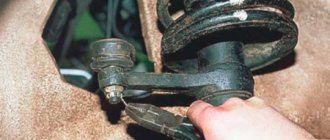
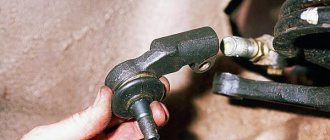
Use pliers to disconnect the steering end from the swing arm.
Unscrew the fixing nut and press out the steering tip.
Unscrew the two steering knuckle bolts and remove the front arm.
Next, all that remains is to remove the inner CV joint from the gearbox. We replace VAZ 2108, 2109, 21099 with a new CV joint and drives.
Source
How to remove the drive
In order to remove the drive assembly, you need to perform the following steps:
- Completely unscrew the nut on the outer joint to free the hub.
- Remove the nuts from the bolts that secure the strut to the hub steering knuckle. This will allow you to move the hub to free the joint. But it will be much more efficient not to unscrew the nuts on the strut, but to disconnect the ball joint.
- If you unscrewed the ball joint, you need to remove the tie rod end pin from the hole in the strut knuckle. This is done using a special puller.
- Now you need to pull the outer joint out of the hole in the hub. How to do this depends on the situation. You can use a thin drift, but without fanaticism, so as not to damage the mechanisms. You should also not hit the CV joint axle with a hammer - this will cause the edges to flatten and make it impossible to remove the element.
- After you pull out the outer joint, you can proceed to the inner one - to remove it from the hole in the gearbox, just apply a few light blows with a small chisel. You can also use a mounting spatula.
That's all, now the drive has been completely removed, you also need to learn how to remove the CV joint on a VAZ-2109.
removal and installation of front wheel drives on VAZ 2108, VAZ 2109, VAZ 21099 cars
Remove the crankcase protection from the vehicle and drain the oil from the gearbox.
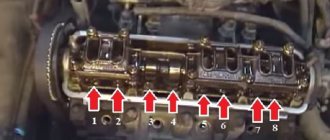
1. After removing the protective cap, loosen the hub nut.
2. Loosen the wheel bolts and hub nut. The hub nut is tightened with a large torque, so it is recommended to use, for example, a piece of pipe as a lever.
WARNING When unscrewing the hub nut, the VAZ 2108, VAZ 2109, VAZ 21099 must stand on the ground! Loosen and tighten wheel bolts only with the vehicle on the ground. The tightening torque of the bolts is 65-95 Nm (6.5-9.5 kgf-m).
3. Brake the VAZ 2108, VAZ 2109, VAZ 21099 car with the parking brake, install thrust bars under the rear wheels of the car and lift the front part of the car, installing reliable supports. Remove the front wheel from the car. After this, completely unscrew the hub nut.
4. Using a screwdriver, remove the thrust washer.
5. Remove the cotter pin from the tie rod ball joint nut to the swing arm.
6. Unscrew the nut securing the steering rod ball joint.
7. Using a puller, press the tie rod ball joint pin out of the strut swing arm.
8. Unscrew the two bolts and disconnect the ball joint of the front suspension arm from the steering knuckle.
9. Pull the steering knuckle with the strut...
10... and remove the splined shank of the outer ball joint from the hub.
11. Using a pry bar, press the inner CV joint shank out of the gearbox.
If you intend to remove both front wheel drives, after removing one of the drives, insert a technological plug into the gearbox instead (for example, an old internal CV joint) and only then remove the second drive. Otherwise, the differential side gears will move and it will be impossible to insert the CV joints during assembly.
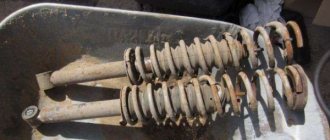
12. Remove the front wheel drive shaft.
Possible malfunctions of the front wheel drive, their causes and solutions
Cause of front wheel drive malfunction Method for eliminating front wheel drive malfunction Noise, knocking from the front wheel when the vehicle is moving Wear of hinge parts
Deformation of the wheel drive shafts Replace worn or damaged joints Replace the wheel drive shafts Lubricant leak Damage or rupture of the protective cover of the inner or outer joint Replace the lubricant in the joint and the protective cover
Source
Replacing CV joints
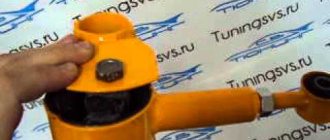
The most important thing now is to knock down the old hinge (or both, if you are also changing the internal one). To do this, you will need to firmly clamp the drive itself in a vice so that the hinge to be removed is directed downward. Apply sharp and strong blows with a hammer to knock down the hinge. If you are only replacing the anthers, try to carry out all work carefully so as not to damage the elements.
But if troubles arise when replacing a VAZ-2109 CV joint and the old joint does not want to come loose, you will need to take extreme measures. Using a grinder, you need to cut the outer casing to free the entire inner part. After this, you will have access to the retaining ring on the drive, removing which you can completely disassemble the element.
Installing new hinges is done in the reverse order. First, install the anthers, then the locking ring and put on the grenade. Gently hit it through the wooden spacer so that it locks onto the ring. The drive is installed without any special features.
Removing and installing CV joints (grenades) VAZ 2108, VAZ 2109, VAZ 21099, Lada Samara
If, during operation, when the vehicle turns, knocking noises are heard in the wheel drive of a VAZ 2108, VAZ 2109, or VAZ 21099, check the CV joints. Rock the drive shaft by hand. If there is play or the dirt covers are torn, the CV joint must be replaced. There is practically no point in disassembling the hinge: if the cover is torn, the dirt that has got into the hinge has already rendered the CV joint parts unusable. Hinge parts cannot be replaced individually.
Remove the inner clamp of the inner CV joint of the Lada Samara.
Remove the outer clamp of the inner CV joint.
Slide the dirt boot over the shaft and turn it inside out.
Using a drift, knock the inner CV joint off the shaft, applying force to the joint cage.
Remove the outer joint outer clamp.
Remove the inner clamp of the outer hinge.
Slide the dirt boot over the shaft and turn it inside out.
Using a drift, knock the outer CV joint of the VAZ 21099 off the shaft, applying force to the joint cage.