Self-replacement of rear struts of VAZ-2109
Any breakdown in a car requires immediate repair, since in most cases the breakdown leads to a decrease in the level of safety during operation.
In this article we will tell you how to replace the rear struts of a VAZ-2109. You should know that, as a rule, a problem is indicated by a very characteristic noise coming from the rear suspension while driving the car. If you do not have sufficient knowledge, then it would be better to seek help from an auto repair shop. But it is worth saying that with some effort you can make the replacement yourself.
Reasons for failure of the rear strut
There are quite a lot of them, but the most common ones are:
- abrasion by the rear wheel of the locker protecting the rack itself;
- fracture of the element in question in the area of the lower silent blocks.
The latter often occurs when the fixing bolt was tightened without load.
- The silent block has various types of damage - cracks or other defects;
- the rubber seal and boot have lost their elasticity;
- the compression buffer was deformed;
- There are cracks directly on the springs.
Such problems require immediate replacement of the rack or its individual elements - otherwise there is a risk of breaking it and causing even greater damage, which is much more difficult to eliminate.
As practice shows, many car enthusiasts, in order to do without spring tensioners, cut off several turns from them. This, among other things, achieves a decrease in clearance. This should not be done under any circumstances.
Replacement procedure
For such work you need the following devices and tools:
- screwdriver set;
- a set of keys;
- jack;
- container for draining shock-absorbing fluid.
The procedure is as follows:
- at the gearbox, switch the lever to first speed;
- lift the rear of the car with a jack (both wheels must be in the air);
- provide reliable support;
- take away the jack;
- dismantle the old racks.
If you need to completely replace them, then the disassembly process ends. When you need to repair any individual element, you should also perform the following steps:
- remove the anthers, bushings and buffer;
- make sure that there are no noticeable flaws;
- wash the shock absorber (it is its contamination that most often leads to breakdown);
- check the rear silent blocks;
- assemble the stand and install it in place.
It is very difficult for one person to complete all the actions on his own, so it is worth asking a friend for help. In particular, your partner will have to direct the rod into the glass. Further:
- install the spring;
- pull out the shock absorber rod completely;
- put on the lower ear and clamp everything with a bolt as tightly as possible.
How to check a shock absorber
To make sure it works, you will need to do the following:
- it is clamped in a vertical position;
- raise to the maximum;
- quickly lowered.
This procedure must be repeated several times.
The following signs indicate failure of this part:
- presence of sounds during the above procedure;
- jamming;
- failure.
This shock absorber is replaced with a new one.
However, before doing this, it is better to make sure that any individual element is not damaged. If this is the case, then only what is broken is replaced. The procedure is as follows:
- the rod is pulled out to the maximum;
- the nut is unscrewed;
- take out the fixing elements and the rod itself;
- remove the working cylinder;
- every detail is inspected.
If defects are found, they are replaced. Assembly is carried out in reverse order.
After installing the compression valve, you need to make sure that its discs move smoothly. Jamming is not acceptable.
Finally, it’s worth telling that on average in Russia a new rack will cost approximately 3 thousand rubles. As you can see, the price is quite serious, and therefore it makes sense to treat the car more carefully and regularly care for it.
To fully familiarize yourself with the process, we recommend watching the video below:
Causes of failure
There are two main reasons why rear shock absorbers begin to misbehave:
- When driving, the rear wheel can gradually wear out the locker, made of plastic. It serves to protect the rack. Over time, the wheel gets closer and closer to the stand;
- If the breakage occurs along the lower silent block, the culprit is the bolt holding it in place. It was simply not tightened to the required load.
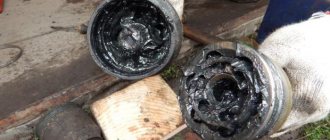
Worn out old shock absorbers
When changing the strut, pay special attention to this bolt. If you make the same mistake again, you will soon have to make repairs again.
Symptoms of a problem
Pay attention to the telltale signs that tell you that you need to take action to correct problems with your rear struts.
| Sign | Peculiarities |
| The silent block has changed | Cracks, various kinds of defects, and flaws may appear on this element. This indicates wear, so the shock absorber should be replaced. |
| The gaskets and boot have lost their elasticity | While these elements are working, they are clearly limp in appearance. This is a serious signal that the rubber components will soon break and this will lead to sad, expensive consequences. |
| The compression buffer is damaged or deformed | Everything in the system operates under high pressure. And if the gasket doesn't do its job properly, pressure is applied to the buffer and it breaks. |
| The spring has cracks | Everything here is more than logical and understandable. If signs of spring deformation appear, it must be replaced. At the same time, you can check the condition of the remaining nodes |
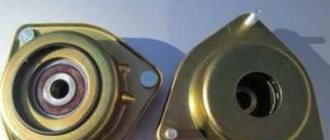
Silent block
How to change rear struts on a VAZ 2109
Replacing shock absorbers VAZ 2108, 2109, 21099: car enthusiasts should take note of the shock absorber
As a result of long-term use of the vehicle or premature breakdown, the vehicle owner may need to replace the front and rear struts. On VAZ 2108, 2109 and 21099 models, the service life of shock absorbers varies between 50-100 thousand kilometers and depends on driving conditions. It is prohibited to drive a car with faulty shock absorber struts, as failure can lead to an accident. Therefore, it is important to at least imagine in theory how the replacement is made.
Purpose of shock absorbers
The main function of shock absorbers is to keep the vehicle on the road no matter the condition of the road surface. Due to the struts, control is not lost when hitting bumps, which ensures a comfortable ride. Also, the front and rear struts do not allow the car to roll too much when entering a sharp turn.
Both the rear and front shock absorber struts of the VAZ 2108, 2109, 21099 consist of two elements - the shock absorber itself and the softening spring. The shock absorber is a cylindrical pipe with smooth inner walls, filled with working fluid. While the car is moving, the spring prevents the shock absorber from falling too low.
Reasons and signs of the need to replace racks
Failure of shock absorber struts in VAZ 2108, 2109, 21099 cars can be determined by a number of signs. Including:
- a characteristic knocking sound from under the car's bottom, which occurs due to wear of the fastening;
- the presence of black streaks on the shock absorber body, which can be easily
- detect during visual inspection;
- ineffective vibration damping, leading to excessive sway of the car body on uneven roads;
- strong shaking when hitting bumps.
To obtain reliable information about the technical condition of VAZ 2108, 2109 or 21099 shock absorbers, test the car on a vibration stand. The computerized stand takes into account the design features of the struts of a specific car model and performs testing by simulating various road conditions. The test results allow you to find out about the serviceability and remaining life of shock absorbers.
Types of loads and specifics of work
All loads that shock absorber struts take on can be divided into two groups:
- dynamic (rapidly changing);
- conditionally constant (quasi-static).
Dynamic loads occur when a vehicle hits an obstacle. When hitting a bump, the shock absorber first compresses, then rebounds. When a wheel gets into a hole, on the contrary, first rebound, then compression. The task of the shock-absorbing element is to take the blow, dissipate its energy, and convert it into heat. This energy conversion is ensured in all three elements of the shock absorber strut: during spring deformation, gas compression under the piston and the rapid passage of oil through the shock absorber cylinder fitting.
Conditionally constant loads on the shock absorber struts occur when the car moves on a flat road surface when cornering. In this case, the geometric position of the wheel relative to the car body changes much more slowly than when hitting an obstacle.
When moving along an arc of constant curvature at a constant speed, the geometry does not change at all. This means that the task of the device is not to dissipate energy, but to ensure uniform distribution of wheel pressure on the road, prevent skidding, and ensure controllability. The flow of oil through the fittings occurs slowly and is of less importance than the reaction of the spring and gas pressure.
Removal and installation of the shock absorber strut of the rear suspension of the VAZ-2109
Lower the rear seat back and remove the upper pillar mount protective cap located under the rear parcel shelf.
Unscrew the nut of the upper strut fastening, holding the shock absorber rod from turning, and remove the support washer with the upper cushion.
Engage first gear and place wheel chocks under the front wheels.
Raise and support the rear of the vehicle.
Remove the rear wheel.
Loosen and tighten wheel bolts only with the vehicle on the ground.
The tightening torque of the bolts is 65–95 Nm (6.5–9.5 kg/m).
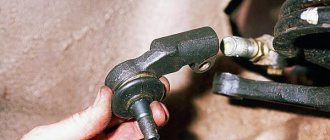
Unscrew the nut of the lower rack mounting and remove the bolt
Lower the strut down and remove the lower cushion with the support washer and spacer from the shock absorber rod through the spring coils
Push the shock absorber rod down
Remove the spring with protective boot, cover and compression buffer
Remove the strut from the rear wheel well
Remove the insulating gasket from the upper spring support cup (if it is not still on the spring)
Place the compression buffer onto the shock absorber rod
Secure the stand and put the protective case and cover on it.
Pull out the shock absorber rod and install the lower cushion with the support washer and spacer on it.
The shock absorber rod can be easily pulled out by screwing a nut onto it
Install an insulating pad on the upper coil of the spring and secure it from displacement using a thin rope, electrical tape, etc.
Install the spring on the stand so that the beginning of the first turn falls into the stamping in the lower cup
To compress the spring when installing the rack, place a jack under the beam.
Gradually lifting the beam with a jack and thereby compressing the spring, insert the shock absorber rod into the hole in the body arch.
Install the upper cushion with a washer on the shock absorber rod and tighten the nut of the upper strut fastening, holding the rod from turning with a second wrench.
After lowering the car to the ground, rock it vigorously several times.
Tighten with the appropriate torques: the nut of the lower fastening of the shock absorber to the beam - 68-84 Nm (6.8-8.4 kg/m), the nut of the upper fastening of the shock absorber - 51-63 Nm (5.1-6.3 kg/m).
After driving 100 km, tighten these threaded connections again to the required torque.
Required Tools
You can remove faulty racks and install new ones in their place yourself. To do this you will need the following set of tools and accessories:
- Socket head for 17 and 19.
- Mount.
- Socket wrench.
- Jack.
- Pliers.
- Ratchet handle.
- Collar.
- Wrenches for 17 and 19.
- Penetrating lubricant.
- A key to keep the shock absorber rod from accidentally turning.
A special wrench prevents the nut from turning while unscrewing
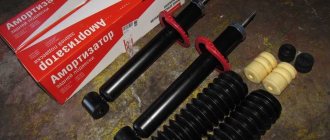
VAZ-2109 replacement of rear struts: rules and replacement process
On a VAZ-2109 car, replacing the rear struts is necessary in case of excessive wear or damage. If we compare the suspension of the “nine” with the “classic”, then it is more advanced, higher efficiency, and the design is a little simpler. Although there are still common features - the design has springs and shock absorbers.
Only on the “nines” they are assembled into a single unit, and on the “classics” they are installed independently of each other. Repair and maintenance of the suspension on a VAZ-2109 car can be done independently, you just need to know the general design of the car and be able to use the tool.
Rear suspension design
The basis of the entire structure is a shock-absorbing strut, which dampens body vibrations when driving on uneven surfaces. The rear struts of a VAZ-2109 are replaced without dismantling other components of the vehicle's suspension. The rear shock absorber strut consists of:
- shock absorber;
- metal plates under a spring;
- springs;
- rubber cushions;
- fastening elements - nuts and bolts.
All these elements are connected into a single unit and installed on both sides of the car. It turns out that the design dampens the vibrations that the entire rear part of the car produces when driving on an uneven road.
What does a shock absorber consist of?
In addition, the shock absorber itself includes many smaller elements. The basis is a system similar in some ways to a hand pump. Only instead of air it pumps oil. Some shock absorbers can be repaired - it is enough to completely disassemble them and replace all components that have become unusable. You will also need to add oil, and exactly as much as indicated in the technical specifications for a particular model.
What tools are needed to replace struts?
When replacing the silent block of the rear pillar of a VAZ-2109, it is advisable to install the car on an inspection hole or overpass. In this situation, repairs occur much faster, because there are more amenities. To make the repair yourself, you will need:
- Jack – preferably hydraulic.
- Body supports.
- Wheel chocks – installed under the front wheels.
- A set of keys.
- Spring puller.
- Steel wire.
Wire may be required to secure the spring in a compressed state. But you can use thick copper or aluminum instead of steel. Only these metals are much softer and under the influence of elastic force the springs can stretch.
Preparatory work
Before starting work on replacing rubber bands on the rear pillars of the VAZ-2109 or dismantling elements, it is necessary to thoroughly prepare. To do this, before starting repairs, treat all threaded connections in advance with penetrating lubricant such as WD-40. The lubricant must remain on the metal for at least half an hour to completely clean the threads of rust and dirt.
How to remove the rear strut on the "nine"?
To dismantle the rear pillar on a VAZ-2109, you will need to perform a few simple steps:
- Loosen the wheel bolts on the side to be repaired.
- Raise the rear of the car on a jack.
- Remove the wheel completely.
- Place a support under the body and lower the car onto it.
- Check how well the spring is compressed with a puller.
- Open the trunk, remove the rubber plug covering the place where the shock absorber rod is attached.
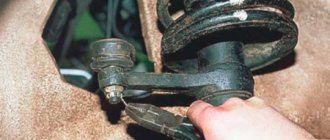
- Using a long tubular wrench size 17 or a special tool, unscrew the nut from the rod.
- Unscrew the lower mounting of the shock absorber strut.
- Pull out the entire rack assembly.
That's all, now you can repair or replace the rear struts of the VAZ-2109 with your own hands.
Repair or change?
Some motorists are faced with a completely reasonable question: shouldn’t they try to restore the old struts themselves, since the cost of new ones is quite high? The cheapest ones of unknown production and quality will cost no less than 1,500 rubles apiece. If you decide to repair them yourself, it will be at least three times cheaper. But there are several pitfalls:
- If the life of the old racks is already decent, then there may be strong wear on the rod, due to which it is sometimes impossible to achieve perfect sealing.
- It is unlikely that you will be able to fill the shock absorber with as much oil as is necessary for proper operation. If you make a mistake of a couple of grams on the smaller side, the shock absorber will not work. If you pour more than normal, the seals will break.
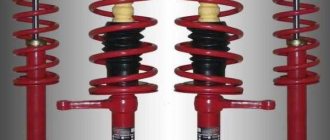
Shock-absorbing element design
The shock absorber strut for the VAZ 2109 structurally consists of a spring and a shock absorber placed inside it. The native version of the “nine” belongs to the category of so-called two-pipe. It is attached with the rod up to the body and the cylinder down to the wheel hub.
The shock absorber cylinder has double walls. They are hermetically connected to each other along the upper edge; along the lower edge, the outer cylinder has a bottom, but the inner one does not. In the inner cylinder, a piston moves on a rod and has bypass valves - fittings - for the flow of working fluid in both directions. A piston can move up and down in an incompressible fluid due to two factors:
- the flow of working fluid between the lower and upper parts of the inner cylinder, which occurs through the valves in the piston;
- partial flow between the lower part of the inner cylinder and the outer cylinder due to air compression in the sealed space between the upper parts of the outer and inner cylinder.
Such devices cannot be installed upside down; their design is complicated and heat removal is difficult. Under extreme operating conditions, the effect of cavitation aeration is observed - foaming of the working fluid, which worsens all the characteristics of the shock absorber.
More modern is the single-pipe shock absorber design, based on the idea of separating the gas volume from the working fluid using a special free piston. This allows the unit to be operated in any position, improves heat dissipation, and eliminates aeration.
Recently, single-pipe structures filled with nitrogen have gained popularity and are the best option for use on the VAZ 2109.
Preliminary quick diagnostics of the VAZ 21099 chassis
In order to have an idea of the condition of the chassis, the car must be driven onto a pit/lift in good lighting. If this is not possible, use a jack, remembering to use the handbrake and place a support under the wheels opposite the raised side. The front wheels can be removed for a more detailed inspection. Be sure to have a soft brush and cloth with you.
A quick inspection can be carried out after every 5 thousand kilometers.
Preventive inspection and possible replacement of chassis components should be carried out every 10-30 thousand kilometers, depending on the operating conditions of the vehicle (quality of the road surface).