AutoNews / Reviews / Tests
How to Remove the Exhaust Manifold of a VAZ 2109 Injector
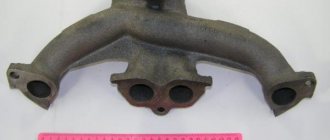
The exhaust manifold is a component of the exhaust system of accounting programs that carries out the process of removing exhaust gases from the cylinders of the unit into the exhaust pipe.
If the collector malfunctions, the culprit is both the element itself and its gasket. Changing the exhaust manifold (exhaust manifold) gasket is a common event when repairing a VAZ 2109.
In order to change the manifold or its gasket, in any case you will have to dismantle the VK. But to get to the element you are looking for, you will first need to go through some preliminary stages. Specifically, tighten the fasteners, and then remove the air filter and carburetor if step 1 does not help.
Your deeds
Often, loose fastenings of the collectors became a prerequisite for the ingress of contaminants, which disrupted the performance of the exhaust system. In that case, the tightening did not give any result, then the gasket was definitely burned out or the collector itself was damaged, which is the least possible
Removing the air filter
- If the engine is injection, to remove the air filter you will need to unscrew the four mounting screws of the filter housing cover. The filter itself is located under the cover. If difficulties arise when lifting the cover, disconnect the mass air flow sensor and remove the filter device.
- If you have a carburetor under the hood, then the filter and housing will be held in place by 3 latches. There is a screw in the center of the iron cover, which is often unscrewed by hand. Once you remove it, you can lift the lid without any problems. Underneath there is a filter, which should be removed carefully. Examine its condition carefully. If the filter has been working for quite a long time, it is recommended to change it during the return assembly.
The carburetor is dismantled in the following order:
- Disconnect the antifreeze supply hose from the fitting to the engine starting device. For this purpose, you unscrew the clamps;
- Be sure to drain the coolant into a prepared container;
- Disconnect the exhaust pipe that comes from the exhaust manifold and the BC bracket;
- Disconnect the throttle cable bracket. To do this, you need to remove one end of the spring from the damper control rod, and then remove the entire spring. Now loosen the nut on the bracket, which will allow you to remove the cable from the engagement;
- Disconnect the EPH sensor from the power plug;
- Disconnect the vacuum tube and a pair of hoses from the carburetor heater unit;
- Remove the crankcase ventilation hose;
- Remove the four mounting nuts holding the carburetor and intake manifold;
- Remove the carburetor carefully without tugging. It must be evenly removed from the studs.
Now it’s time to remove the intake and exhaust manifolds. Having dismantled them, you can easily understand how you can get by by changing the gasket, or whether you will need a complete change of the collectors themselves.
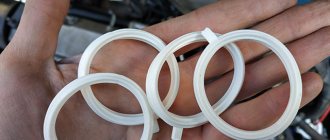
The gasket is a consumable item, the purchase of which will cost you almost 50-250 rubles, depending on the manufacturer and region. Services for replacing gaskets for 100 cost more than 1,500 rubles. Add to this the price of a high-quality gasket and you get quite a lot of money. You will avoid such costs if our client can do it on his own.
By removing the air filter and carburetor, you gain access to the intake manifold.
To dismantle it you will need a certain set of tools:
- Ratchet with 10mm head;
- Collar;
- Ratchet;
- Deepest head at 13;
- Row head for 13;
- Open-end wrench 13.
When our client is ready, we get to work.
- Unscrew a couple of mounting nuts to bend back the platform located under the carburetor.
- Disconnect the hoses that are connected to the intake manifold.
- Remove the 6 mounting nuts that are located on the intake manifold.
- Remove the manifold itself from the studs. To do this, simply swing the knot to the sides. Often it sticks to the gasket, which causes problems with removal.
- Inspect the condition of the unit. If there is damage, the collector is replaced.
- If the problem lies solely in the gasket, put the intake manifold aside for now and start removing the outlet.
To remove a graduate, you will need:
- Ratchet;
- Open-end wrench 13;
- Socket wrench 13;
- The deepest head is 13.
Is our client still ready? Then let's get started.
- Unscrew the four exhaust pipe mounting nuts from our exhaust manifold.
- Pull the so-called trousers off their heels and take them to the side. Now you can unscrew three more fastening nuts securing the VK.
- Carefully, without sudden movements or jerks, pull the graduate off the stiletto heels.
- Often, during the dismantling of this unit, the manifold or its mounting nuts become stuck to the seats. To prevent this, treat the assembly with WD40 in advance, let it react, after which there will be no problems with dismantling work.
- If the studs break off during removal, you will need to drill out the old element, make a new thread and install a fresh stud.
Preparation stages
To replace the manifold or its gasket, in any case you will have to dismantle the VK. But before you get to the element you are looking for, you will first need to go through some preparatory steps. Namely, tighten the fasteners, and then remove the air filter and carburetor if the first stage does not help.
Stage of work
Your actions
Often, loose manifold fastenings caused the entry of contaminants, which disrupted the performance of the exhaust system. If the tightening did not give any result, then the gasket is definitely burned out or the collector itself is damaged, which is less likely
Removing the air filter
Removing the carburetor is carried out in the following sequence:
- Disconnect the coolant supply hose to the engine starting device from the fitting. To do this, unscrew the clamps;
- Be sure to drain the coolant into a prepared container;
- Disconnect the exhaust pipe that comes from the exhaust manifold and the BC bracket;
- Disconnect the throttle cable bracket. To do this, you need to remove one end of the spring from the damper control rod, and then remove the entire spring. Now loosen the nut on the bracket, which will allow you to remove the cable from the engagement;
- Disconnect the EPH sensor from the power plug;
- Disconnect the vacuum tube and a pair of hoses from the carburetor heating unit;
- Remove the engine crankcase ventilation hose;
- Remove the four mounting nuts holding the carburetor and intake manifold;
- Remove the carburetor carefully without yanking. It must be gradually removed from the studs.
Dismantling the unit
Also check out
- When disassembling the valve mechanism, it is necessary to place a wooden block under the valve plate.
- Dry the valve. Remove it from the cylinder head guide bushing.
- Using a key “13”, unscrew the 2 nuts securing the inlet pipe.
- Remove the gasket and pipe.
Assemble and install the cylinder head in the reverse order.
Recommendations :
- Valve stems with engine oil. The same applies to guide bushings.
- Before installation, remove dirt, oil, and remnants of the old gasket from the surface of the cylinder block.
- The cylinder head gasket should be replaced using two special centering bushings.
- Install the mounting screws; the diagram below shows 4 steps on how to tighten them.
- The first tightening torque of the screws is 20 N.m (2 kgf.m);
- The second - with a moment of 69.4–85.7 N.m (7.1–8.7 kgf.m);
- The third - with an extension of 90°;
- The fourth is to turn the screws 90°.
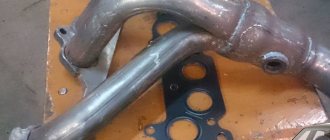
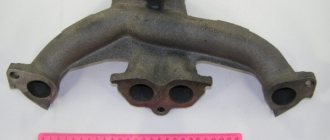
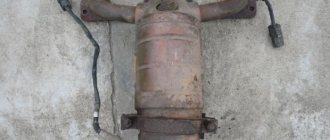
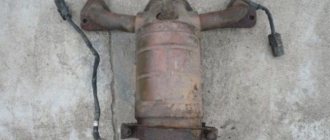
Dismantling of collectors
Now comes the turn to remove the intake and exhaust manifolds. Having dismantled them, you can understand whether it is possible to get by with replacing the gasket, or whether the collectors themselves will need to be completely replaced.
The gasket is a consumable item, the purchase of which will literally cost you 50-250 rubles, depending on the manufacturer and region. Services for replacing the gasket at a service station cost more than 1,500 rubles. Add to this the cost of a high-quality gasket and you will get quite a lot of money. Such costs can be avoided if you do everything yourself.
Dismantled unit
Signs of a malfunction of the cylinder head
There are several reasons for the head gasket to burn out on VAZ cars:
- motor overheating;
- poor tightening of cylinder head bolts;
- crack in the block head;
- deformed surface of the cylinder head or cylinder block.
The main cause of burnout of the cylinder head is overheating; the engine temperature is determined by the sensor on the instrument cluster. The engine can overheat due to various factors:
- insufficient level of antifreeze (antifreeze) in the cooling system;
- the ignition is set incorrectly (too late);
- the main cooling radiator is clogged;
- Intake and exhaust valves are jammed.
If there is severe overheating, the cylinder head may fail and the piston rings may become stuck. If, after replacing the cylinder head, the gasket burns out again, it is necessary to carry out more serious repairs and deal with the cause of the recurring defect.
|
Preliminary work
Replacing the VAZ 2109 intake manifold gasket with your own hands is not very difficult and does not require specific knowledge or expensive tools - the required set of keys is usually present in the trunk of every car enthusiast.
But before replacing, you should try to tighten the fastening of the intake unit - if the gasket is not burned out, it is the loose fastening that may cause exhaust gases to get under the hood. If tightening the fastening does not help, it means that the gasket is completely burned out and needs to be replaced. Replacing the VAZ 2109 manifold gasket will require preliminary work to dismantle the air filter, remove the carburetor and the manifold itself. All of the above work is carried out exclusively on a cold engine.
Removing the air filter with housing
On the injection engine of a VAZ 2109 car, to remove the air filter, it is enough to unscrew the four self-tapping screws securing the cover of the filter element housing - for this, use a 10mm wrench or a ratchet. There will be a filter element under the cover. If the cover is difficult to lift, you can disconnect the mass air flow sensor from the plug.
VESKO-TRANS.RU
AutoNews / Reviews / Tests
How to Remove the Exhaust Manifold of a VAZ 2109 Injector
The exhaust manifold is part of the exhaust gas metering system, which makes the process of removing exhaust gases from the cylinders of the unit into the exhaust pipe.
If the manifold is not working properly, the culprit is both the element itself and its gasket. Replacement of gasket (exhaust manifold). a common occurrence when performing repairs on a VAZ 2109.
To replace the manifold or gasket, the LCD must be removed in any situation. But until you get there, you will first need to complete a few preliminary steps. Specifically, tighten the fasteners, and then remove the air filter and carburetor if the first step does not help.
Your actions
Often, loose manifold fastenings became a prerequisite for contamination, which led to a malfunction of the exhaust system. In this case, lifting did not give any result, then the gasket or the manifold itself was damaged, which is the least possible
Disassembling the air filter
- If the engine is a fuel injector, you will need to remove the four filter housing cover mounting screws to remove the air filter. Under the cover is the filter itself. If you have trouble lifting the cover, turn off the MAF sensor and remove the filter.
- If there is a carburetor installed under the hood, the filter housing will be held in place by 3 clips. In the center of the iron cover is a screw, often loosened by hand. Removal allows the cover to be lifted easily. Below is a filter that should be removed carefully. Examine its condition carefully. If the filter has been in use for a long time, it is recommended to replace it during assembly.
Replacing the gasket
After the preparatory work is completed - the air filter, carburetor and intake and exhaust manifold are dismantled, you can begin the main work, for which all previous steps were done - directly replacing the gasket itself.
The work order will look like this:
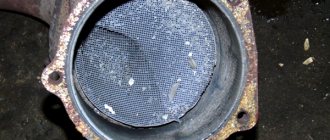
- We remove the old gasket - this can be difficult, since, most likely, it is tightly burned to the cylinder head - in this case, you need to use a thin screwdriver or knife. To make the work easier, you can use special aerosol solvents in cans, sold in auto parts stores. It is also necessary to carefully remove carbon deposits from the mating surface of the block - you can use sandpaper for this.
- The new product is installed on the exhaust manifold, then all work is done in the reverse order. Replacing the intake manifold gasket on a VAZ 2109 is carried out in a similar way.
Replacement of the exhaust manifold gasket on the VAZ 2109 has been completed. The exhaust pipe of the muffler is secured with brass nuts, preferably new ones. And don't forget to fill in the coolant that was drained when dismantling the carburetor!
Replacing the VAZ 2114 manifold. Photos, instructions on how to replace the manifold on a VAZ 2114.
The collector (resonator, “pants”) is an engine attachment; it is a closed reservoir of complex shape with a common chamber (receiver) and outlet pipes. Depending on the nature of the functions performed in a car, there are two types of manifolds - exhaust and intake.
The main task of the intake manifold is to supply air from the distribution system, mix it with fuel and transform it into an air-fuel mixture of the desired consistency, followed by a uniform supply to the combustion chamber of the cylinders. Therefore, the main task of the exhaust manifold is to collect exhaust gases from the engine cylinders into a single pipe.
Features of the design of the on-board network of the VAZ 2107
The “sevens”, like most modern cars, use a single-wire circuit for supplying electricity to electrical equipment. We all know that power to devices is supplied through only one conductor - the positive one. The other terminal of the consumer is always connected to the ground of the machine to which the negative terminal of the battery is connected. This solution allows not only to simplify the design of the on-board network, but also to slow down electrochemical corrosion processes.
Current sources
The vehicle's on-board network has two power sources: the battery and the generator. When the car engine is turned off, electricity comes into the network exclusively from the battery. When the power unit is running, power is supplied from the generator.
The nominal voltage of the on-board network of the “Seven” is 12 V, but depending on the operating mode of the engine, it can vary between 11.0–14.7 V. Almost all electrical circuits of the VAZ 2107 are protected in the form of fuses (fuse links). The main electrical appliances are switched on via a relay.
Wiring on-board network VAZ 2107
The combination of electrical devices into one common “seven” circuit is carried out using flexible PVA type wires. The current-carrying cores of these conductors are twisted from thin copper wires, the number of which can vary from 19 to 84. The cross-section of the wire depends on the strength of the current flowing through it. The VAZ 2107 uses conductors with the following cross-section:
- 0.75 mm2;
- 1.0 mm2;
- 1.5 mm2;
- 2.5 mm2;
- 4.0 mm2;
- 6.0 mm2;
- 16.0 mm2.
Polyvinyl chloride is used as an insulating layer, which is resistant to possible exposure to fuel and process fluids. The color of the insulation depends on the purpose of the conductor. The table below shows the connection wires for the main electrical components in the “seven”, indicating their color and cross-section.