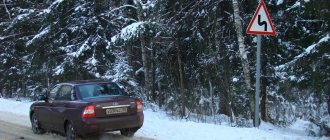
Determining driving speed is required not only to inform the driver about compliance or violation of traffic rules. The speed sensor of a Priora car with an injection engine is a necessary link in the vehicle’s fuel system control system. Externally, it differs little from other similar devices.
What we know about the operation of this sensor:
- records the speed of movement;
- with its help, the mileage of the car is recorded;
- transmits information to the engine electronic control unit (ECU).
Speed sensor on Priora: purpose and principle of operation
A speed sensor or DSA is needed to measure the speed of a vehicle. Such devices are also called speed detectors, which on Priora and other modern cars are presented in the form of electrical devices operating through a control unit.
Many drivers know that it is through the speed sensor that the speedometer on a car functions, but how the readings are recorded, few even think about it. If your DS fails, replacing it will eliminate the problem. However, knowing the operating principle of such a device will be useful for all car owners in order to be able to determine the reasons why the device failed and how to prevent such consequences in the future.
It’s worth noting right away that there are two types of speed sensors: contact and non-contact. The Prioras use non-contact speed detectors (and the VAZ-2110 uses contact speed detectors), the operating principle of which we will consider in detail.
The operation of the speed sensor on the Priora is based on the Hall effect. The sensor itself is a semiconductor Hall element (located inside the working part of the “bevel”), which is designed to record pulses. These impulses are created by a rotating disk with teeth. This disc is also called the master disc, which is installed on the differential box, and it rotates at the same speed of the car wheels. When the car moves, the plates induce pulses in the semiconductor element (pulse magnitude from 1 to 5V), which are transmitted to the ECU. The rate of change of these pulses per unit time allows us to obtain information about the frequency of rotation of the disk. Below is a diagram of the design of the speed sensor on a Priora car.
Thanks to this design, it is possible not only to record the speed of the car, but also to determine the direction of movement of the vehicle. These types of devices are considered the most reliable and are used on modern cars.
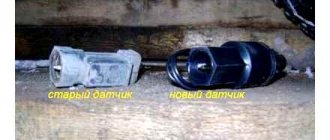
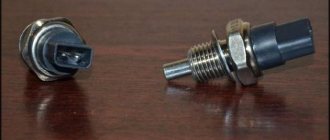
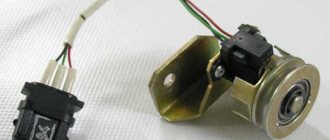
Above is a photo of the speed sensor on a Priora in disassembled form. It is important to note that such a product cannot be repaired, and if it is confirmed to be inoperable, it must be replaced.
Lada Kalina throttle sensor - how to repair?
The Lada Kalina throttle position sensor is designed to determine the degree of opening of the throttle valve. Its design is based on a simple potentiometer: when the position of the damper changes, the voltage at the signal output changes. The potentiometer is a variable resistor.
- Operating principle of the sensor
- Repair and dismantling of the sensor
- Causes of sensor failure and its reinstallation on the Lada Kalina
1 Operating principle of the sensor
In most cases, the position sensor is mounted on the damper axis, the attachment to which must be as rigid as possible; even minimal play is prohibited. Potentiometer pins:
- Signal output connecting to the machine's ECU;
- The supply voltage is standard 5 Volts;
- “Ground” is the “minus” of the power supply, located on the body of the car.
We recommend that you read
- Flushing the throttle valve of a VAZ 2112
- How to remove the ECU on Kalina
- Chip tuning Lada Kalina
- Auto scanner for self-diagnosis of any car
The maximum resistance of the sensor is recorded when the damper is closed, while the ECU voltage level is minimal. When you press the gas pedal, the throttle opens, at the same time the resistance level changes, and the voltage also increases to the maximum value.
The electronic control unit of the Kalina machine has firmware in which all the necessary information is entered. Depending on the level of valve opening, the control unit changes the ignition timing and the opening time of the injectors. Non-contact type throttle position sensors are also used - magnetoresistive. The design of these sensors includes:
- Permanent magnet rigidly connected to the throttle valve;
- High sensitivity electronic element processed with special material.
When you press the gas pedal, the permanent magnet begins to rotate. At the same time, the resistance level of the sensitive element changes, this happens due to a change in the magnetic field around it. However, in this case, the ECU of the Lada Kalina records the change in angle, and not the voltage. When the throttle position sensor breaks down, as a rule, problems appear related to starting the engine, the speed changes, gasoline consumption increases, and acceleration of the car becomes difficult.
2 Repair and dismantling of the sensor
The potentiometer in the Lada Kalina is fixed on the throttle axis. In order to access it, you will need to remove the decorative cover. The lower voltage threshold at the control output is about 0.7 Volts. The maximum opening of the throttle valve corresponds to a voltage value of 4 Volts and higher, the maximum level is 5 Volts. To check the functionality of the damper position sensor, you need a multimeter that measures the voltage at the signal output. If the voltage periodically jumps when the damper is closed, it is recommended to clean both the part itself and the sensor contacts. In most cases, the root cause of all problems and malfunctions is precisely the contamination of the elements and contacts of the device. If the sensor fails, the following changes can be diagnosed:
- The controller stores the digital fault code in memory;
- A light comes on on the instrument panel indicating a breakdown;
- The damper opening angle is calculated by the electronic control unit based on the level of air flow and the number of crankshaft revolutions.
Before you begin the process of repairing or replacing the throttle sensor on a Lada Kalina car, you need to disconnect the negative terminal from the battery. After this, you need to disconnect the sensor itself from the power supply - by removing the plug by pressing a special plastic latch. The throttle position sensor in the Lada Kalina is secured with two screws, after which the entire assembly can be removed.
The removed part is inspected for damage, and the width of the sensor shaft is measured (standard - five millimeters). The throttle body may need to be cleaned. If dirt has accumulated on the axle, the sensor will have difficulty moving. If there is play, there is no way to remove it: winding it up with electrical tape or any other materials will only worsen the situation. The only way to get rid of the backlash is by completely replacing the entire damper position sensor.
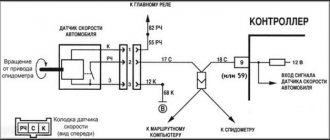
Diagram and pinout of DS Priora
Three wires are connected to the DS Priora plug. One of them is positive 12V, the second or central one is the signal wire that supplies impulses to the control unit, and the third is ground.
The speed sensor power supply circuit is shown in the photo below.
The DS pinout diagram on a Priora may be needed when replacing a plug or checking the incoming power.
What is the effect of a DS malfunction on a Priora?
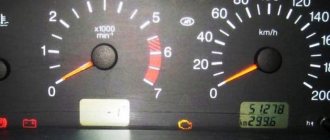
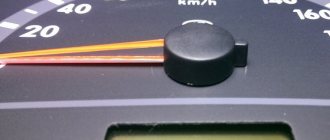
All Priora car owners are familiar with the situation when the speedometer begins to act up. The arrow either shows the wrong speed value, freezes at some position or shows no signs of life at all. The reasons for this behavior are often related to the speed sensor. Such a device affects not only the operation of the speedometer, but also the engine.
If the speed sensor on the Priora is faulty, the engine will function, but the possibility of it going into emergency mode is possible when the fuel-air mixture is prepared at average values. Even on a Priora with electric power steering, if the speed sensor malfunctions, the power will not work (or work intermittently).
This is interesting! The speed sensor on Priora is a problem for all cars of this brand. And therefore, when faced with the first signs of a malfunction, you should resort to eliminating them.
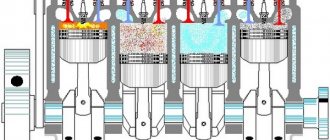
Let's immediately look at how the speed sensor affects engine operation. When the vehicle speed increases, the ECU understands that frequent fuel supply through the injectors is required. Naturally, the rapid movement of the car is also recorded by the level of throttle opening, for which the throttle position sensor is responsible.
If the car is coasting (downhill), then approximately the following picture occurs:
- the speed of the car increases, as evidenced by the DS readings;
- however, intensive fuel supply to the manifold is not necessary, since the ECU records the closed position of the throttle valve;
- Thus, the ECU understands that the car is coasting, which means that fuel consumption at such a moment is minimal.
In modern cars, DS play a very important role, and if you could drive a carburetor car with a broken cable as much as you like, then on injection cars, where the DS is presented in the form of an electrical element, such a breakdown will entail an increase in fuel consumption, as well as interrupted operation of the engine . That is why it is very important, if such a malfunction occurs, to eliminate it as quickly as possible.
Reasons for failure of the speed sensor on a Priora
As mentioned above, on a Priora the speed sensor is a pain. Moreover, its malfunctions do not appear after 100 thousand kilometers, but literally from the first days of operation of the new car. The reason for this is various factors:
- Oxidation of contacts - this phenomenon occurs due to a violation of the seal of the plug.
- Liquids getting inside - and although the sensor’s power supply chip (plug) is sealed, the possibility of oil and other aggressive substances (antifreeze, water) getting inside the connection cannot be ruled out.
- Damage to contacts - oxidized contacts simply fall off over time, breaking the electrical connection. Moreover, this happens even if the chip was not disconnected from the sensor.
- Violation of the integrity of the plastic housing - if the sensor housing is damaged, the product will not function.
- Damage to power cords. On Prioras, this phenomenon is very common, and if you determine that the sensor is working, then you should check the quality of the wires in the area where they enter the chip.
- The presence of dirt on the sensor body, which is a common cause of interruptions in the speed indicator. Small metal particles act as contaminants (production of gearbox gears). The particles are magnetized to the DS body.
Although the speed sensor on the Priora is relatively inexpensive (500-800 rubles), you should not rush to buy a new element. After all, the reason can only be contamination of this device or damage to the supply wires. That is why you first need to identify the cause of the breakdown, and only after that resort to eliminating it.
Signs of a malfunctioning speed sensor on a Priora
The main consequence of problems with the DSA is interruptions with the speed indicator, or more precisely, with the arrow. It can not only be motionless, but also “act up”, namely:
- indicate an incorrect speed value;
- “freeze” at one value (not just zero);
- twitch periodically.
The following types of manifestations may indicate a malfunction of the DS on the Priora:
- The electric power steering does not work (on Priors with electric power steering);
- The fuel level indicator in the tank does not work;
- unstable engine operation, which is especially evident at idle;
- loss of engine power and increase in consumption;
- jerks when changing gears;
- when coasting, the car may stall;
- motor vibrations.
If the speed sensor is faulty, the Check Engine light may light up on the dash. However, the indicator lights up only when the pulses (signal) completely stop arriving at the ECU. This is why the indicator often does not light up, although there is a sensor malfunction. The following error codes may indicate that the DS on the Priora has failed:
- 0500 - no speed sensor signal. When such an error occurs, the “CHECK” light comes on.
- 0501 - DS error.
- 0503 - if the signal from the DS is interrupted.
This is interesting! If the electric power steering does not work on a Priora with an electric power steering system, then do not rush to change this device or look for a problem in it. First, make sure that the speed sensor on the car is working properly.
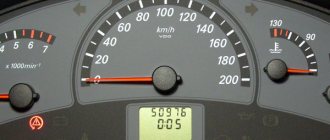
Symptoms
Drivers accustomed to carburetor engines often do not react to the appearance of symptoms of speedometer failure. On injection engines, you need to pay attention to the behavior of this device. Symptoms of failure are as follows:
- The instrument needle does not work completely or partially. It can periodically turn on, tremble, freeze at a certain level.
- Complete failure of the instrument panel.
- The speedometer determines the speed limit with a large error.
- The engine is losing power.
- Fuel consumption increases noticeably.
- The stability of the power unit at idle speed is lost.
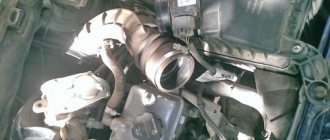
Where is the speed sensor on Priora?
An element such as a speed sensor is located on the gearbox housing, or more precisely, on the clutch housing under the housing of the internal joint of the right wheel drive. It is installed in this place on almost all car models. The photo below shows the place on the gearbox where the DSA is located on a Priora.
The photo below shows the place where the speed sensor is located on a Priora in the engine compartment.
No previous dismantling is required to access it for removal, inspection or replacement. It is better to get to it from the engine compartment (not from the pit), although this is not entirely convenient.
Checking the drive
Sometimes you only need to check the DC drive. Algorithm of actions:
- Raising one wheel using a jack.
- Search for the speed sensor drive (it is easy to find, thanks to its “sticking out” from the gearbox).
- Rotate the wheel with your free foot.
It is easy to determine by tactile sensations whether the drive is working or not. If the device does not function, it is worth disassembling it and assessing the condition of the teeth on the gears. If you lack experience, it is better to entrust the work to a specialist.
Which speed sensor to buy on Priora: types of products
Priora is equipped with three types of speed sensors from the factory. This is important to consider before purchasing a new product. To avoid mistakes, you should first remove the product and, having copied the serial number (you can take a photo), buy a similar option. This approach will ensure that you do not make a mistake with your purchase and buy the right type of sensor.
The second note when buying a DSA for Priora is to choose only original products. Chinese devices may cost 100-200 rubles cheaper, but they may not only not be suitable for installation, as evidenced by the photo below, but also not work correctly (or not work at all).
If you bought a DS, but during installation it fits tightly into the hole, it means that the product was chosen incorrectly. Compare the diameters of the standard and new products, and only then install the part.
In order not to make a mistake with your choice and buy an original DSA for Priora, you should pay attention to the presence of the serial number:
- 2170-3843010-04;
- 2170-3843010-02;
- 2170-3843010.
The main difference between them is in the calibration (the type of signal perceived by the controller) and the shape of the working part where the semiconductor element is located. Choose the products correctly, as the correctness of their operation depends on this.
This is interesting! It is very important to understand that the sensors are not interchangeable, so if you mistakenly purchased or ordered the wrong element, do not install it for testing. Exchange or order another DSA immediately.
Features of replacing DSA on Priora: what is important and need to know
To replace the speed sensor on a Priora, you will need to arm yourself with a “10” key. It is recommended to use a ratchet or L-shaped wrench. You must first disconnect the power supply by pressing the latch and pulling it up.
After this, the nut is unscrewed to “10” and the DS is removed. You may need to pry it off with a screwdriver to remove it, as it has a sealing collar to keep the transmission sealed. The video below describes the detailed process of removing and replacing the speed sensor on a Priora.
It is important to note one point - when installing, it is recommended to treat the upper part of the device, namely the sealing element, with oil. This will simplify the process of not only installing the product in the hole, but also removing it back in the future.
This is interesting! After replacing the sensor, do not forget to reset the ECU by removing the negative terminal of the battery for a few minutes or resetting the errors on the on-board computer display.
It is worth noting once again that on Priors this is a sore when the DC power wires fray. If there is damage to the insulation, you should buy a new chip for the sensor and replace it. Do not try to wrap it with electrical tape, as this will not help. When replacing the chip, be sure to make sure not to mix up the wires. It is recommended to tin the junction of the wires with tin, and then insulate them with heat shrink, which will ensure a high level of tightness. Finally, you can carefully insulate the wires with electrical tape.
Having done it once and well, you will definitely not encounter a malfunction in the near future in the form of a failure of the speed sensor on the Priora. Take the DS replacement procedure responsibly to prevent such breakdowns in the future.
Subtleties of checking for different car models
Depending on the vehicle, the location, malfunctions and details of the check may vary.
VAZ-2110
A common malfunction on the “ten” is incorrect operation of the odometer, expressed in incorrect speed data. The cause may be a broken speed sensor or drive.
Sometimes the malfunction is due to oxidation of the connectors or damage to the wiring.
The sensor is located near the collector, so the cause of the breakdown may be damage to the wiring due to high temperature.
To check the performance of the product, you can use one of the three methods discussed above.
If the device is faulty, replacement will require a 21 or 22 key. When purchasing a new speed sensor, it is recommended to choose a product with a metal rod. It lasts longer and is more reliable.
Kalina
As with other models, a popular reason for DC failure is damage to the wiring (oxidation, rust, poor contact, melting wires, etc.). A multimeter is used for control.
The probes are connected to the central contact (“plus”) and to the body (“minus”). When vibrations occur, the voltage should vary from 0.5 to 10 V.
You can check the operation in other ways - by hanging the wheel or using a test lamp.
The location of the Lada Kalina DS is shown below.
Priora
There are a number of features in checking the Lada Priora speed sensor. Often a problem with it is indicated by error P0501.
Algorithm of actions:
- Inspection of the controller.
- Checking the quality of grounding at the contact connection.
- Reference voltage measurement. The Priora speed sensor has wires of different colors. It is located behind the collector.
Brown has a minus sign and pink has a plus sign. The signal wire is made in gray color. Using a multimeter set to voltage measurement mode, you need to check the reference U. The optimal value is from 12 V. If there is no voltage or it is less than the set parameter, you need to charge the battery and look for a breakdown elsewhere (ECU or power supply circuit). - Checking the quality of connector connections using a thin needle or plate. It is important that the contact groups do not fall out of the connector.
- Checking the speed sensor using an oscilloscope (the wheel must rotate at a speed of more than 5 km/h).
Before checking the DC, it must be removed from the vehicle, but the wires must not be disconnected.
Next, turn on the ignition and check the output voltage. To do this, you need to slowly change the rotation speed of the axis. The curve should have a voltage of five to one volt in the reverse direction.
If the voltage remains unchanged, this indicates a breakdown. An additional sign of failure is the engine stopping when changing gears, failure of the electric power steering.
To check the speed sensor, you can use a simulator - a device that changes the pulse frequency by pressing plus or minus. Using the product you can also check the machine's ECU.
Gazelle
To check the Gazelle speed sensor, you need to take the following steps:
- Unscrew the screws that secure the hatch near the gearshift knob.
- Remove and unscrew the DS chip.
- Check the operation of the device, starting with checking the grounding on the third contact. The first contact should have a voltage of +12 V. The black wire is “negative”, the yellow wire is “positive”. Green goes to the DS and instrument panel.
It is worth considering that the “positive” signal is sent to the DS and the reverse signal. If the reversing lights turn on after moving the gearshift knob to the appropriate position, there is no need to check the fuses.
Nissan
Nissan uses two input signals from the automatic transmission control unit - from the speed sensor and the vehicle speed sensor.
The first determines the rotation speed of the secondary shaft and sends information to the unit, and the second is used as an additional controller. It sends data when the master node is faulty.
The Nissan speed sensor is built into the speedometer assembly and plays the role of an additional device. Symptoms of a malfunction are dropping into neutral or illogical gear shifting.
The sensor itself is located behind the left fender liner, and to replace it you need to remove the left plastic protection (using the example of a Nissan Liberty).
If error “2” appears, you need to check the DC chain, the integrity of the wires and connectors. Studying the operation of the controller itself is carried out according to the standard scheme:
- removing the speed sensor (VSS) from the transmission housing;
- connecting a voltmeter to the terminals and switching the multimeter to AC mode;
- rotation of the drive gear (there should be a voltage with an amplitude of about 0.5 V);
- If there is no U, the sensor needs to be changed.
If tension is present, you need to look for another reason.
To replace the DS you need:
- put the car on a jack;
- discard the wiring from the sensor;
- unscrew the coupling bolt, loosen the clamp and remove the device from the transmission;
- check the condition of the o-ring (if necessary, replace it);
- Put the product in the reverse order.
Niva
The Niva's speed sensor is located on the transfer case. It is made in a plastic case, and inside there is an electronic part.
The device is highly fragile, so you need to be careful.
Check procedure:
- disconnecting the sensor;
- connecting the red (“positive”) probe to the product contact;
- connecting the minus to ground;
- fixing the tube on the shaft for rotation;
- switching the device to voltage measurement mode;
- shaft rotation and U control (this parameter must be changed).
To replace, you need to disconnect the terminals from the battery, press the plastic lock and use a wrench to unscrew the sensor (to simplify the work, you can use WD-40.
VAZ 21093 injector
The VAZ 21093 injector speed sensor is located on the speedometer drive mechanism (at the gearbox). To find it, just open the hood and remove the adsorber.
Performing the last step is not necessary, but it is easier to get to the desired point in another way. On the right CV joint side there is a wire that goes to the gearbox. It connects to the connector of the desired sensor.
In the case of injection VAZ-2109, the main sign of a speed sensor failure is the engine stopping at idle or when the clutch is pressed.
Also, a light on the dashboard lights up asking you to check the engine (code 24). For control, one of the three methods discussed earlier is used.