The chassis is an important parameter for comfort - not everyone will agree to a gear crusher machine. The front and rear suspension of a Priora car is, in fact, its foundation, which consists of several systems, each of which is responsible for a specific task. Some provide “swallowing” of bumps, some provide confident braking, and other systems ensure that the wheels move evenly, with the correct trajectory. The rear suspension on the Priora car is a beam. These are found on all budget cars. Lada Priora is still a budget car, if you dig deeper. Especially the interior, the handles, the paint.
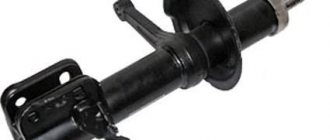
The front suspension of the VAZ 2170 Priora is an independent MacPherson system, in many ways it is a modified copy of the models of the tenth “family”. Its design is simple and even, in my opinion, needs some improvement, for example in the levers. I still like the Priora chassis for its relative softness - few cars in this class are able to show a cushion that could withstand Russian off-road conditions. If you put a front suspension arm on both sides, coupled with braces, it will be a different car both in handling and in swallowing potholes.
Some spare parts are replaced almost immediately after purchase with analog ones - more expensive, but reliable. The strut rod, of course, holds all the components and mechanisms around it, but in serious off-road conditions it cannot cope with this. The rack breaks and it leaks. The chassis mechanism at the front of a vehicle is more often repaired than the rear, but on subsequent AvtoVAZ models it was made a little stronger.
Preparation for repair
Before you begin any repairs, you need to do some preparation. To do this, perform a few simple manipulations:
Park the car (Priora or Ten, it doesn’t matter at all, the operating algorithm is the same for them) on a level surface. Fix the position of the car - place shoes under the rear wheels, squeeze the handbrake and engage first or reverse gear. Remove all the front wheel bolts from the threads (it is advisable to replace the bearings on both struts). Lift up the side on which you plan to replace the support bearing first. Remove the entire wheel.
At this point the preparation stage can be considered complete; it is time to disassemble the suspension and replace worn elements
Pay attention to the condition of all boots - if they are damaged, be sure to replace them
The car pulls to the side
Different air pressures in the tires Set normal tire pressures Violation of wheel alignment angles Perform a wheel alignment Destruction of the rubber element of one of the front suspension strut supports Replace the rubber element of the front suspension strut support Uneven elasticity of the suspension springs Replace the front suspension spring that has lost its elasticity Significant differences in tire wear Replace worn tires Increased imbalance of the front wheels Balance the wheelsLada Priora front suspension diagram
1 — steering knuckle; 2 - eccentric bolt; 3 — shock absorber strut; 4 — lever; 5 — stabilizer bar; 6 — mounting bracket for the stabilizer bar cushion; 7 — stabilizer bar strut; 8 — cross member of the front suspension; 9 — ball joint; 10 - stretching
1 — telescopic stand; 2 - spring; 3 — rod nut; 4 — rebound limiter of the upper support; 5 — upper support; 6 — bearing; 7 — upper spring cup; 8 — spring gasket; 9 — compression stroke limiter of the upper support; 10 — compression progress buffer; 11 - protective cover
1 — ball joint; 2 - hub; 3 — hub bearing nut; 4 — protective cap; 5 — hub bearing; 6 — steering knuckle; 7 - nut; 8 — front wheel brake disc; 9 — brake mechanism shield; 10 — eccentric (adjusting) bolt; 11 — rotary lever; 12 — front suspension spring; 13 — shock absorber rod; 14 — upper spring cup; 15 — upper support of the shock absorber strut; 16 — shock absorber rod nut; 17 — bearing of the upper support of the shock absorber strut; 18 — spring gasket; 19 — front suspension compression buffer; 20 — protective casing; 21 — rack body; 22 — bracket for mounting the anti-roll bar cushion; 23 — front suspension stretch; 24 — front wheel drive shaft; 25 — anti-roll bar; 26 — stabilizer bar; 27 — front suspension arm
Description of design
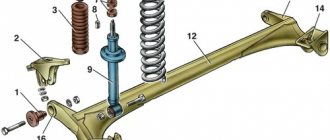
Rear suspension elements: 1 — beam; 2 — anti-roll bar; 3 — silent block; 4 — bracket for attaching the lever to the body; 5 - trailing arm of the beam; 6 — brake drum; 7 — shock absorber; 8 — bracket for attaching the shock absorber to the lever; 9 - spring; 10 — shock absorber cover; 11 — spring gasket; 12 — compression stroke buffer; 13 — rear wheel hub; 14 - rear wheel brake mechanism Rear suspension - semi-independent, with an elastic beam, with helical coil springs and double-acting hydraulic telescopic shock absorbers. The longitudinal arms are welded to the beam through reinforcements. To increase lateral stability and reduce vehicle roll, a stabilizer bar made of 14 mm steel rod runs inside the beam. The ends of the rod are welded to the levers.
Rear suspension: 1 — rear suspension beam; 2 — shock absorber; 3 - spring; 4 — bracket for fastening the beam arm to the body. In the middle part, a rubber cushion is installed on the stabilizer bar. Bushings are welded to the arms in front, into which silent blocks are pressed. At the rear, brackets with eyes for attaching shock absorbers and flanges for attaching the axles (axles) of the rear wheels and brake shields are welded to the suspension arms. The elastic elements of the suspension are coil springs. The lower coil of the spring rests on a cup welded to the shock absorber reservoir, and the upper coil, through a rubber gasket, rests on a support welded from the inside to the wheel arch. Bolt 1 passes through the inner race of the silent block, connecting the lever to the body bracket. The bracket is attached to the welded studs of the body with three nuts. 2In the lower eye of the shock absorber, a rubber-metal hinge (silent block) is pressed into place, through the central bushing of which a bolt passes, securing the shock absorber to the suspension arm bracket. The shock absorber rod is attached to the body through two rubber pads (one at the bottom of the support, the other at the top) and a support washer (under the nut). The chrome-plated surface of the rod is protected from dirt by a rubber corrugated cover, inside of which a compression stroke buffer is installed. A cylindrical collar made on the axle is designed to center it in the hole of the lever flange and center the brake shield on the axle. An unregulated double-row tapered roller bearing is installed in the hub. During operation, the bearing does not require replenishment of lubricant. The outer bearing ring is pressed into the hub and secured with a retaining ring. The fit of the inner rings of the bearing on the journal is transitional (with a slight interference fit or a small gap). The inner rings of the bearing are tightened in the axial direction with a nut, tightened with a large torque and secured by indenting the flange of the nut into the groove of the axle. Shock absorber parts and spring: 1 - shock absorber; 2 - spring; 3 — compression stroke buffer; 4 — rod cushions; 5 — spacer sleeve; 6 — support washer; 7 - spring washer; 8 - nut; 9 — cover; 10 - cover cup; 11 — spring gasket
Rear wheel bearing assembly: 1 - axle; 2 - hub; 3 - bearing; 4 - retaining ring; 5 — washer; 6 — bearing nut; 7 — sealing ring of the hub cap; 8 — hub cap The angles of the rear wheels are set structurally by the geometry of the beam and are not subject to adjustment in operation. The angles can only be checked on a special stand and compared with control values (camber angle - 0°30'±30', wheel toe - 0°10'±5'). If the rear wheel alignment angles do not correspond to the control values, it is necessary to check the condition of the rear suspension elements.
Noise or knocking
A knock in the front suspension (Priora station wagon also suffers from this), as well as a characteristic noise, is one of the signs of a malfunction. All owners of domestic cars of this family have repeatedly encountered this. Chassis maintenance specialists claim that in this case, strut malfunctions are possible. Also, during operation, the bolts that secure the stabilizer bar to the car body loosen.
Another noise may be associated with wear of the bar itself or the cushions. In the case of struts, to get rid of the nasty knocking, you only need to replace the worn shock absorbers. If the fastener is loose, it should be tightened. If the cushions fail, they should be replaced. It is not expensive. Now there are any spare parts for Priora on sale.
The knocking noise can also be caused by a loose fastening on which the upper support is installed to the body. Experts recommend tightening the support nuts. Another cause of noise is a worn rubber element in the strut support. You need to purchase a new part and install it. Then the characteristic noise will disappear.
If the silent blocks on the levers, braces or struts wear out, the suspension will also knock. These parts need to be replaced. Other faults include worn ball joints, broken or deformed springs, worn compression buffers, and unbalanced wheels.
Tips and tricks for motorists
1. Replacing the Priora support bearing without removing the strut is not recommended, in this case the installation of the new product will not occur correctly, which will affect the service life. 2. To prevent dirt and moisture from getting on new products, come up with additional protection for the “supports” under the hood. 3. If you find products in a closed steel case in retail outlets in the price range of 600 rubles - this is a reliable option, feel free to purchase and install. 4. Do not purchase open products where the balls are visible.
The need to replace the front struts arises after dull knocks alternating with clicks begin to be heard from under the wheel arches while the car is driving over uneven surfaces. Typically, this was not observed at high speeds, but when overcoming speed bumps, they appeared again.
After self-diagnosis of your Lada Priora, it is not always possible to find the cause of the knocking, the suspension is normal, but the noise is still there. After digging a little on the net, I came across several similar topics in which people discussed my problem, and it was there that I learned that the front struts were to blame and that now I had serious work to do called: replacing the front struts with my own hands. After I went to the service station, my verdict was confirmed, it was possible to fix everything right there, but I decided to do everything myself. Read more about knocking in the front suspension here.
After several hours of searching, I found front struts that suited me in all respects; these were Acomi struts model “Comfort CLASSIC A170.2905.002/003-05”.
I chose the front struts with the expectation that they would be softer and, as they say, the price would be adequate, comfort while driving is perhaps the most important thing in a car. The original hard SAAZs are no good, so I didn’t repeat the manufacturer’s mistake.
The front struts I bought are hydraulic, collapsible, which is very convenient; if necessary, you can simply go buy cartridges and replace them yourself, which you will never do with your own SAAZ ones.
Replacing the front struts is not the most difficult procedure I have ever performed, but it is complicated by the fact that it requires special tools in the form of special spring ties and a special puller for steering tips.
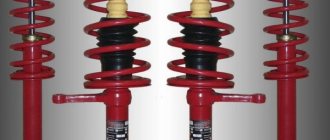
Chassis SS20
These spare parts for domestic and foreign cars are produced under the “System Technologies” brand. These racks have become so popular due to their high quality. For Priora, the manufacturer offers 4 product options that differ in hardness. Which stands are better? They need to be selected according to your driving style. The softest ones are the “Standard” series racks. Rear shock absorbers from the same series are also offered.
A reinforced version is offered to increase the load capacity. Next are the “Comfort” racks. According to reviews from many car owners, this is the best option. They are stiffer than the Standard, but the suspension works equally well on bad and good roads.
The “Highway” kit is suitable for those who like stiff suspension and high speed. With these racks you can drive on bad roads, but it will be uncomfortable. “Sport” is the toughest option from this manufacturer for Priora cars. A front suspension of this type is not very suitable for the city, but for sports competitions it is just right.
Rear suspension beam - replacing silent block
To replace the silent block, removing the beam from the car is not required. We change the silent blocks one by one: first at one, then at the other beam lever.
To complete the work you will need:
- universal cup puller.
1. We prepare the car for work.
2. Place the car on a reliable stand and remove the rear left wheel.
3. On cars without ABS, disconnect the elastic lever of the pressure regulator from the earring. On vehicles equipped with ABS, remove the wheel speed sensor wire from the bracket on the lever.
4. Release the left parking brake cable from the two brackets securing the cable to the left rear suspension arm.
5. Using a 19 mm socket wrench, unscrew the nut of the bolt securing the lever to the body bracket, holding the bolt with a 19 mm socket wrench.
6. Remove the bolt. Pull the lever down (without pulling the brake hose) and install the puller cup on the outside, and a special washer on the inside of the lever.
7. Rotating the nut of the puller bolt, press the silent block into the cup.
The silent block has a stop on one edge, so it should only be pressed out towards the car threshold.
8. Apply silicone grease or soap solution to the cylindrical surface of the new silent block.
9. Install the puller cup on the inside of the lever.
10. Rotating the nut of the puller bolt, press the new silent block into the lever until it stops.
11. Install the lever into the body bracket and fix it with a bolt and nut without tightening it.
The lever fastening bolt is inserted into the body bracket from the side of the car threshold.
12. On cars without ABS, insert the elastic lever of the pressure regulator into the earring and secure it with a stopper.
13. We fix it in the bracket; handbrake cable and wheel speed sensor wire.
14. Install the wheel and remove the car from the stands.
15. Press n several times; rear part of the car for self-installation of the suspension.
16. Finally tighten the nut of the lever mounting bolt to a torque of 66.6–82.3 Nm (6.8–8.4 kgcm).
17. We replace the silent block of the second lever in the same way.
Lada Priora suspension malfunctions
A lot of words have been said about the need to “sort out” the chassis. Every noise or knock can cause concern even for an experienced car enthusiast, because he knows that there are several valuable components and mechanisms below - no one wants them to break. But over time, having learned to determine the causes of a malfunction based on the primary signs of “disease,” you can roughly estimate the cost of repairs.
Noise or knocking in the front suspension of Lada Priora
It is extraneous sounds that cause more concern about the chassis - as if some important part was “exposed”, having lost its protection, and is now being mercilessly beaten to the point of complete wear. There are several reasons why strange noises may be coming from the front:
- the shock absorber is broken;
- the fastening of the stabilizer or its cushion has become loose, mechanical damage has occurred;
- the place where the upper support is attached to the body has become loose;
- the support gasket has worn out;
- silent blocks collapsed;
- stub stretches;
- the ball joint of the lever “walks” or creaks;
- the damper spring is mechanically damaged or stretched;
- The compression stroke buffer has decreased;
- Wheel balancing is off.
The following signs of malfunction are also found in the front part of the chassis:
- fluid is leaking from the shock absorber strut;
- the shock absorber does not work effectively;
- shock absorbers break;
- the car pulls to the right or left when driving straight;
- tires wear out too quickly;
- tires wear unevenly.
Uneven tire wear
Increased speed when cornering Practice a more relaxed ride Excessive wear on the ball joints of the suspension arms and silent blocks Repair the front suspension Imbalance of the wheels Rebalance the wheelsLet us remind you that another car disease can be called steering rack knock.
Key words: front suspension of Lada Priora
0 0 0 0 0 1
Share on social networks:
Kayaba chassis
Kayaba chassis for Niva
It is possible to install racks on the Priora from the Japanese company Kayaba. This company produces suspension elements for foreign cars, but there are also products for the domestic auto industry.
It is quite difficult to purchase both front and rear struts for the Priora, since this model is relatively new. Often, Priora owners purchase Kayaba racks designed for installation on a VAZ 2110. Although some dealers already have Kayaba products made for Priora. Kayaba Exel-G gas-oil front and rear struts are offered for this car. While the VAZ 2110 sells gas and oil Kayaba Exel-G and Premium.
But it is impossible to simply replace the factory front chassis parts with Kayaba for the VAZ 2110. To do this, you will have to purchase collapsible VAZ 2170 glasses and insert the purchased Kayaba glasses into them. The supports will also have to be replaced; most car enthusiasts use CC20 supports. There are no such problems with the rear ones; they are installed assembled.
Engine and gearbox problems
If we talk about power plants, in general they are quite reliable (at least when compared with the “decimal” ones). The timing system is belt driven. The belt runs for quite a long time - up to 120 thousand kilometers. However, the roller and pump may fail earlier, which leads to a break in the timing drive or overheating of the motor in the first and second cases, respectively.
By the way, the “Prior” engine has different pistons, crankshaft and lightweight connecting rods. The resource of the internal combustion engine is about 300-350 thousand kilometers.
Among the common problems on Priora is difficult starting. The reason for this is a low-quality standard battery. Its service life is no more than one year. The owners strongly recommend replacing it with a better one so as not to experience problems with starting, especially in winter.
Now about the transmission. All power units are paired with a five-speed manual transmission. It has been significantly improved and is now equipped with a cable drive. Shifting gears is clear, without hesitation. The clutch lasts up to 100 thousand, depending on driving style. The box itself has no major flaws. The recommended transmission oil change interval is 60 thousand kilometers.
Selection of racks
The front suspension (Lada Priora station wagon included) is no less important than the engine or transmission. The suspension dampens vibrations that are transmitted to the body from the road through the wheels. The chassis must provide stability to the vehicle when driving at high speeds.
If the suspension is too soft, the car will drive fine in a straight line, but there will be significant roll when entering a turn. In the case when it is very rigid, there will be no roll when turning, but there is no smooth ride.
But you can find the best option. Now third-party manufacturers offer struts and other spare parts for Priora. Often these parts significantly exceed the quality and characteristics of the factory ones.
Engines and transmissions
In 2001, a new facelift model of the VAZ 2110 was introduced. The car had slightly more rounded edges and a modernized front bumper. Until 2004, the offer included 1.5-liter gasoline engines with a power of 77 or 92 hp. With. Since 2004, larger 1.6-liter 80- and 89-horsepower engines have been installed under the hood. Power was transmitted to the front wheels through a 5-speed manual transmission 2110.
A year after its debut, the sports version 21106 GTI appeared. The transmission here is based on a 2-liter 150-horsepower engine from Opel, which allowed acceleration to just over 200 km/h. Car enthusiasts are also familiar with the Lada 110 Premier, the difference of which was that the body was increased by 19 cm. It can often be found in the form of a taxi. Under the hood is a 1.8-liter gasoline engine producing 98 hp. With. In 2009, production of the Lada 110 was completed, and the Priora became the model's successor. The VAZ 2110 was offered in sedan (2110), station wagon (2111), five-door hatchback (2112) and coupe (21123) body styles.
The main “disease” of all VAZ 2110 engines is the cooling system. Oxides and deposits often collect here and become clogged in the engine casing and radiator. Due to a malfunction of the sensor, the electric fan periodically fails. The tens clutch also usually fails quickly during aggressive driving.
Every owner of a Ten is faced with the need to replace a piston - the one on the Priora is perfect here. It will significantly improve the technical characteristics, but such an exchange is best carried out after 120,000 km.
Salon VAZ-2110
If we compare the VAZ 2110 and Priora, Russian manufacturers have been upgrading the latter’s 1596 cc engine for many years. The four-cylinder sixteen-valve engine produces 72 kW/98 hp. With. at 5600 rpm and a maximum torque of 145 Nm at 4000 rpm, which, according to available data, allows the Priora to reach a top speed of 183 km/h, and provides acceleration to 100 km/h in 11.5 s.
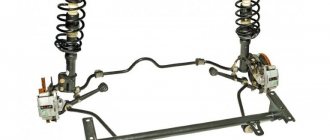
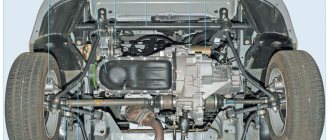
Chassis of the Lada Priora car
When the car moves, the driver and everyone inside are affected by oscillatory movements of various types. There are oscillations with varying degrees of deviation from the equilibrium position. Movements with a small amplitude are successfully smoothed out by the supports of the power plant and gearbox, as well as soft seats. But in order to smooth out oscillatory movements with a large amplitude, wheels and most of the suspension elements are needed.
All front-wheel drive VAZ cars use the same suspension design; there are no fundamental differences.
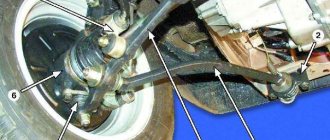
The Lada Priora is in fact a restyled model of the outdated VAZ 2110. The developers have practically not affected the technical equipment, so the suspension elements are identical, with a slight difference in the design of the shock absorber struts. The shortcomings from the “ten” completely migrated to the Priora. For example, low quality wheel bearings, unreliable ball joints, short service life, etc.
Front suspension diagram
A fist for turning is installed on the ball joint at the bottom; at the top it is connected to the bottom side of the strut with a shock absorber. The wheel drive shaft coupling is attached to the central part of the knuckles. The transverse stability lever fixes the ball joints; the other side is attached to the body parts. The brace is designed to prevent movement in the longitudinal direction; one side is connected to the body brackets, and the other to the lateral stability linkage system. The transverse one is also connected to the stabilizer and connected to the side members in two places.
Rear suspension diagram
It is also not very different compared to the previous 2110. Its main component is a semi-rigid beam. Using silent blocks, it is fixed to the side members, and the other part is connected to the shock-absorbing struts of the suspension. Shock absorbers with springs are attached to the body parts at the top and to the wheel hubs at the bottom. The system is based on a partially independent beam and telescopic shock absorbers, reinforced with rigid metal springs. To enhance transverse stability, inside the beam there is a stabilizer link arm in the form of steel reinforcement with a diameter of 14 mm. The rod is welded to the beam on both sides. This design reduces roll during turns.
Features of dismantling work
Disassembling the rear and front suspension elements of the Lada Priora is necessary mainly to lubricate the moving parts. It will also be needed in situations where repair or replacement of worn components is required.
Rear suspension removal
Structurally, the chassis here is simpler, which means it is easier to disassemble (repair). The process consists of several standard procedures.
- The car is installed on a platform with an inspection hole. Even better if you can take it up in an elevator.
- Now you need to open the trunk and remove the upholstery from the seat belt retractors. Behind them are the suspension struts. They should only be unscrewed, there is no need to unscrew them completely.
- Next you need to remove the wheels. If the vehicle is on a lift, the wheel bolts should be loosened while the vehicle is still on the ground before lifting the vehicle.
- Also remove the handbrake cables for easier removal. Unscrew the retaining clips that secure the cables to the brackets and body arms. Next, the brake drums are removed. Remove the ends of the cable through the parking brake lever. At the same time, you will need to unscrew the brake flanges at the rear.
- Now you can remove the brake pipes. The disassembled control lever is designed to operate the pressure distribution regulator. To disassemble it, simply remove the washer, then disconnect the bracket and remove the drive.
- After the work has been done, you can begin to remove the suspension struts. It is necessary to remove the supports, unscrew the fasteners and remove the washer from the body bracket. Place suitable stops under the front wheel axle and suspend the rear one, after which you can remove the suspension strut assembly.
- To disassemble the rear beam, you need to unscrew the fastenings of the bracket with which it is attached to the body from below.
Thus, the rear suspension is dismantled. Then you can disassemble the shock absorbers to replace individual elements or repair them.
Special stops may be required to remove springs
You can buy them at any car dealership. Removing springs without such devices can lead to various injuries, and removing them is otherwise problematic. Since the spring is compressed and strong enough, if you are not careful it will fly off, causing damage.
Removing the front suspension
From a technical point of view, it is a little more complicated than the rear one. Structurally, the spring suspension consists of 41 parts. Its main part is the shock absorber strut, which is attached to the steering knuckle using 2 bolt connections. The mounting bolts are equipped with an eccentric washer.
When the steering mechanism operates, the vertical bolt on top also rotates, allowing it to rotate. At the same time, the position is a weak point. It takes the brunt of vibration reduction.
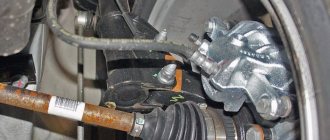
Brake calipers - an exclusive problem
Only in some car models with disc brakes in the rear, the brake calipers become loose or simply play. This is problem number one for all budget cars with rear disc brakes. It is the budget nature of fasteners that often causes parts to fail. It is very interesting that calipers can be an invisible cause of knocking, that is, very difficult to diagnose. You will have to perform the following procedures:
first, you can try to pull the caliper with your hands while the wheel is installed; perhaps the parts of the mechanism are hitting the disc, everything should be tightly screwed; Next, you should remove the wheel and carry out manual diagnostics of all possible fastenings of this unit; you should tug the mechanism with your hands to understand the absence of play; the next step should be to disassemble the caliper to determine the loose parts, but doing this without experience is not recommended, as many problems can be found; when disassembling, you should pay special attention to the quality of tightening of each module and each bolt, this is what can tell you where the knocking problem lies; when reassembling, pay attention to the pads; it is quite possible that they are worn out or deformed, and simply knock in the places where they are installed during operation.
Assembling a new shock absorber
1. Set the rack rod to the upper position.
2. Place the boot and compression buffer on the new front strut.
3. Install the spring, spring cup and damper. Pay attention to the lower shank, it should fall into place.
4. Install the small washer from the new Acomi kit, the large washer and the support with the bearing installed.
5. Install the rod mounting nut.
6. The nut is tightened using a hexagon to “6”, hold the rod with it. It is better to do the final tightening after installing the front struts in place.
7. Remove the spring clamps.
8. Turn the support so that the indicator on it looks forward and slightly inside the car body.
9. After this, install the rack assembly in its place of further service.
10. Tighten the support bolts from above, then put the stand on the steering knuckle, install the eccentric bolt with a washer in the upper hole, and a simple bolt down and tighten.
11. Install the steering tip pin into the rod on the rack and tighten the nut.
12. After this, pin the finger, spreading the antennae.
13. Thread the brake hoses into the holder bracket on the rack.
Done, now we can say that the front strut has been replaced. Install the wheel and lower the jack. When the car is on wheels, go through all the fastenings and tighten them. It would be a good idea to rock the body on the side where the strut was changed for additional pumping.
Now all that remains is to repeat the same thing on the left side. The second time things will be “more fun”, since you will already know what’s what and why.
After replacing the front struts, be sure to do a wheel alignment; don’t rush on the way to the service station - the wheels are not adjusted and the car will “drive” a little on the road, so be vigilant and careful.
The result of the work done:
After several weeks of using the new racks, I can note the following:
- The knocking has disappeared;
- The suspension has become more elastic;
- The laxity and swaying have disappeared;
- The car began to take turns better, the roll decreased;
- It has become more comfortable to drive off-road;
- The steering wheel began to return noticeably faster after a turn - the result of increased castor;
- Improved handling at high speeds;
- Speed bumps are less painful to overcome.
In short, I am very pleased, the impressions are only positive, if I had known that such a result would be achieved, I would have changed the front struts even before they failed, immediately after the purchase.