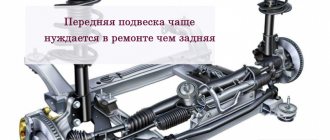
When using any car, its suspension wears out over time. Domestic car enthusiasts know that repairs to the VAZ 2114 chassis are required quite often due to poor roads in our country. How to repair the front or rear suspension of a VAZ 2114 with your own hands, we will look in detail in this material.
The VAZ chassis consists of front and rear suspensions. When operating a vehicle, they bear the greatest load. Their condition affects the quality and comfort of driving a car, as well as the safety of the driver and his passengers.
The main function of car suspensions is to soften the ride and eliminate vibrations. The chassis also reduces roll when cornering and ensures a smooth ride, and also provides high information content to the driver in the city and on highways.
In the CIS countries, the roads are generally not very good, so the VAZ 2114 suspension experiences very high loads. This leads to the need to regularly contact a car service. At the same time, you can save your money by repairing the chassis of a domestic passenger car yourself in a garage. To be able to determine which element has failed, you need to know how the suspension works.
.
Rear suspension design
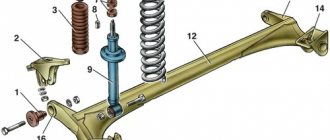
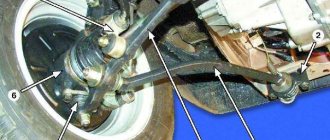
In the picture, the numbers indicate the main elements of the rear suspension of the VAZ 2114, which usually fail on bad roads.
Rear suspension diagram.
- Number 1 in the picture shows a rubber-metal hinge - the main attachment to the car body.
- Bracket for attaching the rear suspension arm to the body.
- Shock absorber protective cover.
- A buffer that takes the load during compression.
- Casing cover.
- Main support washer.
- Cushion for shock absorption.
- Spacer sleeve.
- Shock absorber, also called strut.
- Insulation gasket.
- Spring.
- Connecting beam for levers.
- Beam lever.
- The bracket that secures the rack structure.
- Flange.
- Lever type bushing.
The beam design includes a connector and a pair of trailing arms. They are indicated in the diagram by numbers 12 and 13. The parts are connected by welding. In the rear part, flanges numbered 15 are attached to the levers, as well as brackets for fixing the shock absorbers.
The rear wheel axles with brake blocks are screwed to the flanges. There are bushings on the rear suspension arms at the front. They are held on rubber-metal hinges. One end of the spring rests on the support through a rubber gasket, and the other on the shock-absorbing cup.
.
Do-it-yourself VAZ 2114 suspension repair
Set of struts
Each suspension performs the same role - it eliminates all kinds of vibrations and makes the ride softer. Plus, it is responsible for reducing roll when entering corners. Trips become smoother and more accurate.
Considering the quality of our roads, the cars really are not to be envied, since the front suspension of the VAZ 2114 experiences incredible loads, just like the rear.
Some people prefer the services of service centers, others do their own VAZ 2114 suspension repairs. What exactly you choose is up to you. Let's just say that on such a car, repairing or replacing suspension elements yourself is not as difficult as it might seem at first glance.
Today we will look at the design of the front suspension of the VAZ 2114, as well as the nuances of replacing it. We will go a similar way with the rear suspension.
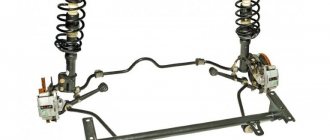
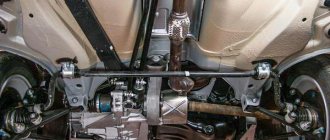
Rear suspension
The diagram of this node includes a total of 16 elements:
- Rubber-metal hinge (it serves as the main fastener to the body);
- Bracket. It secures the rear suspension arm to the body;
- Shock absorber housing;
- Compression stroke load buffer;
- Housing cover;
- Support washer;
- Shock cushion;
- Spacer sleeve;
- Solid spring;
- Shock absorber;
- Beam lever;
- Insulation gasket;
- Lever connection element;
- Flange;
- Rack bracket;
- Lever bushing.
How is the rear suspension disassembled?
To repair the rear suspension of a VAZ 2114, you need to know how to disassemble it correctly. We will tell you how to do this correctly below.
To begin with, the car must be placed above the inspection hole or raised using a lift. In the trunk, you need to disconnect the rear and side trim, as well as the seat belt retractor. Also here you need to find the fastenings of the struts to the car body and loosen them, but do not unscrew them completely.
Then you need to loosen the rear wheel mounts by removing the hubcaps and completely unscrewing the wheels. The machine must stand on reliable jacks - one on each side.
Front strut Dismantle the brake system cables. They should be removed as an assembly by disconnecting the cable fastenings to the chassis arms and body. After this, you need to remove the brake drums. Remove the ends from the manual drive levers and disconnect the flanges from the brake flaps. Before removing brake hoses and pipes, be careful not to leak. Next, remove the elastic drive lever, which is necessary for the functioning of the brake pressure regulator. To remove the lever, disconnect it from the bracket by removing the lock washer, and then remove the shackle from the wheel axle.
Disconnect the shock absorbers by removing the rubber cushions, body mounting nuts and washer. Next, support the front wheelbase and lift the rear. Having done this, you can remove the compression stroke buffers, shock absorber covers and springs.
Once the body mount brackets are detached, you can remove the entire beam. In front of you will be a rear suspension with risers. If necessary, disassemble the shock absorber - this will not cause any special problems.
To remove the shock-absorbing spring, you will need special ties. Without them, you could be seriously injured because the spring is held in place under high pressure. .
Disassembling and replacing the rear suspension: instructions
A complete disassembly of the rear suspension is required if the motorist decides to lubricate all the parts or change them. Most often you need to get to a specific element and replace it. The parsing proceeds as follows:
- The VAZ 2114 is installed under an inspection hole, or, as an option, on a lift. In the luggage compartment, the rear and side trims and the seat belt retractor are disconnected. Also in the luggage compartment there are fastenings for the racks to the car body. They need to be loosened; there is no need to unscrew them completely.
- Next, the fastenings of the rear wheel pair are loosened. To do this, you need to remove the hubcaps and then completely dismantle the wheels. Reliable jacks should hold the car at this time; they are usually installed on each side.
- Now it is necessary to dismantle the brake system cables. You need to get them assembled. To do this, the cable fastenings to the suspension arms and the body of the VAZ 2114 are disconnected. Afterwards, the brake drums are dismantled. The cable ends should be removed from the manual drive levers. You also need to disconnect the flanges from the brake flaps.
- Before dismantling the hoses and pipes of the brake system, care must be taken to prevent leakage. Next, you need to dismantle the elastic drive lever, which is used to operate the brake pressure regulator. To remove the lever, you need to disconnect it from the bracket by removing the lock washer, then remove the shackle from the wheel axle.
- The next step is to disconnect the struts (shock absorbers). To do this, remove the rubber cushions, nuts attaching to the body part and the washer. After this, you need to install additional stops for the front wheelset. The rear part should be raised. After this, you can remove the compression stroke buffers, springs and shock absorber covers.
- If you disconnect the body mounting brackets, the entire beam can be detached. The rear suspension along with the struts will lie in front of the motorist. If necessary, you can disassemble the shock absorbers, which is no longer difficult.
IMPORTANT. The shock-absorbing spring must be removed using special ties. If they are not used, serious injury may occur as the iron spring is under high pressure.
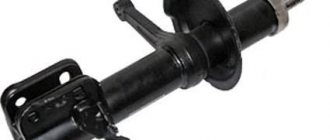
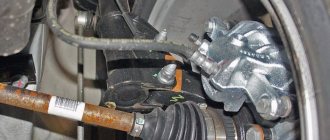
How the front suspension works
The key element of the front suspension of the VAZ 2114 is the shock absorber strut, which is indicated by number 9 in the figure below. It is secured with two bolts to the steering knuckle. Compared to the rear system, the front suspension has a more complex design - this can be seen in the number of parts.
Number 11 indicates the bolt that goes through the holes in the rack bracket. It has an eccentric washer and a special belt. When the steering gear is turned, the top bolt turns.
As a result, the car turns. Shock absorber struts, which carry the main load, usually fail.
VAZ 2114 front suspension diagram
Front suspension of the VAZ 2114 - its design and repair of the running VAZ
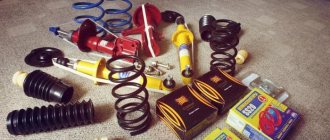
The struts are leaking, the balls are in poor condition, the stabilizer bushings are cracked, the struts are also cracked, all the rubber bands are dead and cracked, the struts are also tired, the rubber bands on the crabs have also started to peel off.
The car had a very loose front end, it was necessary to catch it; on potholes and bumps, the face jumped a lot and there were characteristic knocks.
All spare parts removed were original, from the factory. Under the stabilizer, nickels of the original body color were found. Under the racks in the glasses there are still rubber seals from the factory.
But to my surprise, everything worked out. I was most worried about the crabs, having read that they might not come out, and then the panel would have to be welded in. But everything went smoothly.
- Stub posts and bushings;
- Front arms;
- Steering tips;
- Ball;
- Racks;
- Supports;
- Crabs;
- Springs.
Also all sorts of little things, such as camber bolts, strut bolts, boots, bump stops, spring cups, support cups, puller.
All spare parts cost 13557₽, including wheel alignment 1300₽.
There is no point in writing about the replacement itself. Everything has already been written a hundred times.
But I will say one thing, the spring shot at the ceiling once