03 August 2015 Lada.Online 222 470 0
The front suspension of the Lada Priora remains generally the same as on the predecessor VAZ 2110. There are minor differences in the springs and shock absorbers. Diseases migrated along with the suspension (for example, short service life of wheel bearings, ball joints). The table shows problems in the front suspension of the Lada Priora, as well as ways to eliminate them.
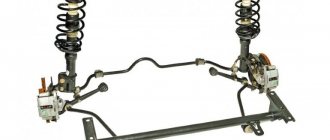
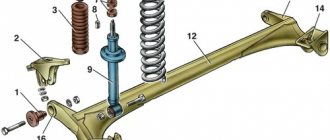
Lada Priora front suspension diagram
1 — steering knuckle; 2 - eccentric bolt; 3 — shock absorber strut; 4 — lever; 5 — stabilizer bar; 6 — mounting bracket for the stabilizer bar cushion; 7 — stabilizer bar strut; 8 — cross member of the front suspension; 9 — ball joint; 10 - stretching
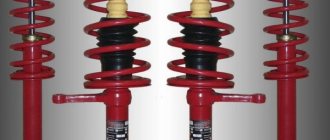
1 — telescopic stand; 2 - spring; 3 — rod nut; 4 — rebound limiter of the upper support; 5 — upper support; 6 — bearing; 7 — upper spring cup; 8 — spring gasket; 9 — compression stroke limiter of the upper support; 10 — compression progress buffer; 11 - protective cover
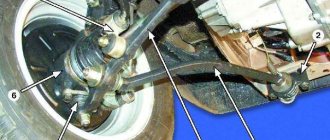
1 — ball joint; 2 - hub; 3 — hub bearing nut; 4 — protective cap; 5 — hub bearing; 6 — steering knuckle; 7 - nut; 8 — front wheel brake disc; 9 — brake mechanism shield; 10 — eccentric (adjusting) bolt; 11 — rotary lever; 12 — front suspension spring; 13 — shock absorber rod; 14 — upper spring cup; 15 — upper support of the shock absorber strut; 16 — shock absorber rod nut; 17 — bearing of the upper support of the shock absorber strut; 18 — spring gasket; 19 — front suspension compression buffer; 20 — protective casing; 21 — rack body; 22 — bracket for mounting the anti-roll bar cushion; 23 — front suspension stretch; 24 — front wheel drive shaft; 25 — anti-roll bar; 26 — stabilizer bar; 27 — front suspension arm
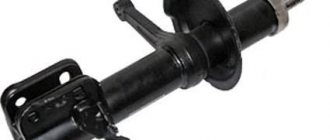
Rear beam for VAZ 2112, VAZ 2111, VAZ 2110 from Priora
Today, the production of the domestic car VAZ-2110 has already been completed, and this model has been perfectly replaced by the modern LadaPriora car model. It is worth noting that as a result of this, for many owners of old “ten” cars, the spare parts of the new car are ideal for each other. Now we will try to figure out how to replace the rear beam. In addition, do not forget that along with replacing the beam, you can begin work on painting the entire body of your car. First, you need to understand what are the main distinguishing features of one rear beam from another. The beam of the Priora car is distinguished by the fact that it has a torsion bar, thanks to which it receives additional reinforcement during its movement.
But as for the replacement process, you need to prepare all the tools that may be needed to simplify the whole job. First, this is a wrench set.
Secondly, these are ring wrenches, it is also better if it is a whole set of them. Thirdly, wrenches for unscrewing brake pipes are very useful. In addition, you will need a spare part of a piece of pipe, but only for attaching keys to it.
To make it more convenient to unscrew the rear beam mount itself, you need to use a 19mm wrench, then unscrew the nuts and brake pipes. Do not forget that you need to remove the rod, at the end of which you can easily find a trim nut, which serves as a clamp.
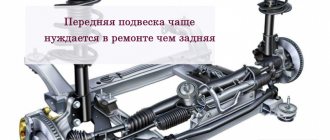
Noise or knocking in the front suspension of Lada Priora
The struts are faulty. Replace. The bolts securing the stabilizer bar to the body are loose. Either the cushions or rod are worn out Tighten the fastening bolts, replace the cushions The fastening of the upper support of the suspension strut to the body is loose Tighten the fastening nuts of the upper support of the suspension strut Wear of the rubber element of the strut support Replace the rubber element Wear of the silent blocks of the suspension arms, braces or struts of the stabilizer bar Replace the silent blocks Wear of the ball joint of the suspension arm Replace the ball joint Wear or breakage suspension springs Replace the spring Destruction of the compression stroke buffer Replace the buffer Increased wheel imbalance Rebalance the wheelsReplacing silent blocks
If squeaks and extraneous noises occur in the car, it is necessary to replace worn parts. This will help avoid more significant breakdowns that will lead to complex and expensive repairs.
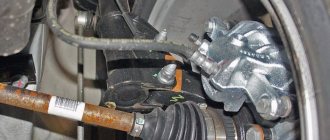
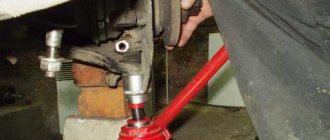
The first thing you need to pay attention to when checking the performance of beams is the silent blocks. They are replaced using a special puller made using several sections of pipes to which washers are welded
If you do not want to spend extra time on manufacturing, purchase the device at any specialized store. The rear wheels must be secured using shoes specially adapted for this procedure or ordinary bricks. This must be done because the car, raised with a jack, can jump off it and crush you.
Remove the raised wheel and check how loose the silent blocks are in the beam arm. If they are loose, repairs will need to be made. Unscrew the upper support nut and, applying short blows to the bipod, turn out the wheel. The blows must be applied until the support pops out. Then unscrew the long bolt, which is located at the top of the lever, and proceed to directly inspect the silent blocks of the front beam.
They must be knocked out with strong blows of the hammer on the chisel. They pop out of the grooves with ease after the first successful hit. In order to obtain greater sliding ability, first clean the old socket. After this, all parts are moistened with a soap solution, and the new silent block is pressed into place of the old one using the pressing method. Please note: after you press in, there should be no play at all, otherwise the repair of the front beam will be in vain.
Replacing the silent blocks on the lower beam will require much more effort. First of all, turn off the stabilizer so that the lever can move freely. Unscrew all the nuts that hold it in place and knock them out in the same way as when replacing the front beam. After you press in the new silent block, the replacement can be considered complete.
The car pulls to the side
Different air pressures in the tires Set normal tire pressures Violation of wheel alignment angles Perform a wheel alignment Destruction of the rubber element of one of the front suspension strut supports Replace the rubber element of the front suspension strut support Uneven elasticity of the suspension springs Replace the front suspension spring that has lost its elasticity Significant differences in tire wear Replace worn tires Increased imbalance of the front wheels Balance the wheelsIndependent rear suspension device
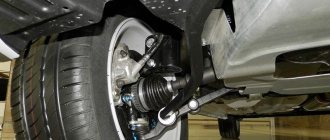
To improve vehicle handling and increase comfort, an independent rear wheel on struts with longitudinal and transverse arms is often used.
Its device is shown in the figure. Independent suspension This design has the following advantages:
Relative simplicity of design; Low weight and cost; Improved wheel camber and toe characteristics during operation.
Along with the advantages, this scheme has disadvantages:
Limited limits for initial wheel camber setting; Increased noise when handling road irregularities due to the location of the strut supports directly in the body.
Uneven tire wear
Increased speed when cornering Practice a more relaxed ride Excessive wear on the ball joints of the suspension arms and silent blocks Repair the front suspension Imbalance of the wheels Rebalance the wheelsLet us remind you that another car disease can be called steering rack knock.
Key words: front suspension of Lada Priora
0 0 0 0 0 1
Share on social networks:
Why change silent blocks
Before you begin replacing the silent blocks of the rear beam on the VAZ 2110, you need to figure out why a similar procedure is being carried out in general.
In reality, it is not always silent blocks that cause car problems. But there are situations in which repairs should be performed immediately.
- When traveling, the tires begin to squeak. If the silent blocks are out of order, they cannot move at once with the wheels, they are inferior in rotation speed, which is why noise appears.
- Knocks are heard from the rear of the car.
- The car is difficult to control, the rear end constantly wobbles, and it is difficult to take turns.
- There is uneven wear on the rear tires; they lose their quality faster than the front tires.
- In some cases, tires are deflated, although there is no damage.
A lightweight method for replacing the silent blocks of the rear beam of a VAZ
2108, 2109, 21099,
2110
, 2111, 2112, 2113, 2114, 2115.
Replacement of silent blocks of the rear beam of VAZ 2108-2115
Rear beam device
The metal rear beam, a photo of which is presented on our resource, is structurally represented by 2 longitudinal levers and connection elements, which are connected by welding through reinforcement components. At the rear of the product there are special holders with holes for mounting shock-absorbing elements. There are also flanges with holes for fastening the axles of the rear wheel pair together with the casings of the stern brake systems.
In the front part of the rear axle beam of the VAZ 2110 there are levers with welded bushings, in which rubber-metal type hinges are installed by pressing. The rear beam mounts pass through them, which connect the lever part of the stern suspension to stamped-welded type holders. Those, in turn, are mounted with welded bolts to the body side members.
The spring elements of the suspension rest with one plane on the support of the shock absorber strut, and with the other, through a rubber insulating gasket, into the welded support of the hidden arch of the body tail. The shock absorber strut of the rear suspension beam of the VAZ 2110 is a hydraulic telescopic system of a two-way operating principle.
Through fasteners in the form of a bolted connection, it is articulated with the holder of the longitudinal-type stern suspension arm. The upper fastener of the rack is made in the form of a pin connection, while the fastening of the rod to the upper support is made through rubber pads and a support washer.
The factory “tens” rear beam, the dimensions of which differ from the parameters of similar products, has the item number 2110-2914008, while the “eight” beam has the catalog number 2108-2914008-10.
Removing and installing the rear beam and its elements
If during the operation of the vehicle the rear suspension beam of the VAZ 2110 bursts, then in the future it will need to be replaced. Of course, as a temporary aid, it can be restored by welding. But this is done solely in order to get to the maintenance site where it needs to be replaced.
Operating a vehicle with a welded beam rear suspension of the VAZ 2110 not only creates an emergency situation on the road, but also leads to disruption of vehicle stability and accelerated wear of the vehicle tires. The market value of the rear beam is quite high, but its replacement in this case is simply necessary.
We replace a product such as a rear beam, which can be purchased at any specialized automotive store, according to the following scenario:
- We place the vehicle on an electric lift or a special repair pit.
- We remove the brake pads from the rear wheels and release the hand brake cables from the rear beam and holders.
- We remove the brake pipes from the rear cylinders, and the hoses from the stern beam.
- We remove the drive-type pressure regulator fasteners from the stern beam.
- Remove the 4 bolts securing the hub axle to the aft beam using a wrench set to “17”.
- We dismantle the hub axle together with the brake mechanism casing.
- Having removed the fastening bracket, we dismantle the brake system pipe.
- If the need arises, we disconnect the hub axle and the brake mechanism housing, while freeing 2 screws with a curly screwdriver.
- We detach the lower fasteners of the shock absorbers from the rear beam.
- Remove the fasteners of the rear suspension beam to the holders.
- Place the rear beam on the ground.
- Having removed the fasteners, we dismantle the product.
- We remove the fasteners of the holder to the bodywork and dismantle the bracket.
- Installing the rear suspension component is carried out in the reverse order.
- We complete the fastening of the rear beam and the lower part of the shock absorber struts with the vehicle installed on the site.
- We finish the job by bleeding the brake system.
On the “ten”, specialized car stores always sell a rear beam stabilizer, which is used by specialists as a tuning component for this model. This element is presented in the form of a steel rod with fasteners to the aft beam and is similar in appearance to the cross-section stabilizer bar installed on the front suspension.
The fundamental difference is that when installing the system on the front wheels and overcoming obstacles with the rear wheelset, the stabilizer creates a torsional moment, and the rear beam stabilizer gives the aft suspension more rigidity, while it will create less torsional moment.
Why do racks fail?
On the Priora, the struts really fail quickly, you may not notice it, but hear it. Experienced mechanics say that there are three main reasons for this - poor build quality, carelessness of the owner and extreme driving. The fact is that when turning, the stabilizer tilts towards the angle of rotation, which is why the strut closest to it is compressed, and the farthest one is decompressed.
Constant cornering, drifting, and driving over artificial bumps at high speed cause the stabilizer struts to continuously compress and unclench. What happens to the springs during such experiments? Sooner or later they will become deformed. And with the racks, everything is a little more complicated, because they do not deform - they break immediately.
There are very few high-quality spare parts on the market; most components are supplied from China. Spare parts are no exception to the rule; they are also low quality - flimsy. The “cherry on the cake” from Chinese manufacturers is the replacement of good lubricant with ordinary technical petroleum jelly. Vaseline does not promote stable rotation of the joint, and the stabilizer does not perform its main function.
Lada Priora asks that its owner check the suspension more often for serviceability! Undoubtedly, you can replace the stabilizer bar, but this will not solve the problem if you install loose bushings and struts on it. If you change something in the suspension, then change it radically - so that the next knock in the suspension will not be heard very soon.
Beam structure
On the inside, brackets with special holes necessary for installing shock absorbers are attached to the suspension arms. There are also flanges located there, bolted to the axle of the rear wheels and shields located on the brake mechanism. Bushings are attached to the suspension arms on the front side. They are inserted into hinges made of a special rubber-metal material.
Bolts pass through them, connecting the suspension arms together with the stamped-welded brackets. They, in turn, are attached with bolts welded into the side member of the car. The springs of the rear beam of the VAZ 2110 are located in such a way that the first end rests against the recess of the shock absorber, and the second passes through a special gasket directly into the support area attached to the underside of the arch on the car body.
The gasket acts as an insulator and is made of rubber. The shock absorber mounted on the rear suspension is double-acting. It is attached with short bolts directly to a bracket located on the trailing arm in the rear suspension area. In the upper part, fastening is done using the rod method. The rod is fixed in the upper support directly on the suspension spring. The shock absorber is fixed through a protective rubber pad and a support washer.
A double row thrust bearing is located in the middle of the hub. Its structure is very similar to the bearing located in the hub of the front wheels, but it is much smaller in size.
Changing the front beam
For work, prepare two keys 17, 19, 24, WD-40 lubricant, and a ball joint remover. Removing and installing the front suspension arm in the following order:
- Place the car over the inspection hole. You can install the front of the car on stable supports.
- Secure the car with the handbrake.
- Remove the wheels. To do this, moving in a circle, gradually loosen the bolts, and then smoothly pull the wheel towards you, accepting it.
- Coat the threaded connections of the lever with WD-40.
- While holding the bolt securing the stabilizer bar to the lever, do not allow it to turn. Smoothly unscrew the fastening nut and remove the bolt.
- Holding the extension from turning with a wrench, unscrew the nut securing it to the beam.
- Remove the washer gasket.
- Unscrew the ball joint bolt and press the ball joint pin out of the beam.
- While holding the spring washer bolt from turning with a wrench, remove the nut that secures the washer to the lever.
- Smoothly remove the end of the lever from the body bracket.
- Remove the beam from the brace.
- Remove several washers from the guy and mark them so that when installing, put them in the same order.
- Inspect the part for damage: as it wears, the rubber will bulge, crack, and possibly peel off from the metal.
- If it is necessary to replace the silent blocks of the front beam of the Priora, unscrew the bolt securing the front silent block with a 18mm socket. The rear mounting bolts are unscrewed with a 15mm socket.
- Remove the silent block, noting its seating depth. Place the new part in place of the old one in strict accordance with the marked depth.
- Install a new lever. Place the washers in the marked order, with the same side in relation to the center of the part with which they were installed previously. Please note that the final tightening of the connections is carried out after the car is lowered to the ground.