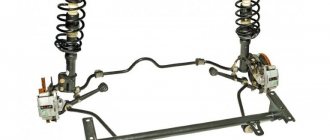
Front suspension
Every experienced motorist understands how important it is to carry out timely preventive maintenance on the most vulnerable parts of the car. These include the chassis - its diagnostics are simply necessary for the safe operation of any machine. The chassis includes: wheels, rear and front suspension, as well as a frame. These elements are subject to heavy loads not only when driving, but also when the vehicle is at rest. Therefore, chassis parts wear out faster than any other. Our article will talk about the VAZ 21099 car, the chassis of which can be repaired by any car owner with his own hands.
Repair of chassis of Lada VAZ 2109
Every car enthusiast knows that preventative repairs for the main components of the Lada 2109 should be done as often as possible. First of all, this concerns the chassis. This includes both suspensions (front and rear), frame, wheels - that is, all those elements that bear the load both when the car is moving and when it is parked. Since these components of the 2109 machine are in operation all the time, they wear out much faster. However, this applies to all VAZ models.
Preventative vehicle inspection
For repairs to be more effective, it is necessary to thoroughly diagnose the vehicle's chassis. It is better to entrust this to car service specialists who have special instruments and equipment. Preventive maintenance includes the following work:
- the degree of shock absorber wear is determined;
- spring cups are inspected;
- the presence of backlashes is checked;
- anthers change;
- The ball joints and tie rod end are inspected.
If any working unit of a VAZ fret has a large percentage of wear, it should be replaced. In order for the running function of the 2109 car to be performed efficiently, it is necessary to control the operation of the silent blocks, since they are an important connecting link between the suspension and the frame. In addition, an important part of diagnosing a car is inspecting the brake pads for wear, as well as checking the tightness of the hoses.
You should pay more attention to the wheels. If the edges of the iron disks of a Lada VAZ have bends from impacts with stones, they should be rolled on a special machine that can easily eliminate such defects. An essential part of wheel repair is wheel balancing. Thanks to computer diagnostics used by car services, it is possible to promptly detect even the most minor deviations in the operation of a particular part. This allows you to make repairs on time, without waiting for a serious breakdown.
The need to perform a preventive inspection of the car's chassis is consistent with the distance traveled indicated in the warranty service book. During this event, existing faults are identified and eliminated. If a torn boot is discovered, it must be replaced immediately. When dirt gets into the lubricant underneath, the lubricant begins to act like sandpaper, which significantly accelerates the wear process of the part.
Once a year, it is advisable to check the condition of all rubber bushings, seals, oil seals and boots.
How to check the health of a car's suspension
Perhaps the most critical component after the steering and braking system that influences safe operation is the vehicle's chassis. Therefore, it is necessary to constantly monitor its condition. Of course, in a passenger car, the wear of this unit is not as severe as in a truck, but most often (and VAZ cars are no exception) designers plan for the stability and durability of the suspension scheme taking into account the soft mode.
For a qualified conclusion that the suspension is in good or faulty condition, it is better to contact a service station, where they will be able to fully diagnose the condition of your car on special stands, and the technicians, for whom the suspension diagram has no secrets, will be able to accurately identify a breakdown or minor malfunction. But still, even without knowing the device thoroughly, you need to know the most important symptoms that something is wrong with the machine. It is advisable to pay close attention to the slightest changes in the behavior of the car on the road, which may be symptoms of faulty bridges.
Article on the topic: How to charge a maintenance-free car battery?
Replacing shock absorbers
If you first press the rear of the VAZ car and then release it sharply, the trunk should return to its original position without any hesitation. Long swinging of the trunk will indicate a malfunction of the rear shock absorbers. Since the factory devices are of a non-separable design, they should be replaced with new shock absorbers. Here's what it takes.
| Action | Result |
| First, the Lada VAZ is put in first gear, then the rear wheels are removed. | Thanks to this, niches are freed up. |
| The side trims are removed. | This must be done to get to the upper mounting of the rods, |
| After this, the fixing nuts are unscrewed from the upper and lower bolts. | To make it easier to remove the shock absorber, its rod should be pushed down all the way. |
| The device is removed along with the spring, compression buffer and cushions. | Installing a new shock absorber is performed in reverse order. |
| By the way, pillows are available in different thicknesses. If you want to raise the rear of the 2109, larger parts must be installed. | At this point, the repair of the rear shock absorbers can be considered complete. |
If the rubber-metal suspension bushings have lost their elasticity, in this case it is necessary to replace the lever. To do this, you need to turn on the handbrake and support the rear wheels with special stops. Then the front part of the car should be raised with a jack and secured. After this, the pressure nut of the ball assembly is unscrewed.
Using a removable device, the finger is removed. Next, the brace fastening is released and the stand is disconnected. The bolt with which the lever is attached to the body bracket is also released. After this, the old part is removed and a new lever is installed in its place.
The anti-roll bar is changed in a similar way. Both racks are unscrewed from both sides of the car. The stabilizer bar is then detached from the brackets. When installing a new rod, do not overdo it when tightening the nuts. They should be tightened until the gap in the cushions disappears.
The final tightening of all nuts is carried out with full load on the suspension, when the machine is on the ground.
Leveling up
You can first remove the old strut, but before installing the new one, you must bleed it.
There is no need to pump single-pipe struts due to the fact that the container with high-pressure gas is reliably isolated by a piston.
If you avoid the bleeding procedure, or do this work incorrectly, the twin-pipe shock absorber may fail due to air or gas entering the inner sleeve, depending on the type of strut, through the valve. This happens when the unit is not transported in an upright position.
Now let's see how to pump the racks with your own hands.
Check the stroke of the rod after bleeding. If there are no dips, no bubbling sounds, everything is fine. If such phenomena occur, it is necessary to repeat the pumping procedure several more times.
Please note that gas-oil struts, unlike oil struts, are pumped only in the position with the rod up. The shock absorber must remain in this position until installation begins.
Do-it-yourself repair of the VAZ 2109 chassis
Every experienced motorist understands how important it is to carry out timely preventive maintenance on the most vulnerable parts of the car. These include the chassis - its diagnostics are simply necessary for the safe operation of any machine. The chassis includes: wheels, rear and front suspension, as well as a frame. These elements are subject to heavy loads not only when driving, but also when the vehicle is at rest. Therefore, chassis parts wear out faster than any other. Our article will talk about the VAZ 21099 car, the chassis of which can be repaired by any car owner with his own hands.
How to repair the chassis of a VAZ 21099
An article about the repair of the VAZ 21099 chassis: what the chassis is, front and rear suspensions, step-by-step work plan. At the end of the article there is a video about replacing VAZ silent blocks.
All these components are subject to continuous load both during movement and at rest. Because of this, chassis parts wear out faster than others, and they must be replaced much more often. The VAZ 21099 allows the car owner to easily diagnose and repair the chassis on his own.
Diagnostics
It would be wisest if you do not wait for a breakdown and diagnose the chassis. There is no consensus on its timing - each specialist has his own opinion on this matter. The mileage recommended for vehicle maintenance varies from ten to thirty thousand kilometers. First of all, you need to focus on operating conditions - if you drive on broken country roads, this figure will be minimal. So:
- The diagnostic procedure includes checking the degree of wear of the shock absorbers. In car services, it is done with a special device that checks the elasticity of the spring. It is impossible to determine the degree of wear visually. Springs that have lost their elasticity may break.
- Be sure to inspect the spring cups, which may also have defects and damage. They check the play in the VAZ CV joint - a torn boot can create problems. Inspection of ball joints and tie rod ends is also necessary.
- Silent blocks are connecting elements between the frame and suspension; due to this worn-out part, the smoothness of the car is lost. Both brake pads and wheel bearings are subject to inspection, and the tightness of the hoses is checked.
- Computer diagnostics makes it possible to identify and promptly eliminate even minor faults, which will protect parts from more significant damage.
- When you fall into a hole or hit a curb, the rims are the first to suffer. The rim of the disc may bend, which will certainly be felt when moving. An iron or cast disk can be rolled, but a forged one cannot be repaired. It will simply burst upon impact.
- The wheels of any car need periodic balancing and checking tire pressure. It must be as prescribed in the operating instructions. When changing wheels seasonally, you need to alternate their installation from the front to the rear axle, which will balance out tire abrasion.
Replacement of front axle parts
In certain circumstances, a breakdown may occur before you have time to make a diagnosis. If you want to independently repair the chassis of a VAZ 2109, videos, photos and special literature will help you thoroughly understand how and what needs to be done.
Front suspension arm
A hum, vibration or knocking that appears while driving, or a feeling that the car is pulling to the side are signs of a malfunction in the suspension. So:
- The first step is to inspect the front suspension arm. To get to it, you need to raise the front of the car by placing it on supports, or use two jacks.
Front suspension arm
- After unscrewing the four wheel bolts with a 17mm wheelbrace, remove the wheel. Unscrew the nut that secures the ball joint and use a puller to free the joint pin. Next you need to disconnect the stabilizer link from the lever.
Removing the front suspension arm
- To remove the lever itself, you need to unscrew the nut and remove the bolt that connects it to the body bracket.
If you notice that the geometric shape of the lever is broken or the rubber elements of its hinge are worn out, the part will have to be replaced.
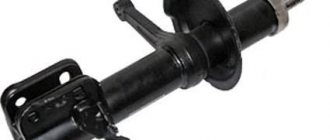
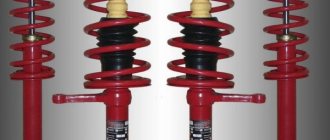
Shock absorbers
Often, in a VAZ 2109 car, repairing the front suspension is not complete without replacing the shock absorber. The need for such repairs may be indicated by impacts accompanied by a characteristic sound that occur during movement. Most often, the cause of this problem is a broken shock absorber spring or loss of its elasticity. Replacing springs or shock absorbers assemblies is done in pairs on one axle (front or rear). So:
- In order to replace the front shock absorber, you need to remove and then disassemble the front strut. Theoretically, it can be removed together with the brake disc and steering knuckle. But then it will be impossible to adjust the wheel alignment angles.
- Therefore, you need to act in a different way. After removing the wheel, turn the steering wheel all the way in the opposite direction. Having removed the cotter pin, use a 19mm spanner and unscrew the nut that secures the steering pin to the strut arm.
- By removing the lever pin, remove the brake hose coupling from the strut holder. Then you need to remove the plastic plug of the upper strut support and loosen the shock absorber rod nut.
- Before unscrewing the bolt that secures the strut and steering knuckle, you need to paint an installation mark on the bracket and bolt.
- During reassembly, aligning the marks allows you to obtain the smallest deviation of the wheel camber angle from the specified value. After all, repairing the front suspension of a VAZ 2109 in a garage should not add new problems to you.
- Next, using a 19mm socket, unscrew the upper and lower bolts securing the rack and remove the adjusting washer. We move the steering knuckle away from the rack so that the brake hose is not stretched.
- Using a 13mm wrench, unscrew the nuts connecting the strut support to the body. The rack has been removed, now you need to install two ties on the springs so that they capture five turns. The ties must be diametrically opposed to each other.
Shock absorber with ties
- When the tie screws are tightened, the spring is compressed. The rod nut can be unscrewed when the pressure of the spring on the support cups is released. Now you can remove the cup, upper support, spring with ties, protective cover and power buffer from the rack.
- You can knock off the compression buffer support and the strut housing nut with a chisel. You will no longer need this nut, because it is included with the new shock absorber. Having removed the rod with the working cylinder, drain the liquid from the shock absorber into a container.
- After washing the strut body with white spirit, install the shock absorber cartridge into it. The strut housing nut must be tightened using a torque wrench. The tightening torque is usually indicated on the part packaging.
- Having put the protective cover on the rod, now install the ties on the new spring. When compressed, it is installed on the upper support cup and support. After securing it with nuts, the ties can be removed.
Then the second shock absorber is reassembled and similarly replaced.
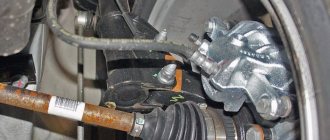
Brake pads
Repair of the VAZ 2109 suspension, and specifically, replacement of brake pads, will be needed if the car pulls to the side when braking, or the braking distance has increased . To see the condition of the pad without removing it, there is an inspection window in the brake housing - you just need to remove its plug.
- The minimum permissible brake lining thickness is one and a half millimeters. Measure it with a ruler; if the wear exceeds the permissible limit, the linings will have to be replaced. This is done symmetrically on one axis.
- After placing the car on a lift, remove the front wheel. Wash the brake mechanism with warm soapy water and let it dry. There is no need to use any solvents or petroleum products.
Removing the brake pad
- Disconnect the brake hose from the shock absorber strut bracket and move it away from the brake disc using a screwdriver. Bend the locking plate of the caliper pin and unscrew the bolt, holding the pin. The caliper must be lifted up and left in this position.
- After removing the old brake pad, measure the thickness of the brake disc at different points with a caliper - it should be at least 11 mm. At the same time, all contaminated elements are cleaned, especially the pad seats.
- Pay attention to the condition of the guide pin. If it becomes unusable, replace the pin by treating its surface with graphite lubricant.
- When performing suspension repairs on a VAZ 21099 or disassembling any of its components, automatically check the integrity of all seals and anthers. The low price of rubber bands allows you to replace them without compromising your budget.
- When installing a new block, be careful: make sure that the pressure spring is parallel to the upper contour of the block. Lower the caliper to the reverse position, tighten the pin bolt and secure it with a plate.
At this point, the replacement of the brake pad is completed, you can put the wheel in place. All this needs to be done on the opposite side. Having lowered the car, you need to press the brake pedal all the way so that the caliper pistons are in the working position.
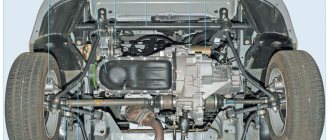
Rear suspension
The central beam is the main element of the rear-wheel drive system of the VAZ 2109 - repair of the rear suspension often requires replacing the entire beam. So:
- To do this, you need to lift the rear of the car, place shoes under the front wheels and engage the gear.
- After removing the wheels, remove both shock absorbers, disconnect the hand brake cables and remove the ends from the brackets.
- When disconnecting the brake hoses, you need to think about how to cover the holes to avoid brake fluid leakage. After unscrewing the nuts securing the beam, knock out the bolts and remove the beam.
Repair of front suspension of VAZ 2109
Section with instructions for self-repair and maintenance of the front suspension of the VAZ 2109. Using this section, you can independently carry out maintenance and repair of your car without going to a service station. Here you can find repair information with step-by-step instructions on how to complete the job. This section will be useful both for motorists who do their own repairs and for auto mechanics.
Replacing the front suspension arm of a VAZ 2109
Replacing the front suspension arm of a VAZ 2109 with your own hands To replace the front suspension arm of a VAZ 2109, we lift and install the front part of the car on supports. We remove the wheel. We brake the car with the parking brake and install wheel chocks (“shoes”) under the rear wheels. We loosen and tighten the wheel bolts only with the car standing on the ground. Unscrew Read more..
Replacing a VAZ 2109 extension
Self-replacement of the VAZ 2109 extension If, after replacing the extension, the car begins to pull to the side when driving, you need to contact a specialized workshop to diagnose the front suspension, be sure to inform the repairman that the extension was changed. EXECUTION ORDER 1. Raise and place the front part of the car on supports. We remove the wheel. We brake the car with the parking brake and set Read more..
Self-replacement of a VAZ 2109 ball joint
Replacing a VAZ 2109 ball joint yourself Before replacing a VAZ 2109 ball joint, you need to make sure that the noise in the suspension comes from it and not from the wheel bearing. To do this, we hang out the wheel from which the noise is coming. How to check the ball joint of a VAZ 2109 On cars with MacPherson type suspension, the ball joint must be unloaded, Read more..
Replacing the anti-roll bar for VAZ 2109
How to replace the VAZ 2109 anti-roll bar yourself To replace the VAZ 2109 anti-roll bar, place the car on an inspection ditch or lift and place the front part of the car on supports. It is necessary to brake the car with the parking brake and install wheel chocks under the rear wheels. PERFORMANCE ORDER: Unscrew one nut securing the stabilizer struts Read more..
Replacing the front wheel bearing of a VAZ 2109
How to independently replace the front wheel bearing of a VAZ 2109 To replace the front wheel bearing of a VAZ 2109, you need to remove the steering knuckle from the car. How to do this is described in the article: Replacing the front hub of a VAZ 2109. Then we proceed to replacing the front wheel bearing of a VAZ 2109, to do this we perform the following procedure. We press the hub out of Read more..
Replacing the front hub of a VAZ 2109 with your own hands
How to independently replace the front hub of a VAZ 2109 Before replacing the front hub of a VAZ 2109, you need to brake the car with the parking brake and install wheel chocks (“shoes”) under the rear wheels. Raise the front part of the car and place it on supports. Unscrew the hub nut with the car standing on the ground! You only need to loosen and tighten the wheel bolts Read more..
Repair of the front pillar of VAZ 2109, 2108, 21099
Do-it-yourself repair of the front strut of a VAZ 2109. Repair of the front strut of a VAZ 2109 consists of replacing a faulty shock absorber. To do this, remove the rack and begin disassembling it. How to remove and install the strut is described in this article: Replacing the front struts of a VAZ 2109. Dismantling the front strut of a VAZ 2109. Install the ties on the spring and compress a little Read more..
Replacing the front struts of a VAZ 2109 yourself
How to replace the front struts of a VAZ 2109 yourself When replacing the front strut of a VAZ 2109, we will need a special key for the nut of the upper shock absorber mounting. Without it, it is quite difficult to loosen the nut. Loosen and tighten wheel bolts only with the vehicle on the ground. Removing the front pillar of a VAZ 2109 Remove the protective cap Read more..
Symptoms of a problem
How do you know if your racks need replacing? Not difficult. To do this, you should be aware of several objective signs of failure:
- Slightly audible squeaks from the suspension when driving on uneven roads;
- Knocks when starting or braking;
- The appearance of traces of shock-absorbing fluid under the car;
- A wet and dirty surface of the counter, which quickly becomes dirty again after washing.
Front suspension VAZ-2109: repair, features
The front suspension of the VAZ-2109 requires mandatory regular inspection of the safety covers of the hinge assembly. In this case, it is worth paying attention to the absence or presence of mechanical deformations. In addition, it is necessary to find out the presence of cracks or signs of damage due to contact with foreign objects, damage to levers, braces, stabilizing support, struts and the front part of the body, especially in places where components and elements of the suspension mechanism are fixed.
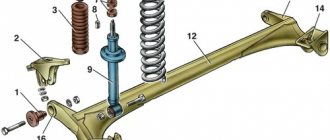
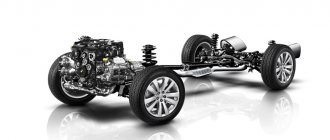
Scheme
The diagram below will allow you to determine what components the assembly is divided into and what it represents in the assembly. The table will help you figure out where each suspension element is located.
Node diagram
Item number
What is
Upper shock mount
Troubleshooting
Deformation of the suspension elements, especially body braces, disorganizes the wheel angles and makes it impossible to adjust the camber and toe. First of all, you should check the car's silent blocks, rubber cushions, ball joints, and the shrinkage of telescopic struts.
Repairing a VAZ-2109 requires replacing rubber cushions and silent blocks if there is rupture and one-sided swelling, including after trimming the end surfaces of rubber elements.
You can check the condition of the front suspension ball joint on the car after removing the wheel, by measuring the distance between the lower arm and the disc element of the brake system. If, after pumping the unit, the distance increases from 0.8 mm or more, the hinge should be replaced.
Time to change hydraulic vibration dampers
Classic symptoms will indicate that the VAZ 2109 struts are defective and the need to replace them:
- damping fluid leaks;
- poor directional stability when driving at any speed;
- knocks and squeaks, especially when driving off-road.
You can also diagnose the malfunction of the suspension elements in question with the vehicle stationary:
- from the front: open the hood and rock each corner one by one (the vibrations die out in no more than 1-2 cycles - the suspension is working);
- rear: open the trunk and shake each “side” in turn (the criterion is similar).
Unusual sounds when moving
If there are certain malfunctions, the front suspension of the VAZ-2109 may make noise or knock. Below are the main causes of problems and recommendations for resolving them.
- If the racks have become unusable, they need to be replaced or repaired.
- The fixing bolts of the stabilizer bar are loose. If the tension pads wear out, the bolts should be tightened and the worn pads replaced.
- Poor quality fastening of the upper support - the problem can be solved by tightening the fixing nuts.
- There is settlement and destruction of the supporting rubber element - it is advisable to replace the problematic part.
- If the lever silent blocks, braces or stabilizer rod struts are worn out, new blocks should be installed.
- The ball joint will need to be replaced if it becomes excessively worn.
- If there is a significant imbalance of the wheels, it is necessary to carry out balancing.
- If a spring or compression buffer breaks, it requires immediate replacement.
Required tools:
- vice;
- new silent blocks VAZ 2109;
- liquid soap (can be replaced with detergent or soapy water)
- source of fire (a gas burner is suitable);
- a piece of pipe whose diameter allows free entry of the silent block;
- standard set of keys;
- chisel and hammer;
- WD-40 penetrating fluid.
To work, place the car on a viewing hole or lift.
To replace the silent blocks of a VAZ 2109, as for other work, disassembly and dismantling are required.
- Unscrew the lower lever. To do this, use a socket with an extension to remove the extension nut, as well as the fixation nut to the body. Then remove the stabilizer link and 2 ball joint bolts. To make it easier to work with stuck and rusted nuts, you need to warm up the connection or use a penetrating liquid. If these methods do not help, try unscrewing the crab, clamp it in a vice, and try again.
- Secure the removed lever in a vice and use a lamp or torch to burn out the old silent block from its seat. If this option is not possible, you will have to press it out with a special puller or vice, but this will take more time.
Insufficient strut resistance
If the front suspension of the VAZ-2109 has lost the tightness of the return or bypass valve, it is necessary to replace the damaged parts. If there is a small amount or leakage of the working mixture, it is necessary to check, replace worn parts, and add the used composition to the norm.
In addition, in case of wear, settlement, deformation of the guide bushing, rings of the cylinder-piston group, spring mechanism, unusable elements and filters should be replaced and new fluid should be added. It is also necessary to pay attention to the integrity of the additional spring elements, valve discs and hinge block. If necessary, deformed elements must be replaced as quickly as possible, which will facilitate the rapid restoration of the unit in question and prevent further damage.
Other causes of malfunctions and possible repairs
Replacing the front suspension or repairing it may be necessary due to the following conditions:
- If there is a large difference in tire pressure, this indicator needs to be adjusted.
- Violation of wheel mounting angles - timely adjustment of this unit is required.
- Deformation of the rubber element of the support strut - can be solved by replacing the faulty part.
- If there is a large difference in the elasticity of tires or spring mechanisms, the defective spare part should be replaced.
- In addition, it is necessary to monitor the balancing of the wheels.
To avoid premature repair of the front suspension, it is necessary to follow the recommendations for the maximum load of the vehicle, avoid sudden acceleration and not exceed the maximum permissible values specified in the operating instructions.
What problems can there be and how to fix them
The condition of the front suspension should be monitored regularly. The most common damage is abrasion of the joint covers. These damages are classified as mechanical. Among the malfunctions of this element of the car, unevenness of the lever located on the suspension or on the stabilizer bar is noted. This may result in incorrect and inaccurate operation. In all these cases, you need to check the parts and then simply replace them with new ones.
Among the malfunctions there may be minor ones that should be eliminated using a regular repair kit. For example, loosening the bolts of the stabilizer bar or the nut of the support. You should tighten them tighter.
If you hear the suspension making sounds (knocking, creaking), then this indicates more serious damage. First you need to determine where the sound is coming from. You can use a jack for this. Rock the wheel in a vertical plane; if there is a knock in the center of the wheel, then most likely there is a fairly large gap in the bearing. It is better not to change the bearing yourself, as it can be destroyed. It is better to contact a car service center that has special equipment for these purposes.
We draw conclusions: it is better to diagnose and prevent your car and protect yourself while driving than to invest in tuning.
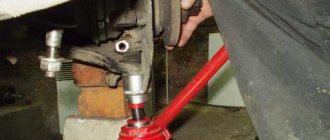
Replacing the lever
The front suspension arm of the VAZ-2109 is one of the most important elements of the unit under consideration. Its replacement is usually carried out in case of a violation of the geometry, after falling into a pothole, hole, ditch, hatch, or when it is impossible to remove the rubber-metal hinges. It is best to repair the VAZ-2109 on a lift, but you can get by with a jack.
First, the front wheel is removed, which should first be hung and secured with a backing made of boards or bricks. The ball nut is unscrewed with a spanner and then removed from the lever. At the next stage, the rear nut is loosened, the stub rack mount and the bracket mount are unscrewed. The bolt is removed, the lever can be freely removed.
The removed front suspension of the VAZ-2109 is inspected for integrity and the presence of defects, after which the rubber-metal hinges or the entire lever are replaced. Assembly occurs in reverse order.
Main principles of the operation
The technology for changing the front shock absorbers on the “nine” looks simplified like this:
- hang up the body and remove the wheel;
- Unscrew the nut securing the strut to the body;
- disconnect the steering joint;
- remove the two screws securing the strut to the rotating knuckle;
- loosen the three nuts securing the upper support relative to the body;
- remove the stand;
- compress the spring;
- remove the rod nut, upper support, cup, compressed spring, boot, compression buffer;
- Perform preliminary assembly and installation of the shock absorber in the reverse order.
Repair of front suspension of VAZ 2109
Section with instructions for self-repair and maintenance of the front suspension of the VAZ 2109. Using this section, you can independently carry out maintenance and repair of your car without going to a service station. Here you can find repair information with step-by-step instructions on how to complete the job. This section will be useful both for motorists who do their own repairs and for auto mechanics.
Replacing the front suspension arm of a VAZ 2109
Replacing the front suspension arm of a VAZ 2109 with your own hands To replace the front suspension arm of a VAZ 2109, we lift and install the front part of the car on supports. We remove the wheel. We brake the car with the parking brake and install wheel chocks (“shoes”) under the rear wheels. We loosen and tighten the wheel bolts only with the car standing on the ground. Unscrew Read more..
Replacing a VAZ 2109 extension
Self-replacement of the VAZ 2109 extension If, after replacing the extension, the car begins to pull to the side when driving, you need to contact a specialized workshop to diagnose the front suspension, be sure to inform the repairman that the extension was changed. EXECUTION ORDER 1. Raise and place the front part of the car on supports. We remove the wheel. We brake the car with the parking brake and set Read more..
Self-replacement of a VAZ 2109 ball joint
Replacing a VAZ 2109 ball joint yourself Before replacing a VAZ 2109 ball joint, you need to make sure that the noise in the suspension comes from it and not from the wheel bearing. To do this, we hang out the wheel from which the noise is coming. How to check the ball joint of a VAZ 2109 On cars with MacPherson type suspension, the ball joint must be unloaded, Read more..
Replacing the anti-roll bar for VAZ 2109
How to replace the VAZ 2109 anti-roll bar yourself To replace the VAZ 2109 anti-roll bar, place the car on an inspection ditch or lift and place the front part of the car on supports. It is necessary to brake the car with the parking brake and install wheel chocks under the rear wheels. PERFORMANCE ORDER: Unscrew one nut securing the stabilizer struts Read more..
Replacing the front wheel bearing of a VAZ 2109
How to independently replace the front wheel bearing of a VAZ 2109 To replace the front wheel bearing of a VAZ 2109, you need to remove the steering knuckle from the car. How to do this is described in the article: Replacing the front hub of a VAZ 2109. Then we proceed to replacing the front wheel bearing of a VAZ 2109, to do this we perform the following procedure. We press the hub out of Read more..
Replacing the front hub of a VAZ 2109 with your own hands
How to independently replace the front hub of a VAZ 2109 Before replacing the front hub of a VAZ 2109, you need to brake the car with the parking brake and install wheel chocks (“shoes”) under the rear wheels. Raise the front part of the car and place it on supports. Unscrew the hub nut with the car standing on the ground! You only need to loosen and tighten the wheel bolts Read more..
Repair of the front pillar of VAZ 2109, 2108, 21099
Do-it-yourself repair of the front strut of a VAZ 2109. Repair of the front strut of a VAZ 2109 consists of replacing a faulty shock absorber. To do this, remove the rack and begin disassembling it. How to remove and install the strut is described in this article: Replacing the front struts of a VAZ 2109. Dismantling the front strut of a VAZ 2109. Install the ties on the spring and compress a little Read more..
Signs of wear or damage to the undercarriage
- Leaks under the car in the area where suspension parts are located. Cars of the VAZ 2109 model, as a rule, already have a long service life (and the design of the hydraulic cylinders is designed for a certain resource, which they may have exhausted a long time ago). There is a high probability that the oil seal or shock absorber rod mirror may wear out, so pay attention to possible leakage of hydraulic fluid (in principle, you need to be careful about any leaks from the car);
- Knock when driving. Yawing on the road is the most common sign of trouble. As a rule, this indicates wear or loosening of the components; carefully inspect the suspension, or best of all, contact a workshop;
We have not yet mentioned the uneven wear of tires - if your wheels are adjusted for wheel alignment and balanced, and the CV joints (since the VAZ 2109 is assembled according to the front-wheel drive scheme) work correctly, then the reason is the chassis, there is a breakdown somewhere, unnecessary backlash or wear.
In conclusion, it should be noted that although the chassis of the VAZ 2109 is not subject to such overloads as a similar truck unit, its design is still quite complex and requires constant attention; fortunately, the suspension design allows for maintenance and repair without large material costs.
Rate the usefulness of the article!
- Why do brake pads squeak when braking and what to do about it
- Replacing engine mounts on VAZ and other cars
- Car rental: what you need to know when choosing
- What does the braking distance depend on and what formula can it be calculated by?
- How well do you understand car emblems?
- How to remove the outer CV joint and replace a torn boot
- How to independently replace the internal grenade on VAZ cars
- Wheels for rotating the car in place 360 degrees
- In 3 years, diesel engines will become a luxury
- Review of the most expensive Hyundai Solaris ever
- Test drive Lamborghini Huracan from Mikhail Petrovsky